In this example, we will show how to use jetty with NIO based connector for server side communications with clients. Before Jetty 9 , there were both blocking Input/Output (BIO) and non-blocking Input/Output (NIO) and one has to specify protocol and implementation used through connector.
Jetty 9 now only offers NIO connector and protocol is configured through collection of ConnectionFactory on the connector. Jetty primarily uses a single connector type called ServerConnector . We will basically configure this connector in standalone jetty and embedded jetty both.
1. Environment
- Windows 7 SP 1
- Eclipse Kepler 4.3
- Jetty version 9.2.15 v20160210
- Java version 7
- Java Servlet Library – servlet-api-3.1
- Maven 3.0.4
2. Example Outline
In this example, we will create a simple servlet to run on a standalone jetty where we will configure our standalone jetty for ServerConnector and a port. To configure this connector, we will configure network parameters, services used by the connector and connection factories. After this we will show similar configuration through embedded jetty in java source code.
3. What is NIO?
Before we show how to use ServerConnector which is NIO based connector in Jetty 9, we will go through some basic concepts of NIO (Non-blocking Input/Output). Non-blocking Input/Output,also known as New I/O, is a collection of Java APIs that offers new features for intensive I/O operations. NIO data transfer is based on buffers and channels. In standard IO , data transfer was through byte streams and character streams. Example of non-blocking IO – a thread can ask a channel to read data into a buffer. While the channel reads data into the buffer, the thread can do something else. Once the data is read into the buffer, the thread can then continue processing it.
4. Jetty NIO Example
4.1 Standalone Jetty Configuration for NIO
Jetty uses ServerConnector which is NIO based connector. To configure a connector, we will have to configure following things
- Configure network parameters on the connector (e.g. Port)
- Configure the services used by the connector
- Configure connection factories which will be used to instantiate and configure the protocol for an accepted connection
4.1.1 Configuring a Server Connector
In standalone jetty, most of the configuration for server connector comes default. In jetty-http.xml file, you will find configuration to instantiate ServerConnector which accepts HTTP connection. In jetty-https.xml file, configuration to instantiate ServerConnector which accepts SSL/TLS connection. The file jetty-http.xml will look like below for ServerConnector settings.
jetty-http.xml
<New class="org.eclipse.jetty.server.ServerConnector">
  <Arg name="server"><Ref id="Server" /></Arg>
  <Arg name="factories"> </Arg>

  <Set name="port"><Property name="jetty.port" default="8090"/></Set>
</New>
The network settings that can be set on ServerConnectorinclude-host,port,idleTimeout,defaultProtocol,stopTimeout,
acceptQueueSize,reuseAddress and soLingerTime.
4.1.2 Configure connection factories
ConnectionFactory instances create the protocol handling connection instances for the network endpoints accepted by ServerConnector . Different connection factories can be used, but you need very less configuration for connection factories. We can use HttpConfiguration or SslContextFactory instances at the most for this example. jetty-http.xml file will look like below after configuring connection factory.
jetty-http.xml
  <Call name="addConnector">
    <Arg>
      <New class="org.eclipse.jetty.server.ServerConnector">
        <Arg name="server"><Ref id="Server" /></Arg>
        <Arg name="factories">
          <Array type="org.eclipse.jetty.server.ConnectionFactory">
            <Item>
              <New class="org.eclipse.jetty.server.HttpConnectionFactory">
                <Arg name="config"><Ref id="httpConfig" /></Arg>
              </New>
            </Item>
          </Array>
        </Arg>
        <Set name="host"><Property name="jetty.host" /></Set>
        <Set name="port"><Property name="jetty.port" default="8090" /></Set>
        <Set name="idleTimeout">30000</Set>
      </New>
    </Arg>
  </Call>
In this example, we only showed one connection factory, but multiple connection factories can be created.
4.2 Embedded Jetty Example
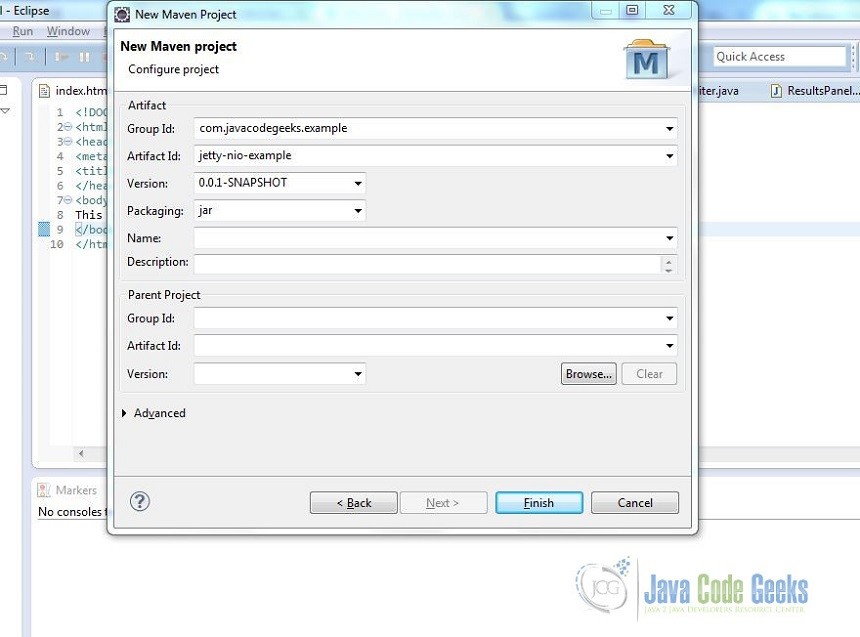
4.2.1 Create A Maven Project
Create a new maven project as shown below. Fill the details for GroupId as com.javacodegeeks.example and ArtifactId as jetty-nio-example.
Add following dependencies in pom.xml
pom.xml
<project xmlns="http://maven.apache.org/POM/4.0.0" xmlns:xsi="http://www.w3.org/2001/XMLSchema-instance" xsi:schemaLocation="http://maven.apache.org/POM/4.0.0 http://maven.apache.org/xsd/maven-4.0.0.xsd">
  <modelVersion>4.0.0</modelVersion>
  <groupId>com.javacodegeeks.example</groupId>
  <artifactId>jetty-nio-example</artifactId>
  <version>0.0.1-SNAPSHOT</version>
    <packaging>war</packaging>
    <dependencies>
	        <dependency>
	            <groupId>org.eclipse.jetty</groupId>
	            <artifactId>jetty-server</artifactId>
	            <version>9.2.15.v20160210</version>
	        </dependency>
			<dependency>
  			     <groupId>org.eclipse.jetty</groupId>
  		             <artifactId>jetty-servlet</artifactId>
  			     <version>9.2.15.v20160210</version>
			</dependency>
	</dependencies>
</project>
4.2.2 Create an embedded jetty server with ServerConnector
We will write our java code to run an embedded jetty with a ServerConnector and add a ServletHandler to run a simple servlet on the server. Create a java file ManyConnectors under src->main->java as shown below:

ManyConnectors.java
package com.javacodegeeks.example;

import java.io.IOException;
import javax.servlet.ServletException;
import javax.servlet.http.HttpServlet;
import javax.servlet.http.HttpServletRequest;
import javax.servlet.http.HttpServletResponse;

import org.eclipse.jetty.server.Connector;
import org.eclipse.jetty.server.Server;
import org.eclipse.jetty.server.ServerConnector;
import org.eclipse.jetty.servlet.ServletHandler;

public class ManyConnectors {

	public static void main(String[] args) throws Exception {

		Server server = new Server();
		ServerConnector connector = new ServerConnector(server);
		connector.setPort(8090);
		server.setConnectors(new Connector[]{connector});

		ServletHandler servletHandler = new ServletHandler();
		server.setHandler(servletHandler);

		servletHandler.addServletWithMapping(HelloServlet.class, "/");

		server.start();
		server.join();

	}

	public static class HelloServlet extends HttpServlet
	{
		protected void doGet(HttpServletRequest request, HttpServletResponse response) throws ServletException, IOException
		{
		   response.setContentType("text/html");
		   response.setStatus(HttpServletResponse.SC_OK);
		  response.getWriter().println("New Hello Simple Servlet");
                }
        }
}
As shown in the code, our server will be connected through ServerConnector at port 8090. Once we build our project, we can run our server.
4.2.3 Run our example
Now once we run ManyConnectors.java from eclipse, we can access the HelloServlet in browser at port 8090. Jetty server in this example is connected through ServerConnector which is configured at port 8090. Similarly we can add other connectors like Https Connector or Spdy Connector.

5. Conclusion
In this example we showed how to use a ServerConnector which is based on Non-blocking IO in Jetty. The main advantage of NIO is that it allows to manage multiple channels like network connections or files using only few threads compared to blocking IO.
6. Download the eclipse project
This was an example for Jetty NIO based ServerConnector with an embedded-jetty.
You can download the full source code of this example here: jettynioexample
7. Related Articles
Following articles were referred in developing this example:
