The Java Naming and Directory Interface (JNDI) is a Java API for a directory service that allows Java clients to discover and lookup data and objects via name. Data sources, Mail Servers or Messaging queues are among the common objects that can be discovered through JNDI. JNDI lookup strategy abstracts applications from the external resources and makes them more configurable.
In this example, we are going to enable Jetty for JNDI lookups. As in the previous examples, we will start with embedded Jetty and programmatically enable JNDI lookups. We will register a JDBC datasource and demonstrate how we can lookup and access this datasource through JNDI. Thereafter we will see how JNDI resources can be configured in a Standalone Jetty.
1. Environment
In the example, following programming environment will be used:
- Java 8 (Java 7 is also OK)
- Maven 3.x.y
- Eclipse Luna(as the IDE)
- Jetty v9.2.11 (In Embedded Jetty example, we will add Jetty libraries through Maven)
- H2 Database v1.4.x
As mentioned above, we are going to register a JDBC datasource to the JNDI. In this example, we haven chosen H2 database, which is very convenient for prototyping. But any other database platform can be used as well.
H2 runs through a single JAR file, which can be obtained from central Maven Repository.
2. Structure of the Example
In this example, we assume that we have JCG Example records that are stored in an H2 database. There is a single table named JCGEXAMPLE with only two columns (ID and ARTICLE_NAME). For simplicity we have skipped other types of integrity and database constraints. We will query content of this table through a Servlet deployed in a Jetty web application. We will access the datasource through a JNDI lookup.
3. Setting the H2 Database
As we have mentioned earlier, H2 is very convenient for prototyping and development environments. It is very easy to have a running H2 database once we have the JAR file . All we have to do is, running the simple shell command in the directory of the JAR file.
java -cp h2*.jar org.h2.tools.Server
This command immediately starts an H2 in server mode. In addition to this, it fires a browser window that gives us a Web based console to create and configure H2 databases.
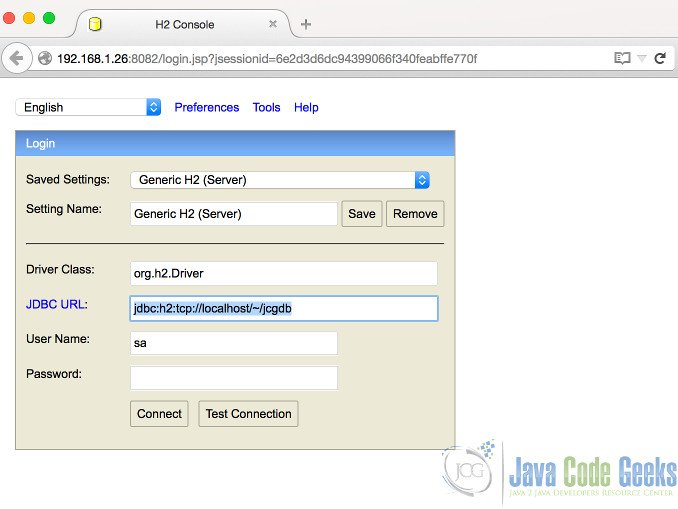
On the browser window, we can connect the database altering the following infomation:
- JDBC URL: jdbc:h2:tcp://localhost/~/jcgdb
- User Name: sa
If it is the first time that we connect to this url, H2 creates a database file named jcgdb.mv.db in our home directory and opens a console that enables us to execute SQL scripts.
We can create our JCGEXAMPLE table running the following SQL command:
CREATE CACHED TABLE PUBLIC.JCGEXAMPLE(
  ID INTEGER,
  ARTICLE_NAME VARCHAR(255)
)
Then we insert two rows to this table:
insert into JCGEXAMPLE values( 1,'Jetty JNDI Example');
insert into JCGEXAMPLE values(2,'Jetty JMX Example');
Now our database is ready with one table and two rows, which will suffice for this example.
4. JNDI in Embedded Jetty
4.1 Creating the Maven Project in Eclipse
We will create the Maven project in Eclipse, applying the steps below:
- Go to File -> New ->Other -> Maven Project
- Tick Create a simple project and press “Next”.
- Enter groupId as: com.javacodegeeks.snippets.enterprise
- Enter artifactId as: jetty-jndi-example
- Select packaging as “war”.
- Press “Finish”.
After creating our project, we are going to add following dependencies to our pom.xml:
- org.eclipse.jetty:jetty-server
- org.eclipse.jetty:jetty-webapp
- org.eclipse.jetty:jetty-plus
- org.eclipse.jetty:jetty-jndi
- com.h2database:h2
The first two dependencies are common for almost all embedded Jetty applications. jetty-plus and jetty-jndi are required for JNDI lookups. Finally, h2 is required for the H2 database driver and datasource.
After adding these, the dependencies section of our pom looks like:
	<dependencies>
		<dependency>
			<groupId>org.eclipse.jetty</groupId>
			<artifactId>jetty-server</artifactId>
			<version>9.2.11.v20150529</version>
		</dependency>

		<dependency>
			<groupId>org.eclipse.jetty</groupId>
			<artifactId>jetty-webapp</artifactId>
			<version>9.2.11.v20150529</version>

		</dependency>

		<dependency>
			<groupId>org.eclipse.jetty</groupId>
			<artifactId>jetty-plus</artifactId>
			<version>9.2.11.v20150529</version>
		</dependency>

		<dependency>
			<groupId>org.eclipse.jetty</groupId>
			<artifactId>jetty-jndi</artifactId>
			<version>9.2.11.v20150529</version>
		</dependency>


		<dependency>
			<groupId>com.h2database</groupId>
			<artifactId>h2</artifactId>
			<version>1.4.188</version>
		</dependency>

	</dependencies>
4.2 Registering resources in JNDI
In embedded Jetty, we register our dependencies to the server programmatically. In order to keep things simple, we will run our Server through the main Java class, which is named JettyJndiExampleMain. In our main class, we will initialize a Jetty Server, append a web application context and register a datasource for JNDI.
The source code of JettyJndiExampleMain decorated with source comments is below:
JettyJndiExampleMain.java
package com.javacodegeeks.snippets.enterprise.jettyjndi;

import org.eclipse.jetty.server.Server;
import org.eclipse.jetty.util.resource.Resource;
import org.eclipse.jetty.webapp.WebAppContext;
import org.eclipse.jetty.xml.XmlConfiguration;
import org.h2.jdbcx.JdbcDataSource;

public class JettyJndiExampleMain {

	public static void main(String[] args) {
		try {
			// 1.We are creating the service
			Server server = new Server(8080);

			// 2.We are enabling Jetty-plus configuration
			org.eclipse.jetty.webapp.Configuration.ClassList classlist = org.eclipse.jetty.webapp.Configuration.ClassList.setServerDefault(server);
			classlist.addAfter("org.eclipse.jetty.webapp.FragmentConfiguration", "org.eclipse.jetty.plus.webapp.EnvConfiguration", "org.eclipse.jetty.plus.webapp.PlusConfiguration");

			// 3.We are creating the web-application context
			WebAppContext ctx = new WebAppContext();
			ctx.setResourceBase("src/main/webapp");
			ctx.setContextPath("/jetty-jndi-example");

			// 4.We are creating the data-source here
			JdbcDataSource dataSource = new JdbcDataSource();
			dataSource.setUrl("jdbc:h2:tcp://localhost/~/jcgdb");
			dataSource.setUser("sa");

			// 5.Here we are registring the datasource for our server
			new org.eclipse.jetty.plus.jndi.Resource(server, "jdbc/jcgDS", dataSource);

			// 6.Handler setting and application registration code
			server.setHandler(ctx);
			server.start();
			server.join();
		} catch (Exception exc) {
			exc.printStackTrace();
		}

	}
}
- In the first step, we create a server for port 8080.
- In step 2, we enable Jetty-plus configuration which is required for additional Jetty features which include JNDI.
- Step 3 is the part where we initialize a web application with the context path ‘jetty-jndi-example’
- In Step 4, we define the H2 Datasource for the database we have created in the previous section.
- In Step 5, we register the data source to the server with the name “jdbc/jcgDS”.
- After step 6, we attach the web application to the server and start the server.
4.3 Configuring the Web Application
Our web application is a simple web application, with a Servlet that queries the database and returns the result as the HTTP response.
The web application can be configured following the steps below:
- Create the directory src/main/webapp (if not exists)
- Create the directory WEB-INF under src/main/webapp.
- Create web.xml file under src/main/webapp/WEB-INF (The content of web.xml will be presented below.)
- Implement the
JndiExampleServletwhich queries the datasource.
Our web.xml file looks like as follows:
web.xml
<web-app xmlns="http://java.sun.com/xml/ns/javaee" xmlns:xsi="http://www.w3.org/2001/XMLSchema-instance"
	xsi:schemaLocation="http://java.sun.com/xml/ns/javaee http://java.sun.com/xml/ns/javaee/web-app_2_5.xsd"
	version="2.5">
	<display-name>JSP Example Application</display-name>

	<servlet>
		<servlet-name>jndiservlet</servlet-name>
		<servlet-class>com.javacodegeeks.snippets.enterprise.jettyjndi.JndiExampleServlet</servlet-class>

	</servlet>

	<servlet-mapping>
		<servlet-name>jndiservlet</servlet-name>
		<url-pattern>/*</url-pattern>
	</servlet-mapping>

	<resource-ref>
		<res-ref-name>jdbc/jcgDS</res-ref-name>
		<res-type>org.h2.jdbcx.JdbcDataSource</res-type>
		<res-auth>Container</res-auth>
	</resource-ref>
</web-app>
Here we have defined a Servlet named JndiExampleServlet and mapped it to the all URLs under our application. In the bottom part, we have mentioned the JNDI resource that we are going to use in this application.

JndiExampleServlet is a simple Servlet that uses the class DatabaseUtil and returns the query result as the response.
JndiExampleServlet.java
package com.javacodegeeks.snippets.enterprise.jettyjndi;

import java.io.IOException;
import java.util.List;

import javax.servlet.ServletException;
import javax.servlet.http.HttpServlet;
import javax.servlet.http.HttpServletRequest;
import javax.servlet.http.HttpServletResponse;

import com.javacodegeeks.snippets.enterprise.jettyjndi.dbutils.DatabaseUtil;

public class JndiExampleServlet extends HttpServlet {

	@Override
	protected void service(HttpServletRequest req, HttpServletResponse resp) throws ServletException, IOException {

		List<String> articleNames = DatabaseUtil.getArticleNames();
		for (String articleName : articleNames) {
			resp.getOutputStream().println(articleName);
		}
	}
}
DatabaseUtil is a Data Access Object like class that handles all database related operations including the JNDI lookup.
DatabaseUtil.java
package com.javacodegeeks.snippets.enterprise.jettyjndi.dbutils;
import java.sql.Connection;
import java.sql.ResultSet;
import java.sql.Statement;
import java.util.ArrayList;
import java.util.List;

import javax.naming.InitialContext;
import javax.sql.DataSource;

public class DatabaseUtil {

	public static void main(String[] args) {

		List<String> articleNames = getArticleNames();

		System.out.println(articleNames);

	}

	private static Connection createConnection() {
		try {
			InitialContext ctx = new InitialContext();
			// Here we lookup the datasource with the name
			// "java:comp/env/jdbc/jcgDS"
			DataSource ds = (DataSource) ctx.lookup("java:comp/env/jdbc/jcgDS");
			return ds.getConnection();
		} catch (Exception exc) {
			exc.printStackTrace();
			return null;
		}
	}

	public static List<String> getArticleNames() {

		Connection conn = createConnection();
		List<String> articleNames = new ArrayList<String>();
		try {
			Statement stmt = conn.createStatement();
			ResultSet rs = stmt.executeQuery("SELECT * from JCGEXAMPLE");
			while (rs.next()) {
				String articleName = rs.getString("ARTICLE_NAME");
				if (articleName != null) {
					articleNames.add(articleName);
				}
			}
			conn.close();

		} catch (Exception e) {
			throw new RuntimeException(e);
		}
		return articleNames;
	}

}
In the source code, you can see that, the datasource is retrieved from JNDI through the following snippet:
InitialContext ctx = new InitialContext();
// Here we lookup the datasource with the name "java:comp/env/jdbc/jcgDS"
DataSource ds = (DataSource) ctx.lookup("java:comp/env/jdbc/jcgDS");
You should notice that, JNDI configuration abstracts the datasource from the application so that our application does not know (and care) about the URL,username and password and driver and in most cases the vendor of the datasource.
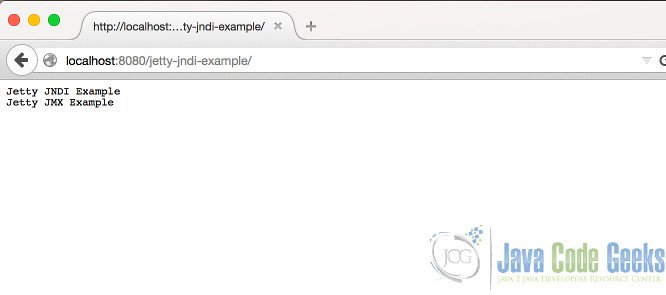
4.4 Demo
When we run our main class and try to access http://localhost:8080/jetty-jndi-example, we can see the Servlet response below:
5. JNDI in Standalone Jetty
Configuring JNDI for standalone Jetty is easy. The required steps can be summarized as follows:
- Enable jetty-plus module in JETTY_HOME/start.ini file.
- Add the datasource configuration in JETTY_HOME/jetty.xml file.
- Copy the H2 jar und er JETTY_HOME/lib/ext directory.
The module jetty-plus can be enabled by adding the following line to start.ini:
--module=plus
The configuration for the datasource in jetty.xml file is as follows:
<Configure id="Server" class="org.eclipse.jetty.server.Server">

    <New id="jcgdatasource" class="org.eclipse.jetty.plus.jndi.Resource">
		<Arg></Arg>
		<Arg>jdbc/jcgDS</Arg>
		<Arg>
			<New class="org.h2.jdbcx.JdbcDataSource">
				<Set name="url">jdbc:h2:tcp://localhost/~/jcgdb</Set>
				<Set name="user">sa</Set>
			</New>
		</Arg>
	</New>
...
</Configure>
After we copy H2 jar to JETTY_HOME/lib/ext and drop our application WAR under JETTY_HOME/webapps directory; we can run Jetty and see that our application can seamlessly access the datasource through JNDI.
6. Final Remarks
JNDI provides a mechanism that enables application programmers to access objects through lookups. In this example. we have configured Jetty to access JNDI objects both for standalone and embedded modes of Jetty.
You can download the full source code of this example here: Jetty JNDI Example
