1. Introduction
In this post we will learn about how to install and configure Jenkins through the Jenkins Docker image. This is the official Docker image of Jenkins available from the Docker hub here. Please ensure that you have Docker engine and Docker-Compose installed to try out the examples provided in this post.
2. Install Jenkins Docker Image
The official Jenkins Docker image can be found here. It is installed in the standard way of pulling any Docker image.
$ docker pull jenkins
Using default tag: latest
latest: Pulling from library/jenkins

75a822cd7888: Pull complete
57de64c72267: Pull complete
4306be1e8943: Pull complete
1e6944bfb718: Pull complete
3521f2f45ed2: Pull complete
9c2f0d9b5f90: Pull complete
8cedcf6d2527: Pull complete
31f99da7583d: Pull complete
2b1a4e887f7e: Pull complete
ec60c180ba47: Pull complete
b8c5058508d7: Pull complete
d5f5f89b9fbc: Pull complete
9d9de1ae7cbb: Pull complete
b9281b89f5bb: Pull complete
b2b525bc7c36: Pull complete
7ba52a961890: Pull complete
1902c30f8508: Pull complete
87e732b3b721: Pull complete
4fae69e3ea03: Pull complete
Digest: sha256:a71f0957979d360c80c1be258e9f5bb0de66a27ae072c4d1e49f569fc83538a9
Status: Downloaded newer image for jenkins:latest
$
$ docker images
REPOSITORY          TAG                 IMAGE ID            CREATED             SIZE
jenkins             latest              e11ceb27c34e        2 weeks ago         714.6 MB
3. Run Jenkins Image
Now that the Jenkins image is downloaded it can be stated with the docker run command like below:
$ docker run --detach --publish=49001:8080 --volume=/home/hariharan/work/jenkins_home:/var/jenkins_home --tty --name="my_jenkins_1" jenkins
d1c5bd67c530d67212ca2dd3f35e50366309d4f33d197120c93907b4a3d80559
$
$ docker ps
CONTAINER ID        IMAGE               COMMAND                  CREATED             STATUS              PORTS                                NAMES
d1c5bd67c530        jenkins             "/bin/tini -- /usr/lo"   51 seconds ago      Up 50 seconds       50000/tcp, 0.0.0.0:49001->8080/tcp   my_jenkins_1
We started the Jenkins container called my_jenkins_1 in a detached mode. Jenkins server listens on port 8080 by default, this is exposed as port 49001 on the docker host. All Jenkins data is persisted in /home/hariharan/work/jenkins_home. We can check if the server started properly using docker logs
$ docker logs my_jenkins_1
Running from: /usr/share/jenkins/jenkins.war
webroot: EnvVars.masterEnvVars.get("JENKINS_HOME")
...
...
*************************************************************

Jenkins initial setup is required. An admin user has been created and a password generated.
Please use the following password to proceed to installation:

750e3bffe30a4b959a703c1d4a6072c0

This may also be found at: /var/jenkins_home/secrets/initialAdminPassword

*************************************************************
...
...
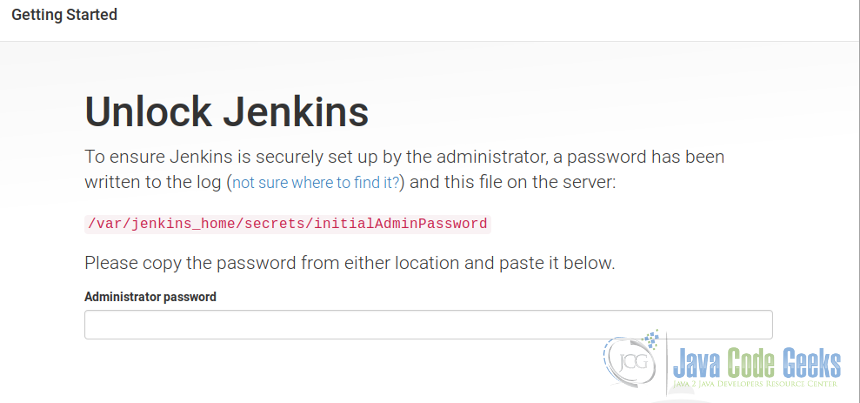
As you can see from above, there is a one-time password to be provided to unlock Jenkins. This means that Jenkins has started properly. Copy the password provided in the logs. You will need that for setting up Jenkins for first-time use. Let us now setup Jenkins for first-time use.
Open http://localhost:49001 in the browser. You should see the “Unlock Jenkins” screen where you should provide the unlock password from above, like so:
After entering the password to unlock Jenkins, the setup wizard takes us to the next screen to setup the plugins you need to customize your Jenkins instance.
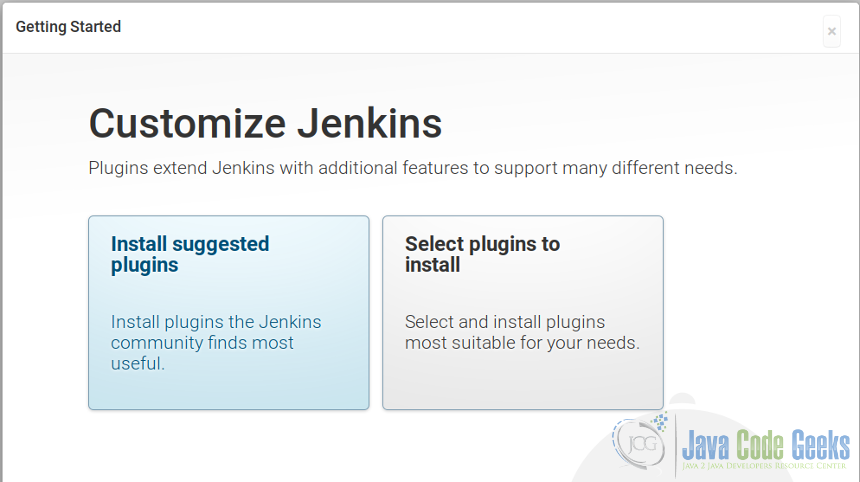
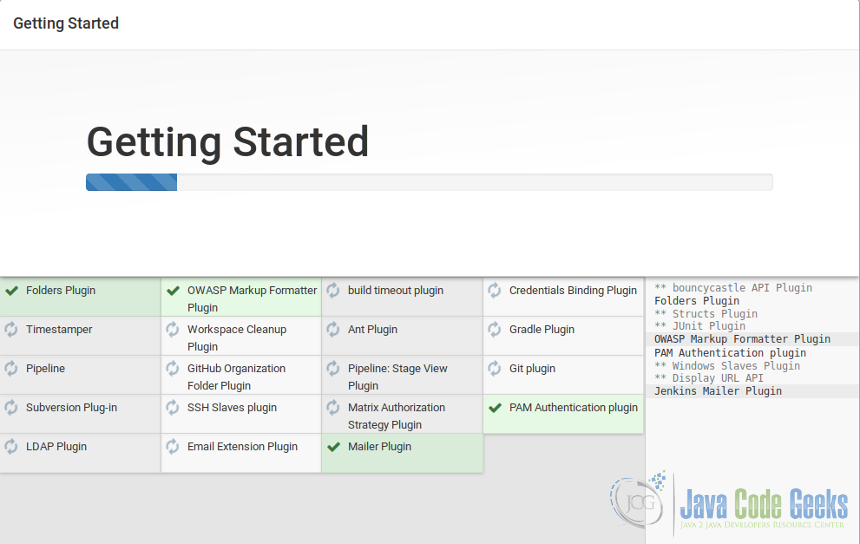
Let us select the option “install suggested plugins” for now. This leads us to the next screen where a set of pre-determined plugins are installed for you. This will take some time to finish.
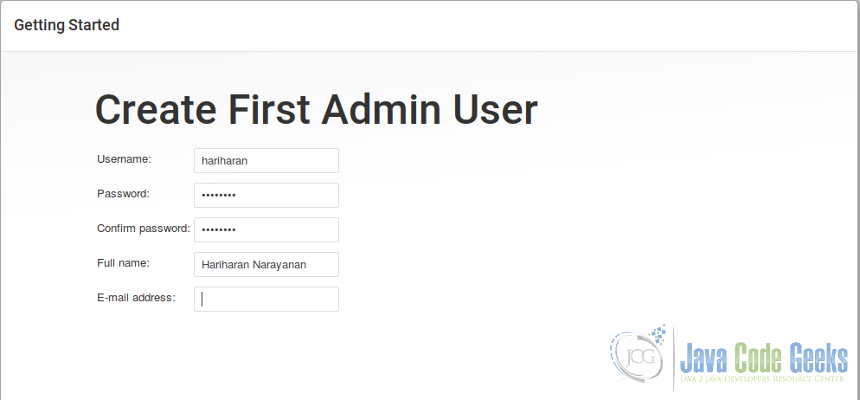
After this we will be taken to a screen to create the first admin user. That screen is pretty self-explanatory. Keep aside the username and password that you created here. We will use these credentials in chapter 3 below. Fill up the details in this below screen and click on the same button.
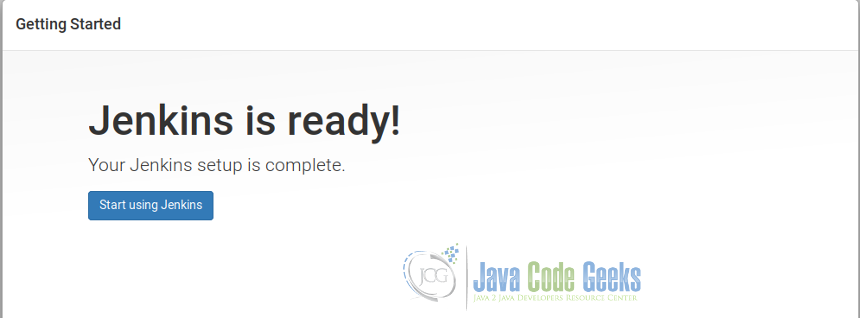
This finishes Jenkins setup and you will see a final “Jenkins is ready!” screen. Click on the “Start using Jenkins” button and you are all set to start using Jenkins from it’s Docker image.
4. Configure Jenkins Plugins Through Dockerfile
In the previous example we installed plugins through the browser. In this section, we will see how to configure Jenkins plugins through a Dockerfile. For this we will have to create a new Docker image derived from the official Jenkins Docker image. For this example, we will see how to configure the nodejs Jenkins plugin through a Dockerfile.
Let us start with a simple Docker-compose file to setup the custom Jenkins image. Create a file called docker-compose.yml, enter the below text and save. Be careful with the tab alignment in the YAML file. Things go crazy if the lines are not properly indented and aligned like below.
version: "2"
services:
  my-jenkins-setup:
    build:
      context: .
      dockerfile: Dockerfile
    # image: jenkins:latest
    ports:
      - "49001:8080"
    volumes:
      - /home/hariharan/work/jenkins_home:/var/jenkins_home
Above, we gave references to the Dockerfile, listed out the ports to expose and set up the Jenkins volume. Now let us setup the Dockerfile. Create a file called Dockerfile and enter the below text.
FROM jenkins:latest

COPY plugins.txt /usr/share/jenkins/plugins.txt
RUN /usr/local/bin/plugins.sh /usr/share/jenkins/plugins.txt
Above, we configured to derive from the official Jenkins image. We copied a file called plugins.txt into /usr/share/jenkins and finally invoked a script called /usr/local/bin/plugins.sh with /usr/share/jenkins/plugins.sh as input. plugins.sh is a script provided by Jenkins to install Jenkins plugins. It refers to a file that provides a list of all plugins to install. This list of plugins to install is provided in plugins.txt. Let us create plugins.txt now. Save the below text in a file called plugins.txt.
#pluginID:version
structs:1.2
junit:1.19
bouncycastle-api:2.16.0
windows-slaves:1.2
antisamy-markup-formatter:1.5
icon-shim:2.0.3
script-security:1.25
credentials:2.1.10
cloudbees-folder:5.16
matrix-auth:1.4
matrix-project:1.8
nodejs:0.2.2
Essentially, we want to install only nodejs plugin. But while installing plugins through Docker we have to provide all dependencies for this plugin also. So the above list provides all plugins in the dependency tree of nodejs. The list is in the format of pluginID:version and this information for each plugin was gleaned from the Jenkins plugins directory online.
Now, save the files docker-compose.yml, Dockerfile and plugins.txt in the same folder. Next run docker-compose build.
$ docker-compose build
Building my-jenkins-setup
Step 1 : FROM jenkins:latest
 ---> e11ceb27c34e
Step 2 : MAINTAINER Hariharan Narayanan
 ---> Running in ce996b865537
 ---> d1f5a4528e99
Removing intermediate container ce996b865537
Step 3 : COPY plugins.txt /usr/share/jenkins/plugins.txt
 ---> ee5dacd49d2b
Removing intermediate container 343a85d2721f
Step 4 : RUN /usr/local/bin/plugins.sh /usr/share/jenkins/plugins.txt
 ---> Running in 366ca368d247
WARN: plugins.sh is deprecated, please switch to install-plugins.sh
Analyzing war: /usr/share/jenkins/jenkins.war
Downloading structs:1.2
Downloading junit:1.19
Downloading bouncycastle-api:2.16.0
Downloading windows-slaves:1.2
Downloading antisamy-markup-formatter:1.5
Downloading icon-shim:2.0.3
Downloading script-security:1.25
Downloading credentials:2.1.10
Downloading cloudbees-folder:5.16
Downloading matrix-auth:1.4
Downloading matrix-project:1.8
Downloading nodejs:0.2.2
---------------------------------------------------
INFO: Successfully installed 12 plugins.
---------------------------------------------------
 ---> 8f35404720be
Removing intermediate container 366ca368d247
Successfully built 8f35404720be
$
$ docker images
REPOSITORY                 TAG                 IMAGE ID            CREATED             SIZE
jenkins_my-jenkins-setup   latest              8f35404720be        52 seconds ago      720.6 MB
jenkins                    latest              e11ceb27c34e        2 weeks ago         714.6 MB
ubuntu                     latest              104bec311bcd        4 weeks ago         129 MB
alpine                     latest              baa5d63471ea        12 weeks ago        4.803 MB
The docker-compose build command created a new image called jenkins_my-jenkins-setup which contains all the Jenkins plugins listed in plugins.txt. The build process lists out all the plugins that were installed.
Now start the new Jenkins container and open http://localhost:49001 in the browser.
$ docker-compose up
Creating jenkins_my-jenkins-setup_1
Attaching to jenkins_my-jenkins-setup_1
my-jenkins-setup_1  | Running from: /usr/share/jenkins/jenkins.war
my-jenkins-setup_1  | webroot: EnvVars.masterEnvVars.get("JENKINS_HOME")
...
...
my-jenkins-setup_1  | INFO: Jenkins is fully up and running
...
...
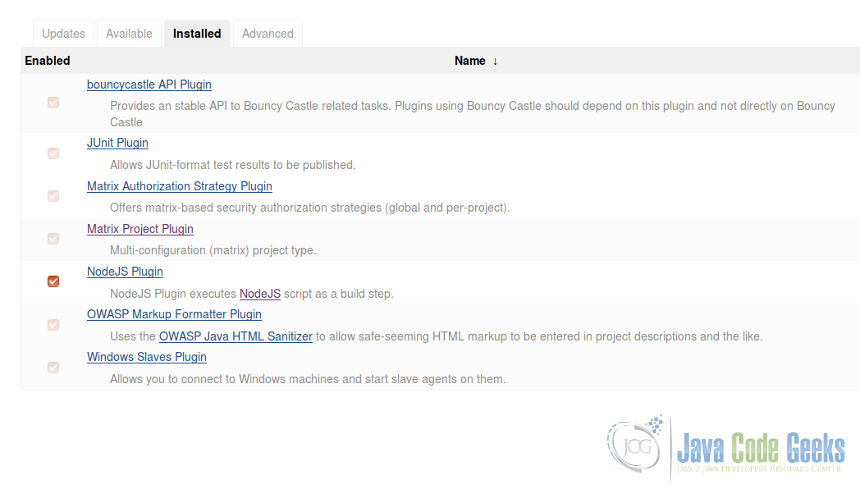
You will not be taken to the setup screen again since we reused the same volumes created in chapter 2 above. You will be asked for the username and password. Enter the same admin username and password that you created during the setup process in chapter 2. Once you are logged in, you can start using Jenkins like before but with the new plugins installed. You can verify that nodejs plugin is installed by opening the installed plugins page at http://localhost:49001/pluginManager/installed. Type “nodejs” in the “filter” box and you should see a box like below.
5. Summary
In this post we learnt how to install and run a Jenkins server from the official Jenkins Docker image. We also saw how to customize and extend the Jenkins Docker image with the Jenkins plugins we need. More details on how to use the Jenkins Docker image can be found from the Dockerhub page for Jenkins.

Thank you