Introduction to Docker for Java Developers – Getting started with Docker
1. Introduction
According the official definition of Docker, it is an open platform for building, shipping and running distributed applications. It gives programmers, development teams and operations engineers the common toolbox they need to take advantage of the distributed and networked nature of modern applications. In other words, Docker is a tool to avoid the usual headaches of conflicts, dependencies and inconsistent environments, which is an important problem for distributed applications, where we need to install or upgrade several nodes with the same configuration.
Docker is a container manager, which means that is able to create and execute containers that represent specific runtime environments for your software. In contrast with virtual machines like VirualBox, Docker uses resource isolation features of the Linux kernel to allow independent “containers” to run within a single Linux instance, avoiding the overhead of starting and maintaining virtual machines. A computer with docker can run multiple containers at the same time.
Docker has a public repository of runtime environments(i.e. Docker images), which is called Docker Hub. In this repository allows Docker download and start an specific runtime environments for an specific software (e.g. MongoDB or MySQL) without any installation procedure.
2. Docker Setup
The installation instructions for Docker depends on your operative system and are widely explained (here for mac, here for windows and here for ubuntu). Once, you have followed the installation instructions, you should be able to run the following command.
Docker installation test
$ docker run ubuntu:14.04 /bin/echo 'It works!'
It works!
3. Java Hello World for Docker
In this example, we are going to run the typical Java Hello World example in docker. We shall use Maven to setup a new project for Hello word example. The contents of our maven project descriptor should be as follows:
pom.xml
<project xmlns="http://maven.apache.org/POM/4.0.0" xmlns:xsi="http://www.w3.org/2001/XMLSchema-instance"
xsi:schemaLocation="http://maven.apache.org/POM/4.0.0 http://maven.apache.org/xsd/maven-4.0.0.xsd">
  <modelVersion>4.0.0</modelVersion>
  <groupId>com.javacodegeeks</groupId>
  <artifactId>helloworld</artifactId>
  <version>1.0</version>
  </project>
Now, add a Java class into the source folder (src/main/java directory) with the following code.
HelloWorld.java
public class HelloWorld {
  public static void main(String[] args) throws Exception{
    System.out.println("Hello World");
  }
}
After that, create a file called Dockerfile into the root directory of the project and copy the following contents.
Dockerfile
FROM ubuntu:14.04
MAINTAINER javacodegeeks

RUN apt-get update && apt-get install -y python-software-properties software-properties-common
RUN add-apt-repository ppa:webupd8team/java

RUN echo "oracle-java8-installer shared/accepted-oracle-license-v1-1 boolean true" | debconf-set-selections

RUN apt-get update && apt-get install -y oracle-java8-installer maven

ADD . /usr/local/helloworld
RUN cd /usr/local/helloworld && mvn install
CMD ["java", "-cp", "/usr/local/helloworld/target/helloworld-1.0.jar", "HelloWorld"]
This file contains the set of commands that docker executes to create an execution environment for our application. An execution environment is called Docker image. The last line, which starts with CMD, is the command that launches our application. A single machine can have different simultaneous executions of the same docker image. Each of these executions is called Docker container.
Now, let’s understand the Dockerfile commands of our example:
FROM: Specifies the original required software that our Dockerfile requires to start. In this case, we have selected Ubuntu, version 14.04.MANTAINER: The author of the Dockerfile.RUN: Run a unix command in order to build the container.ADD: Adds local files inside the container.CMD: It is the command that is executed once the container starts. After the command ends, the container stops.
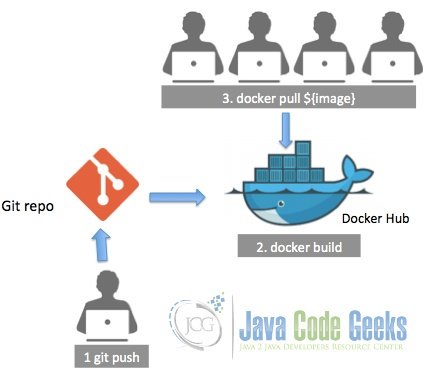
A Dockerfile can be located in any directory of our machine, but if it is stored inside our project, it is cleaner to move the contents of your project into a Docker image with the ADD instruction. Indeed, if the project repository belongs to GitHub or Bitbucket, the Docker Hub service allows to store a hook(i.e listener) to automatically rebuild the Docker image when a new push arrives. This approach allows to ensure continous delivery for your docker images. The following image shows the described Docker Hub workflow.
4. Running the example
Now, we are going to build the Docker image. Open a prompt and go to the directory where the Dockerfile is located. Now, you just need to execute the following command:
Docker build command
docker build -t javacodegeeks/helloworld:1.0 .
Once the command ends, the last line should be similar to this one:
Docker build output
Successfully built 29336bbbfa5c
At this moment, Docker has created an image called javacodegeeks/helloworld:1.0. Now, let’s create and start a container for this image with the docker run command.
Docker run command
docker run --name helloworldcontainer javacodegeeks/helloworld:1.0
HelloWorld
Now, a new container called helloworldcontainer has been created and executed in our machine. Each docker container must have a unique name. Therefore, the same command just can be executed again if the container name is different or the existing container is removed. Let’s see what are the current containers in our machine with the following command:
Docker ps command
docker ps -a
It shows a table like this one:
The status of our container is Excited successfully because the exit code is 0. In order to execute it again, it is necessary to restart the container with the following command:
Docker start command
docker start helloworldcontainer
By default, the command docker start does not print the container standard output. However, we can see it using the command docker log as follows:
Docker logs command
docker logs helloworldcontainer
Usually, Docker images and containers need a considerable disk space. In order to clean our environment, we need to perform the following actions:
- Remove the container:Docker remove container command
docker rm helloworldcontainer
- Remove the image:Docker remove image command
docker rmi javacodegeeks/helloworld:1.0
5. Download the complete source code
This was an example of how running a Java program in Docker.
You can download the full source code of this example here: docker-example4j


