In this article we are going to explain the main features of Docker. We are going to briefly explain why containers are necessary, which are the main commands to use and how to use Docker in our integration tests. The following table shows an overview of the whole article:
Table Of Contents
1. Why do we need Docker?
 Docker is a tool to avoid the usual headaches of conflicts, dependencies and inconsistent environments, which is an important problem for distributed applications, where we need to install or upgrade several nodes with the same configuration.
Docker is a container manager, which means that is able to create and execute containers that represent specific runtime environments for your software. In contrast with virtual machines like VirtualBox, Docker uses resource isolation features of the Linux kernel to allow independent “containers” to run within a single Linux instance, avoiding the overhead of starting and maintaining virtual machines. A computer with docker can run multiple containers at the same time.
Therefore, the automation of Docker mainly offers facilities for integration tests and continuous delivery.
2. Machines, Images and Containers
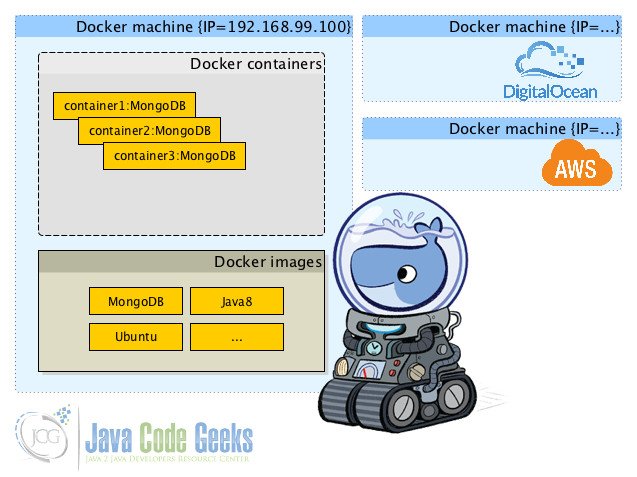
In order to use docker, it is important to have clear some vocabulary. Docker distinguishes three important concepts: docker machines, docker images and containers.
Docker containers are executions of an specific runtime environment. For example, to simulate a machine with an specific database up. These runtime environments are called Docker images, which are the result of executing the set of commands that appear in an specific script-like file called Dockerfile. Therefore, Docker allow having multiple containers of an specific Docker image. These could be compared with the concepts of program and process. Indeed, containers like processes, can be created, stopped, died, or running.
Docker machines are local (and virtual) machines or remote machines(e.g in a cloud such as Amazon AWS or DigitalOcean) with a docker running. Like physical machines, docker machines has an specific IP address. Each docker machine can manage multiple docker images and containers. From our own personal computer, the docker-machine command, allow us connecting to all our docker machines to manage their containers and images.
2.1. Installing docker and docker-machine
Follow the next steps to install docker and docker machine
- Download and install the docker binary file from here.Once, you have followed the installation instructions, you should be able to run the following command.
Docker installation test$ docker run ubuntu:14.04 /bin/echo 'It works!' It works!
- Download the Docker Machine binary and update your
PATH.If you are running OS X or Linux:
Unix Docker Machine installation$ curl -L https://github.com/docker/machine/releases/download/v0.6.0/docker-machine-`uname -s`-`uname -m` > /usr/local/bin/docker-machine && \ chmod +x /usr/local/bin/docker-machine
If you are running Windows with git bash
Windows Docker Machine installation$ if [[ ! -d "$HOME/bin" ]]; then mkdir -p "$HOME/bin"; fi && \ curl -L https://github.com/docker/machine/releases/download/v0.6.0/docker-machine-Windows-x86_64.exe > "$HOME/bin/docker-machine.exe" && \ chmod +x "$HOME/bin/docker-machine.exe"
Otherwise, simply use the installer from the Docker official releases.
3. Understanding the commands
There are many docker commands. In fact, if we run simply docker from our terminal, we can see all the available commands.
Docker commands
Commands:
    attach    Attach to a running container
    build     Build an image from a Dockerfile
    commit    Create a new image from a container's changes
    cp        Copy files/folders from a container to a HOSTDIR or to STDOUT
    create    Create a new container
    diff      Inspect changes on a container's filesystem
    events    Get real time events from the server
    exec      Run a command in a running container
    export    Export a container's filesystem as a tar archive
    history   Show the history of an image
    images    List images
    import    Import the contents from a tarball to create a filesystem image
    info      Display system-wide information
    inspect   Return low-level information on a container or image
    kill      Kill a running container
    load      Load an image from a tar archive or STDIN
    login     Register or log in to a Docker registry
    logout    Log out from a Docker registry
    logs      Fetch the logs of a container
    pause     Pause all processes within a container
    port      List port mappings or a specific mapping for the CONTAINER
    ps        List containers
    pull      Pull an image or a repository from a registry
    push      Push an image or a repository to a registry
    rename    Rename a container
    restart   Restart a running container
    rm        Remove one or more containers
    rmi       Remove one or more images
    run       Run a command in a new container
    save      Save an image(s) to a tar archive
    search    Search the Docker Hub for images
    start     Start one or more stopped containers
    stats     Display a live stream of container(s) resource usage statistics
    stop      Stop a running container
    tag       Tag an image into a repository
    top       Display the running processes of a container
    unpause   Unpause all processes within a container
    version   Show the Docker version information
    wait      Block until a container stops, then print its exit code

Run 'docker COMMAND --help' for more information on a command.
In this section, we will see how to manage docker machines, how to pull a docker image using an specific docker machine and how to create a container for such docker image.
3.1 Creating a machine
First of all, we will list the set of available docker machines with the following command:
List Docker Machines
docker-machine ls
In case of not having any machine, we are going to create a new one as follows:
Docker installation test
docker-machine create --driver virtualbox default
Notice that in order to create a docker machine, we need to specify a driver, which will determine if it is a virtual machine, in this case virtual box, or if it is a connection to docker running in an external machine.
3.2 Creating an image
Docker images are created in an specific docker machine. In order to define the docker machine that we want to use, we need to run the following command:
Select docker machine
eval "$(docker-machine env default)"
In order to check the effects, list the available docker machines again. At this moment, a new machine should appear with a new IP address (192.168.99.100) and contains an asterisk in the ACTIVE column.
Active Docker Machine
NAME            ACTIVE   DRIVER         STATE     URL                          SWARM
default           *       virtualbox     Running   tcp://192.168.99.100:2376
Docker images are the binary files of runtime environments. The contents of a docker image are the result of executing the set of instructions that appear in a plain text file called Dockerfile. However, in order to avoid building docker images from Dockerfiles over and over again, there is an online repository for docker images called Docker Hub.
For example, in order to pull a MongoDB image, we only need to execute the docker pull command as follows:
Docker pull command
docker pull mongo
In order to see the installed docker images in our docker machine, use the following command. Notice that a new entry appears with the Mongo image. Each image has a unique identifier of the docker image for our machine called IMAGE ID.
List Docker Images
docker images
If you are interested to understand how to create a Dockerfile, we strongly recommend follow this example.
3.3 Creating a container
Docker containers are executions of docker images. In order to create a container from an image, we use the command docker run. For example:
List Docker Images
docker run mongo
After that, we can check the list of containers, with the following instruction.
List docker containers
docker ps -a
Notice that our container has an identifier too, called CONTAINER ID. We will use it later.
The IP address to connect to this container from our application is the IP of our docker machine (192.168.99.100).
3.4 Cleaning the environment
At this point we have downloaded a docker machine and we have started a docker container. In order to stop and remove the container and the image we need to execute the following instructions:
Stop the container:
Stop Docker Container
docker stop #containerId
Remove the container:
Remove Docker Container
docker rm #containerId
Remove the docker image:
Remove Docker Image
docker rmi #imageId
4.Running integration tests with Maven
There are different approaches to design integration tests with Docker. In this example, we will design a Maven project, which before executing JUnit tests, it automatically starts a MongoDB Docker container.
4.1 Maven configuration
First of all, copy this pom.xml file. We are going to use the docker-maven-plugin to automatically load the defined Docker images and create a container before running the integration tests. In order to support integration tests, we use the maven-failsafe-plugin.
pom.xml
<project xmlns="http://maven.apache.org/POM/4.0.0" xmlns:xsi="http://www.w3.org/2001/XMLSchema-instance"
	xsi:schemaLocation="http://maven.apache.org/POM/4.0.0 http://maven.apache.org/xsd/maven-4.0.0.xsd">
	<modelVersion>4.0.0</modelVersion>

    <groupId>javacodegeeks</groupId>
	<artifactId>javacodegeeks</artifactId>
	<version>1.0-SNAPSHOT</version>
	<packaging>jar</packaging>


    <properties>
        <project.build.sourceEncoding>UTF-8</project.build.sourceEncoding>
        <project.build.resourceEncoding>UTF-8</project.build.resourceEncoding>
        <maven.compile.encoding>UTF-8</maven.compile.encoding>
    </properties>

    <build>
        <plugins>

            <plugin>
                <artifactId>maven-compiler-plugin</artifactId>
                <version>2.1</version>
                <configuration>
                    <source>1.8</source>
                    <target>1.8</target>
                    <encoding>UTF-8</encoding>
                </configuration>
            </plugin>
            <plugin>
                <groupId>org.apache.maven.plugins</groupId>
                <artifactId>maven-failsafe-plugin</artifactId>
                <version>2.19.1</version>
                <configuration>
                    <includes>
                        <include>**/IntegrationTest.java</include>
                    </includes>
                </configuration>
                <executions>
                    <execution>
                        <id>integration-test</id>
                        <goals>
                            <goal>integration-test</goal>
                        </goals>
                    </execution>
                    <execution>
                        <id>verify</id>
                        <goals>
                            <goal>verify</goal>
                        </goals>
                    </execution>
                </executions>
            </plugin>
            <!-- Tell surefire to skip test, we are using the failsafe plugin -->
            <plugin>
                <groupId>org.apache.maven.plugins</groupId>
                <artifactId>maven-surefire-plugin</artifactId>
                <version>2.10</version>
                <configuration>
                    <skip>true</skip>
                </configuration>
            </plugin>
            <plugin>
                <groupId>io.fabric8</groupId>
                <artifactId>docker-maven-plugin</artifactId>
                <version>0.15.0</version>
                <configuration>
                    <logDate>default</logDate>
                    <autoPull>true</autoPull>
                    <dockerHost>tcp://192.168.99.100:2376</dockerHost>
                    <certPath>${user.home}/.docker/machine/certs/</certPath>
                    <images>
                        <image>
                            <name>mongo</name>
                            <run>
                                <ports>
                                    <port>27017:27017</port>
                                </ports>
                            </run>
                        </image>

                    </images>
                </configuration>
                <!-- Hooking into the lifecycle -->
                <executions>
                    <execution>
                        <id>start</id>
                        <phase>pre-integration-test</phase>
                        <goals>
                            <goal>start</goal>
                        </goals>
                    </execution>
                    <execution>
                        <id>stop</id>
                        <phase>post-integration-test</phase>
                        <goals>
                            <goal>stop</goal>
                        </goals>
                    </execution>
                </executions>
            </plugin>
        </plugins>
    </build>
    <dependencies>
       <dependency>
	      <groupId>org.mongodb</groupId>
	      <artifactId>mongo-java-driver</artifactId>
	      <version>3.2.2</version>
       </dependency>
        <dependency>
            <groupId>junit</groupId>
            <artifactId>junit</artifactId>
            <version>4.12</version>
            <scope>test</scope>
        </dependency>
    </dependencies>
  </project>
4.2 Creating integration tests
Integration tests are executed after creating a MongoDB container by the maven-docker-plugin. We are going to create a test to validate the following Zoo component, which only has one operation called addAnimal that inserts an animal to MongoDB.
Zoo.java
package javacodegeeks;

import org.bson.Document;

import com.mongodb.MongoClient;

public class Zoo {

	private MongoClient client;

	public Zoo(MongoClient client) {
		this.client = client;
	}

	public void addAnimal(String name, String type) {
		Document doc = new Document("name", "lion").append("type", "mammal");
		client.getDatabase("mydb").getCollection("animals").insertOne(doc);
	}
}
To test the Zoo component, we just validate, with an empty database, that after invoking the addAnimal operation, MongoDB contains a new animal.
IntegrationTest.java
package javacodegeeks;

import org.bson.Document;
import org.junit.AfterClass;
import org.junit.Assert;
import org.junit.BeforeClass;
import org.junit.Test;
import com.mongodb.MongoClient;
import com.mongodb.client.FindIterable;
import com.mongodb.client.MongoDatabase;

public class IntegrationTest {

	private static MongoClient client;

	@BeforeClass
	public static void start() {
		client = new MongoClient("192.168.99.100");
		MongoDatabase db = client.getDatabase("mydb");
		db.createCollection("animals");
	}

	@Test
	public void testMongoInsert() {

		Zoo zoo = new Zoo(client);
		zoo.addAnimal("lion", "mammal");

		FindIterable it = client.getDatabase("mydb").getCollection("animals")
				.find(new Document("name", "lion"));
		Assert.assertNotNull(it.first());

	}

	@AfterClass
	public static void stop(){
		client.close();
	}
}
Notice that the IP address of our MongDB database is our Docker machine.
4.3 Running the tests
To run our integration tests, we simply need to execute the mvn verify command.
Run integration tests
mvn verify
Which will produce these contents:
Mvn verify output
INFO] Building jar: /Users/rpau/workspace/javacodegeeks/target/javacodegeeks-1.0-SNAPSHOT.jar
[INFO]
[INFO] --- docker-maven-plugin:0.15.0:start (start) @ javacodegeeks ---
[INFO] DOCKER> [mongo] : Start container a2a9d37cbbfd
[INFO]
[INFO] --- maven-failsafe-plugin:2.19.1:integration-test (integration-test) @ javacodegeeks ---

-------------------------------------------------------
 T E S T S
-------------------------------------------------------
Running javacodegeeks.IntegrationTest
may 15, 2016 6:11:10 PM com.mongodb.diagnostics.logging.JULLogger log
INFORMACIÓN: Cluster created with settings {hosts=[192.168.99.100:27017], mode=SINGLE, requiredClusterType=UNKNOWN, serverSelectionTimeout='30000 ms', maxWaitQueueSize=500}
may 15, 2016 6:11:10 PM com.mongodb.diagnostics.logging.JULLogger log
INFORMACIÓN: No server chosen by WritableServerSelector from cluster description ClusterDescription{type=UNKNOWN, connectionMode=SINGLE, all=[ServerDescription{address=192.168.99.100:27017, type=UNKNOWN, state=CONNECTING}]}. Waiting for 30000 ms before timing out
may 15, 2016 6:11:10 PM com.mongodb.diagnostics.logging.JULLogger log
INFORMACIÓN: Opened connection [connectionId{localValue:1, serverValue:1}] to 192.168.99.100:27017
may 15, 2016 6:11:10 PM com.mongodb.diagnostics.logging.JULLogger log
INFORMACIÓN: Monitor thread successfully connected to server with description ServerDescription{address=192.168.99.100:27017, type=STANDALONE, state=CONNECTED, ok=true, version=ServerVersion{versionList=[3, 2, 6]}, minWireVersion=0, maxWireVersion=4, maxDocumentSize=16777216, roundTripTimeNanos=1473362}
may 15, 2016 6:11:10 PM com.mongodb.diagnostics.logging.JULLogger log
INFORMACIÓN: Opened connection [connectionId{localValue:2, serverValue:2}] to 192.168.99.100:27017
may 15, 2016 6:11:10 PM com.mongodb.diagnostics.logging.JULLogger log
INFORMACIÓN: Closed connection [connectionId{localValue:2, serverValue:2}] to 192.168.99.100:27017 because the pool has been closed.
Tests run: 1, Failures: 0, Errors: 0, Skipped: 0, Time elapsed: 0.601 sec - in javacodegeeks.IntegrationTest

Results :

Tests run: 1, Failures: 0, Errors: 0, Skipped: 0

[WARNING] File encoding has not been set, using platform encoding UTF-8, i.e. build is platform dependent! The file encoding for reports output files should be provided by the POM property ${project.reporting.outputEncoding}.
[INFO]
[INFO] --- docker-maven-plugin:0.15.0:stop (stop) @ javacodegeeks ---
[INFO] DOCKER> [mongo] : Stop and remove container a2a9d37cbbfd
[INFO]
[INFO] --- maven-failsafe-plugin:2.19.1:verify (verify) @ javacodegeeks ---
