In this article, we will see what is a Docker container and how to use it.
1. Introduction
Containers, in general, and Docker in particular is quickly gaining in popularity. In this post, we will get some basics sorted out about the Docker container. We will learn the meaning of the term Container in general and see specifically how Docker implements them. We will try to execute a few basic commands to understand the bare basics of Docker itself, Docker images, and Docker containers. So, let’s start.
2. Containers, what are they?
Operating system designers have always striven to provide secure operating environments to applications running on them. While applications need the harness the complete power of the underlying processing power and hardware for their work, they also need to be secured from harming other running applications. Over time, operating systems have progressed to provide features to virtualize several aspects of the underlying hardware – memory, file-systems, network interfaces, process trees, etc.
These virtualization efforts diverged primarily into 2 directions (among many of course) – hardware virtualization and operating system (OS) level virtualization. Hardware virtualization refers to the creation of virtual machines (on a host OS or even further lower) that virtualizes the underlying physical machine. Users can install complete OS into such virtual machines. OS level virtualization refers to features provided in the kernel (of the host OS) that allows creation of virtual and isolated hosting environments in the user space of the host OS. These virtual hosting environments are also termed Containers.
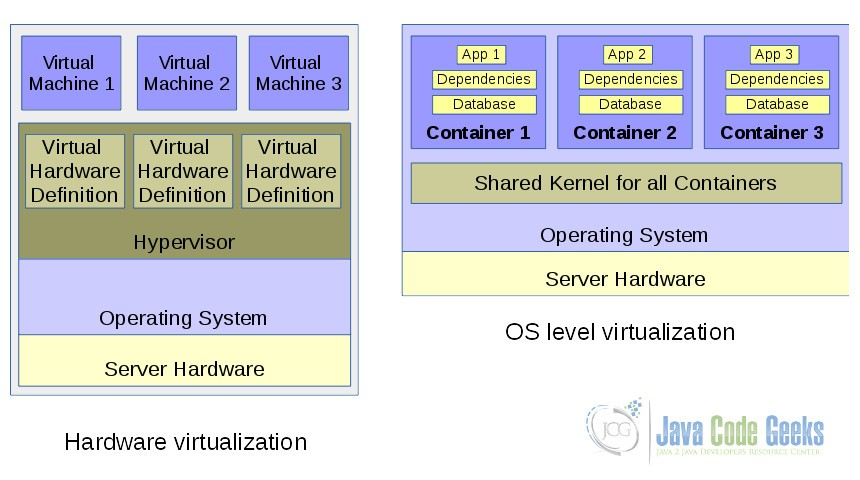
Over time there have been several such Container technologies that enabled containers to be created in the user space – chroot, jail, Oracle Solaris Zones, LXC, Docker
3. Docker – What is it?
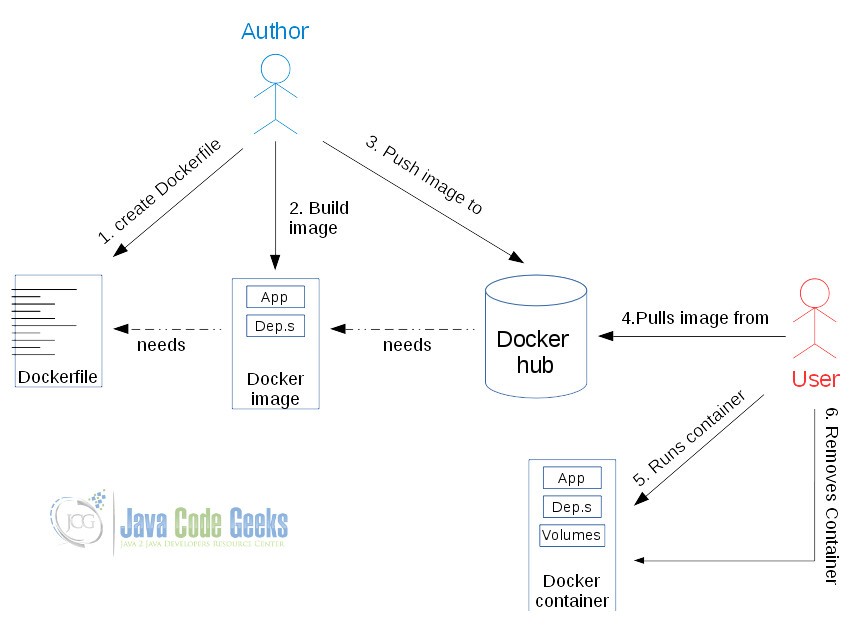
So now, what is Docker? Simply put, Docker is a container technology that enables users to deploy their applications into containers and run them within those containers. Docker enables users to easily package their applications and all of their dependencies into read-only images called Docker images. These images can be easily distributed through a Docker hub. These images can then be downloaded and executed in Docker Containers.
Now that we are briefly introduced to Docker, let us next discuss how we can install Docker and use it to create new containers.
4. Install Docker
Docker can be installed on Linux, Mac, and Windows. Please follow the installation instructions for Docker docs to get them installed in your machine. Once installed you can check if it is installed properly by running a Hello world container. Please follow this post to explore a few ways to do so. Now that Docker is installed, let us play around with the basics.
5. Basic commands to understand your Docker installation
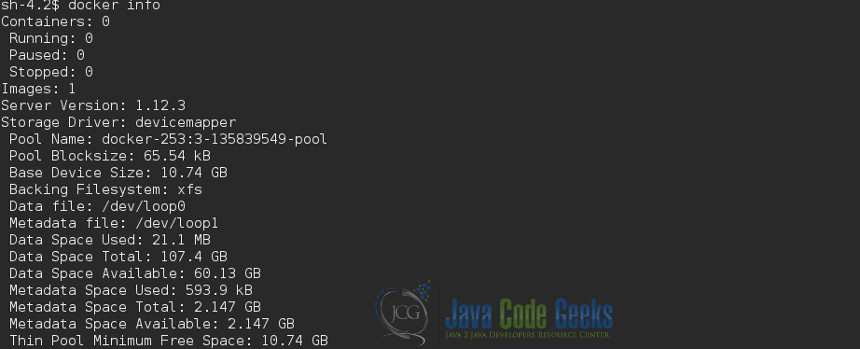
We can get overall information from Docker using the command:
$ docker info
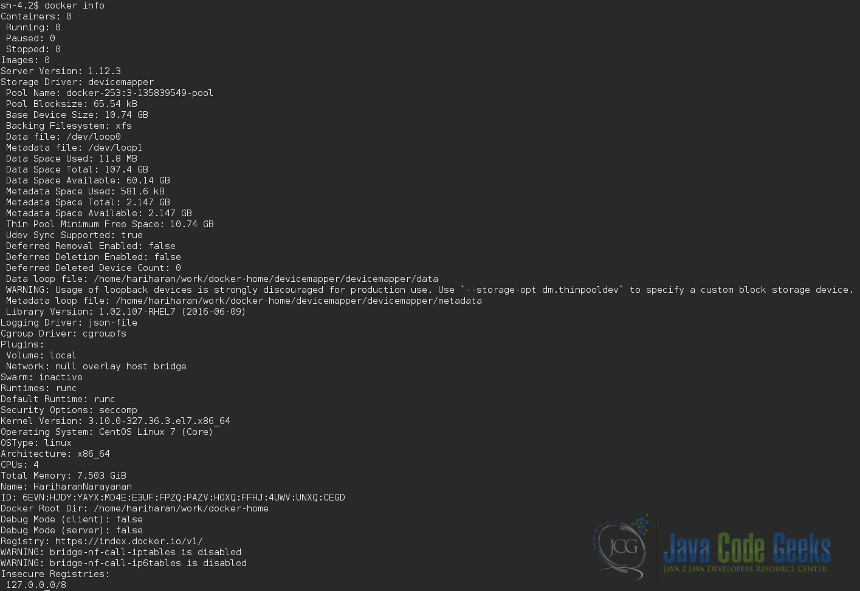
As you can see from the top 3 lines of the output, the number of total containers and images is 0 since we have a fresh install of Docker.
Once installed you can check the Docker images present using the command
$ docker images

It will be empty since we have installed Docker just now.
Once installed you can check the Docker containers present using the command
$ docker ps

It will be empty since we have installed Docker just now. Now let us create a container and try to understand how Docker behaves.
6. Basic Docker commands to create containers and images
Let us suppose that we want to create a separate container running Alpine Linux. To do this we simply pull down the official Alpine Docker image shared in the Docker Hub.
$ docker pull alpine:latest
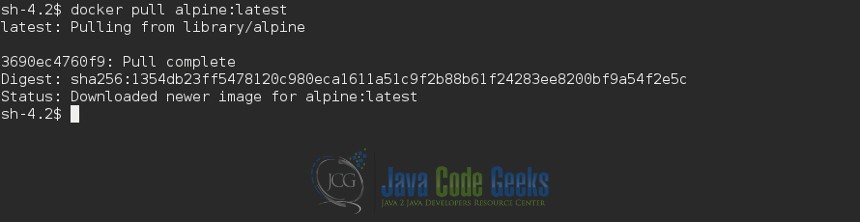
If you do not have this Docker image already then you will see a similar output like below. Otherwise, you will get a message saying you already have this image. Let us see what Docker tells us about the number of images available locally now.
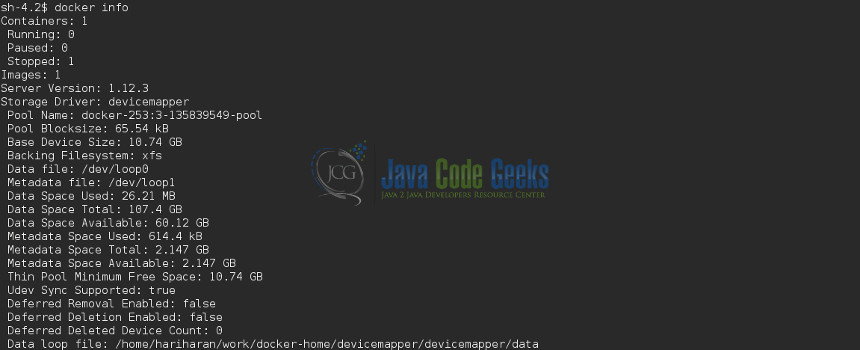
$ docker info
Now you can see that the number of images is 1 – the Alpine image we just downloaded. However, the number of Containers is still 0 since we have not spawned a new container yet. This image gets stored locally in the folder /var/lib/docker/image

We can see that the SHA256 id listed is the same as in the output for docker images.
To use this image, we need to create a new container out of this image. We do that by the docker run command.
$ docker run alpine:latest ls -l
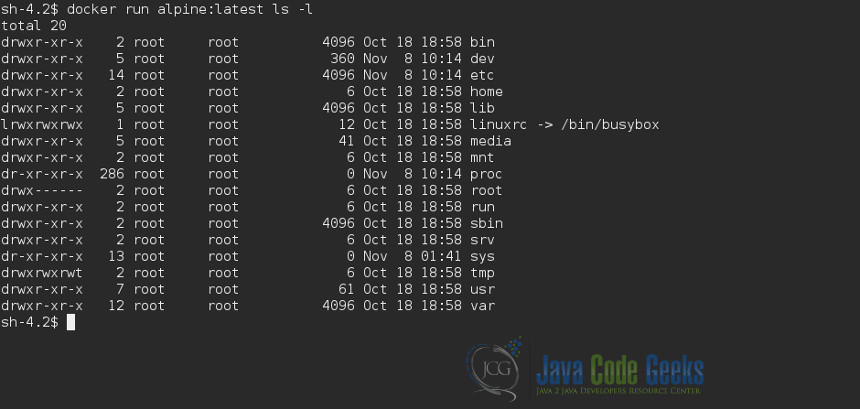
So we spawned a new container out of the alpine image and ran the command ls -l within this container. What you see is the output of this command within the virtual environment provided by the container. By using the docker info command we can see that the number of containers has increased by 1.
Specifically, we see from the above output that the number of stopped containers has increased by 1. That is because when we spawned a new container above from the Alpine image, a new container was created and then the ls -l command was run and then the container was stopped. We can see all containers that are created by the docker ps command like so

From above, there is now one container created from the Alpine image and it has exited now.
Now let us see what happens if we use the same Alpine image to run another command in a container.
$ docker run alpine:latest echo "hello world"
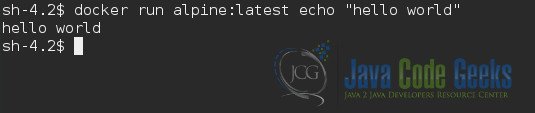
“hello world” was printed as instructed. But let us see how many containers are present now
$ docker ps --all

We can see that Docker created a new container from the same image to execute the new command. So Docker spawns a new container from an image for every operation unless we explicitly ask it to use the same container to execute different commands.
Now let us try to understand more about the Docker image we created
$ docker inspect alpine:latest
[
    {
        "Id": "sha256:baa5d63471ead618ff91ddfacf1e2c81bf0612bfeb1daf00eb0843a41fbfade3",
        "RepoTags": [
            "alpine:latest"
        ],
        "RepoDigests": [
            "alpine@sha256:1354db23ff5478120c980eca1611a51c9f2b88b61f24283ee8200bf9a54f2e5c"
        ],
        "Parent": "",
        "Comment": "",
        "Created": "2016-10-18T20:31:22.321427771Z",
        "Container": "1d811a9194c47475510bc53700001c32f2b0eb8e3aca0914c5424109c0cd2056",
        "ContainerConfig": {
            "Hostname": "1d811a9194c4",
            "Domainname": "",
            "User": "",
            "AttachStdin": false,
            "AttachStdout": false,
            "AttachStderr": false,
            "Tty": false,
            "OpenStdin": false,
            "StdinOnce": false,
            "Env": [
                "PATH=/usr/local/sbin:/usr/local/bin:/usr/sbin:/usr/bin:/sbin:/bin"
            ],
            "Cmd": [
                "/bin/sh",
                "-c",
                "#(nop) ADD file:7afbc23fda8b0b3872623c16af8e3490b2cee951aed14b3794389c2f946cc8c7 in / "
            ],
            "Image": "",
            "Volumes": null,
            "WorkingDir": "",
            "Entrypoint": null,
            "OnBuild": null,
            "Labels": null
        },
        "DockerVersion": "1.12.1",
        "Author": "",
        "Config": {
            "Hostname": "1d811a9194c4",
            "Domainname": "",
            "User": "",
            "AttachStdin": false,
            "AttachStdout": false,
            "AttachStderr": false,
            "Tty": false,
            "OpenStdin": false,
            "StdinOnce": false,
            "Env": [
                "PATH=/usr/local/sbin:/usr/local/bin:/usr/sbin:/usr/bin:/sbin:/bin"
            ],
            "Cmd": null,
            "Image": "",
            "Volumes": null,
            "WorkingDir": "",
            "Entrypoint": null,
            "OnBuild": null,
            "Labels": null
        },
        "Architecture": "amd64",
        "Os": "linux",
        "Size": 4799225,
        "VirtualSize": 4799225,
        "GraphDriver": {
            "Name": "devicemapper",
            "Data": {
                "DeviceId": "7",
                "DeviceName": "docker-253:3-135839549-8cb0423f038b9f8d5f1b1a28bc13ba1a32ec373994d46b41b299774aa15e2b12",
                "DeviceSize": "10737418240"
            }
        },
        "RootFS": {
            "Type": "layers",
            "Layers": [
                "sha256:011b303988d241a4ae28a6b82b0d8262751ef02910f0ae2265cb637504b72e36"
            ]
        }
    }
]
That is a lot of information we get about the image there. We will not discuss them in detail here but you can see that the image id, tag, and time-stamp of creation are obvious there. Any containers created from this image are listed next with details of that container. The Docker version used and the Author of the image are also listed. Then follow further details of the image, its architecture of the virtual hosting environment, and finally the emulated root file-system for that image.
Now let us try to understand more about the container we created from this image. Let us see what all containers we have at present.
$ docker ps --all

We see that the containers adoring_bell and desperate_poincare is based on the image alpine:latest. Let us see the metadata of this container more.
$ docker inspect adoring_bell
[
    {
        "Id": "c1631bed732bac64355c652ef0b82876b5c7c8a89c3dfe45a4155e1148d5e46b",
        "Created": "2016-11-08T10:38:04.90010304Z",
        "Path": "echo",
        "Args": [
            "hello world"
        ],
        "State": {
            "Status": "exited",
            "Running": false,
            "Paused": false,
            "Restarting": false,
            "OOMKilled": false,
            "Dead": false,
            "Pid": 0,
            "ExitCode": 0,
            "Error": "",
            "StartedAt": "2016-11-08T10:38:05.582857658Z",
            "FinishedAt": "2016-11-08T10:38:05.610419062Z"
        },
        "Image": "sha256:baa5d63471ead618ff91ddfacf1e2c81bf0612bfeb1daf00eb0843a41fbfade3",
        "ResolvConfPath": "/home/hariharan/work/docker-home/containers/c1631bed732bac64355c652ef0b82876b5c7c8a89c3dfe45a4155e1148d5e46b/resolv.conf",
        "HostnamePath": "/home/hariharan/work/docker-home/containers/c1631bed732bac64355c652ef0b82876b5c7c8a89c3dfe45a4155e1148d5e46b/hostname",
        "HostsPath": "/home/hariharan/work/docker-home/containers/c1631bed732bac64355c652ef0b82876b5c7c8a89c3dfe45a4155e1148d5e46b/hosts",
        "LogPath": "/home/hariharan/work/docker-home/containers/c1631bed732bac64355c652ef0b82876b5c7c8a89c3dfe45a4155e1148d5e46b/c1631bed732bac64355c652ef0b82876b5c7c8a89c3dfe45a4155e1148d5e46b-json.log",
        "Name": "/adoring_bell",
        "RestartCount": 0,
        "Driver": "devicemapper",
        "MountLabel": "",
        "ProcessLabel": "",
        "AppArmorProfile": "",
        "ExecIDs": null,
        "HostConfig": {
            "Binds": null,
            "ContainerIDFile": "",
            "LogConfig": {
                "Type": "json-file",
                "Config": {}
            },
            "NetworkMode": "default",
            "PortBindings": {},
            "RestartPolicy": {
                "Name": "no",
                "MaximumRetryCount": 0
            },
            "AutoRemove": false,
            "VolumeDriver": "",
            "VolumesFrom": null,
            "CapAdd": null,
            "CapDrop": null,
            "Dns": [],
            "DnsOptions": [],
            "DnsSearch": [],
            "ExtraHosts": null,
            "GroupAdd": null,
            "IpcMode": "",
            "Cgroup": "",
            "Links": null,
            "OomScoreAdj": 0,
            "PidMode": "",
            "Privileged": false,
            "PublishAllPorts": false,
            "ReadonlyRootfs": false,
            "SecurityOpt": null,
            "UTSMode": "",
            "UsernsMode": "",
            "ShmSize": 67108864,
            "Runtime": "runc",
            "ConsoleSize": [
                0,
                0
            ],
            "Isolation": "",
            "CpuShares": 0,
            "Memory": 0,
            "CgroupParent": "",
            "BlkioWeight": 0,
            "BlkioWeightDevice": null,
            "BlkioDeviceReadBps": null,
            "BlkioDeviceWriteBps": null,
            "BlkioDeviceReadIOps": null,
            "BlkioDeviceWriteIOps": null,
            "CpuPeriod": 0,
            "CpuQuota": 0,
            "CpusetCpus": "",
            "CpusetMems": "",
            "Devices": [],
            "DiskQuota": 0,
            "KernelMemory": 0,
            "MemoryReservation": 0,
            "MemorySwap": 0,
            "MemorySwappiness": -1,
            "OomKillDisable": false,
            "PidsLimit": 0,
            "Ulimits": null,
            "CpuCount": 0,
            "CpuPercent": 0,
            "IOMaximumIOps": 0,
            "IOMaximumBandwidth": 0
        },
        "GraphDriver": {
            "Name": "devicemapper",
            "Data": {
                "DeviceId": "11",
                "DeviceName": "docker-253:3-135839549-71e94f8b4e5e1af0b31889245ea0d2ffa54c68e6991399d0438f473846f701cc",
                "DeviceSize": "10737418240"
            }
        },
        "Mounts": [],
        "Config": {
            "Hostname": "c1631bed732b",
            "Domainname": "",
            "User": "",
            "AttachStdin": false,
            "AttachStdout": true,
            "AttachStderr": true,
            "Tty": false,
            "OpenStdin": false,
            "StdinOnce": false,
            "Env": [
                "PATH=/usr/local/sbin:/usr/local/bin:/usr/sbin:/usr/bin:/sbin:/bin"
            ],
            "Cmd": [
                "echo",
                "hello world"
            ],
            "Image": "alpine:latest",
            "Volumes": null,
            "WorkingDir": "",
            "Entrypoint": null,
            "OnBuild": null,
            "Labels": {}
        },
        "NetworkSettings": {
            "Bridge": "",
            "SandboxID": "27ee3cf100495a82743f1ec700195a4e560a04e0164a65976774ea23bb515450",
            "HairpinMode": false,
            "LinkLocalIPv6Address": "",
            "LinkLocalIPv6PrefixLen": 0,
            "Ports": null,
            "SandboxKey": "/var/run/docker/netns/27ee3cf10049",
            "SecondaryIPAddresses": null,
            "SecondaryIPv6Addresses": null,
            "EndpointID": "",
            "Gateway": "",
            "GlobalIPv6Address": "",
            "GlobalIPv6PrefixLen": 0,
            "IPAddress": "",
            "IPPrefixLen": 0,
            "IPv6Gateway": "",
            "MacAddress": "",
            "Networks": {
                "bridge": {
                    "IPAMConfig": null,
                    "Links": null,
                    "Aliases": null,
                    "NetworkID": "efd29ba943ae4030c14b6e88fda502ff260a490ae5d264e9626d3882d7358195",
                    "EndpointID": "",
                    "Gateway": "",
                    "IPAddress": "",
                    "IPPrefixLen": 0,
                    "IPv6Gateway": "",
                    "GlobalIPv6Address": "",
                    "GlobalIPv6PrefixLen": 0,
                    "MacAddress": ""
                }
            }
        }
    }
]
There is a wealth of info there. We will not get into the details but discuss it overall here. The first 5 entries give the container id, time-stamp at container creation, the command sent to the container at the start (echo “hello world”), and the current state of the container (it has exited now). Next follows the details of the image from which the container was spawned and where it is mapped into the local file system. The container name assigned is seen (adoring_bell). Then follows the various details of the emulated virtual environments – the virtual networks, virtual mount points, etc.,
7. Summary
We covered some very basic understanding of what a Docker container is in this post. We were introduced to the concept of OS-level virtualization and a software container. Then we covered some basic commands to download Docker images and spawn new containers from the image. Later we covered some commands to inspect the metadata that Docker holds about itself, the images, and the containers.
Last updated on Jan. 31st, 2022
