1. Introduction
This example introduces how to create a Docker container and connect to it. The previous posts discussed creating basic Hello World containers and understanding your Docker installations. This post carries it further to talk about working with containers. This post assumes that you have a working Docker installation. Let’s start
2. Understanding Docker container and image
A Docker container is based on a Docker image. A Docker image is based on a definition provided in a Dockerfile. Consider a Docker image as a read-only snapshot of a Docker Container. The Docker container adds a writable file-system layer on top of a Docker image to make the container usable. Let us understand this a little bit more by examining the official openjdk version 8u111 Docker image. What does its Dockerfile say?
openjdk/8-jdk/Dockerfile (Removed comments from original file for brevity)
FROM buildpack-deps:jessie-scm

RUN apt-get update && apt-get install -y --no-install-recommends \
		bzip2 \
		unzip \
		xz-utils \
	&& rm -rf /var/lib/apt/lists/*

RUN echo 'deb http://deb.debian.org/debian jessie-backports main' > /etc/apt/sources.list.d/jessie-backports.list

ENV LANG C.UTF-8

RUN { \
		echo '#!/bin/sh'; \
		echo 'set -e'; \
		echo; \
		echo 'dirname "$(dirname "$(readlink -f "$(which javac || which java)")")"'; \
	} > /usr/local/bin/docker-java-home \
	&& chmod +x /usr/local/bin/docker-java-home

ENV JAVA_HOME /usr/lib/jvm/java-8-openjdk-amd64

ENV JAVA_VERSION 8u111
ENV JAVA_DEBIAN_VERSION 8u111-b14-2~bpo8+1

ENV CA_CERTIFICATES_JAVA_VERSION 20140324

RUN set -x \
	&& apt-get update \
	&& apt-get install -y \
		openjdk-8-jdk="$JAVA_DEBIAN_VERSION" \
		ca-certificates-java="$CA_CERTIFICATES_JAVA_VERSION" \
	&& rm -rf /var/lib/apt/lists/* \
	&& [ "$JAVA_HOME" = "$(docker-java-home)" ]

RUN /var/lib/dpkg/info/ca-certificates-java.postinst configure
Docker builds an image in layers. To understand this, pull the openjdk image locally and see what Docker does.
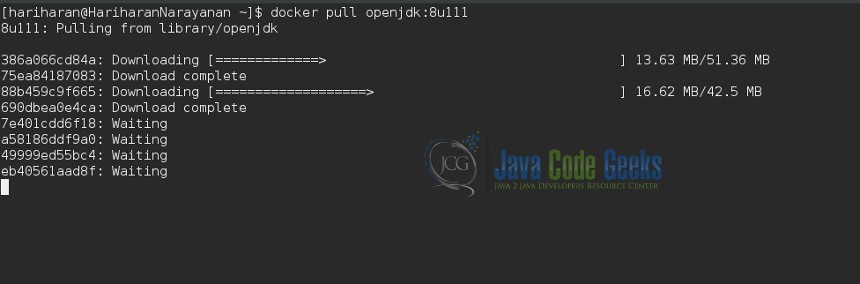
From the above image, it can be seen that Docker pulled the image in several layers. You can explore what goes into each of these layers by using docker history command
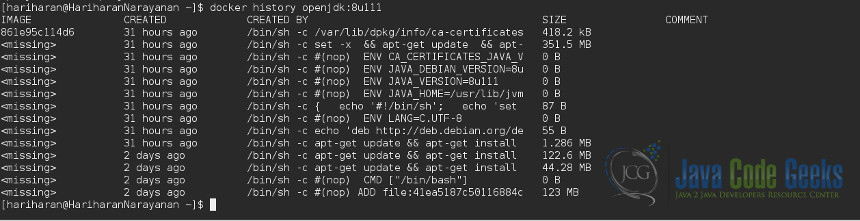
What do you see? The openjdk:8u111 image has 14 layers. These layers are listed in the below table. The details for these layers can be also be seen at Dockerhub
| Dockerfile line | Produces layer | Sized |
|---|---|---|
FROM buildpack-deps:jessie-scm | ADD file:41ea5187c50116884c38d9ec51d920d79cfaeb2a61c52e07a97f457419a10a4f in / | 123 mb |
CMD ["/bin/bash"] | 0 b | |
RUN apt-get update && apt-get install -y --no-install-recommends \ | /bin/sh -c apt-get update && apt-get install -y --no-install-recommends ca-certificates curl wget && rm -rf /var/lib/apt/lists/* | 44.28 mb |
/bin/sh -c apt-get update && apt-get install -y --no-install-recommends bzr git mercurial openssh-client subversion procps && rm -rf /var/lib/apt/lists/* | 122.6 mb | |
/bin/sh -c apt-get update && apt-get install -y --no-install-recommends bzip2 unzip xz-utils && rm -rf /var/lib/apt/lists/* | 1.286 mb | |
RUN echo 'deb http://deb.debian.org/debian jessie-backports main' > /etc/apt/sources.list.d/jessie-backports.list | /bin/sh -c echo 'deb http://deb.debian.org/debian jessie-backports main' > /etc/apt/sources.list.d/jessie-backports.list | 0 b |
ENV LANG C.UTF-8 | ENV LANG C.UTF-8 | 0 b |
RUN { \ | /bin/sh -c { echo '#!/bin/sh'; echo 'set -e'; echo; echo 'dirname "$(dirname "$(readlink -f "$(which javac || which java)")")"'; } > /usr/local/bin/docker-java-home && chmod +x /usr/local/bin/docker-java-home | 87 b |
ENV JAVA_HOME /usr/lib/jvm/java-8-openjdk-amd64 | ENV JAVA_HOME=/usr/lib/jvm/java-8-openjdk-amd64 | 0 b |
ENV JAVA_VERSION 8u111 | ENV JAVA_VERSION=8u111 | 0 b |
ENV JAVA_DEBIAN_VERSION 8u111-b14-2~bpo8+1 | ENV JAVA_DEBIAN_VERSION=8u111-b14-2~bpo8+1 | 0 b |
ENV CA_CERTIFICATES_JAVA_VERSION 20140324 | ENV CA_CERTIFICATES_JAVA_VERSION=20140324 | 0 b |
RUN set -x \ | /bin/sh -c set -x && apt-get update && apt-get install -y openjdk-8-jdk="$JAVA_DEBIAN_VERSION" ca-certificates-java="$CA_CERTIFICATES_JAVA_VERSION" && rm -rf /var/lib/apt/lists/* && [ "$JAVA_HOME" = "$(docker-java-home)" ] | 351.5 mb |
RUN /var/lib/dpkg/info/ca-certificates-java.postinst configure | /bin/sh -c /var/lib/dpkg/info/ca-certificates-java.postinst configure | 418.2 kb |
So you see how Docker creates layers for every image that you create or pull. Let us see how to create a Docker container and learn further about the containers-and-images story
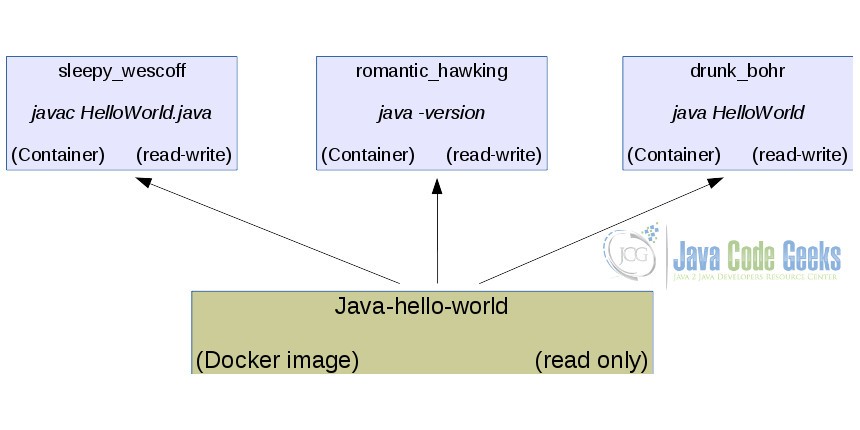
3. Start a new Docker container from a new image
A new Docker image is created using a Dockerfile. As an example, let us create a new Docker image from the openjdk image we pulled earlier. We will create a Dockerfile that will setup a Helloworld class and execute it. This is the Dockerfile.
FROM openjdk:8u111
COPY . /usr/src/hello-world
WORKDIR /usr/src/hello-world
RUN javac HelloWorld.java
CMD ["java", "HelloWorld"]
Next create a image from this Dockerfile and examine how many new layers are created.
$ docker build -t java-hello-world .
$ docker history java-hello-world:latest
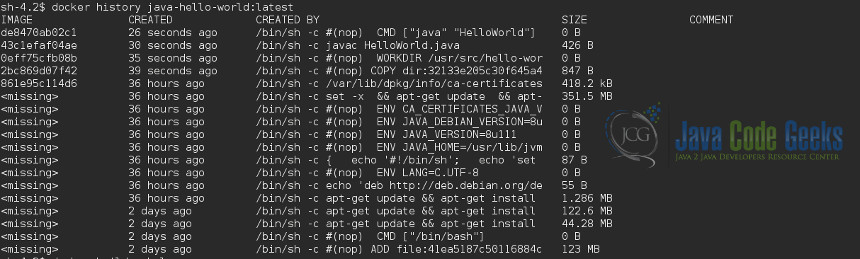
As can be seen 4 more layers have been added to the previous openjdk:latest image. Execute a few commands using the java-hllo-world:latest image and finally see what containers are created.
$ docker run java-hello-world:latest
$ docker run java-hello-world:latest javac HelloWorld.java
$ docker run java-hello-world:latest java -version
$ docker ps --all

We see that for every invocation of the openjdk:latest image there is a new container created.
Next, we will see next how to connect to a running container.
4. Connect to an existing Docker container
In the previous section we saw that Docker creates a new container for every new command that we execute using an image. But this need not be so. One can also connect to an existing container provided that the container is running. A container gows into stopped state once it is done executing the command it was assigned either through the CMD command in Dockerfile or through a command given through docker exec. So how can we create a Docker container that will remain in running state?
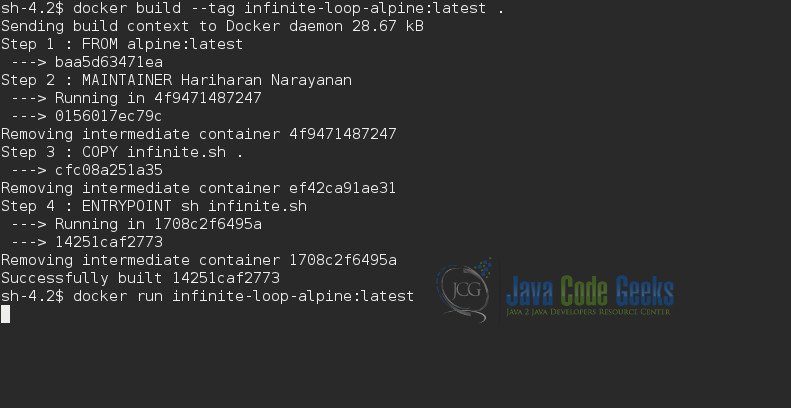
4.1 Create a Docker container that will remain in running state
A Docker container executing a server-side component will always remain in running state. For a simple example, create a Docker container that runs a infinite loop so it remains in running state forever (or until explicitly stopped). Create a new folder and write the code below in that folder.
For that, we write a simple shell script – infinite.sh – that runs an infinite loop like so
#!/bin/sh
#infinite.sh
i=0
while [ 1 ]; do
    i=1
done
Write a simple Dockerfile – called Dockerfile of course – that uses this script
FROM alpine:latest
COPY infinite.sh .
ENTRYPOINT ["sh", "infinite.sh"]
Build a Docker image from this Dockerfile next
$ docker build --tag infinite-loop-alpine:latest .
You may use the docker images to verify that the image infinite-loop-alpine:latest is created. Run the image now to see that it creates a perpetually running container
$ docker run infinite-loop-alpine:latest
If it ran fine, the above command must lock the terminal in a foreground task. You can check if the command succeeded by checking the running containers in a new terminal
$ docker ps

To run the container as a background task instead, it must be started as a daemon. This is how it can be done
$ docker run --detach infinite-loop-alpine:latest
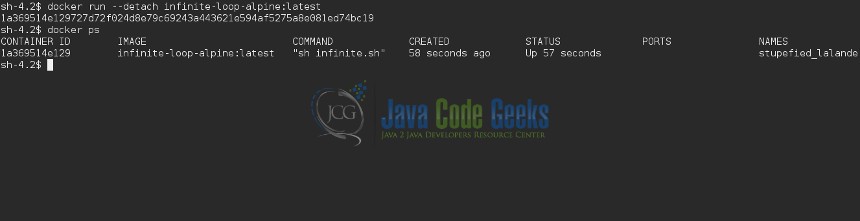
Notice that calling docker run like this does not lock the terminal anymore.
4.2 Connect to the daemon container
Connecting to a running container is simple. Use the docker exec command for this like below
$ docker exec --interactive --tty stupefied_lalande /bin/sh
--interactive opens an interactive STDIN input to the container
--tty opens a terminal to the container
nauseous_wing is the name of the container to connect to
/bin/sh is the command to be executed once connected to the container
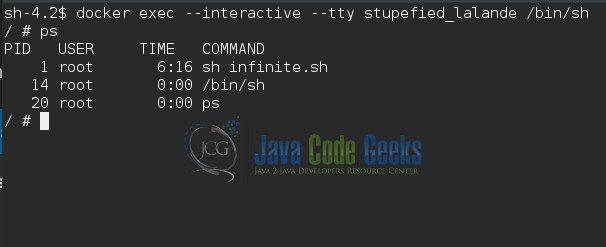
You can see that a new shell has opened to the container. Running ps on the prompt will show that the script infinite.sh is already running with PID 1. This shall always remain the primary process since it is specified in the Dockerfile through the CMD command. A new shell process /bin/sh is also added due the docker exec command above apart from the ps command of course
This is how one connects to a running container using the Docker CLI. There are other ways too, like docker-compose for instance, which we will probably explore in more detail in another post
5. Summary
In this example we understood the concepts behind how Docker spawns containers from an image. Later we saw how we can create a container and run it in the background so that we can connect to it whenever needed
