Welcome readers, in this tutorial, we will show how to deploy multiple Spring Boot Microservices on Docker.
1. Introduction
Before starting the tutorial, we will make an introduction to Spring Boot and Docker.
1.1 Spring Boot introduction
- Spring boot is a module that provides rapid application development feature to the spring framework including auto-configuration, standalone-code, and production-ready code
- It creates applications that are packaged as jar and are directly started using embedded servlet container (such as Tomcat, Jetty or Undertow). Thus, no need to deploy the war files
- It simplifies the maven configuration by providing the starter template and helps to resolve the dependency conflicts. It automatically identifies the required dependencies and imports them in the application
- It helps in removing the boilerplate code, extra annotations, and XML configurations
- It provides a powerful batch processing and manages the rest endpoints
- It provides an efficient JPA-starter library to effectively connect the application with the relational databases
- It offers a Microservice architecture and cloud configuration that manages all the application related configuration properties in a centralized manner
1.2 Docker introduction
In the present world, Docker is an important term,
- Often used in CI/CD platform that packages and runs the application with its dependencies inside a container
- Is a standard for Linux Containers
- A Container is a runtime that runs under any Linux kernel and provides a private machine-like space under Linux
1.2.1 Docker Terminology
- Image: Representation of Docker container i.e. a JAR or WAR file in Java
- Container: Runtime of Docker i.e. a deployed and running Docker image. For example, an executable Spring Boot jar
- Engine: The code that manages, creates and runs the Docker containers
- Hub: A public developers registry to distribute their code
- Repository: A collection of Docker related images i.e. different versions of the same application
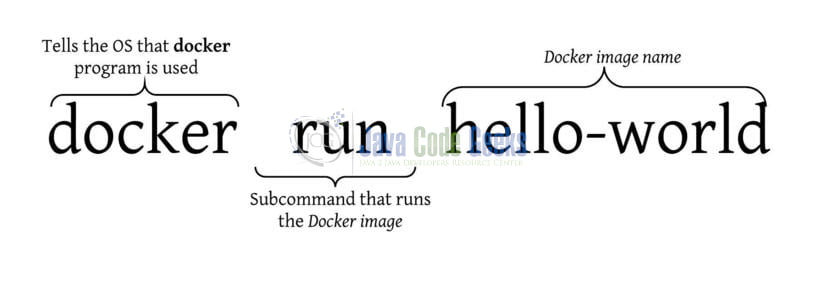
1.2.2 Docker Command Basics
Here’s an example command.
1.2.3 Need for using Docker
- For environment replication, while the code runs locally on the machine
- For numerous deployment phases i.e. Dev/Test/QA
- For version control and distributing the application’s OS within a team
1.2.4 Setting up Docker
If someone needs to go through the Docker installation, please watch this video.
To start with this tutorial, we are hoping that users at present know the basis of a Spring boot application and have the Docker environment installed on a Windows operating system.
2. Deploying Multiple Spring Boot Microservices to Docker
In this tutorial, we will use the existing microservices implemented under the tutorial present at this javacodegeek tutorial. Since both the microservices are the same and have a different port number so we will point out the required differences to be made. Or, readers have the easy option to download the source code from the project download section. Let us start building our microservices!
2.1 Maven Dependency
In the microservices pom.xml file we will remove the dependencies like – spring-cloud-starter-sleuth, spring-cloud-starter-sleuth and the following dependency to the build section so that during the project packaging all the required jars are available to the microservice. This is an essential step once the application is deployed on the Docker environment.
pom.xml
1 2 3 4 5 6 7 8 | <!-- To make spring boot as a fat jar so that all required jar files and main file is added for running the code from Docker. --><plugins> <plugin> <groupId>org.springframework.boot</groupId> <artifactId>spring-boot-maven-plugin</artifactId> </plugin></plugins> |
2.2 Changing the RestTemplate URL in Microservice1
As these microservices will be deployed on two different docker containers so for inter-communication from Microservice1 to Microservice2, we’ll make a quick change in the RestTemplate URL. Head over to the Microservice1 controller class and replace the existing URL on line #29 with the one given below.
Microservice1 Controller class
1 |
2.3 Adding the Dockerfile
This is an important part where we will add the Dockerfile to the project’s root folder. This is required so that we can make a Docker image for our microservices which will be used later to deploy on the Docker container.
Dockerfile for Microservice1
1 2 3 | From openjdk:8copy ./target/Microservice1.jar Microservice1.jarCMD ["java","-jar","Microservice1.jar"] |
Similarly, we will create a Dockerfile for Microservice2.
Dockerfile for Microservice2
1 2 3 | From openjdk:8copy ./target/Microservice2.jar Microservice2.jarCMD ["java","-jar","Microservice2.jar"] |
3. Docker Actions
Open the command prompt terminal and let us execute the below Docker commands.
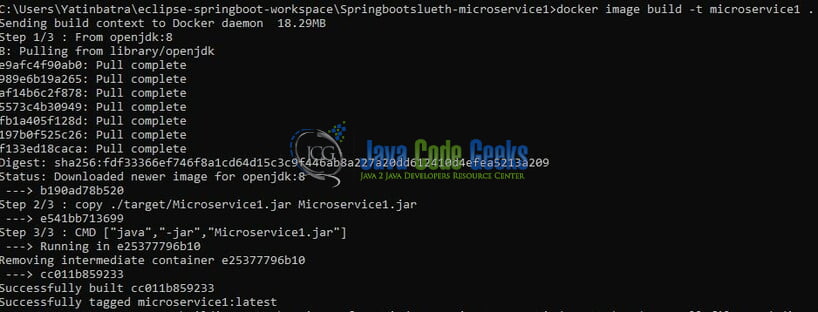
3.1 Creating a Docker image for Microservice1
To create a Docker image for Microservice1, navigate to the project folder. Once there hit the following command to successfully create an image as shown in Fig. 2.
Docker Image build command
1 2 | ## Building docker image for microservice1docker image build -t microservice1 . |
If everything goes well, the following output image will be shown.
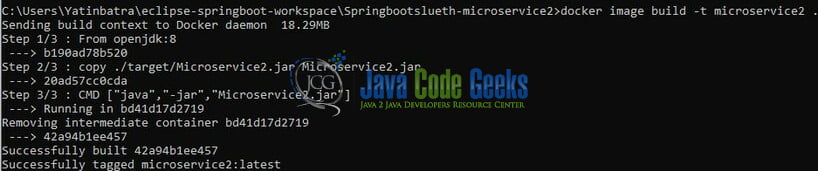
3.2 Creating Docker images for Microservice2
To create a Docker image for Microservice2, navigate to the project folder. Once there hit the following command to successfully create an image as shown in Fig. 3.
Docker Image build command
1 2 | ## Building docker image for microservice2docker image build -t microservice2 . |
If everything goes well, the following output image will be shown.
3.3 Creating Docker Bridge network
To support the inter-communication between two different docker containers we’ll need to create a new bridge-type docker network. If the developer needs to understand the Docker network they can refer to the tutorial available at this javacodegeek link.
Creating a new Docker network
1 2 3 | ## Creating a bridge docker network for inter-networking communication between the two microservices## Use "docker network ls" to verify that the new network is created successfullydocker network create microservice1-microservice2 |
If everything goes well, the following output image will be shown. Readers can also use the docker inspect …… to verify that newly created network.

3.4 Starting the Docker containers
In this step, we will start the Docker containers (for the docker images created above) on the new bridge network (i.e. microservice1-microservice2).
Starting Docker containers
## Starting docker container on the bridge network created
### Running the microservice1 on a docker container and exposing port 10091 as
### spring boot application is running on the port number- 10091
docker container run --network microservice1-microservice2 --name microservice1 -p 10091:10091 -d microservice1

### Running the microservice2 on a docker container and exposing port 10092 as
### spring boot application is running on the port number- 10092
docker container run --network microservice1-microservice2 --name microservice2 -p 10092:10092 -d microservice2
If everything goes well, developers can use the docker ps -a to verify that both the docker containers are successfully started.
4. Project Demo
Once the microservices are successfully started on the Docker network, developers need to open the browser of their choice and hit the following application URL.
Application URL
http://localhost:10091/microservice1
Once the hit this tutorial, the request will go to the HTTP GET method of microservice1 controller which in turn will forward this request to the HTTP GET method of microservice2 controller. This request flow implies that the request coming to microservice1 is dependent on microservice2 which in turn is responsible to provide a successful response or an error in case any exception occurs at the microservice2 during the request processing. If everything goes well, the below response will be shown to the user.

That is all for this tutorial and I hope the article served you whatever you were looking for. In case the readers do not get a response they will hit the docker logs <container_id> command on the docker terminate to keep an eye on the container logs. Happy Learning and do not forget to share!
5. Summary
In the above sections, we learned the following:
- Introduction to Spring Boot and Docker
- Simple Spring boot application set up and deploy on Docker containers
As the clarity of some demo images is blurry due to the size limitations, so readers can download the high-resolution images from the download section. Developers can download the sample application from the Download section.
6. Download the Project
This was a tutorial of Deploying Multiple Spring Boot Microservices to Docker.
You can download the full source code of this example here: Deploying Multiple Spring Boot Microservices to Docker
