Deploying a simple Spring Boot application on Docker
Welcome readers, in this tutorial, we will discuss how to deploy a simple Spring Boot application on Docker.
1. Introduction to Docker
In the present world, Docker is an important term,
- Often used in CI/CD platform that packages and runs the application with its dependencies inside a container
- Is a standard for Linux Containers
- A Container is a runtime that runs under any Linux kernel and provides a private machine-like space under Linux
1.1 Docker Terminology
- Image: Representation of Docker container i.e. a JAR or WAR file in Java
- Container: Runtime of Docker i.e. a deployed and running Docker image. For example, an executable Spring Boot jar
- Engine: The code that manages, creates and runs the Docker containers
- Hub: A public developers registry to distribute their code
- Repository: A collection of Docker related images i.e. different versions of the same application
1.2 Docker Command Basics
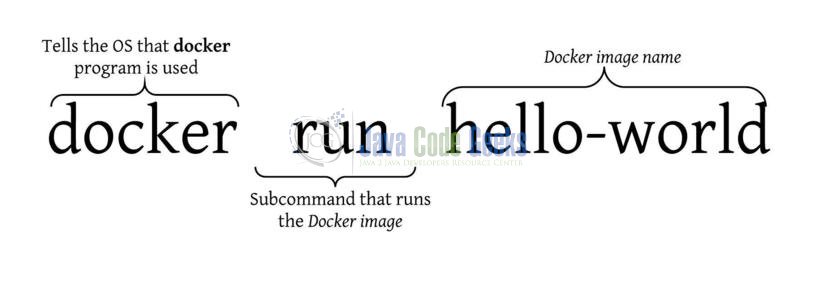
Here’s an example command.

1.3 Need for using Docker
- For environment replication, while the code runs locally on the machine
- For numerous deployment phases i.e. Dev/Test/QA
- For version control and distributing the application’s OS within a team
1.4 Setting up Docker
If someone needs to go through the Docker installation, please watch this video.
To start with this tutorial, we are hoping that users at present know how to create a simple hello-world spring-boot application.
2. Deploying a simple Spring Boot application on Docker
2.1 Application pre-requisite
To deploy a Spring Boot application on Docker, developers need to ensure that they add/have the following plugin to the application’s pom.xml file.
1 2 3 4 5 6 7 8 | <!-- To make spring boot as a fat jar so that all required jar files and main file is added for running the code from Docker. --><plugins> <plugin> <groupId>org.springframework.boot</groupId> <artifactId>spring-boot-maven-plugin</artifactId> </plugin></plugins> |
2.2 Preparing the Dockerfile
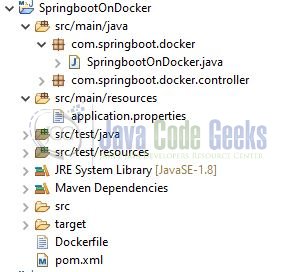
To deploy a Spring Boot application on Docker, it is important to create an image file for our application. To create an image file, we’ll add the Dockerfile in the project’s root directory as shown in the project structure and add the following code to it.

# Pull the centos image from DockerHub repository to build our application as a base
# The centos image will act as a base image
FROM centos

# Installing java to our image
RUN yum install -y java

# Creating a temporary directory
VOLUME /tmp

# Steps to run the spring boot application
# Copy the application’s jar from target directory and name it
ADD ./target/SpringbootOnDocker.jar myapp.jar
RUN sh -c 'touch /myapp.jar'
ENTRYPOINT ["java","-Djava.security.egd=file:/dev/./urandom","-jar","/myapp.jar"]
2.3 Build the image
Open the terminal and navigate to the project directory and execute the below commands to build the application and the image.
# To prepare the jar package for the application
> mvn clean install

# To prepare the image with a name
> docker build -t jcgassignment .
If everything goes well, the image will be created. We can use the docker images command to list the newly created image as shown in Fig. 3.

2.4 Starting the Docker container
Now we can run the below command to start the container and can hit the application url (http://localhost:9099/) as shown in Fig. 4.
docker run -d -p 9099:9099 jcgassignment

Try out these commands in your development environment to practice and learn.
3. Conclusion
That is all for this tutorial and I hope the tutorial will help you understand the basic commands to deploy a Spring Boot application on Docker. Happy learning and do not forget to share!
4. Download the source code
You can download the full source code of this example here: Deploying a simple Spring Boot application on Docker


