The article will feature a comprehensive tutorial on how to implement machine learning use cases with Apache Spark.
Table Of Contents
1. What is Apache Spark ?

Apache Spark is a unified analytics engine for large scale data processing. It is based on Hadoop MapReduce and it extends the MapReduce model to efficiently use it for more types of computations, which includes interactive queries and stream processing. Spark provides an interface for programming entire clusters with implicit data parallelism and fault tolerance.
It was originally developed at the University of California, Berkeley’s AMPLab and the Spark codebase was later donated to the Apache Software Foundation, which has maintained it since. For more detailed explanation and tutorial, check out the official website.
1.1 Features of Apache Spark
In this section, we will go through some of the striking features of Apache Spark.
- Speed − Spark helps to run an application in Hadoop cluster, up to 100 times faster in memory, and 10 times faster when running on disk for both batch and streaming data, using a state-of-the-art DAG scheduler, a query optimizer, and a physical execution engine. This is possible by reducing number of read/write operations to disk. It stores the intermediate processing data in memory.
- Supports multiple languages − Spark provides built-in APIs in Java, Scala, or Python. Therefore, you can write applications in different languages. Spark comes up with 80 high-level operators for interactive querying.
- Advanced Analytics − Spark not only supports ‘Map’ and ‘reduce’. It also supports SQL queries, Streaming data, Machine learning (ML), and Graph algorithms.
- Runs Everywhere – Spark runs on Hadoop, Apache Mesos, Kubernetes, standalone, or in the cloud. It can access diverse data sources.
1.2 Components of Spark
Below following are the components of Apache Spark framework.
- Apache Spark Core – Spark Core is the underlying general execution engine for spark platform that all other functionality is built upon. It provides In-Memory computing and referencing datasets in external storage systems.
- Spark SQL – Spark SQL is a component on top of Spark Core that introduces a new data abstraction called SchemaRDD, which provides support for structured and semi-structured data.
- Spark Streaming – Spark Streaming leverages Spark Core’s fast scheduling capability to perform streaming analytics. It ingests data in mini-batches and performs RDD (Resilient Distributed Datasets) transformations on those mini-batches of data.
- MLlib (Machine Learning Library) – MLlib is a distributed machine learning framework above Spark because of the distributed memory-based Spark architecture. It is, according to benchmarks, done by the MLlib developers against the Alternating Least Squares (ALS) implementations. Spark MLlib is nine times as fast as the Hadoop disk-based version of Apache Mahout (before Mahout gained a Spark interface).
- GraphX – GraphX is a distributed graph-processing framework on top of Spark. It provides an API for expressing graph computation that can model the user-defined graphs by using Pregel abstraction API. It also provides an optimized runtime for this abstraction.
1.3. Data processing with Spark
Spark help us execute jobs in parallel across different nodes in a cluster and then combine those results in one single result/response. It transforms our collection of data into a collection of elements distributed across nodes of the cluster called an RDD (resilient distributed dataset). For example, in a Java program, we can transform a collection into an RDD capable of parallel operations.
Parallel collections are cut into partitions and Spark executes one task per partition, so we want to have two to four partitions per CPU. We can control the number of partitions Spark created by defining another argument to the method with sc.parallelize(collection,partitionNumber). Besides collections coming from the application, Spark is also capable of transforming data from the storage source supported by Hadoop, including your local file system, HDFS, Cassandra, HBase, and Amazon S3.
After our data is transformed to an RDD, we can perform two kinds of parallel operations on cluster nodes. The transforming operation takes an RDD collection as input and returns a new RDD collection, like maps and actions, which take an RDD and return a single result like reduce, count, etc. Regardless of the type, actions are lazy, similar to Java 8 in the way that they do not run when defined but rather when requested. So, we can have an operation calculated several times when requested, and to avoid that, we can persist in memory or cache.
2. Apache Spark Machine Learning
2.1 MLLib
MLlib is Spark’s machine learning (ML) library. It provided several ready-to-use ML tools like:
- ML algorithms
- Classification
- Regression
- Clustering
- Collaborative filtering
- Featurization
- Feature extraction
- Transformation
- Dimensionality reduction
- Selection
- Utilities
- Linear algebra
- Statistics
- Data handling
2.2 Anomaly Detection with Apache Spark
Anomaly detection in the given dataset is one of the common use cases in Machine learning. In the below example, we would use Apache spark MLib to detect anomalies in banking transactions. We would use the synthetic dataset generated using the simulator called PaySim. We will using 5 lakhs financial transaction record data from the dataset to run our experiment. The dataset is made available as allData.csv under the data directory of the application.
2.2.1 Data preparation
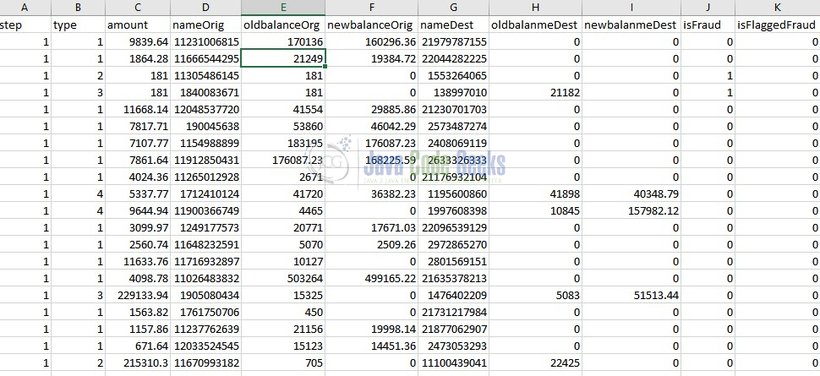
Prior to executing our anomaly detection algorithm on the dataset, the dataset needs to be prepared in the desired format. Below is how the data looks like.

All the data needs to be numbers for the algorithm. So the characters C, D, or M in the data fields of nameOrig and nameDestare replaced with 1, 2, and 3 respectively. Also, we convert types from chars to numbers like below:
PAYMENT= 1TRANSFER= 2CASH_OUT= 3DEBIT= 4CASH_IN= 5
The data preparation is performed in the following method using the method loadDataFromFile which is specified below.
AlgorithmTemplateExecution.java
 protected JavaRDD loadDataFromFile(JavaSparkContext sc) throws IOException {
        File file = new File(algorithmConfiguration.getFileName());

        return sc.textFile(file.getPath()).
                map(line -> {
                    line = line.replace(TransactionType.PAYMENT.name(), "1")
                            .replace(TransactionType.TRANSFER.name(), "2")
                            .replace(TransactionType.CASH_OUT.name(), "3")
                            .replace(TransactionType.DEBIT.name(), "4")
                            .replace(TransactionType.CASH_IN.name(), "5")
                            .replace("C", "1")
                            .replace("M", "2");
                    String[] split = line.split(",");
                    //skip header
                    if (split[0].equalsIgnoreCase("step")) {
                        return null;
                    }
                    double[] featureValues = Stream.of(split)
                            .mapToDouble(e -> Double.parseDouble(e)).toArray();
                    if (algorithmConfiguration.isMakeFeaturesMoreGaussian()) {
                        FraudDetectionAlgorithmSpark.this.makeFeaturesMoreGaussian(featureValues);
                    }
                    //always skip 9 and 10 because they are labels fraud or not fraud
                    if (featureValues.length > 9) {
                    		double label = featureValues[9];
                    		featureValues = Arrays.copyOfRange(featureValues, 0, 9);
                    		return new LabeledPoint(label, Vectors.dense(featureValues));
                    }
                    return null;
                }).cache();
    }
The above code returns JavaRDD<LabeledPoint> which is the RDD datatype on which Spark MLib executes the algorithm of anomaly detection on.
Post the preparation process for the dataset, the resultant dataset with all numbers look like below.
2.2.2 Execution
Before running anomaly detection algorithm on the dataset, the RDD needs to be filtered based on some of the configurations which are defined in algorithm.properties property file present under the config directory in our project. We can define the transaction types to be included as part of the RDD datatype and the features to be skipped with transactionTypes and skipFeatures properties respectively.
In our example, we are running the anomaly detection algorithm on the datatypes with transaction types of all (PAYMENT, TRANSFER, CASH_OUT, DEBIT, CASH_IN) and none of the features are skipped.
Let’s go with the step by step process of executing the algorithm.
From all the data (five lakh records) we need to randomly choose a percentage for training, cross-validation, and test data. The code that will randomly pick up regular and fraudulent data for a dataset looks like this:
AlgorithmTemplateExecution.java
 GeneratedData trainData = randomlyGenerateData((int) (algorithmConfiguration.getTrainDataNormalPercentage() * totalRegularSize),
                (int) (algorithmConfiguration.getTrainDataFraudPercentage() * totalAnomaliesSize), regular, anomalies, sc);
        setTrainDataSizes(resultsSummary, trainData);

        GeneratedData crossData = randomlyGenerateData((int) (algorithmConfiguration.getCrossDataNormalPercentage() * totalRegularSize),
                (int) (algorithmConfiguration.getCrossDataFraudPercentage() * totalAnomaliesSize), trainData.leftRegular, trainData.leftAnomalies, sc);
        setCrossDataSizes(resultsSummary, crossData);

        setTestDataSizes(resultsSummary, crossData);
And the code for the method randomlyGenerateData is below:
FraudDetectionAlgorithmSpark.java
protected GeneratedData randomlyGenerateData(int normalSize, int fraudSize, JavaRDD regularData, JavaRDD anomalies, JavaSparkContext sparkContext) {

        double weightNormal = normalSize / (double) regularData.count(); // Calculate weight normal
        JavaRDD[] regularSplit = regularData.randomSplit(new double[]{wightNormal, 1 - weightNormal}); // Generate regular split data

        double weightFraud = fraudSize / (double) anomalies.count();// Calculate weight fraud
        JavaRDD[] fraudSplit = new JavaRDD[2];
        if (!Double.isNaN(wightFraud)) {
            fraudSplit = anomalies.randomSplit(new double[]{wightFraud, 1 - wightFraud});
        } else {
            fraudSplit[0] = sparkContext.emptyRDD();
            fraudSplit[1] = sparkContext.emptyRDD();
        }
        return new GeneratedData(regularSplit[0], fraudSplit[0], regularSplit[0].union(fraudSplit[0]), regularSplit[1], fraudSplit[1]);
    }
Next, we will need µ (mean) and σ2 (variance) calculations, as they are crucial to getting the probability of new examples. The code looks like this:
FraudDetectionAlgorithmSpark.java
@Override
protected MultivariateStatisticalSummary getMultivariateSummary(GeneratedData<JavaRDD> trainData) {
    return Statistics.colStats(trainData.regularAndAnomalyData.map(e -> e.features()).rdd());
}
Once we have mean and variance using the Gaussian formula, we can calculate the probability value. Based on the probability value, we decide if it is an anomaly or a regular example. We compare the value with some threshold (epsilon); if it is lower, then we mark it as an anomaly, and if greater, we mark it as regular. Choosing epsilon is crucial, as having small value can cause the algorithm to flag a lot of false fraud. On the other hand, with large values, we can miss fraud. We use cross-validation data with precision and recall to choose best epsilon.
FraudDetectionAlgorithmSpark.java
Double bestEpsilon = findBestEpsilon(sc, crossData, summary);
resultsSummary.setEpsilon(bestEpsilon);
Now, we are ready to evaluate our algorithm on test data (we also do an optional evaluation on cross-validation data)
FraudDetectionAlgorithmSpark.java
 TestResult testResultFromTestData = testAlgorithmWithData(sc, getTestData(crossData), summary, bestEpsilon);
        fillTestDataResults(resultsSummary, testResultFromTestData);

        TestResult testResultFromCrossData = testAlgorithmWithData(sc, crossData.regularAndAnomalyData, summary, bestEpsilon);
        fillCrossDataResults(resultsSummary, testResultFromCrossData);
After the configuration is changed, the application can be run on the Java IDE or in Maven by running:
mvn clean install exec:java
Depending on your machine and configuration, it may take some time (for me, it takes two minutes) for the application to finish. Also, your computer may freeze a bit as, as Spark gets the CPU to 100% at a certain point. Also, expect a lot of memory to be used by the application (2-3 GB for me). You can see the result printed on the console or by looking at folder out/ there will a generated file *.txt with the output. The algorithm is based on randomness, so you can configure it to run several times by tweaking the algorithm configuration and expect one file per each execution.
2.2.3 Experiments and results
When run only for the ALL type and without skipping any columns/features, we get the below following results.
ResultsSummary{

, RUN =0

, successPercentage=0.13333333333333333

, failPercentage=0.8666666666666667

trainRegularSize=326966

, trainFraudSize=0

, trainTotalDataSize=0

, transactionTypes=[ALL]

, timeInMilliseconds=10866

, testNotFoundFraudSize=59

, testFoundFraudSize=7

, testFlaggedAsFraud=846

, testFraudSize=66

, testRegularSize=109418

, testTotalDataSize=109484

, crossFoundFraudSize=25

, crossFlaggedAsFraud=863

, crossNotFoundFraudSize=149

, crossFraudSize=174

, crossRegularSize=108701

, crossTotalDataSize=108875

, totalRegularSize=545085

, totalFraudSize=240

, totalNotFoundFraudSize=208

, totalFoundFraudSize=32

, totalFlaggedAsFraud=1709

, epsilon=-27.183878364633976

, sigma=[0.32073976972789164, 2.1982170717851144, 0.2726045480458537, 67562.02373820347, 2.773195139323955, 2.020762436915761, 85491.49223863179]

, mu=[3.757354184655851, 2.7055565410470717, 3.0061941309455325, 809.3729512607393, 2.1711564547218134, 1.261515567743092, 860.9304121506725]
In the result summary above, the success percentage denotes the percentage of success in detecting anomalies in the given dataset. In our case, the success percentage has come out as ~13% which denotes the percentage of fraudulent transactions for all types by skipping none of the features. We can as well try to run the algorithm for different combinations i.e for different types and different data types to see if the success percentage improves.
3. Conclusion
In this article, we have understood apache spark concepts and got a glimpse of its internals along with its features and working. We have also got to know about the machine learning library of Apache Spark and understood its concepts by building an anomaly detection algorithm for banking transactions and analysed its results.
5. References
- https://spark.apache.org/
- https://www.kaggle.com/ntnu-testimon/paysim1
- https://towardsdatascience.com/a-beginners-guide-to-apache-spark-ff301cb4cd92
- https://dzone.com/articles/java-fraud-detection-with-spark-mlib
4. Download the Source Code
You can download the full source code of this example here: Apache Spark Machine Learning Tutorial
