Nowadays, mobile applications are trending so much that, most of the websites have their Android application. Android made it so simple that one can convert their websites to application or can open web page in their application by using WebView. This tutorial walks you through the concept usage ant its implementation.
Table Of Contents
1. Introduction
An Android web app is an application that uses WebView to render part of the app’s GUI. As name suggests, WebView is a View that displays Web pages. Let’s say you are in Facebook and it shares some link. Instead of opening the link in browser, it uses the WebView component to open the link in the app itself. It is an extension of Android’s View class that allows to display web pages as a part of Activity layout. WebView by default displays only webpage i.e. it does not include features of fully developed web browser like navigation and address bar. There are additional methods used to manually include all the features of a Web browser (managing cookies, history, navigating forward and backward, bookmarks and so on). We will discuss these methods in the next section.
WebView uses Webkit rendering engine to display web pages and includes all of the above methods. To know more about the Webkit check here.
2. Methods & Description
To have a more control over WebView, we can use the following methods defined in the WebView class.
canGoBack()– This method specifies if theWebViewhas a back history item.canGoForward()– This method specifies if theWebViewhas a forward history item.clearHistory()– This method clears up theWebViewforward and backward history.destroy()– This method destroys the internal state ofWebView. It is required not to call any other method of WebView after callingdestroy(), as this might can result in app crash.findAllAsync()– This method finds of instances of the string and highlight them. Works the same way as WebBrowser when we press CTRL+F to look for any String.getsProgress()– This method gets the progress of the current page. It returns the value between 1 and 100.getsTitle()– This method gets the title of the current page.getUrl()– This method gets the URL of the current page.
Signature of above methods
Webview webview = (Webview) findviewbyId(R.id.webview);

if(webView.canGoBack()){
 webView.goBack();

if(webView.canGoForward()){
 webView.goForward();

webView.clearHistory();

webView.destroy();

int findAllAsync(String find)

int progress = webview.getProgress()

String title = webview.getTitle()

String url = webview.getUrl()}
Apart from these methods, there are several other customization points where you can add your own behavior. These are:
- Creating and setting a
WebChromeClientsubclass. This class is called when something that might impact a browser UI happens, for instance, progress updates and JavaScript alerts are sent here. - Creating and setting a
WebViewClientsubclass. It will be called when things happen that impact the rendering of the content(For example: errors or form submissions). You can also intercept URL loading here (viashouldOverrideUrlLoading()). - Modifying the
WebSettings, such as enabling JavaScript withsetJavaScriptEnabled(). - Injecting Java objects into the
WebViewusing theaddJavascriptInterface(Object, String)method. This method allows you to inject Java objects into a page’s JavaScript context, so that they can be accessed by JavaScript in the page.
Let’s start creating a Android Web Application example that illustrates the use of WebView.
IDE used – Android Studio 3.0 (You can use Eclipse as well, but Android studio works well with Gradle. Fore more info about Gradle read here – https://developer.android.com/studio/build/index.html
Download Android Studio 3.0: https://developer.android.com/studio/index.html
3. Simple Android WebView Example
Firstly, we will create a basic app which will show you how to add WebView excluding the additional methods which will be discussed in the latter section.
3.1 Layout File
To add a WebView to the application, simple include the element in activity layout.
activity_web.xml
<LinearLayout xmlns:android="http://schemas.android.com/apk/res/android"
    android:layout_width="fill_parent"
    android:layout_height="fill_parent"
    xmlns:app="http://schemas.android.com/apk/res-auto"
    android:orientation="vertical">

    <WebView
        android:id="@+id/webView"
        android:layout_width="match_parent"
        android:layout_height="match_parent" />
</LinearLayout>
3.2 Activity File
Now in the Activity use the loadUrl() to load a particular url.
WebActivity.java
public class WebActivity extends AppCompatActivity {
    WebView webView;

    @Override
    protected void onCreate(Bundle savedInstanceState) {
        super.onCreate(savedInstanceState);
        setContentView(R.layout.activity_web);
        webView = (WebView) findViewById(R.id.webView);
        webView.loadUrl("www.google.com");
    }
}
3.3 Manifest File
Since we we will be connecting to the web, add Internet permissions in the Manifest File.
AndroidManifest.xml
<uses-permission android:name="android.permission.INTERNET" />
3.4 Run the application
In the screenshot, the url gets loaded in the app browser.
4. Display Custom HTML
Sometimes, there’s need to open web page from the app’s local storage instead from a url. In order to do so, keep all the HTML, CSS and Fonts in Assets folder and load them from there.
4.1 Create HTML file
Add the Assets folder in the application.
You can create the assets folder by: Right Click on app -> New -> Folder -> Assets Folder.
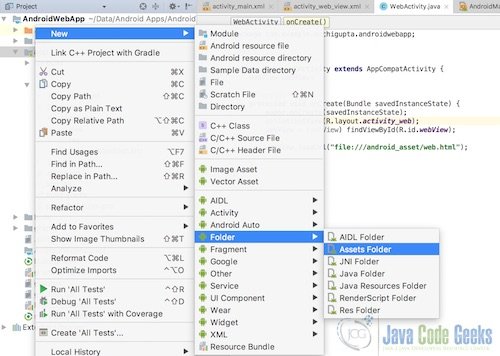
Now locate the assets folder here. src -> main -> assets. Create a new HTML file : Right Click on assets -> New -> File.
web.html
<!doctype html>
<html>
<head>
    <title>Android WebView Example</title>
</head>
<body>
    <h1 style='font-family:roboto;color:green;margin-left:30px;'>This is custom HTML loaded from app storage</h1>
    <p>Loading custom HTML is useful where you want to show static HTML, like privacy policy or user agreement in your app.</p>
</body>
</html>
4.2 Activity File
Now use the loadUrl() method to load a custom url.
WebActivity.java
webView.loadUrl("file:///android_asset/web.html");4.3 Run the Application
On running the application, custom HTML will be showed up.

5. Using JavaScript in WebView
If the web page you plan to load in your WebView uses JavaScript, you must enable JavaScript for your WebView. Once JavaScript is enabled, you can also create interfaces between your application code and your JavaScript code. JavaScript is disabled in a WebView by default. It can be enabled through the WebSettings attached to the WebView. You can retrieve WebSettings with getSettings(), then enable JavaScript with setJavaScriptEnabled(). It’s also possible to bind the JavaScript code in your web page to android WebView code like calling a method in your app to display alert dialog rather than using alert() in JavaScript.
Enabling JavaScript
WebView myWebView = (WebView) findViewById(R.id.webview);
WebSettings webSettings = myWebView.getSettings();
webSettings.setJavaScriptEnabled(true);
WebSettings provides access to a variety of other settings that you might find useful. For example, if you’re developing a web application that’s designed specifically for the WebView in your Android application, then you can define a custom user agent string with setUserAgentString(), then query the custom user agent in your web page to verify that the client requesting your web page is actually your Android application.
6. Handling Page Navigation
When the user clicks a link from a web page in your WebView, the default behavior is for Android to launch an application in a web browser. However, you can override this behavior for your application and so, links will open within your WebView. You can then allow the user to navigate backward and forward through their web page history that’s maintained by WebView.
To open the links clicked by user, simply provide a WebViewClient for your WebView, using setWebViewClient().
Signature of setWebViewClient()
myWebView.setWebViewClient(new WebViewClient());
If you want to add backward and forward arrows in the application just like Web application, it can be done manually by adding the icons in the ActionBar and call goBack() and goForward() respectively. By doing so, you would be able to handle the already browsed pages. We will use it in our code in next section.
7. Creating the Application with Page Navigation
In this example we will learn how to add back and forward arrows in Activity.
7.1 Layout File
This is the Main Activity. We are passing the url to the WebViewActivity.
activity_main.xml
<?xml version="1.0" encoding="utf-8"?>
<android.support.constraint.ConstraintLayout xmlns:android="http://schemas.android.com/apk/res/android"
    xmlns:app="http://schemas.android.com/apk/res-auto"
    xmlns:tools="http://schemas.android.com/tools"
    android:layout_width="match_parent"
    android:layout_height="match_parent">
    <Button
        android:id="@+id/url"
        android:layout_width="wrap_content"
        android:layout_height="wrap_content"
        android:layout_marginBottom="20dp"
        android:layout_marginStart="64dp"
        android:layout_marginTop="181dp"
        android:text="Go to https://www.w3schools.com/"
        android:textAllCaps="false"
        app:layout_constraintBottom_toTopOf="@+id/custom_html_button"
        app:layout_constraintStart_toStartOf="parent"
        app:layout_constraintTop_toTopOf="parent" />

    <Button
        android:id="@+id/custom_html_button"
        android:layout_width="wrap_content"
        android:layout_height="wrap_content"
        android:layout_marginBottom="214dp"
        android:layout_marginStart="44dp"
        android:text="Load Custom HTML"
        android:textAllCaps="false"
        app:layout_constraintBottom_toBottomOf="parent"
        app:layout_constraintStart_toStartOf="@+id/url"
        app:layout_constraintTop_toBottomOf="@+id/url" />

</android.support.constraint.ConstraintLayout>
Here we have another layout to display the web pages.

activity_web_view.xml
<?xml version="1.0" encoding="utf-8"?>
<LinearLayout xmlns:android="http://schemas.android.com/apk/res/android"
    android:layout_width="fill_parent"
    android:layout_height="fill_parent"
    xmlns:app="http://schemas.android.com/apk/res-auto"
    android:orientation="vertical">

    <android.support.design.widget.AppBarLayout
        android:layout_width="match_parent"
        android:layout_height="wrap_content"
        android:theme="@style/AppTheme">
        <android.support.v7.widget.Toolbar
            android:id="@+id/toolbar"
            android:layout_width="match_parent"
            android:layout_height="?attr/actionBarSize"
            android:background="?attr/colorPrimary"
            app:popupTheme="@style/AppTheme.PopupOverlay" />
    </android.support.design.widget.AppBarLayout>

    <WebView
        android:id="@+id/webView"
        android:layout_width="match_parent"
        android:layout_height="wrap_content" />
</LinearLayout>
7.2 Activity File
This the main activity. On clicking the Upper button, WebViewActivity will be opened. On clicking the Load Custom HTML button, WebActivity will be opened discussed in Section 4.
MainActivity.java
public class MainActivity extends Activity {

    private Button customButton;
    private Button urlButton;
    String url = "https://www.w3schools.com/";

    public void onCreate(Bundle savedInstanceState) {
        final Context context = this;

        super.onCreate(savedInstanceState);
        setContentView(R.layout.activity_main);

        urlButton = (Button)findViewById(R.id.url);
        customButton = (Button) findViewById(R.id.custom_html_button);

        urlButton.setOnClickListener(new OnClickListener() {

            @Override
            public void onClick(View arg0) {
                Intent intent = new Intent(MainActivity.this, WebViewActivity.class);
                intent.putExtra("url", url);
                startActivity(intent);
            }

        });
        customButton.setOnClickListener(new OnClickListener() {

            @Override
            public void onClick(View arg0) {
                Intent intent = new Intent(context, WebActivity.class);
                startActivity(intent);
            }
        });
    }
}
Here is the WebViewActivity which will display the webpage and handling navigation.
WebViewActivity.java
public class WebViewActivity extends AppCompatActivity {

    private String url;
    private WebView webView;

    @Override
    protected void onCreate(Bundle savedInstanceState) {
        super.onCreate(savedInstanceState);
        setContentView(R.layout.activity_web_view);
        Toolbar toolbar = (Toolbar) findViewById(R.id.toolbar);
        setSupportActionBar(toolbar);
        getSupportActionBar().setDisplayHomeAsUpEnabled(true);
        getSupportActionBar().setTitle("");

        url = getIntent().getStringExtra("url");
        webView = (WebView) findViewById(R.id.webView);

        webView.setWebViewClient(new WebViewClient() {
            @Override
            public void onPageStarted(WebView view, String url, Bitmap favicon) {
                super.onPageStarted(view, url, favicon);
                invalidateOptionsMenu();
            }
            @Override
            public boolean shouldOverrideUrlLoading(WebView view, String url) {
                webView.loadUrl(url);
                return true;
            }
            @Override
            public void onPageFinished(WebView view, String url) {
                super.onPageFinished(view, url);
                invalidateOptionsMenu();
            }
            @Override
            public void onReceivedError(WebView view, WebResourceRequest request, WebResourceError error) {
                super.onReceivedError(view, request, error);
                invalidateOptionsMenu();
            }
        });
        webView.clearCache(true);
        webView.clearHistory();
        webView.loadUrl(url);
    }

    @Override
    public boolean onCreateOptionsMenu(Menu menu) {
        getMenuInflater().inflate(R.menu.brower, menu);
        return super.onCreateOptionsMenu(menu);
    }

    @Override
    public boolean onPrepareOptionsMenu(Menu menu) {
        if (!webView.canGoBack()) {
            menu.getItem(1).setEnabled(false);
        } else {
            menu.getItem(1).setEnabled(true);
        }

        if (!webView.canGoForward()) {
            menu.getItem(2).setEnabled(false);
        } else {
            menu.getItem(2).setEnabled(true);
        }
        return true;
    }

    @Override
    public boolean onOptionsItemSelected(MenuItem item) {
        switch (item.getItemId()){
            case R.id.action_home :
                 webView.loadUrl("https://www.w3schools.com/");
                 break;
            case R.id.action_back :
                 if(webView.canGoBack()){ webView.goBack(); }
                 break;
            case R.id.action_forward :
                 if(webView.canGoForward()){ webView.goForward(); }
                 break;
        }
        return super.onOptionsItemSelected(item);
    }
}
For your reference, to add the icons: Right click on Drawable Folder -> New -> Vector Asset. From here you can choose the icon to be added to the application.
7.3 Manifest File
This is the AndroidManifest File.
AndroidManifest.xml
<?xml version="1.0" encoding="utf-8"?><
manifest xmlns:android="http://schemas.android.com/apk/res/android" package="com.example.archigupta.androidwebapp">
<application
        android:allowBackup="true"
        android:icon="@mipmap/ic_launcher"
        android:label="@string/app_name"
        android:roundIcon="@mipmap/ic_launcher_round"
        android:supportsRtl="true"
        android:theme="@style/AppTheme.NoActionBar">

        <activity
            android:name=".MainActivity"
            android:label="@string/title_activity_web_view">
            <intent-filter>
                <action android:name="android.intent.action.MAIN" />

                <category android:name="android.intent.category.LAUNCHER" />
            </intent-filter>
        </activity>

        <activity
            android:name=".WebViewActivity"
            android:label="@string/title_activity_web_view">
        </activity>

        <activity
            android:name=".WebActivity"
            android:label="@string/title_activity_web_view">
        </activity>

</application>
</manifest>
7.4 Run the application
See the screenshots here.
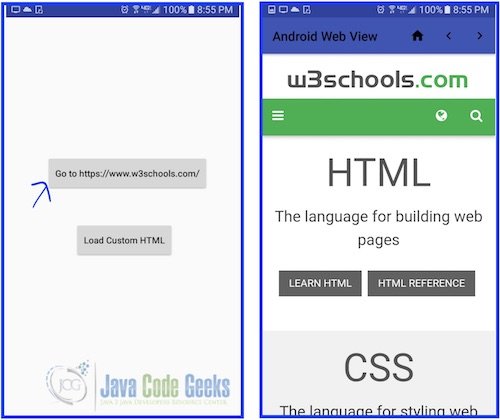
On clicking the Load Custom HTML button, the Image in Section 4.3 will be opened up.
8. Conclusion
We have seen how to use WebView in the application. A big advantage of using a WebView is that you can store assets inside the app. This lets your app work offline and improves load times, since the WebView can retrieve assets directly from the local file system. Also, it provides interesting methods for Web pages to interact with the Android app using Javascript interface. Another scenario where it is helpful is when you want to provide information in your application that you might need to update, such as an end-user agreement or a user guide. Within your Android application, you can create an Activity that contains a WebView, then use that to display your document that’s hosted online.
9. Download the Source Code
This was an example of Android Web App.
You can download the full source code of this example here: Android Web App Example

Hello
I tried to create an app that opens a website but I have an error on “webView = (WebView) findViewById(R.id.webView);”, the last webView from R.id.webView is red and shows the error “cannot resolve symbol ‘webView'”.
Sorry for the delayed response. Did you double check the id of Webview defined in the layout?
This is a great post. I like this topic.This site has lots of advantage.I found many interesting things from this site. It helps me in many ways.Thanks for posting this again. Webdesign
Thank you..Yes, It helped me too. Happy Android Studying!!
Thank You so much. This website is truly amazing..Keep it up and God bless..Time will come I can repay you for helping me solve our android thesis..Thanks a million times
Thank you..Good luck with your Android thesis!
Can I download your example webview app and edit it make my own app is this violate copyright or not please let me know
Very nice
HOW TO ADD USER AGENT