This article is about installing Selenium IDE and the various commands you can run to enable test automation. This article will cover the most frequently used Selenium IDE Commands.
1. Introduction
Selenium is used to automate browsers. Selenium WebDriver has found its place in test automation for web applications. It is used to create robust, browser-based regression automation suites and tests. But, it requires a bit of learning curve too.
The Selenium-IDE (Integrated Development Environment) is the tool you use to develop your Selenium test cases. It’s an easy-to-use Chrome and Firefox extension and is generally the most efficient way to develop test cases. It records the user’s actions in the browser for you, using existing Selenium commands, with parameters defined by the context of that element. This is not only a time-saver but also an excellent way of learning Selenium script syntax.
The crux of Selenium is the element locator. Selenium supports the following locators:
- id
- name
- link text
- partial link text
- tag name
- class name
- css
- xpath
Out of these, predominantly xpath and css are powerful enough to cover variety of scenarios and is the most widely used. It is preferable to use CSS selector while leveraging xpath for advanced selection.
2. Installation
In this section, We will see how to install Selenium IDE for browsers. We will look at the installation links for two major browsers:
- Firefox -> https://addons.mozilla.org/en-US/firefox/addon/selenium-ide/
- Chrome -> https://chrome.google.com/webstore/detail/selenium-ide/mooikfkahbdckldjjndioackbalphokd
After addon installation, clicking on the addon displays the below window.

As shown above, each command has four fields:
- Command – the actual command to be executed on the page.
- Target – element on the page.
- Value – Value to be used in case of commands like typeText etc.
- Comment – To provide extra information regarding the command used.
3. Commands in Action
Selenium commands can be generally classified as Actions, Accessors and Assertions. Actions generally involve commands interacting with the page and execute an action on the page. Accessors are used to store values in our environment and generally do not interact with the page. Assertions are generally used to verify matching conditions and generally act as the control points of our tests.
We will look at each of the commands individually and then finally see a full example utilizing the commands.
3.1 Open
Open is used to open subdomain of the page. For example, Under google.com if you need to open images, we would provide google.com as the base playback url while /images will be provided as the target. It can also be provided a fresh absolute url to open a webpage in the current tab. But predominantly the former case will be used as base playback url will be the homepage of the application.
Command - Open
 Target - /images (or) http://www.google.com/images
 Value -
3.2 Click/Clickat
Click is the most frequently used command. It is used to click on a button or link which will trigger the associated action. Click is used to simulate the user click on the page. Click is provided with a css locator to identify the element to be clicked. Clickat takes not only the locator but also the position x,y in case the element is not uniquely identifiable via either its id or css locator.
Command - Click
 Target - id=logo
 Value -
3.3 Send Keys
This command is used to simulate a keypress event. We can pass events like enter using this command on the specified element or on global level like esc.
Command - send keys
Target - id=lst-ib
Value - ${KEY_ENTER}
3.4 highlight
This command is used to highlight a particular element or area of the page. Here we have specified id selector as the target.
Command - highlight
 Target - id=lst-ib
 Value -
3.5 store/echo
These commands are generally used in conjunction with each other. store is used to store a value into a particular variable, while echo is used to print the value of the particular variable.
Command - store
Target - hello
Value - var1
Stores the value hello into variable var1
Command - echo
Target - ${var1)
Value -
Prints the value of var1 in console. By using store title we can store the title of the page in the variable.
Command - store title
Target -
Value - var1
The above command on google.com homepage stores the title google into variable var1.
3.6 verify title/assert title
This command is used to verify the title of the page. This is similar to assert Title except that the latter stops the execution if the assertion fails. This is the general differentiation between verify and assert. Both try to match the condition but verify logs the failure and continues execution while assert stops the execution.
Command - verify title
Target - Google
Value -
The above command on google.com checks if the title is Google and passes the test. On other domains, it will fail but still rest of the commands in the test will pass.
3.7 verify text/assert text
This command is used to verify the presence of text in the target field specified.
Command - verify text
Target - id=slcvcob
Value - Google
The above command checks if the text Google is present in the element matching the specified selector i.e a element with id as slcvob.
3.8 verify element present
This command is used to verify the presence of element in the page. This tries to find an element matching the specified selector.
Command - verify element present
Target - //input[@value='Google Search']
Value -
This checks if an input control with value Google Search is displayed on the google.com page.
3.9 pause
This command is used to delay the execution by a specified amount of time. This is useful when we know that particular action executes after a certain amount of interval.
Command - pause
Target -
Value - 200
The above example delays the execution of next command by 200 ms.
3.10 choose ok on next confirmation
This command is used to confirm the selection by pressing ok on confirmation prompts/alerts. This has been discontinued in latest selenium webdriver in favour of handle alert but selenium ide still supports it.
Command - choose ok on next confirmation
Target -
Value -
Its counterpart is choose cancel on next confirmation which is equivalent to pressing cancel in the confirmation prompt.
3.11 Select
This command is used to select a value from the drop down.
Command - select
Target - id=select
Value - one
This command selects the value one from a dropdown whose id is select.
3.12 add selection
This command is used to select a value from the drop down much similar to Select Command.
Command -add selection
Target - id=select
Value - two
This command selects the value one from a dropdown whose id is select. This is useful in case of multi-select. Select selects only 1 value where as this is used to select multiple values from the multi-select box.
3.13 remove selection
This command is used to remove a selected value from the drop down.
Command -remove selection
Target - id=select
Value - two
This command de-selects the value one from a dropdown whose id is select. This is very useful in case of multi-select.
3.14 assert alert
This command is used to verify if an alert window appears with the specified text. If not found, rest of the execution is stopped.
Command - assert alert
Target - Alert
Value -
This checks if an alert box appears with the text Alert in the current window.
3.15 assert editable
This command is used on input fields such as text box, list box, drop downs etc. This checks if a particular element is editable or not. If element is not editable, rest of the execution is stopped.
Command - assert editable
Target - id=lst-ib
Value -
The above command on google.com site executes successfully as the google search box is editable.
3.16 assert not editable
This command is inverse of the previous command. This checks if a particular element is un editable or not.
Command - assert not editable
Target - id=lst-ib
Value -
The above command on google.com site fails as the google search box is editable.
3.17 assert element present
This command checks if a particular element is present in the current page or not. As with any assert command, on failure it stops execution.
Command - assert element present
Target - id=lst-ib
Value -
The above command on google.com site passes as google search box is present in page. The inverse of this command is assert element not present.
3.18 check
This command checks if a particular element is present in the current page or not. As with any assert command, on failure it stops execution.
Command - check
Target - id=check1
Value -
The above command checks the check box check1 present in the page. The inverse of this command is uncheck.
3.19 mouse over
This command checks if a particular element is present in the current page or not. As with any assert command, on failure it stops execution.
Command - mouse over
Target - css=input[value='Google Search']
Value -
The above command simulates mouse over on Google Search in google.com website.
4. Full Example
Selenium Scripts are generally saved in format .side. The complete script will be provided int the download section. Below we will look at the completed script in selenium ide.
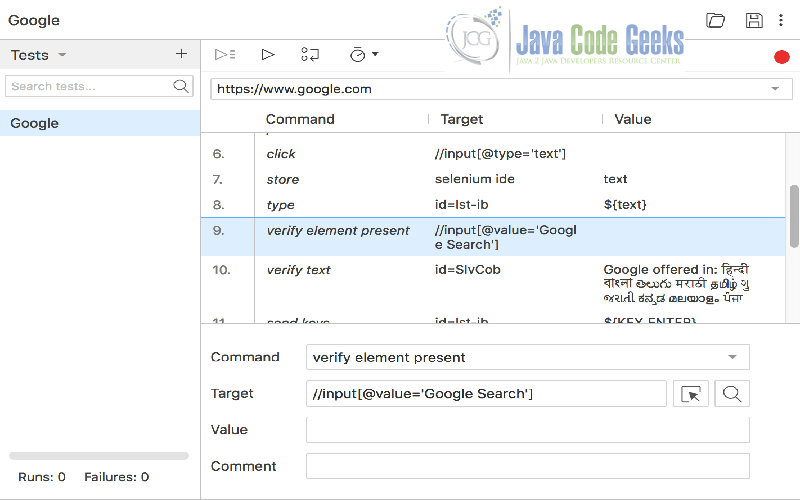
Below we will see the commands executed in the above screenshot with an explanation of their behavior.
- Click on folder icon(Open Project) to open the Google.side file.
- Script has playback url as www.google.com which opens the webpage in browser.
- To open a relative url, We provide /images which opens relative to the home page.
- We provide
windowMaximizeto maximize the window but since we have not provided a window id nothing happens. - Text box is highlighted using the
highlightcommand on the textbox id=lst-ib. We highlight the google search box. - We pause for 200 ms to delay execution.
- We click on the google search text box using the input text selector.
- We store the search string into a variable text.
- We type the text into the google search text box.
- We check if google search button is available using verify element present.
- We check if Google Offered text is available in the google page.
- We then send enter to the text box which automatically clicks the search button as focus is given to the google search text box.
- Refresh command refreshes the page.
- The google logo is clicked to provide a back navigation.
- Verify title is used to verify the title of the page to be Google.
- Store title is used to store the title of the page which is displayed using echo.
5. Download the Source Code
This was an example on Selenium IDE Commands.
You can download the full source code of this example here: Google.side
