In this tutorial, we will show you how to use the Apache Tomcat Maven plugin, in order to package and deploy a war file to Apache Tomcat. You can download the plugin from the official page.
In this example, we use the following tools on a Windows 7 platform:
- Apache Maven 3.1.1
- Apache Tomcat Maven Plugin
- JDK 1.7
- Apache Tomcat 7
Please refer to this guide here, in order to verify that you know how to create a Web application project, using Apache Maven.
1. Create a user in Apache Tomcat
First of all, we must create a user with administrator rights for the Apache Tomcat. Using the terminal (Linux or Mac) or the command prompt (Windows), navigate to the folder where the Apache Tomcat is installed. Then, navigate to the folder called conf and add the following code snippet to the tomcat-users.xml file, inside the <tomcat-users> tag:
<role rolename="manager"/>
<role rolename="admin"/>
<role rolename="manager-gui"/>
<role rolename="manager-script"/>
<user username="admin" password="admin" roles="admin,manager,manager-gui,manager-script"/>
We have now successfully created a new user, called admin.
2. Create a user in Apache Maven
Using the terminal (Linux or Mac) or the command prompt (Windows), navigate to the folder where the Apache Maven is installed. Recall that the MAVEN_HOME environment variable points to the home folder of Maven. Then, navigate to the folder called conf and add the following code snippet to the settings.xml file, inside the servers tag:
<server>
   <id>TomcatServer</id>
   <username>admin</username>
   <password>admin</password>
</server>
We created a user with the name TomcatServer, along with its credentials.
3. Add Apache Tomcat Maven plugin as a Dependency
The next step is to declare the Apache Tomcat Maven plugin as a dependency to our project. Inside the pom.xml, we must add the following code snippet:
<plugin>
   <groupId>org.codehaus.mojo</groupId>
   <artifactId>tomcat-maven-plugin</artifactId>
   <version>1.1</version>
   <configuration>
      <url>http://localhost:8080/manager/text</url>
      <server>TomcatServer</server>
      <path>/javaCodeGeeks</path>
   </configuration>
</plugin>
By using the above code snippet, we specify that our project must be deployed on http://localhost:8080/manager/text, in the path /javaCodeGeeks, using the credentials of the TomcatServer user.
A sample pom.xml file is shown below:
pom.xml:
<project xmlns="http://maven.apache.org/POM/4.0.0" xmlns:xsi="http://www.w3.org/2001/XMLSchema-instance"
xsi:schemaLocation="http://maven.apache.org/POM/4.0.0 http://maven.apache.org/maven-v4_0_0.xsd">

   <modelVersion>4.0.0</modelVersion>
   <groupId>com.javacodegeeks</groupId>
   <artifactId>SampleWebApplication</artifactId>
   <packaging>war</packaging>
   <version>1.0-SNAPSHOT</version>
   <name>SampleWebApplication Maven Webapp</name>
   <url>http://maven.apache.org</url>

   <dependencies>
      <dependency>
         <groupId>junit</groupId>
         <artifactId>junit</artifactId>
         <version>4.11</version>
         <scope>test</scope>
      </dependency>
   </dependencies>

   <build>
      <finalName>SampleWebApplication</finalName>
      <plugins>
         <plugin>
            <groupId>org.apache.maven.plugins</groupId>
            <artifactId>maven-compiler-plugin</artifactId>
            <version>3.1</version>
            <configuration>
               <source>1.7</source>
               <target>1.7</target>
            </configuration>
         </plugin>

      <plugin>
         <groupId>org.codehaus.mojo</groupId>
         <artifactId>tomcat-maven-plugin</artifactId>
         <version>1.1</version>
         <configuration>
            <url>http://localhost:8080/manager/text</url>
            <server>TomcatServer</server>
            <path>/javaCodeGeeks</path>
         </configuration>
      </plugin>
   </plugins>

   </build>
</project>
4. Deploy the project to Apache Tomcat
The first thing to do, before deploying our project, is start the Apache Tomcat. From the Windows command line, we execute the following command:
C:\tomcat\bin\startup.bat
Now, using the terminal (Linux or Mac) or the command prompt (Windows), we navigate to the folder where our project is located. Then, we issue the command:
mvn tomcat:deploy
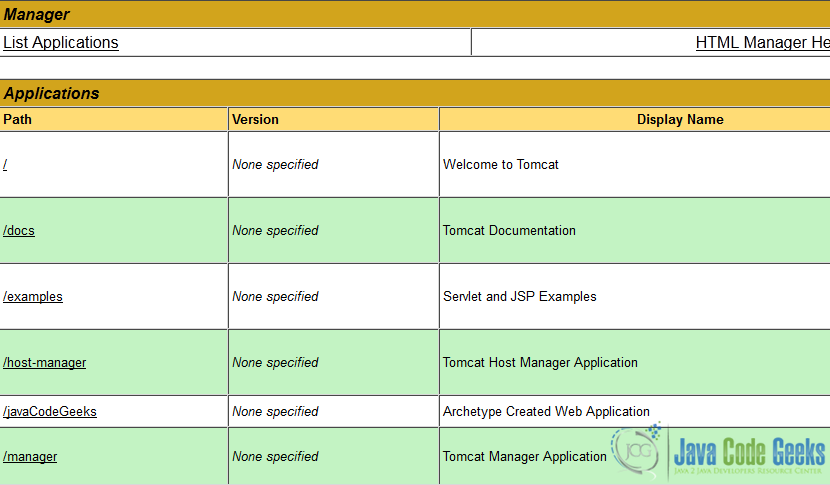
This command packages our project in a war file and deploys it to the Apache Tomcat. In order to verify that our installation is successful, we must go to the manager page of the Apache Tomcat and check that /javaCodeGeeks actually exists:
http://localhost:8080/manager/html/:
Finally, if we want to deploy our project and the javaCodeGeeks.war file already exists, we must issue the following command:
mvn tomcat:redeploy
Notice that the Apache Tomcat must already be running, before we issue this command.
This was a tutorial on how to use the Apache Tomcat Maven plugin to deploy a war file to Apache Tomcat.
