In this tutorial, we will show you an easy way to create a Java web application project, using Apache Maven. The web application will make use of the Spring MVC and it will be transformed, in order to be recognizable and supported by the Eclipse IDE.
In this example, we use the following tools on a Windows 7 platform:
- Apache Maven 3.1.1
- Eclipse Kepler Service Release 1
- JDK 1.7
- Spring 3.2.3.RELEASE
- Apache Tomcat 7
For this example, we assume that Apache Tomcat is installed in the folder “C:\tomcat”.
1. Create a Java Project using Maven’s Archetype
Archetype is a Maven project templating toolkit that enables the creation of Maven project templates for users. For more information about Maven Archetype, click here.
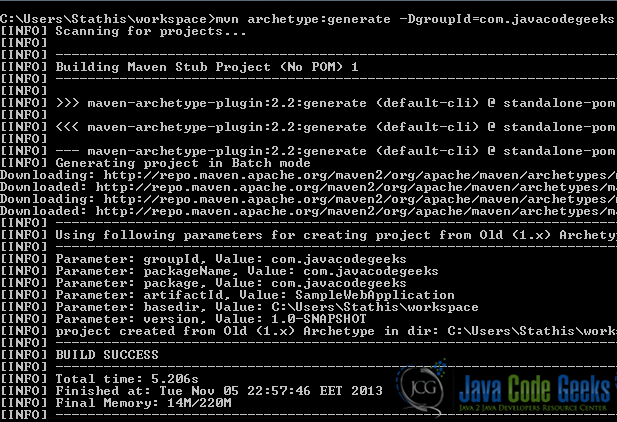
First of all, using the terminal (Linux or Mac) or the command prompt (Windows), navigate to the folder where the new project shall be created. Using the command
$ mvn archetype:generate -DgroupId={project-packaging} -DartifactId={project-name} -DarchetypeArtifactId=maven-archetype-webapp -DinteractiveMode=falsewe create a new Java web application project, using the maven-archetype-webapp template. If the argument archetypeArtifactId is missing, Apache Maven uses the maven-archetype-quickstart template by default. For this reason we must explicitly include the archetypeArtifactId argument, in order to create a Java web application.
Now, we execute the command:
$ mvn archetype:generate -DgroupId=com.javacodegeeks -DartifactId=SampleWebApplication -DarchetypeArtifactId=maven-archetype-webapp -DinteractiveMode=false
This command creates a new Java web application project under the name SampleWebApplication, along with its entire directory structure.
2. Layout of the Project’s Directory
The Apache Maven creates a standard web application directory layout, as shown below:
SampleWebApplication
|-- pom.xml
`-- src
    |-- main
    |   `-- resources
    |    `-- webapp
    |           `-- index.jsp
    |	`-- WEB-INF
    |	      `-- web.xml
You can check the official guide for more information.
By default, the source code of the project is located under the folder “/src/main/resources/webapp”.
In addition, two files are automatically generated by Apache Maven. The first one is the pom.xml file and the second file is the standard deployment descriptor, called web.xml. These special files contain all necessary information about the project’s compilation and deployment.
The created pom.xml file is shown below:
pom.xml:
<project xmlns="http://maven.apache.org/POM/4.0.0" xmlns:xsi="http://www.w3.org/2001/XMLSchema-instance"
xsi:schemaLocation="http://maven.apache.org/POM/4.0.0 http://maven.apache.org/maven-v4_0_0.xsd">
 <modelVersion>4.0.0</modelVersion>
 <groupId>com.javacodegeeks</groupId>
 <artifactId>SampleWebApplication</artifactId>
 <packaging>war</packaging>
 <version>1.0-SNAPSHOT</version>
 <name>SampleWebApplication Maven Webapp</name>
 <url>http://maven.apache.org</url>

 <dependencies>
  <dependency>
   <groupId>junit</groupId>
   <artifactId>junit</artifactId>
   <version>3.8.1</version>
   <scope>test</scope>
  </dependency>
 </dependencies>

 <build>
  <finalName>SampleWebApplication</finalName>
 </build>

</project>
The created web.xml file is shown below:
web.xml:
<!DOCTYPE web-app PUBLIC "-//Sun Microsystems, Inc.//DTD Web Application 2.3//EN"
"http://java.sun.com/dtd/web-app_2_3.dtd" >

 <web-app>
  <display-name>Archetype Created Web Application</display-name>
 </web-app>
Finally, the created index.jsp file is show below:
index.jsp:
<html>
 <body>
  <h2>Hello World!</h2>
 </body>
</html>
3. Enrich the “pom.xml” file
The default generated files are rather outdated and for this reason, we must apply the following changes to our pom.xml file:
- Add the “compiler” plugin, in order to specify that JDK 1.7 must be used to compile this project.
- Add all Spring framework dependencies.
- Update jUnit to its latest version.
The final output of our pom.xml file must look like this:
pom.xml:
<project xmlns="http://maven.apache.org/POM/4.0.0" xmlns:xsi="http://www.w3.org/2001/XMLSchema-instance"
xsi:schemaLocation="http://maven.apache.org/POM/4.0.0 http://maven.apache.org/maven-v4_0_0.xsd">

 <modelVersion>4.0.0</modelVersion>
 <groupId>com.javacodegeeks</groupId>
 <artifactId>SampleWebApplication</artifactId>
 <packaging>war</packaging>
 <version>1.0-SNAPSHOT</version>
 <name>SampleWebApplication Maven Webapp</name>
 <url>http://maven.apache.org</url>

 <dependencies>
  <dependency>
   <groupId>junit</groupId>
   <artifactId>junit</artifactId>
   <version>4.11</version>
   <scope>test</scope>
  </dependency>

  <dependency>
   <groupId>org.springframework</groupId>
   <artifactId>spring-core</artifactId>
   <version>3.2.3.RELEASE</version>
  </dependency>

  <dependency>
   <groupId>org.springframework</groupId>
   <artifactId>spring-web</artifactId>
   <version>3.2.3.RELEASE</version>
  </dependency>

  <dependency>
   <groupId>org.springframework</groupId>
   <artifactId>spring-webmvc</artifactId>
   <version>3.2.3.RELEASE</version>
  </dependency>
 </dependencies>

 <build>
  <finalName>SampleWebApplication</finalName>
  <plugins>
   <plugin>
    <groupId>org.apache.maven.plugins</groupId>
    <artifactId>maven-compiler-plugin</artifactId>
    <version>3.0</version>
    <configuration>
     <source>1.7</source>
     <target>1.7</target>
    </configuration>
   </plugin>
  </plugins>
 </build>
</project>
Moreover, we must change our web.xml file to use Servlet 3.0:
web.xml:
<web-app
        version="3.0"
        xmlns="http://java.sun.com/xml/ns/javaee"
        xmlns:xsi="http://www.w3.org/2001/XMLSchema-instance"
        xsi:schemaLocation="http://java.sun.com/xml/ns/javaee http://java.sun.com/xml/ns/javaee/web-app_3_0.xsd">
               <display-name>Archetype Created Web Application</display-name>
</web-app>
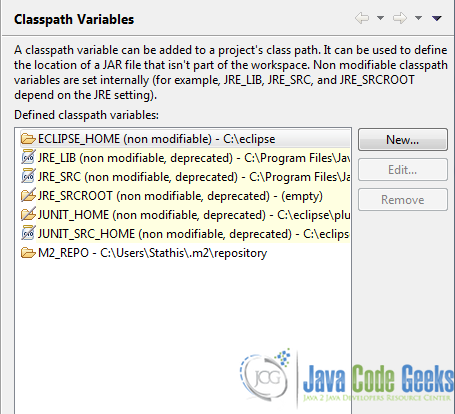
4. Add the M2_REPO classpath variable in eclipse IDE
The “M2_REPO” classpath variable is required by the Eclipse IDE, in order to locate all declared depencencies for a Maven project. This variable must point to Maven’s Local Repository.
We will add the “M2_REPO” variable to Eclipse‘s classpath variables, by undergoing the following steps:
- Inside the Eclipse IDE, we click on Windows > Preferences.
- In the left panel, we click on Java > Build path > Classpath Variables.
- In the right panel, we click on “New:” button and we fill these values:
Name: “M2_REPO”
Path: “C:\Users\Username\.m2\repository\” - We click on the “OK” button.
If the procedure has been completed successfully, our newly created variable will be placed among the other variables, as shown:
5. Eclipse IDE Integration
Before we import our project into the Eclipse IDE, we must first install the following two plugins:
- Maven Integration (m2e): Please follow the official guide here, to successfully download and install this plugin.
- Maven Integration for WTP: Please follow the official guide here, to successfully download and install this plugin.
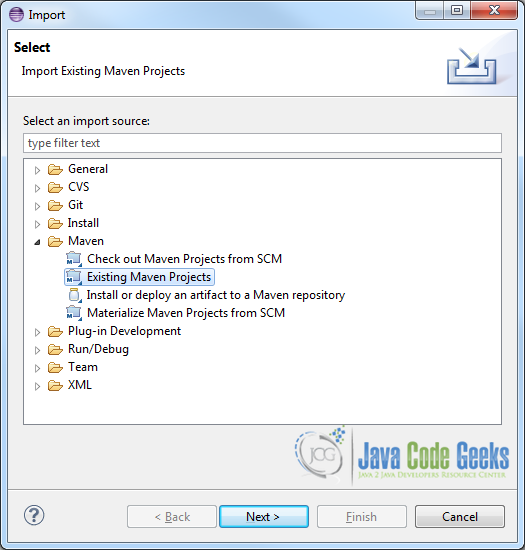
Now we are ready to import our project into the Eclipse IDE:
- Click on File > Import…
- Choose Maven > Existing Maven Projects and then, click on ‘Next’.
- As a root directory, enter the home folder of our web application project.
- Choose our web application project and click on ‘Finish’.
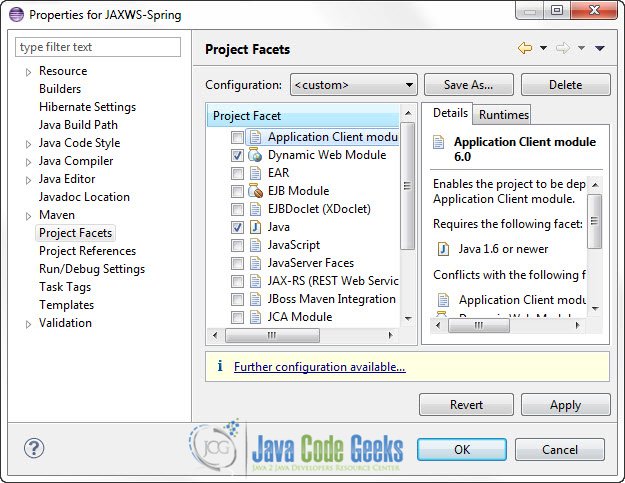
The project should now be imported and initialized. If we make a Right click on our project, click on ‘Properties’ and in the left panel choose ‘Project Facets’, we shall see the following picture:
6. Use the Spring MVC Framework
In this step, we will create a new class, called ApplicationController.java. The new class must be created inside the folder “/src/main/java/com/javacodegeeks/controller”. Copy and paste the following code snippet:
ApplicationController.java:
package com.javacodegeeks.controller;

import org.springframework.stereotype.Controller;
import org.springframework.ui.ModelMap;
import org.springframework.web.bind.annotation.PathVariable;
import org.springframework.web.bind.annotation.RequestMapping;
import org.springframework.web.bind.annotation.RequestMethod;

@Controller
@RequestMapping("/")
public class ApplicationController {

   @RequestMapping(value="/Test", method = RequestMethod.GET)
   public String welcome(ModelMap model) {
      model.addAttribute("msgArgument", "Maven Java Web Application Project: Success!");

      return "index";
   }

   @RequestMapping(value="/Print/{arg}", method = RequestMethod.GET)
   public String welcomeName(@PathVariable String arg, ModelMap model) {
      model.addAttribute("msgArgument", "Maven Java Web Application Project, input variable: " + arg);

      return "index";
   }
}
Let’s explain the annotation used in the above snippet:
- The
@Controllerannotation indicates that a particular class serves the role of acontroller. The basic purpose of the@Controllerannotation is to act as a stereotype for the annotated class, indicating its role. The dispatcher will scan such annotated classes for mapped methods, detecting@RequestMappingannotations. - The
@RequestMappingannotation is used to map URLs to an entire class or a particular handler method. - The
ModelMapclass is essentially a glorifiedMapthat can make adding objects that are to be displayed in (or on) aViewadhere to a common naming convention.
Furthermore, we will create a Spring configuration file, which defines the Spring View resolver. Inside the folder “/src/main/webapp/WEB-INF/”, we create a new XML file called view-resolver-servlet.xml. Copy and paste the following code snippet:
view-resolver-servlet.xml:
<beans xmlns="http://www.springframework.org/schema/beans"
       xmlns:context="http://www.springframework.org/schema/context"
       xmlns:xsi="http://www.w3.org/2001/XMLSchema-instance"
       xsi:schemaLocation="http://www.springframework.org/schema/beans http://www.springframework.org/schema/beans/spring-beans-3.0.xsd http://www.springframework.org/schema/context http://www.springframework.org/schema/context/spring-context-3.0.xsd">

<context:component-scan base-package="com.javacodegeeks.controller" />

 <bean class="org.springframework.web.servlet.view.InternalResourceViewResolver">
  <property name="prefix">
   <value>/WEB-INF/pages/</value>
  </property>
  <property name="suffix">
   <value>.jsp</value>
  </property>
 </bean>

</beans>
Now, we must update our existing web.xml file, to support Servlet 3.0. Moreover, we will integrate the Spring framework in this web application project, via Spring’s listener ContextLoaderListener. The updated version of our web.xml file, is show below:
web.xml:
<?xml version="1.0" encoding="UTF-8"?>

<web-app
  version="3.0"
  xmlns="http://java.sun.com/xml/ns/javaee"
  xmlns:xsi="http://www.w3.org/2001/XMLSchema-instance"
  xsi:schemaLocation="http://java.sun.com/xml/ns/javaee http://java.sun.com/xml/ns/javaee/web-app_3_0.xsd">

 <display-name>Archetype Created Web Application</display-name>
 <servlet>
  <servlet-name>mvc-dispatcher</servlet-name>
  <servlet-class>
   org.springframework.web.servlet.DispatcherServlet
  </servlet-class>
  <load-on-startup>1</load-on-startup>
 </servlet>

 <servlet-mapping>
  <servlet-name>mvc-dispatcher</servlet-name>
  <url-pattern>/</url-pattern>
 </servlet-mapping>

 <context-param>
  <param-name>contextConfigLocation</param-name>
  <param-value>/WEB-INF/view-resolver-servlet.xml</param-value>
 </context-param>

 <listener>
  <listener-class>
   org.springframework.web.context.ContextLoaderListener
  </listener-class>
 </listener>
</web-app>
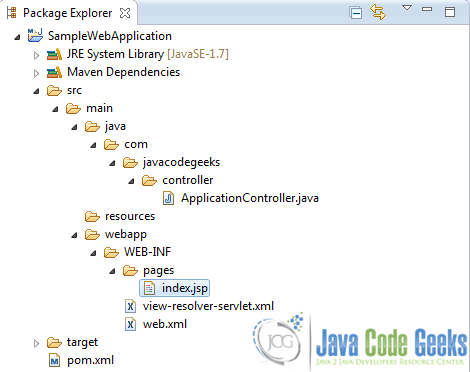
Furthermore, we create a new folder called “pages”, inside the “WEB-INF” folder and we move our index.jsp file inside the foler “pages”, in order to permit a direct access from users. Finally, we alter our index.jsp file, to print the $msgArgument variable, passed as an argument by the controller. The updated index.jsp file is show below:
index.jsp:
<html>
 <body>
  <h2>Hello World!</h2>
  <h3>Message: <font color="green">${msgArgument}</font></h3>
 </body>
</html>
The final directory structure inside the Eclipse IDE is shown below:
7. Package our Application into a .jar file
We can now use Apache Maven to package our application into an executable “.war” file. The “packaging” element inside our pom.xml” file defines the packaging format or output.
Open a terminal as in Step 1, navigate to the SampleApplication project folder and execute the command:
$ mvn package
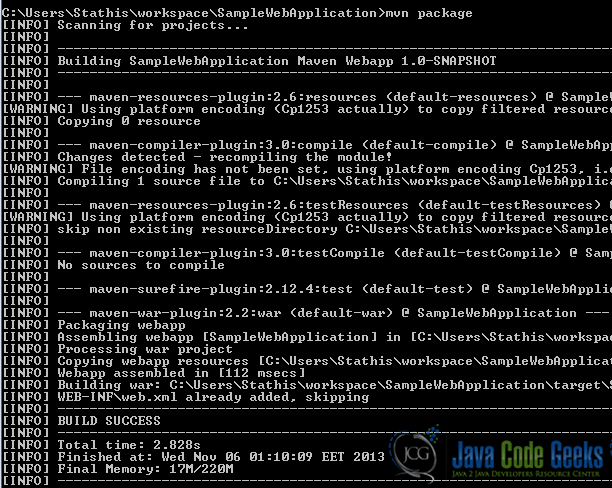
This command compiles our project, executes all unit tests and finally, generates the executable “.war” file inside the “project/target” folder.
Finally, we must copy the “project/target/SampleWebApplication.war” file inside Tomcat’s “webapps” folder and then, launch Tomcat from the Windows command line, using the command:
$ C:\tomcat\bin\startup.bat
8. Sample Project Execution
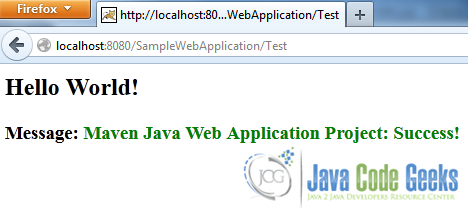
A sample execution of our web application can be tested by following the URL:
http://localhost:8080/SampleWebApplication/Test
An additional sample execution:
http://localhost:8080/SampleWebApplication/Print/Test Message

9. Download The Eclipse Project
The Eclipse project of this example: SampleWebApplication.zip.
This was an example on how to create a Java web application project, using Apache Maven.

This project is good and shows without any explaination, but I can google the steps. However, when I put it in the apache tomcat webapp directory, it breaks my startup in the bin directory in cmd.
Using the downloaded project zip, gaves me java.io.FileNotFoundException: Could not open ServletContext resource [/WEB-INF/mvc-dispatcher-servlet.xml] error. Why?