Hello. In this tutorial, we will learn the SQL cursor and see a practical implementation to it.
1. Introduction
SQL stands for Structured Query Language and is used to extract and organize data stored in relational databases like MySQL, PostgreSQL, Oracle, etc. A relational database consists of rows and columns that allow fetching specific information from databases that can be used later for analysis. In real-time SQL manages a large amount of data that is written and read simultaneously and any query that reaches the SQL server is processed into three parts –
- Parsing – Process to check the SQL query syntax
- Binding – Process to check the SQL query semantics
- Optimization – Process to generate the SQL query execution plan
1.1 Usage of SQL
Structured Query Language (popularly known as SQL) is commonly used by data analysts and data science professionals and is helpful too –
- Execute queries against the database
- Retrieve data from the database
- Insert new records into the database
- Update existing records into the database
- Created stored procedures, functions, and materialized views in the database
- Create users and grant permissions
- Set permissions on tables, stored procedures, functions, and materialized views
1.2 SQL Cursors
A cursor in SQL is an object that enables us to traverse over the rows of the result set individually or in a group. A database cursor is represented by the below lifecycle.
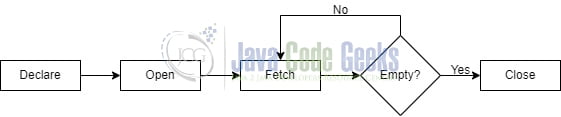
A database cursor in postgresql is represented by the following syntax.
SQL cursor syntax
DECLARE CURSOR_NAME [BINARY] [INSENSITIVE] [SCROLL]
    CURSOR [ { WITH | WITHOUT } HOLD ] FOR query
Where –
DECLAREkeyword is used to declare the cursor in postgresqlCURSOR_NAMEspecifies the name given to the cursorBINARYis an optional cursor argument to fetch the output in the ASCII formatINSENSITIVEis redundant in postgresql and is used for SQL standard compatibilitySCROLLdescribes the default behavior of the cursor and tells that cursor can select multiple rows at one timeWITH HOLDcreated a cursor that is not automatically closed at the end of a transactionCURSOR FORdescribes the complete query result set
There is also a FETCH keyword that helps to fetch more than one row at a time and they need to be closed with the CLOSE keyword to end the transaction.
1.2.1 Importance of cursors
- Helps to retrieve a single record from the result set
- Saves time
- Saves memory
- Minimizes the load on the server
2. SQL Cursor Example
Let us dive into some practice implementation.
2.1 Postgres Setup
Usually, setting up the database is a tedious step but with technological advancements, this process has become simple with the help of Docker. Readers can watch the video available at this link to understand the Docker installation on Windows OS. Open the terminal and trigger the following commands to get the postgresql up and running on the local machine.
Docker commands
-- command to run postgres on docker --
-- remember to change the password --
docker run -d -p 5433:5432 -e POSTGRES_PASSWORD= --name postgres postgres

-- command to stop the Postgres docker container --
docker stop postgres

-- command to remove the Postgres docker container --
docker rm postgres
Remember to enter the password of your choice. If everything goes well the postgresql database server would be up and running on a port number – 5433 and you can connect with the pgadmin gui tool for connecting to the server.

2.2 Creating a Sample table
To implement this tutorial I am using the sample SQL table provided below. You’re free to create the below SQL table under the database of your choice. I selected test database while working.
Create and insert records
-- create database --
create database test;
-- creating table --
create table users (uid serial, full_name varchar not null, age int, gender varchar, primary key(uid));
-- populating dummy data into table --
insert into users (full_name, age, gender) values ('Laurie', 46, 'Female');
insert into users (full_name, age, gender) values ('Aime', 93, 'Female');
insert into users (full_name, age, gender) values ('Paquito', 31, 'Male');
insert into users (full_name, age, gender) values ('Phoebe', 65, 'Female');
insert into users (full_name, age, gender) values ('Justine', 34, 'Female');
insert into users (full_name, age, gender) values ('Venus', 90, 'Female');
insert into users (full_name, age, gender) values ('Peterus', 33, 'Non-binary');
insert into users (full_name, age, gender) values ('Grete', 82, 'Female');
insert into users (full_name, age, gender) values ('Merrick', 94, 'Male');
insert into users (full_name, age, gender) values ('Toiboid', 38, 'Male');
insert into users (full_name, age, gender) values ('Si', 19, 'Male');
insert into users (full_name, age, gender) values ('Leo', 91, 'Agender');
insert into users (full_name, age, gender) values ('Annamarie', 40, 'Bigender');
insert into users (full_name, age, gender) values ('Gene', 71, 'Female');
insert into users (full_name, age, gender) values ('Barney', 19, 'Male');
insert into users (full_name, age, gender) values ('Dido', 80, 'Bigender');
insert into users (full_name, age, gender) values ('Luis', 78, 'Male');
insert into users (full_name, age, gender) values ('Rancell', 77, 'Male');
insert into users (full_name, age, gender) values ('Atlante', 2, 'Female');
insert into users (full_name, age, gender) values ('Gun', 64, 'Male');
-- verifying the inserted records --
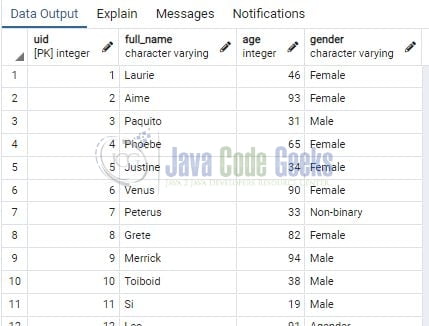
select * from users;
Once the sql script is executed successfully the following result will be shown.
2.3 Creating and Executing cursor command
You can use the following SQL commands to practice the cursor. Here we are creating a cursor named – test_cursor1 to fetch all the records from the table sorted by user id in ascending order.
Playing with cursor
-- create cursor --
BEGIN; DECLARE test_cursor1 CURSOR WITH HOLD FOR SELECT * FROM users ORDER BY uid; COMMIT;

-- running the cursor --

-- output a single record --
FETCH 1 FROM test_cursor1;

-- output 3 records --
FETCH 3 FROM test_cursor1;
The FETCH 1 command will only return a single record from the sql table. You can freely change the number value in the fetch command to take a deep dive into the sql cursors.

Remember to close the cursor with the help of the CLOSE keyword at the end of the transaction.
Close cursor
CLOSE test_cursor1;
3. Summary
In this tutorial, we learned the SQL cursor to fetch single records from the whole set. This operation saves a lot of memory and network bandwidth on the server however rarely you will use the cursor to process the result set in a row-by-row manner. You can download the sql scripts from the Downloads section.
4. Download the Scripts
This was a tutorial on learning the SQL Cursor.
You can download the full source code of this example here: SQL Cursor Example
