MySQL is one of the most used SQL databases in many of the world-enterprise applications. It is one of the most used databases due to its ability to manage transactions and the ACID-behaviour built into its core. One of the reasons MySQL is so popular is due to the easiness it provides for its usage and its related commands.
If you prefer a UI utility which can be used to interact with MySQL for easy access and interaction, head over to the MySQL Workbench post.
Table Of Contents
- 1. Introduction
- 2. Checking if MySQL is running
- 3. Connecting to MySQL via command-line
- 4. Creating database and tables
- 5. Inserting data in Tables
- 6. Display data in Tables
- 7. Update commands with SQL
- 8. Delete commands with SQL
- 9. Toggle Safe update and Autocommit
- 10. Administrating SQL DB
- 11. SQL, a fourth generation language
- 12. Conclusion
1. Introduction
Based on the official website, MySQL is described as:
MySQL powers the most demanding Web, E-commerce, SaaS and Online Transaction Processing (OLTP) applications. It is a fully integrated transaction-safe, ACID compliant database with full commit, rollback, crash recovery and row level locking capabilities. MySQL delivers the ease of use, scalability, and performance to power Facebook, Google, Twitter, Uber, and Booking.com.
Due to its availability on all the OS platforms, it can be used freely over your preferred Operating System which makes it easily usable database. Recently, a newer version for MySQL is released claiming that it is 2X faster than its earlier release. Read the white paper on what’s new in MySQL 8.0. MySQL is the most trusted and widely used open source database platform in use today.
In this lesson, we will see one of the most important MySQL Database 8.0 commands on an Ubuntu 18.04 LTS machine and perform various actions on command-line only. This will help us to get familiar with many commands which come with MySQL database. We will also discuss some administration and authorization management commands which are necessary to know while using MySQL database including commands to select, insert, update and delete data from the database we define.
If you haven’t yet installed MySQL for your machine, head over to this post to understand how this can be done. Once this is done, continue with this lesson. Let’s get started.
2. Checking if MySQL is running
Before we can start working with MySQL and connect to it to perform various actions, we can first confirm if the MySQL server process is actually running. This can be done with a simple process command:
Check MySQL Process
ps -ef | grep MySQL
The output for the above command will be something like:
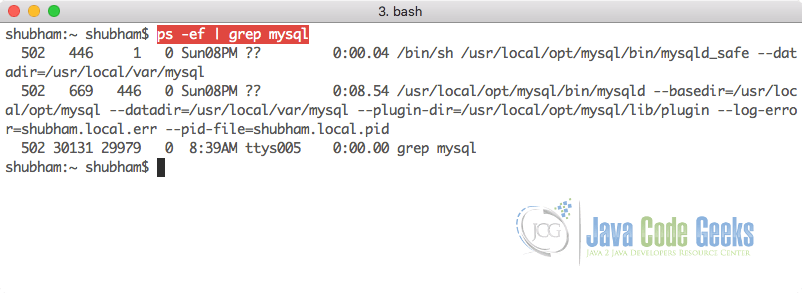
The PID (Process ID) will be different each time you run MySQL and also for different machines.
3. Connecting to MySQL via command-line
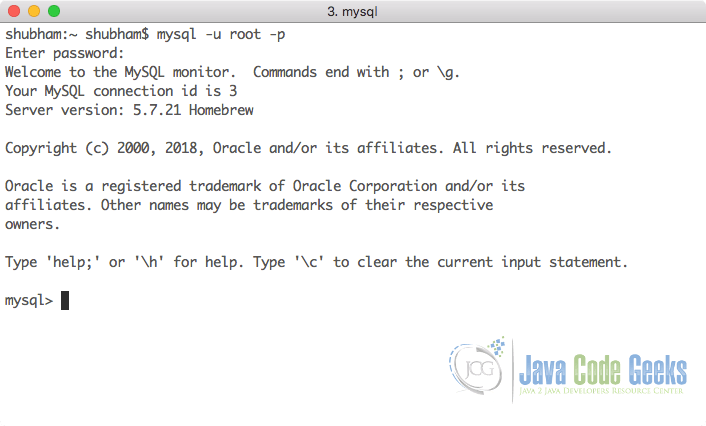
Now that we know that the MySQL server is up and running, we can connect to it using the username and password we supplied to it during the installation process. We can use the following command to do so:
Connect to MySQL
mysql -u <username> -p
When you hit enter, MySQL will quietly wait for you to enter the password. When you type it, the password will not be echoed back to the terminal due to security reasons. We will see the following prompt once we have logged into the MySQL command line:
Once we are inside the MySQL terminal, we can use the following command to display the databases which currently exist in the system and to confirm that MySQL actually works:
Connect to MySQL
show databases;
Here is what we get back with this command:
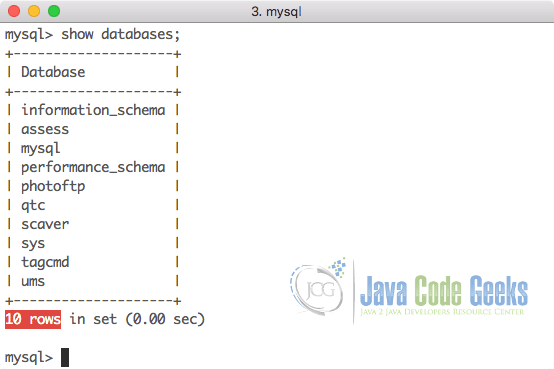
In case of a fresh installation, it would just display the list of MySQL default databases that are used for administration purpose.
4. Creating database and tables
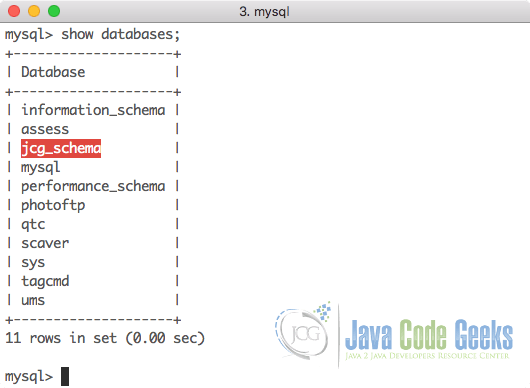
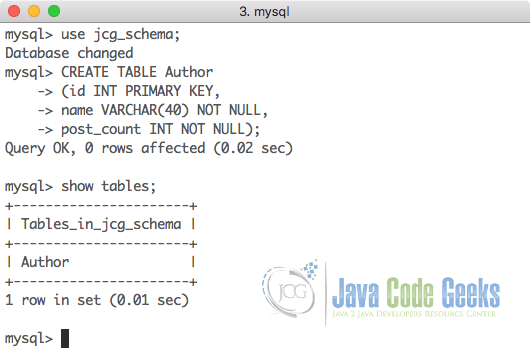
As a next step, we can create our own database and tables inside that database where we can store data. In MySQL, a database is also known as a schema. We can create a new database using the following command:
Create Database
create database jcg_schema;
When we execute this command, we will just get back a Query OK response. If we again check the databases, we can see that our newly made schema is now created:
Now let us use the database and create tables in it. We will create a table of author details in the database. To start using a specific database, we need to run the following command:
Use Database
use jcg_schema;
Once a DB is active, we can execute further commands on it:, like to create a table inside it:
Create Table
CREATE TABLE Author
(id INT PRIMARY KEY,
name VARCHAR(40) NOT NULL,
post_count INT NOT NULL);
Once a table is created, we can see all existing tables in the DB with the following command:
Show Tables
show tables;
Here is what we get back with all the above commands:
In the create table command, we did the following tasks:
- We used
CREATE TABLEcommand (case insensitive) to inform SQL that we need to create a table with the name we supply next i.e. Author in this case - On each line of the command, we supply the column names with which columns should be made like
id,nameandpost_countin the mentioned command - We also mention the data type of each column we want to create as
INTandVARCHAR. The number for VARCHAR describe the length limit each value can have for this column - Finally, we also provide some additional constraints which extends the behaviour of each column defined, like
NOT NULLconstraint makes sure that a null value is never inserted into this column. If you try to so, it will raise an error and will leave the write operation as incomplete.
5. Inserting data in Tables
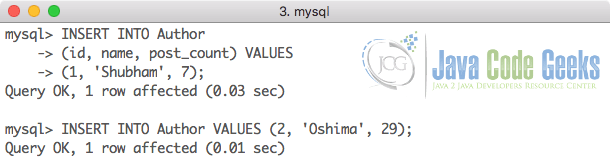
Now that we have created our database and a table inside it, we can start using it to store some records. We can use standard SQL commands to insert the records into the table, like the following command:
Insert data into Tables
INSERT INTO Author
(id, name, post_count) VALUES
(1, 'Shubham', 7);
We can even avoid mentioning the column names where we want to insert the values if we provide data for all of our columns:
Insert data into Tables
INSERT INTO Author
VALUES (2, 'Oshima', 29);
When we execute this command, we will just get back a Query OK response:
Let us try to avoid inserting value in a column which we assigned with a NOT NULL constraint and see what happens:
Insert data into Tables
INSERT INTO Author
(id, name) VALUES
(3, 'Jacob');
We will see the following error when we try to execute the above command:
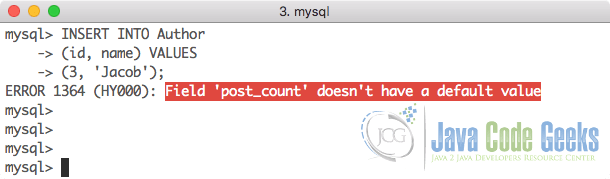
MySQL informs us that a null value was tries to be inserted into a column which is protected by NOT NULL constraint when it hasn’t been assigned a default value. If we had assigned the column with a default value, this error wouldn’t be presented as MySQL will pick the default value when no value is passed for the column.
6. Display data in Tables
Now that we have some data in our table, we can display that data in various formats using different commands in MySQL. Let us look at some commands here.
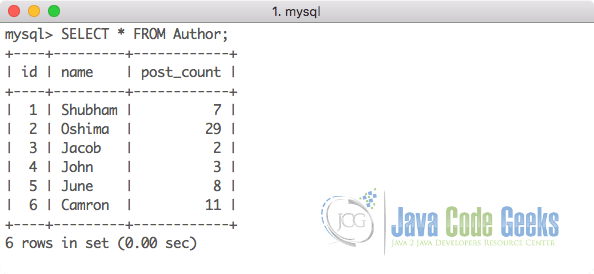
6.1 Display all data
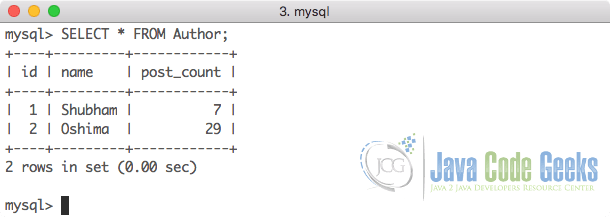
We will start with a simple command to show all of the data in our table in a tabular format:
Select all columns
SELECT * FROM Author;
Here is what we get back with the above command:
6.2 Display selected columns
We can restrict the number of columns which are returned in the response using the SELECT clause and specifying what columns we need in the table with the following command:
Insert data into Tables
SELECT id, name, post_count FROM Author;
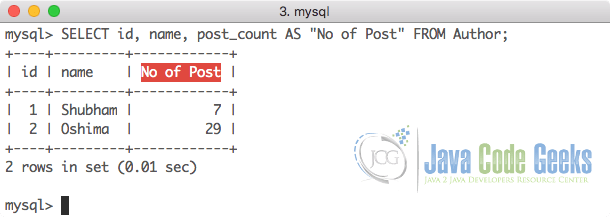
We will get exactly the same response as the last query we ran. It is also possible to modify the table column header at the query level only with a simple AS clause:
Select column header
SELECT id, name, post_count AS "No of Post" FROM Author;
Here is what we get back with the above command:
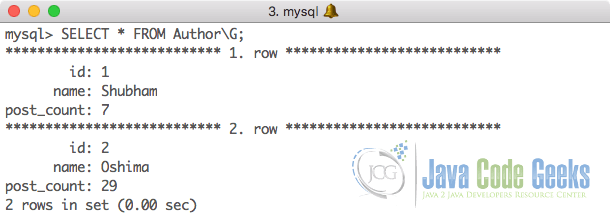
6.3 Display data in illustrative manner
We can display data in an illustrative manner using a simple hack, with the following command:
Data Illustration
SELECT * FROM Author\G;
Here is what we get back with the above command:
6.4 Display limited data
It will often be the case that there are too many records in our table to display in a terminal window. With a simple addition in our command to display data, we can limit the number of records to output to the screen:
Display limited data
SELECT * FROM Author LIMIT 1\G;
Here is what we get back with the above command:
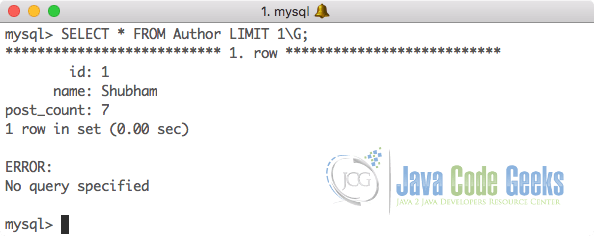
With this command, we can just specify an integer and get that number of records with our query.
6.5 Display paginated data with OFFSET
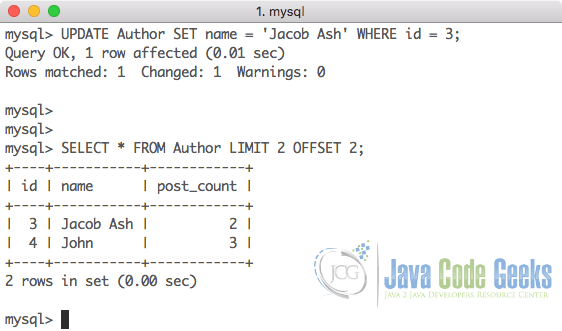
Just like we mentioned above about too many records in a table, we can limit the number of records by using the LIMIT command. But what happens when we want to see, say next 20 records once we have used LIMIT 20 in our command, how do we see next 20 records? This is possible with the OFFSET command.
Offsetting is basically a mechanism to skip a certain number of records and fetch the next ones. For instance, if a table contains 40 records and we create a table where we display 10 records per page. In such a case, on the second page, we need to fetch 10 records after skipping the first 10. This is possible using the keywords offset. An example of the same is displayed below. Before providing an OFFSET in the query, we inserted some more records in our table:
With a simple addition in our command to display data, we can offset the records to output to the screen:
Display paginated data
SELECT * FROM Author LIMIT 2 OFFSET 2;
Here is what we get back with the above command:

7. Update commands with SQL
We also often need to update the data we inserted based on some condition. SQL provides us with UPDATE clause to fulfill this requirement. If we want to update the name of one of the Authors in the table, we can use a simple ID condition, shown as:
Update selected row data
UPDATE Author SET name = 'Jacob Ash' WHERE id = 3;
Here is what we get back with the above command and when we try to display the data again for the same Author:
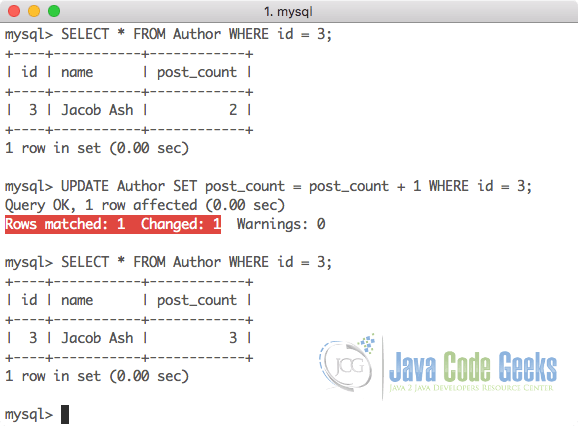
What if we don’t know what we want to update the value to? For example, if we want to increment an Author’s post_count field by 1 without knowing or having to fetch its current value, we can do so by just using the original column name in the query at LHS and RHS as well. See below query for an illustrative example:
Increment integer value
UPDATE Author SET post_count = post_count + 1 WHERE id = 3;
Here is what we get back with the above command:
8. Delete commands with SQL
Just like what we did with update command, we can delete records from our table either by strict rules like by providing specific IDs or by providing a broader WHERE condition. Let’s look at an example here where we delete table rows with specific IDs:
Delete Table records
UPDATE Author SET post_count = post_count + 1 WHERE id = 3;
Here is what we get back with the above command:
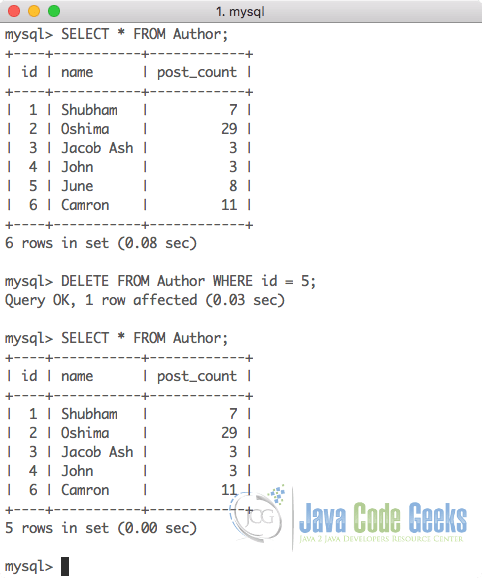
The count of deleted rows is displayed by the number of rows that were affected. Thus, it can be understood that one record has been deleted successfully.
9. Toggle Safe update and Autocommit
When we are working with databases, we need to be very careful about the update and delete queries we run on tables as a small mistake in WHERE clauses, UPDATE commands or DELETE commands can results in data getting corrupted or even worse, completely lost.
To prevent such mistakes to happen, even though we cannot rollback our actions in real-life but we can do so with SQL. There are two possible ways to stop this:
- Stop the query execution without a key field condition
- Disable auto-commit which allows a user to rollback last action performed
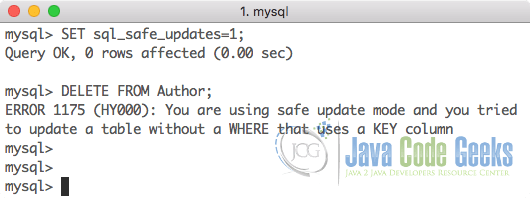
9.1 Stop the query execution
The safe update option is turned off in MySQL command line by default. This allows a user to execute the query shown below:
Delete all records
DELETE FROM Author;
This query will remove all records from the Author table without any opportunity to roll back option or restriction feature. A restriction can be applied with SQL sql_safe_updates features which stops DELETE commands to run without a WHERE clause. This feature can be turned on with the following SQL query itself:
Turn Safe Update ON
SET sql_safe_updates=1;
After this command is executed, if we try to delete all records from a table, we will get an error. Here is what we get back when we try to delete all records:
If we want to toggle the safe mode to off again, we can simply run the opposite query:
Turn Safe Update OFF
SET sql_safe_updates=0;
After this command is executed, we will again be able to execute DELETE commands without any restrictions.
9.2 Disable auto-commit
In an SQL database, the query we execute are immediately executed and the response is returned to the user without any option of rolling back the query and changes made by that query. If we want, we can make use of SQL’s rollback feature but we need to turn the auto-commit off.
On disabling the auto-commit, the changes being done using the command line will be cached until we ask the database to commit it explicitly. Once the auto-commit is disabled, if a query is executed, you can rollback the changes by executing a simple command – rollback. In order to disable auto-commit, we can simply use the following command:
Turn Auto-commit OFF
SET autocommit=0;
After this command is executed, if we try to delete all records from a table, those records will be removed from the table and will be cached until we commit the result explicitly. First, we will turn the safe-update mode off:
Turn Safe Update OFF
SET sql_safe_updates=0;
Now we will try a DELETE command, try rolling back and see what happens. Here is what we get back with the above command:
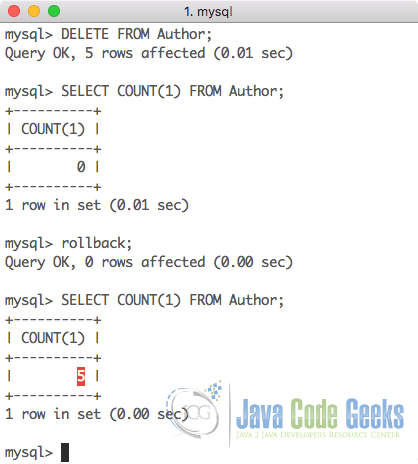
As it can be seen in the above process of execution of delete command, after the execution of delete command, if we display all of the data from the Author table, there will no available records. Also, after rollback, we can see that the 5 records are intact and the delete action has been rolledback. So, turning off auto-commit can have a significant impact in the regular use of MySQL command line.
10. Administrating SQL DB
Now that we have looked at basic SQL commands, we will also look at some of the SQL commands which can be helpful in managing the DB. Every database has its own way of storing administrative data. MySQL stores the administrative data in two different databases. The first database being used for the administrative purpose is the database named mysql. We will cover only the tables which are important to look at as a beginner.
Let us use the database and check the list of available tables:
Display sql tables
USE mysql;
SHOW Tables;
Here is what we get back with the above command:
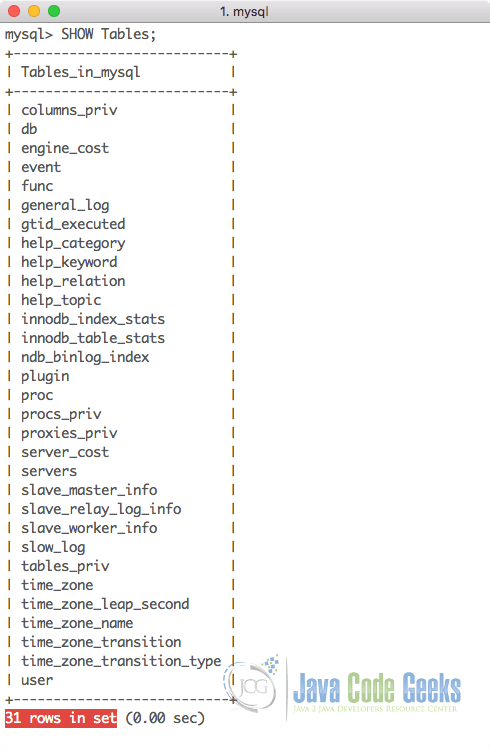
As it can be seen, this database contains a collection of 31 tables. Of these, the tables to look for are user & global_grants as the former table contains the list of users that have been created for SQL. On viewing the records, we will find some additional users in addition to the default root user. These users are created by default during the installation and should not be updated unless necessary. If we look at the root user data, here is what we see:
Root user data
mysql> SELECT * FROM user \G;
*************************** 1. row ***************************
                  Host: localhost
                  User: root
           Select_priv: Y
           Insert_priv: Y
           Update_priv: Y
           Delete_priv: Y
           Create_priv: Y
             Drop_priv: Y
           Reload_priv: Y
         Shutdown_priv: Y
          Process_priv: Y
             File_priv: Y
            Grant_priv: Y
       References_priv: Y
            Index_priv: Y
            Alter_priv: Y
          Show_db_priv: Y
            Super_priv: Y
 Create_tmp_table_priv: Y
      Lock_tables_priv: Y
          Execute_priv: Y
       Repl_slave_priv: Y
      Repl_client_priv: Y
      Create_view_priv: Y
        Show_view_priv: Y
   Create_routine_priv: Y
    Alter_routine_priv: Y
      Create_user_priv: Y
            Event_priv: Y
          Trigger_priv: Y
Create_tablespace_priv: Y
              ssl_type:
            ssl_cipher:
           x509_issuer:
          x509_subject:
         max_questions: 0
           max_updates: 0
       max_connections: 0
  max_user_connections: 0
                plugin: mysql_native_password
 authentication_string: *AFA439E0ED25A5992714C9C84E3E1A2E3EFC64E4
      password_expired: N
 password_last_changed: 2017-12-11 22:38:09
     password_lifetime: NULL
        account_locked: N
As clearly seen, the root user has all the privileges to perform any actions on any database. Another database which you can look at is sys database. This DB contains live data about which users are connected to which DB as of now.
If you want to change the password for the root user, there are some simple set of commands you can use to do so. For this task as well, we need to use the mysql database:
Change root user Password
UPDATE mysql.user
SET authentication_string=PASSWORD('new-password-string')
WHERE user='root';
After this command is executed, we need to flush privileges for the user which makes this password effectove from the time you log in to the database next time. To flush the privileges, we use the following command:
Change root user Password
FLUSH PRIVILEGES;
After this command is executed, we can exit the mysql session and log in again with the new password.
11. SQL, a fourth generation language
Often, people ask if SQL is a programming language at all. Well, it is as it allows looping, logic directives, variables, and so on in the stored procedures and normal SQL queries. But it is not a normal programming language like Java and C++. Java and C++ are third-generation programming languages and SQL is a fourth-generation language. The fourth-generation languages are programming languages which are closer to human language than high-level languages like Java. These fourth-generation languages are usually used to access databases, such as SQL, where simple code is used to get and modify data.
12. Conclusion
In this lesson, we described the basic SQL commands which help us to store, modify and remove data from the databases and tables we have defined for our usage. We also looked at how we can administer SQL database and even how we can modify the password for one of the users in SQL database. Although we covered many basic commands, there is much more we can do with this simple yet effective database.
Don’t forget to check the examples of using Java with SQL: JDBC Best Practices Tutorial and Java JDBC ResultSet Example. These lessons explain how to effectively use SQL commands with Java & JDBC drivers.
