MySQL Workbench is one of the most used tools to work with MySQL-based databases and manage schema for a database, data in tables, and reverse engineering the schema definitions. The reason MySQL Workbench is so popular is the easiness it provides when working with MySQL databases. It provides a visually intuitive DB design tool that integrates many functionalities like:
- Creating databases
- Managing databases and related properties like user-access permissions
- Database design using a visual DB designer which allows us to create class-diagrams
- DB administration & maintenance
Most of the Database administrators prefer using MySQL Workbench over many other similar tools available in the marketplace.
You can also check this tutorial in the following video:
Table Of Contents
1. Introduction to MySQL Workbench
Based on the official website, MySQL Workbench is defined as:
MySQL Workbench is a unified visual tool for database architects, developers, and DBAs. MySQL Workbench provides data modeling, SQL development, and comprehensive administration tools for server configuration, user administration, backup, and much more. MySQL Workbench is available on Windows, Linux and Mac OS X.
Due to its availability on all the populator OS platforms, it can be used freely over your preferred Operating System to do a lot of tasks actually and can single-handedly perform operations for which you don’t need to install any more tools for DB administration. One of the most complex tools MySQL Workbench provides is a DB migration tool that can be used to migrate Microsoft SQL Server, Microsoft Access, Sybase ASE, PostgreSQL, and other RDBMS tables, objects, and data to MySQL database.
2. Installing MySQL Workbench
Before continuing to understand the features presented by MySQL Workbench and basic tools, we need to install the Workbench on our machine. If you want to run a local database, you must install a compatible MySQL server on the machine as well. If you haven’t installed that yet, follow this link to get the server up and running so that we can continue installing the Workbench too.
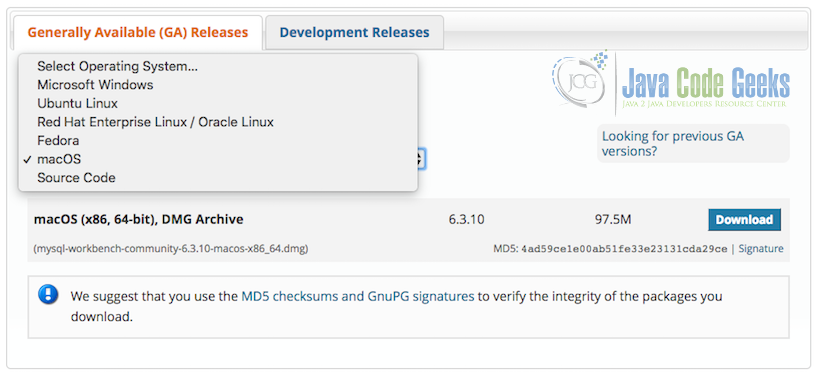
Once the MySQL server is up and running on your local machine, we’re ready to move forward to install the Workbench on our system. We can download the Workbench installer file from here for specific Operating Systems. As shown in the image below, MySQL Workbench is available for Windows, MacOSX & multiple variants of Linux systems:
The installation process is pretty straightforward. The below subsections cover the installation process for specific Operating Systems.
2.1 Installing on Macintosh OS
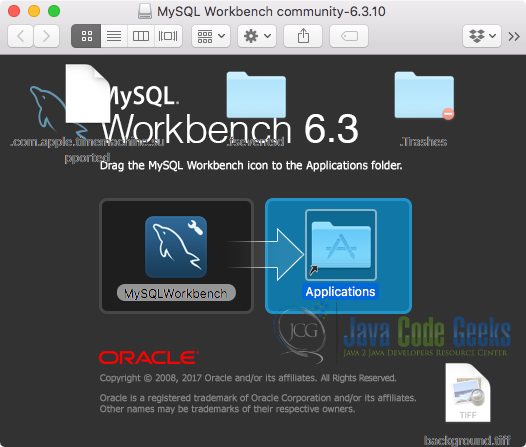
To install MySQL Workbench on a Macintosh OS, download the .dmg package file and open it which will bring up the following installer window:
Follow the steps as presented by the application window once we open the installer file, like moving the file to the applications folder as mentioned in the image:
2.2 Installing on Windows OS
For the purpose of installation on Windows OS, we can download the .exe format file and set up the Workbench as the windows installer instructs. The installer will also check for all the dependencies for MySQL Workbench like MySQL server, so that should be up and running when we start installing the Workbench on the same machine. When all checks are passed, the installation will continue.
Find more information about installing the tool on Windows OS here.
2.3 Installing on Linux variants
For the purpose of installation on Linux OS, we can download the .deb format file and set up the Workbench as the Linux installer instructs. On Linux, it is also possible to install the Workbench using the command line. Here are set of commands we can use to download and install the Workbench on a Linux machine:
Downloading Installer for Linux
sudo dpkg -i mysql-apt-config_0.5.3-1_all.deb
sudo apt-get update
sudo apt-get install mysql-workbench-community
This is pretty much the most straightforward set up technique in all of the platforms. We’re ready to start the Workbench on our OS. As we’re using a Mac, the UI window will be related to that but other platforms, Workbench behave in the same manner.
3. Getting Started with MySQL Workbench
Once we have installed and started the MySQL Workbench, we will see a welcome screen similar to the following depending on the OS we are using:
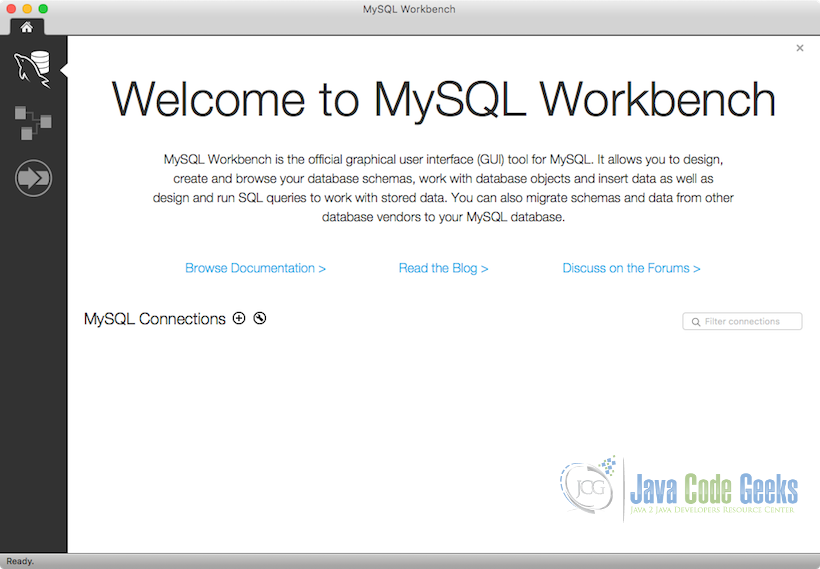
By default, the application doesn’t make any connections for the MySQL server running on localhost. We can start making new connections directly from this screen. The local host server can be connected only if the local MySQL server has been installed.
3.1 Making a new MySQL connection
To add new connections to the Workbench so that you don’t have to enter DB credentials, again and again, we can make use of the + symbol shown beside the MySQL Connections Label which will present a small window, as follows:
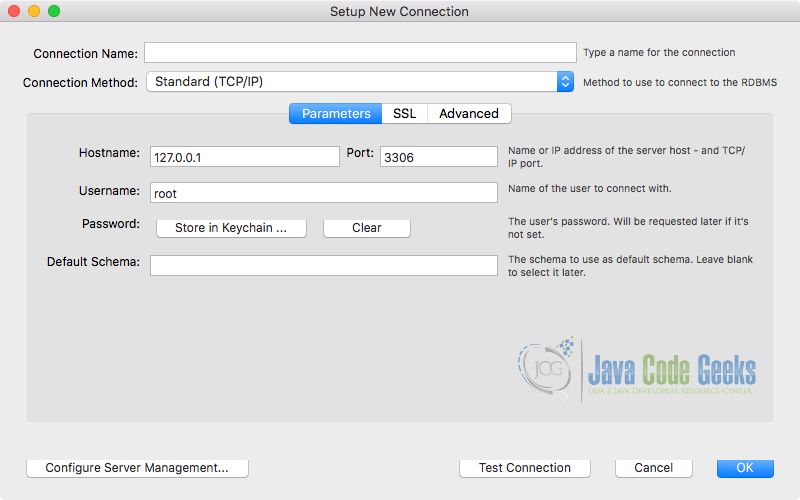
In this window, we can enter the DB details like the DB name, connection method, host for the DB server, port where MySQL server is running (by default, it is 3306), username and password for the database we’re connecting to.
The connection name is an alias through which we can easily identify a DB connection where there more connections in our tab to different databases. If you’re connecting to a local MySQL server, we can specify the host as localhost with Port number 3306. Otherwise, provide the hostname and port number of the remote server. When we provide all correct details in this form, MySQL Workbench will try to connect to the server we mentioned in the details and show a connected message if it was successful in doing so:
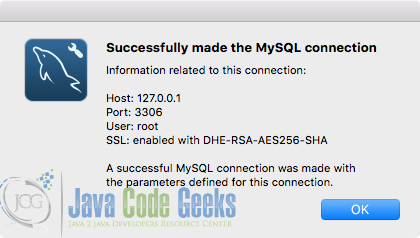
Once a connection is successful and you save the connection, we can access the database anytime without having to re-enter the credentials and other information in a repetitive manner.
3.2 Managing the Database
Once we have made the connection to the database, we can see the following screen with various components which allows us to manage databases, analyse the query performance, modify the schema of a table and do other common operations with just a few clicks. We can see four views in the screen:
- Management
- Instance
- Performance
- Schema

Let us understand each section of the panel briefly here:
- The Management section enables us to manage and monitor the health of the MySQL server. As the number of clients connecting to the server, we can monitor how does it affect the health of the server and if we should consider modifying memory requirements for the server to increase its performance. This section also allows us to import and export data into the database.
- Next section is the Instance section. With this section, we can start or stop the server directly from the MySQL Workbench. Please note that this requires the MySQL server to be installed at the default location as MySQL Workbench will try to find the configuration file as well as server related scripts at the default location on the machine.
- The Performance section allows us to provide informative performance analysis and reports about the server health. This feature is only available in MySQL Server version 5.6.6 or above. So make sure to use that version if you want to make use of this feature.
- The last section in the panel is the Schema which is currently present in the database we’re connected to right now. If we right-click on any of the schemas, we can do many operations like creating new tables inside a schema, deleting all data and much more.
4. Managing Database and Table schema
If you want a way with which creating databases and tables is super-fast and easy, MySQL Workbench provides an excellent GUI through which you don’t have to write any SQL. We have the following options to create and manage databases and tables in the Workbench:
- Using the GUI directly
- Executing SQL scripts in the Query builder
Let’s demonstrate each of these methods here one by one.
4.1 Using the GUI for managing schema
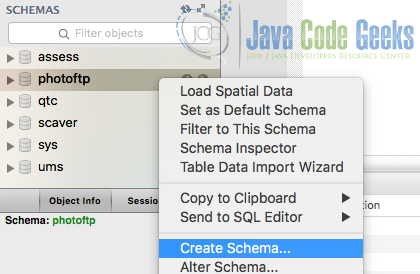
To create a new database, we can click on any of the existing schemas or on the blank schema window. In the context menu that opens up, select Create Schema as shown below:
Once we select the specified option, we will see a new tab asking for a DB schema name:
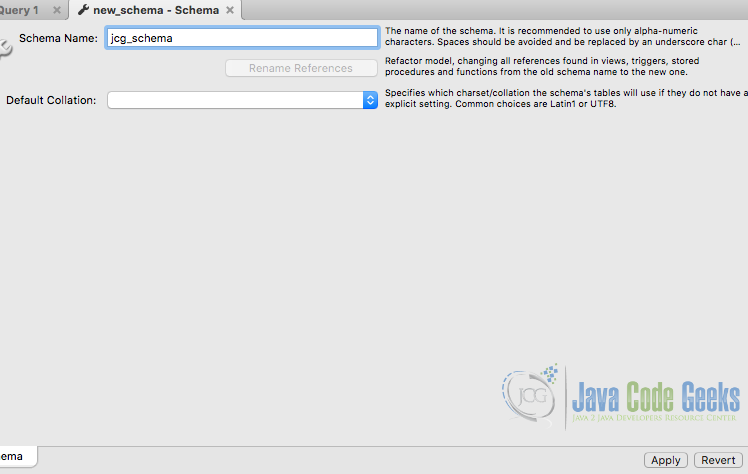
Select Apply once you have entered the values. This will open up a review screen display the SQL as shown under with the following SQL which will be executed once we select Apply:
SQL Query for creating DB
CREATE SCHEMA `jcg_schema`;
We can see the new schema in the Schemas section in the panel. When we expand the schema, we can create new Tables for the Database.
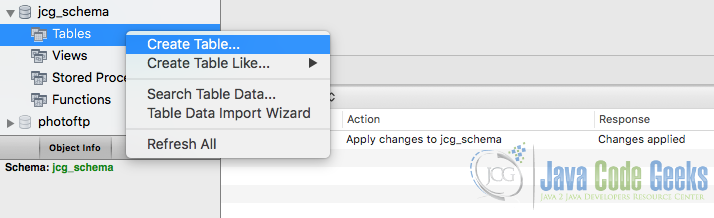
4.2 Making new Tables in a Database
To create a new table inside a schema, right-click on the Tables group as shown and select Create Table:
Once you hit the option, we will be taken on a new screen that asks for more information about the structure of the table to create, what type of columns to include, and what type of data they can store. Fill in all the information with desired columns and we can move ahead with inserting some sample data into the schema with manual SQL scripts.
When the new tab opens to create a table, we can see the following options to decide the structure of the table:
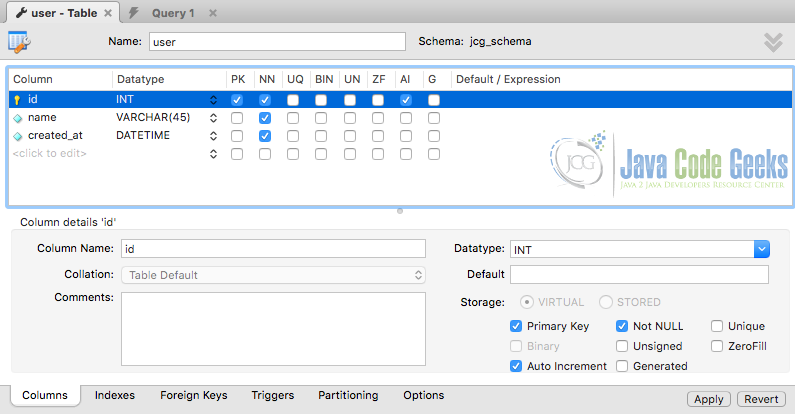
The first and second columns above are self-explanatory. The rest of the columns are described below.
PK: Primary Key
NN: Not null
UQ: Unique data
BIN: Contains binary data
UN: Contains unsigned data
ZF: Stands for Zero-filled columns
AI: Auto-Increment the field value
G: Generated column. The value is generated using a formula for the column
Select the checkboxes to apply specific properties to the columns you defined in the schema. You could make any changes if required in the script and click Apply.
Finally, it is also possible to do so much more in the tab shown before you create the table. Indexes tab can be used to create an index on a given column in addition to the primary key of the table which will make the search on that column a lot faster but also make this table occupy more space when any data is inserted into the table. We can see these options by clicking the Indexes tab. The available options are self-explanatory as long as the user has sufficient knowledge about MySQL Database. As of now, this table does not need any more indexes to be created. Hence, we would skip to the next tab.
4.3 Inserting Data with SQL scripts
We can manage the schema with SQL scripts as well. The SQL scripts will be executed for the database which is currently open. Open up a query builder (which is open by default) and we can execute some SQL queries into the query builder to insert some data into the schema and table we just made in previous steps.
These scripts will be normal SQL scripts with INSERT commands with sample values. A simple example for an SQL statement will be like:
SQL Command for Inserting Data
INSERT INTO `jcg_schema`.`user` (`name`, `created_at`) VALUES ('Shubham', now());
Now, we can run another SQL script to see the data in the table:
SELECT Command
SELECT * FROM jcg_schema.user;
5. Creating a model in MySQL Workbench
Now that we have an idea of how to create a database in the MySQL Workbench, we can start to use the MySQL workbench feature to a greater extent. The main reason for MySQL workbench being a popular tool among the DB developers and Admins is that it provides a large number of features to make DB creation easy with multiple tools like EER design tool, Model design tool, GUI for schema, table, trigger, and procedures management, utilities for performance monitoring, utilities for server management and facilities for data export, import as well as migration. In this section, we will discuss one of these important features – Model creation.
Model creation is another way to create schema and tables in a visual manner. Therefore, we will shorten the process of table creation from here. Although, we will cover the creation of the EER diagram from the same as well.
5.1 Creating a Schema using Workbench model interface
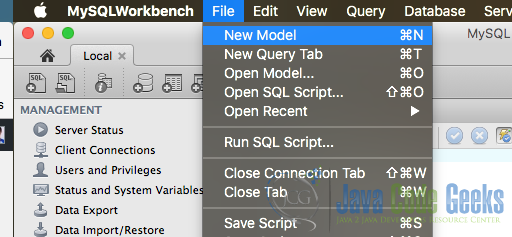
A model is termed as a replica of a schema except for it being displayed visually as an EER diagram. In order to start with the creation of a new model, navigate to File->New Model.
Once we are taken to the new model tab, you will find several icons placed on the top. The first three icons in the image shown below are related to File operations like create a new document, open an existing model and save a model. These icons are followed by undo and redo icons. The next group of icons is important here.
To start with, click the second icon in the group – Create a new schema. It should create a new schema as shown above. A tab opens up below it and allows to configure the schema name. Next, proceed with the creation of tables by clicking Add Table in the image shown above. The table creation process is similar to the above section once the Add Table link is clicked:

Try creating some tables in the schema after which we can create an EER Diagram for the same schema. In the image below, we have created two tables in the provided schema. Select the Add Diagram in the EER diagram section of the tab to create an EER diagram for the current schema. A new tab opens up with a blank EER diagram sheet. On the left-hand panel, there is a Catalog section marked with a red rectangle below.

To create a new EER diagram, we can expand the tables node and drag and drop the tables onto the sheet. On dragging the previously created tables onto the sheet, it automatically draws a line referencing the foreign link between the tables. The tables we defined didn’t have any foreign keys, otherwise, it could have been seen clearly how tables are related to each other.
It is also possible to create tables right away from the UI. The buttons marked with red rectangle allows you to easily add new tables in the sheet and opens up a create table UI in below the sheet. You could notice that as you add columns and foreign key constraints, they get added automatically in the EER diagram above. Thus, the EER diagram could be created using a drag and drop interface quite easily.
6. Reverse Engineering
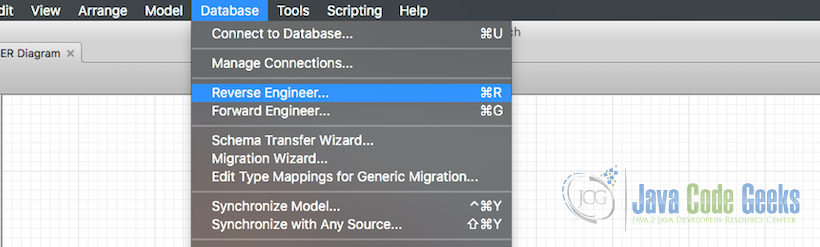
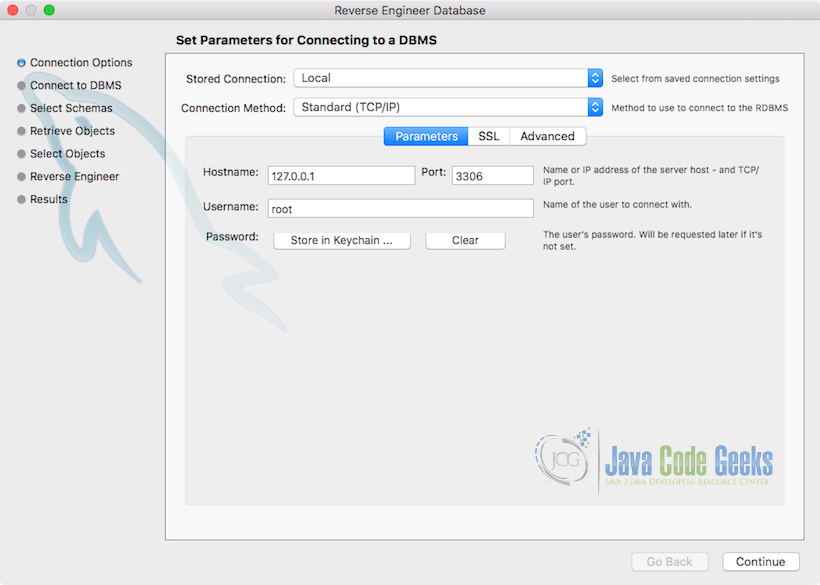
It is one of the most common scenarios that developers start to create the schema of the table directly in the code instead of creating an EER diagram for understanding first. In such cases when the number of tables is a lot more, it is difficult to create an ER diagram from scratch. The Workbench has a solution for this situation as well. With Workbench’s Reverse Engineering feature, we can create an EER diagram from any existing schema at any point in time. To do so, click on Database > Reverse Engineer feature:
Once we select the given option, we will have to provide details about the DB to connect to:
Once this is done, we will have to select the database and continue normally till the end. Once all steps are complete, you will be presented the EER diagram for the database you selected in the complete process.
The final presented window will show the tables in the EER diagram format. We can drag and arrange the tables for a large database if some table view is preferred over another and cover them in a limited area of the sheet too. If we want to save the diagram as an image to use it in a document, we can do so by navigating to File -> Export. Select the option as per the format and save the diagram at the desired location.
7. Summary
In this lesson, we discussed many important features provided by the MySQL Workbench and displayed how it can solve some very common problems for developers and administrators which is the main reason for its popularity. The major features like the creation of schema, tables, and EER diagram were also discussed. However, this is not all that Workbench has. There is always more to explore. To study all the operations and features one can do with the Workbench, feel free to explore the MySQL Workbench official website.
