In the past examples we studied the basics of MongoDb and how to manage and maintain the Mongo DB. In this example, we will demonstrate how we can use Node.js to communicate with the MongoDB server.
Table Of Contents
1. Introduction
Node.js is a lightweight and efficient Javascript runtime which can be integrated seamlessly with MongoDB to create a dynamic Application.
2. Project Setup
Install MongoDb Server from here as per your system. For the sake of this demonstration, we are using the Community Edition.
Next step is to install Node.js from here. Once Nodejs and MongoDB are installed, we are ready for the actual project setup.
MongoDb Node.js Driver Installation
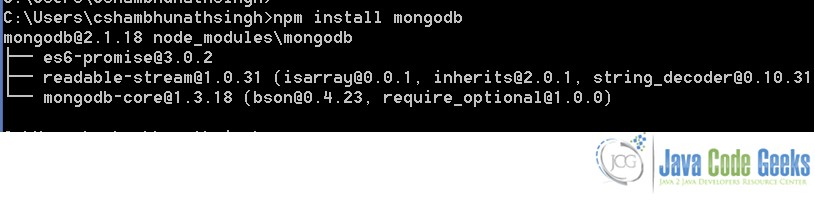
We start the project Setup by installing the MongoDB Node.js Driver. This driver helps MongoDB Server understand the service requests sent via Node.js. To install this driver, open command prompt or shell,depending upon your environment and run the following command :
npm install mongodb
Here is how the output looks in the console :
This is a onetime process and will install the MondoDB Driver on the client system. Next step is to start the MongoDB Server with the following command :
mongod.exe --dbpath C:\MongoDb\Data
We use the --dbpath argument to specify the location of the database files on the server.
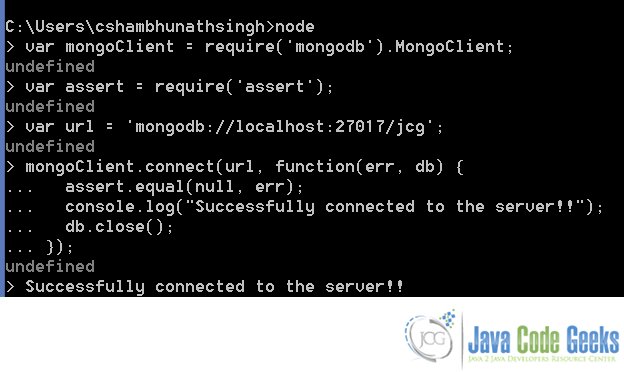
Now, let’s test out if the connection is set-up properly and connected with the MongoDb Database. Open a node shell by typing node in the normal shell/cmd. Then type the following statements :
var mongoClient = require('mongodb').MongoClient;
var assert = require('assert');
This will load the required modules including the Mongodb driver. Now we can use this Driver to establish the connection to the mongodb server.
var url = 'mongodb://localhost:27017/jcg';
mongoClient.connect(url, function(err, db) {
  assert.equal(null, err);
  console.log("Successfully connected to the server!!");
  db.close();
});
In the above function, we are using the default mongodb url and connecting to the database - 'jcg'.
Let’s run the code and check out the output in the console :
That is all on setting up the environment. Now let’s try out the CRUD operations using Node.js on the MongoDB Server.
3. Implementation
3.1 Insert
Lets try to insert a document in the jcg database. Here’s the relevant code for that :
var insertDocument = function(db, callback) {
   db.collection('person').insertOne( {
   "name" : "Chandan",
  "address" : "Kalyan, Mumbai, India",
   "Gender" : "Male"
   }, function(err, result) {
    assert.equal(err, null);
    console.log("Document successfully inserted");
    callback();
  });
};
We are using the insertOne method of Collection class to insert the document in the database. This method inserts only one document and takes db as a input argument. Upon successful insertion we print the success message to the console.
Let’s execute the insertDocument in the following manner :
mongoClient.connect(url, function(err, db) {
  assert.equal(null, err);
  insertDocument(db, function() {
      db.close();
  });
});
The URL and mongoClient variables have been defined above. To check if the above code executed properly open a mongo Client and execute the commands as shown below:
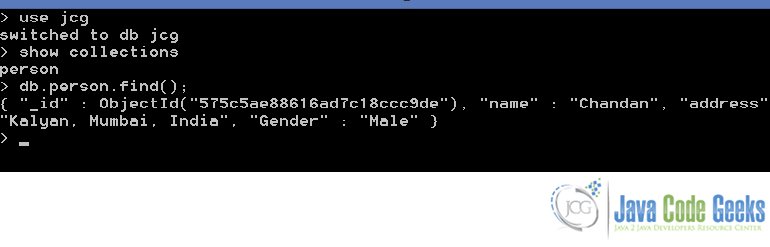
As you can see the document was successfully inserted into the person collection.
Similarly, we can insert multiple documents using the insertMany method of Collection class. The documents should be enclosed by parenthesis and seperated by a comma. Here is a sample code for the same:
var insertDocuments = function(db, callback) {
   db.collection('person').insertMany( [{
   "name" : "Chandan",
  "address" : "Kalyan, Mumbai, India",
   "Gender" : "Male"
   },{
   "name" : "John Doe",
  "address" : "New York, USA",
   "Gender" : "Male"
   }], function(err, result) {
    assert.equal(err, null);
	assert.equal(result.insertedCount,2);
    console.log("Documents successfully inserted");
    callback();
  });
};
3.2 Update
TO update a document we use the Collection#updateOne(filter, update, options, callback) method. Now let’s see the code to update a document in the collection.
var updatePerson = function(db, callback) {
db.collection('person').updateOne(
  { "name" : "Chandan" },
  {
	$set: { "address": "Uttar Pradesh, India" }

  }, function(err, results) {
  console.log(err);
  callback();
});
};
{ "name" : "Chandan" }, is the filter to identify the document to be updated. Since we are using updateOne method, only the first document to match this criteria is updated. In case the requirement is to update all the documents matching this criteria, updateMany method can be used.
We use the $set operator to change the values of the existing document.
Let’s execute the updatePerson function created above and see the result:
mongoClient.connect(url, function(err, db) {
  assert.equal(null, err);
  updatePerson(db, function() {
      db.close();
  });
});
Here’s the output in the Mongo Client before and after the execution of updatePerson method :
> db.person.find();
{ "_id" : ObjectId("575f1e485bec4a5421ff30e2"), "name" : "Chandan", "address" :
"Kalyan, Mumbai, India", "Gender" : "Male" }
> db.person.find();
{ "_id" : ObjectId("575f1e485bec4a5421ff30e2"), "name" : "Chandan", "address" :
"Uttar Pradesh, India", "Gender" : "Male" }
As you can see , the address property of the document gets updated.
The properties of the document not modified, remain as before. In case, the requirement is to replace the content of the documents who satisfy the filter criteria, we can use the Collection.replaceOne(filter, doc, options, callback) method.
Here is an example of the same :
	var replacePerson = function(db, callback) {
	db.collection('person').replaceOne(
	  { "name" : "Chandan" },
	  {
	  "Designation" : "Author",
	  "Organization" : "JavaCodeGeeks",
	  "hobbies" : "Cricket" },
	  function(err, results) {
	  console.log(err);
	  callback();
	});
	};
This will replace all the properties of the existing document with the new ones. However, the value of _id cannot be changed.
Here’s the output:
> db.person.find();
{ "_id" : ObjectId("575f1e485bec4a5421ff30e2"), "Designation" : "Author", "Organ
ization" : "JavaCodeGeeks", "hobbies" : "Cricket" }
As you can see, the properties of the document have been replaced by the newer ones, but the value of _id remains the same even after the replace operation.
3.3 Read
To read data from the MongoDB server we use the Collection#find(query), which iterates over the document and prints all the non-null documents returned by the server after applying the filter.
Let’s demonstrate this with the help of an example :
var searchPerson = function(db, callback) {
   var cursor =db.collection('person').find( { "name": "Chandan" } );
   cursor.each(function(err, doc) {
      assert.equal(err, null);
      if (doc != null) {
         console.dir(doc);
      } else {
         callback();
      }
   });
};
Here, we are querying the person collection to see if there are any records with the name having value as Chandan. If we find any non-null document with this matching criteria, we simply print it to the console.
To execute the searchPerson, we use the below block:
mongoClient.connect(url, function(err, db) {
  assert.equal(null, err);
  searchPerson(db, function() {
      db.close();
  });
});
Here is the output of executing the search method:
{ _id: { _bsontype: 'ObjectID', id: 'W_%f[ìJT!ÿ1\u0005' },
  name: 'Chandan',
  address: 'Kalyan, Mumbai, India',
  Gender: 'Male' }
To search the collection, we may use the logical operators like greater than, less than etc. in the filter part of the find method. Here’s an example of the same :
var searchPerson = function(db, callback) {
var cursor =db.collection('person').find( { "age": { $lt: 30 }, { "name": "Chandan" }  } );
   cursor.each(function(err, doc) {
      assert.equal(err, null);
      if (doc != null) {
         console.dir(doc);
      } else {
         callback();
      }
   });
};
More than one conditions can be separated by a comma ,.
3.4 Delete
To delete documents from the MongoDB Server we use the Collection#deleteOne(filter, options, callback) method. The first document that matches the criteria in the filter, is removed from the collection. To delete all the documents matching a given filter criteria, we use the Collection#deleteMany method.
var deletePersonDocument = function(db, callback) {
   db.collection('person').deleteOne(
      { "name": "Chandan" },
      function(err, results) {
         console.log(results);
         callback();
      }
   );
};
Here is the code to test the delete method :
mongoClient.connect(url, function(err, db) {
  assert.equal(null, err);
  deletePersonDocument(db, function() {
      db.close();
  });
});
Here’s a snapshot of the output after executing deletePersonDocument method :
{ result: { ok: 1, n: 1 }, deletedCount: 1 }
4. Conclusion
Here, we demonstrated how we can use Node.js to communicate effectively with Mongo Database Server.
