Merge Conflicts are undesirable for most of the developers for various reasons. No matter how careful and collaborative developers are, they often end up in merge conflicts. There are multiple ways to resolve merge conflicts, and each developer prefers a different way. Compared to other version control systems like SVN, CVS etc, resolving conflicts with Git is much easier. Though Git tries to be smart in resolving merge conflicts, there are some cases where it does not overdo stuff and lets developer decide which code needs to be merged. This article explains how to resolve merge conflicts using git mergetool.
1. Introduction
The git mergetool helps the developer to resolve conflicts in an efficient way. It provides a GUI where you can look at versions from your current branch, remote branch, common ancestor and final merged version, all in one window, which we will see going further into the article.
In this example, we will walk you through how git mergetool can be of great help while resolving conflicts. We will start with a scenario that will create a conflict situation. Then we will explain how the conflict can be resolved with git mergetool using vmdiff editor. We will then explain few useful commands and various options to configure a mergetool of your choice. Finally, we will show you how mergetool can be used with kdiff3.
2. Tools used
- Git 2.7.0.2
- KDiff3 0.9.98 (64 bit)
- Windows 7
3. Conflict scenario
This section describes a scenario that will run you into a conflict so that we can use git mergetool to resolve it.
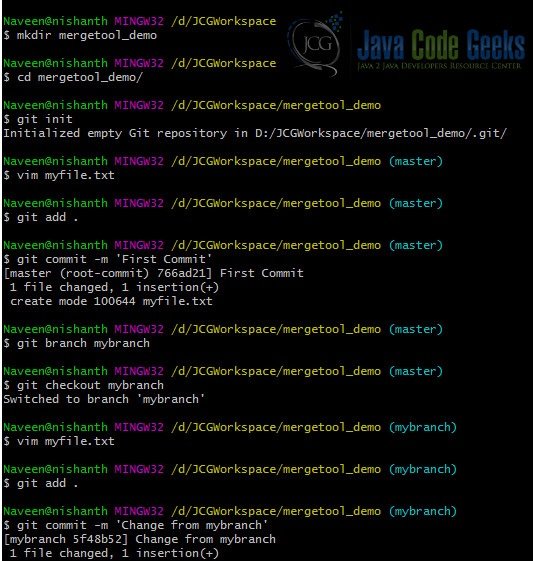
-
- Invoke Git Bash.
- Create a directory in your local computer, and navigate to the same. (mergetool_demo)
- Create an empty Git repository under this directory. You will be on ‘master’ at this point.
- Create a new file ‘myfile.txt’.
- Add a new line to the file -> ‘First Commit.’
- Add the file to staging area, then commit it. Now you have committed the changes to ‘myfile.txt’ to ‘master’.
- Create a new branch ‘mybranch’, and switch to it. The below command creates a new branch named ‘mybranch’ and switches to it in one step.
git checkout -b mybranch
- Add new line ‘Changed from mybranch.’ in the 2nd line of the file ‘myfile.txt’.
- Commit the file to ‘mybranch’.
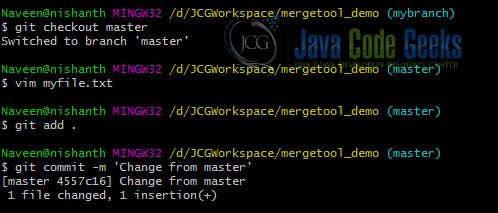
- Now, Checkout to ‘master’.
- Add new line ‘Changed from master’ in the 2nd line of the file ‘myfile.txt’.
- Commit the file to ‘master’.
- Finally, merge ‘mybranch’ to ‘master’ using the command below. You will see an error.
git merge mybranch

4. Mergetool
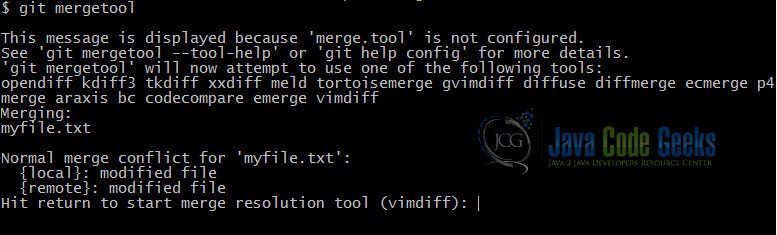
Now we have a conflict, because we changed the same line of a file in both branches. As Git cannot resolve this conflict automatically, we have to solve it by ourselves. Here, we will use Git Merge tool to resolve this. Use the command:
git mergetool
Since we have not configured any merge tool yet, git uses the default tool (in this case, it is vimdiff).
It opens up a view with 4 different panes.
- The top-left pane displays content of the file from the current branch, which is master in our case. This is called LOCAL.
- The top-right pane displays content from the remote branch, from where we are trying to merge, which is ‘mybranch’ in our case. This is called REMOTE.
- The top-center pane displays content from the common ancestor. This is the version of the file from where both the ‘master’ and ‘mybranch’ versions started diverging. This is called BASE.
- The bottom pane displays content after the merge is performed. This is called MERGED.
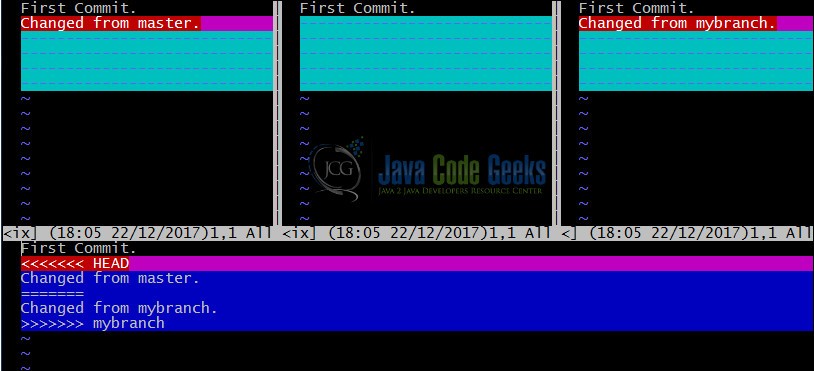
As you can see in the MERGED pane (bottom), the content where the conflict is present is wrapped around the lines
<<<<<<< HEAD and >>>>> mybranch separated by =======
We can manually resolve the merge conflict by editing the content in the bottom pane, and then saving the file using :wqa (Write and Quit all files).
Otherwise, if you need only content of the file from one of the branches, and not a mixture of both, you can use the below commands:
To get LOCAL version to MERGED :diffg LO
To get REMOTE version to MERGED :diffg RE
To get BASE version to MERGED :diffg BA
Once the conflict resolution is successful, the merged file will be staged for commit.
Finally, we have to commit the merged file, using
git commit -m 'Merged from multiple branches'.
Compared to merging the files manually, mergetool offers a better interface where we can view the changes from both the branches, base and merged content all in one place, thereby reducing the chances of human error while merging the file.
5. Configure a mergetool of your choice
This section describes how to configure a mergetool of your choice. Though we explain the steps taking KDiff3 as editor, the steps involved are same for any editor you like to use, among the ones supported by Git.

5.1 help
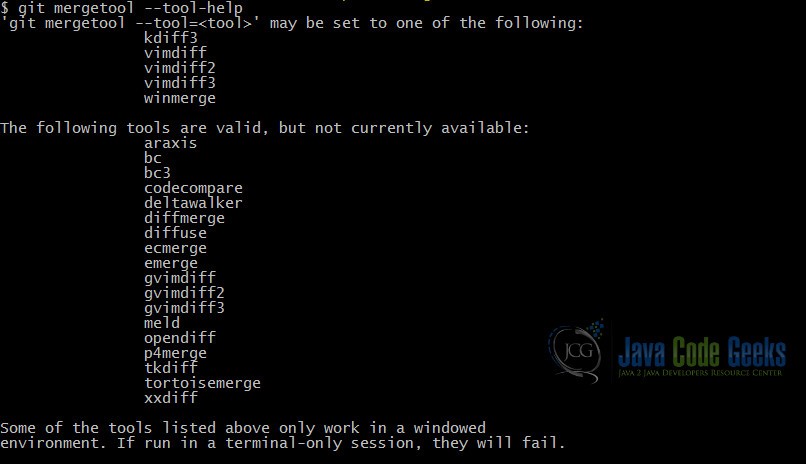
If you like to know which editors are supported by Git, you can use the command:
git mergetool --tool-help
5.2 setup kdiff3
Make sure you have KDiff3 installed on your computer and Path variable contains the path to KDiff3 executable, before we proceed further.
To configure kdiff3 as your preferred editor, using one of the below commands:
git config merge.tool kdiff3
git mergetool --tool=kdiff3
git mergetool -t kdiff3
You can set a different path to kdiff3 executable, by using the command:
git config mergetool.kdiff3.path "C:/Program Files/KDiff3/kdiff3.exe"
In the above case, you don’t have to write the executable path in Path variable.
5.3 prompt
In case you want to be prompted each time the merge tool editor is invoked, use --prompt option as below:
git mergetool --tool=kdiff3 --prompt
Using --no-prompt option does not prompt each time the merge tool is invoked, this is the default setting when tool is invoked using –tool or merge.tool options. You can use the option in one of the two ways below.
git mergetool --tool=kdiff3 --no-prompt
git mergetool --tool=kdiff3 -y
5.4 trustExitCode
If your merge tool can indicate that a merge conflict is resolved successfully with its exit code, we can set trustExitCode to true, as below:
git config mergetool.kdiff3.trustExitCode true
Otherwise, you will be prompted to indicate whether the merge conflict is resolved or not.
5.5 keepBackup
While resolving conflicts, mergetool creates backup files (with extension *.orig). These can be removed safely once the merge session is completed. If you want to automatically remove these files once conflicts are resolved successfully, set the keepBackup flag to false as below:
git config mergetool.kdiff3.keepBackup false
5.6 –global
Wherever git config is used in the above steps, you can use --global if you want to use the same configuration for all the Git projects in your computer. Using --global writes the config information into .gitconfig file under <your_user_home> directory or <your_user_home>/Documents path.
If there is no --global, the config information is written into your <your_git_project_folder>/.git/config.
5.7 Using config entries
An easier way to execute the above steps is by using the config file to make entries as below.
You can either write the below config in <your_user_home>/.gitconfig or <project_root>/.git/config
[merge]
   tool = kdiff3
[mergetool "kdiff3"]
   path = C:/Program Files/KDiff3/kdiff3.exe
   trustExitCode = true
[mergetool]
   keepBackup = false
6. KDiff3 as mergetool
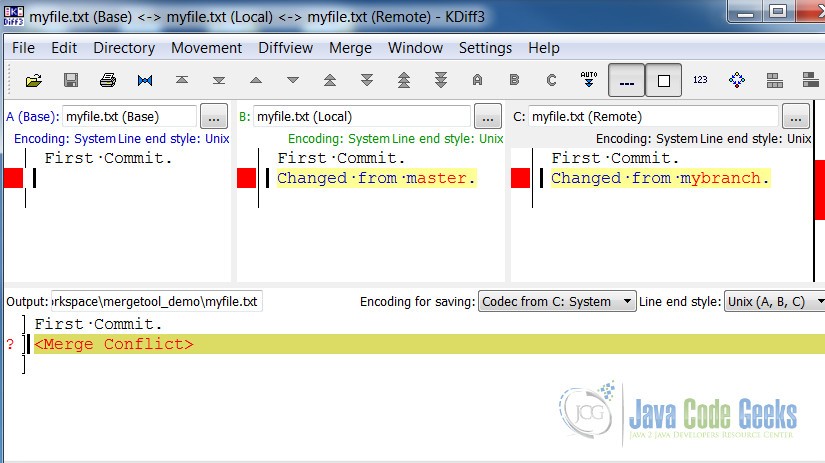
After we have setup KDiff3 as our mergetool following the above steps, lets see how KDiff3 presents the content for us.
Once are we are in a conflict situation, use the command
git mergetool --tool=kdiff3
in order to launch kdiff3.
The picture below shows 4 different panes. Please note there is a small difference in how the panes are arranged in vimdiff and kdiff3.
- Top-right and Bottom panes still display REMOTE & MERGED versions of the file respectively.
- Top-left pane displays BASE.
- Top-center pane displays LOCAL.
You can now resolve the merge conflict, and save the merged file. Then commit the file, as we did at the end of Section 4 with vimdiff.
7. Conclusion
With this, our Git Mergetool example comes to an end. We have now learnt what git mergetool is all about, how it can help resolve merge conflicts better, various configuration options of mergetool, and how to configure vimdiff and kdiff3 as your merge tools. We covered most of the areas around git mergetool in this example.

You can also use Code Compare for git merge, it can be integrated with version control systems by means of the command-line interface. here you can try it out http://www.devart.com/codecompare/