How to Build a Macro Add-on for Atlassian Confluence Server
Beverly was excited to start her first job at SegFault Software. She quickly fired up her browser to see if there were tasks assigned to her on the Kanban board. After searching through the long list of backlogs, she found a task assigned to her. She was tasked to build a macro add-on for the Atlassian Confluence Server.
1. Prepare the Tools
Beverly gathered the following tools for her work:
2. Create the Plug-in
Happy with her setup, she began her journey by running the atlas-create-confluence-plugin command in her terminal. She typed com.javacodegeeks.example when she was prompted for a groupId. For her artifactId, she placed hello-world. In the version and package prompts, she just pressed ENTER to accept the defaults. Finally, she pressed Y to accept everything inputted.
3. Modify the Files
Beverly proceeded by removing the generated skeleton code and added her own files. In the end, her hello-world directory contained the following files:
pom.xmlREADMELICENSE- Under “src/main/resources” –
atlassian-plugin.xml,hello-world.properties, css folder, images folder, js folder, and META-INF folder (all folders contained their default files) - Under “src/main/java” –
com.javacodegeeks.examplepackage and under itMyMacro.java
She then executed atlas-mvn eclipse:eclipse to create .classpath and .project so that she will be able to import her Maven project into Eclipse. When she opened the pom.xml in Eclipse, she saw some project build errors but she didn’t worry about it because she will be using the terminal to run the atlas-mvn commands. She was just using Eclipse as a smart editor.
4. Add the Logic
Beverly’s MyMacro class accepts a parameter named “user” and then proceeds to return a greeting. She didn’t want any data inside her macro during edit mode so she placed BodyType.NONE. In view mode, she wanted the output in a block so she placed OutputType.BLOCK. Her code looks like this:
MyMacro.java
package com.javacodegeeks.example;

import java.util.Map;

import com.atlassian.confluence.content.render.xhtml.ConversionContext;
import com.atlassian.confluence.macro.Macro;
import com.atlassian.confluence.macro.MacroExecutionException;

public class MyMacro implements Macro {

	@Override
	public String execute(Map parameters, String body, ConversionContext context)
			throws MacroExecutionException {
		String username = parameters.get("user");
		if (username == null) {
			return "";
		}
		return "<h2>Greetings from " + username + ".</h2>";
	}

	@Override
	public BodyType getBodyType() {
		return BodyType.NONE;
	}

	@Override
	public OutputType getOutputType() {
		return OutputType.BLOCK;
	}

}
5. Modify the Add-on Descriptor
Confident with her code, she added the <xhtml-macro> tag in the plug-in descriptor just before the <atlassian-plugin> closing tag. Since her code was going to accept a parameter named “user“, she added the parameter tag named user with the type username. The type username tells Confluence to display an autocomplete field for search on username and full name. See Macro Parameter Options for more details. Her add-on descriptor looks like this:
atlassian-plugin.xml
<atlassian-plugin key="${atlassian.plugin.key}" name="${project.name}" plugins-version="2">
    <plugin-info>
        <description>${project.description}</description>
        <version>${project.version}</version>
        <vendor name="${project.organization.name}" url="${project.organization.url}" />
        <param name="plugin-icon">images/pluginIcon.png</param>
        <param name="plugin-logo">images/pluginLogo.png</param>
    </plugin-info>

    <!-- add our i18n resource -->
    <resource type="i18n" name="i18n" location="hello-world"/>

    <!-- add our web resources -->
    <web-resource key="hello-world-resources" name="hello-world Web Resources">
        <dependency>com.atlassian.auiplugin:ajs</dependency>

        <resource type="download" name="hello-world.css" location="/css/hello-world.css"/>
        <resource type="download" name="hello-world.js" location="/js/hello-world.js"/>
        <resource type="download" name="images/" location="/images"/>

        <context>hello-world</context>
    </web-resource>

    <xhtml-macro name="my-macro" class="com.javacodegeeks.example.MyMacro" key="my-macro-key">
    	<description>My Macro displays a greeting to a specified user.</description>
    	<parameters>
    		<parameter name="user" type="username"/>
    	</parameters>
	</xhtml-macro>
</atlassian-plugin>
6. Modify the Properties
Beverly modified the properties file so that her plug-in will have easy to read labels. The format is {pluginKey}.{macroName}.label. See i18nConventions for more details. Her properties file looks like this:
hello-world.properties
#put any key/value pairs here
#{pluginKey}.{macroName}.label
com.javacodegeeks.example.hello-world.my-macro.label=My Macro Greeter

com.javacodegeeks.example.hello-world.my-macro.param.user.label=User
com.javacodegeeks.example.hello-world.my-macro.param.user.desc=Auto-search user names.
7. Try the Plug-in
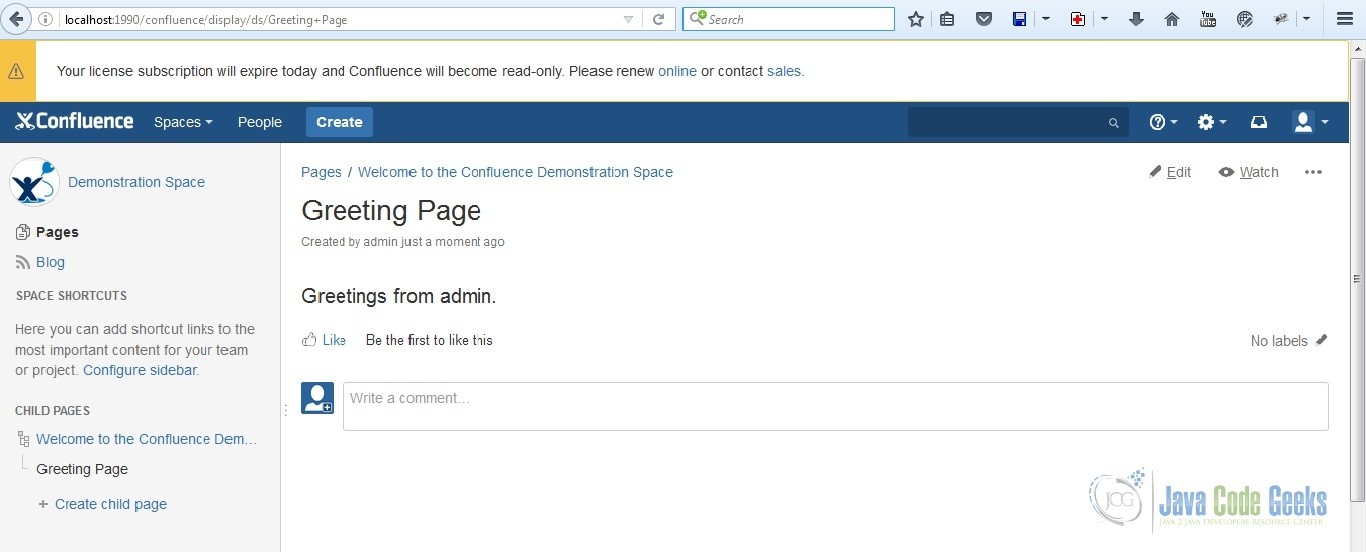
She paused for a moment and asked herself “Did I miss anything?”. Thinking she didn’t, she ran atlas-run. Beverly accessed the Confluence Server at http://localhost:1990/confluence. She used admin as her username and password. She then clicked on the “Create” button at the top of the page to create a blank page and used Greeting Page as her title. She pressed “Shift + {“ to open the Macro Browser Dialog and typed “greet” in the search field to filter and display her My Macro Greeter Plug-in. She chosed it and picked “admin” as her user since it was the only available username in her development environment. The final output looks like this:
8. Summary
In this example, Beverly was able to build a macro for the Atlassian Confluence Server by following these steps:
- Prepare tools
- Create the plug-in
- Modify the files
- Add the logic
- Modify the add-on descriptor
- Modify the properties
- Try the plug-in
9. Download the Source Code
This is an example of building a Macro Add-on for Atlassian Confluence Server.
You can download the source code of this example here: macro-addon-atlassian-confluence-server.zip.


