This article will show you how to add a Servlet Module to your Confluence add-on. This article builds upon the previous article “How to Add a Space Admin Screen to Your Confluence Add-on”. Make sure you have read it and tried the example because this tutorial will add code to it. Are you ready?
1. Requirements
You will require the following tools, source code and have read a pertinent tutorial:
- Atlassian SDK
- Mars Eclipse
- space-admin-screen.zip
- How to Add a Space Admin Screen to Your Confluence Add-on
Once you have extracted the space-admin-screen.zip file, I would suggest to rename the space-admin folder to space-admin-servlet. It’s just a suggestion. You don’t have to change it if you don’t want to.
2. Check the Files
Make sure you have the right files. The contents of the space-admin-servlet directory are the following:
pom.xmlREADMELICENSE- Under “src/main/resources” –
atlassian-plugin.xml,space-admin.properties, css folder, images folder, js folder, and META-INF folder - Under “src/main/resources/templates” –
space-admin-action.vm - Under “src/main/java” –
com.javacodegeeks.examplepackage and under itMyAction.java
All files checked? Great!
3. Modify the Velocity Template
Your velocity template should look like the one below:
space-admin-action.vm
<html>
    <head>
        <title>$action.getText("space.admin.item.label")</title>
        <meta name="decorator" content="main"/>
    </head>
    #applyDecorator("root")
        #decoratorParam("helper" $action.helper)
        ## Name of the tab to highlight: space-operations is also valid.
        #decoratorParam("context" "space-administration")

        #applyDecorator ("root")
            ## The .vmd to use - This one displays both in Space Admin and Space Tools.
            #decoratorParam ("context" "spaceadminpanel")
            ## Key of the web-item to highlight in Space Tools
            #decoratorParam ("selectedSpaceToolsWebItem" "space-admin-item")
            #decoratorParam ("helper" $action.helper)
            <body>
                <form action="$req.contextPath/plugins/servlet/quotes" method="post">
                     Quote: <input type="text" name="quote" placeholder="enter quote here">
                     <br><br>
                     <input type="hidden" name="spaceKey" value="$helper.spaceKey">
                     <input type="submit" value="Add">
                </form>
                <br><br>
                <table border="1">
                <tr>
                  <th>Quote</th>
                </tr>
                #foreach( $quote in $quotes )
                  <tr>
                  <td>$quote</td>
                  </tr>
                #end
                </table>
            </body>
        #end
    #end
</html>
Here, you changed the body of the template. The page will contain a form that accepts an input. Below the form is a table that will display the quotes inputted. It will not display the quotes yet for this tutorial since this is about the Servlet Module and you would need Active Objects to be able to display the quotes. Active Objects will be in the next article.
The $action, $req, and $helper are Confluence objects accessible from Velocity. The $quotes object will be provided by your MyAction class.
The Servlet you will create will handle the POST method of this page.
4. Add a Servlet Module in the Add-on Descriptor
Add the Servlet module just before the </atlassian-plugin> closing tag. You add-on descriptor will look like the one below:
atlassian-plugin.xml
<atlassian-plugin key="${atlassian.plugin.key}" name="${project.name}" plugins-version="2">

    <!-- other contents omitted -->

    <xwork name="Space Admin Action" key="space-admin-action">
        <description>Action for Space Admin</description>
        <package name="space-admin-xwork-package" extends="default" namespace="/plugins/${project.artifactId}">
            <default-interceptor-ref name="validatingStack"/>
            <action name="sas" class="com.javacodegeeks.example.MyAction">
                <result name="input" type="velocity">/templates/space-admin-action.vm</result>
                <result name="success" type="velocity">/templates/space-admin-action.vm</result>
            </action>
        </package>
    </xwork>

    <servlet name="Quote Servlet Handler" class="com.javacodegeeks.example.QuoteServlet"
    	key="quote-servlet">
    	<description>A servlet to handle quotes</description>
    	<url-pattern>/quotes</url-pattern>
    </servlet>
</atlassian-plugin>
As you recall above, the form action points to /quotes which is your URL. The class that will handle the POST is called QuoteServlet.
5. Create the Servlet
Creating the servlet is pretty straightforward. You extend the HttpServlet class and override the doGet and doPost methods. Your servlet should look like the one below:
QuoteServlet.java
package com.javacodegeeks.example;

import java.io.IOException;

import javax.servlet.ServletException;
import javax.servlet.http.HttpServlet;
import javax.servlet.http.HttpServletRequest;
import javax.servlet.http.HttpServletResponse;

import org.slf4j.Logger;
import org.slf4j.LoggerFactory;

public class QuoteServlet extends HttpServlet {
	private static final long serialVersionUID = 1L;
	private static final Logger log = LoggerFactory.getLogger(QuoteServlet.class);

	@Override
	protected void doGet(HttpServletRequest req, HttpServletResponse res) throws ServletException, IOException {
		//TODO: next article about Active Objects insert here
	}

	@Override
	protected void doPost(HttpServletRequest req, HttpServletResponse res) throws ServletException, IOException {
		final String quote = req.getParameter("quote");
		final String spaceKey = req.getParameter("spaceKey");

		log.warn("====== \n Quote: {} \n ======", quote);

		//TODO: next article about Active Objects insert here

		res.sendRedirect(req.getContextPath() + "/plugins/space-admin/sas.action?key=" + spaceKey);
	}
}
Once an HTTP POST message is received, the quote is printed in the console log. This is just for now. You will update the page when you get to the Active Objects tutorial. It will then redirect back to the calling page.
6. Modify the MyAction Class
You will add a method to supply values (hard coded for now) to the $quotes object mentioned above. Your code should look like this:
MyAction.java
package com.javacodegeeks.example;

import com.atlassian.confluence.spaces.actions.SpaceAdminAction;

public class MyAction extends SpaceAdminAction {

    private static final long serialVersionUID = 1L;

    @Override
    public String doDefault()
    {
        return INPUT;
    }

    public List getQuotes() {
        //TODO: next article about Active Objects insert here
        ArrayList quotes = new ArrayList();
        quotes.add("no guts, no glory");
        quotes.add("when you're cool, the sun always shines!");

        return quotes;
    }
}
7. Try the Plug-in
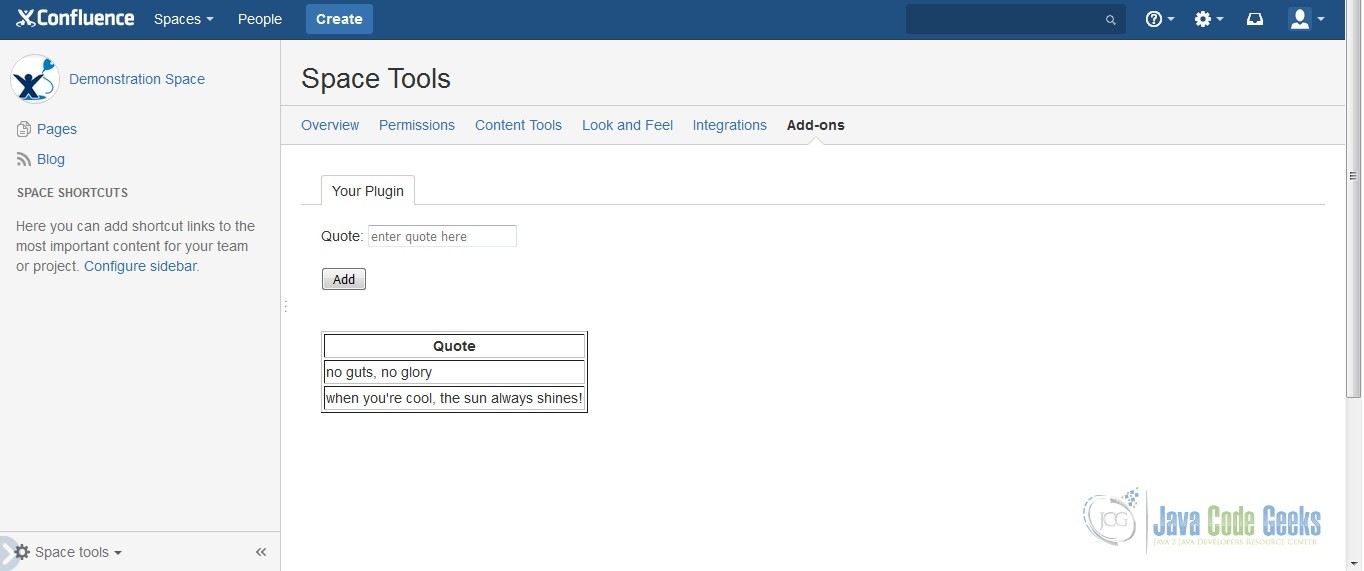
To run the plug-in, execute atlas-run. Your Confluence Server is accessible at http://localhost:1990/confluence. Your username and password are the same. It’s admin. Click on Demonstration Space at the lower left corner of the dashboard page. At the lower left corner of the Demonstration Space page, click on Space Tools and then Add-ons. Your plug-in will be displayed in the Your Plug-in tab. The hard coded values are displayed in the table. The final output looks like this:
Try putting a quote (“don’t cry because it’s over, smile because it happened”) in the input field and click Add. Your quote will be printed in the console like so:
console output
[INFO] [talledLocalContainer] 2016-01-20 19:33:17,263 WARN [http-nio-1990-exec-6] [com.javacodegeeks.example.QuoteServlet] doPost ======
[INFO] [talledLocalContainer]  Quote: don't cry because it's over, smile because it happened
[INFO] [talledLocalContainer]  ======
In my next example about Active Objects, you will be able to persist data and your Action class will provide the persisted data to your template for rendering.
8. How to Add a Servlet Module Summary
You were able to create a Servlet module in this example by following these steps:
- Fulfilling the Requirements
- Checking the files
- Modifying the Velocity Template
- Adding a Servlet Module in the Add-on Descriptor
- Creating the Servlet
- Modifying the MyAction Class
- Trying out the Plug-in
9. Download the Source Code
This is an example of how to add a Servlet Module to your Confluence Add-on.
You can download the source code of this example here: space-admin-servlet.tar.gz.
