Have you read my past articles on Atlassian Confluence Add-on Development? Yes? Cool! Now that you have created an add-on, you might want to add a Space Admin Screen to your Confluence Add-on to add some configuration or behavior to it. Read on and together we will add a Space Admin Screen to your Confluence Add-on.
1. Gather the Tools
We will require the following tools:
2. Create the Add-on
We execute the atlas-create-confluence-plugin command in our terminal. Type com.javacodegeeks.example for our groupId. For our artifactId, we’ll use space-admin. We will accept the defaults for the version and package prompts by pressing ENTER. Lastly, we input Y to accept everything.
3. Modify the Files
A space-admin directory along with other files will be automatically created by the SDK. We shall prune the directory of the unnecessary files. Our file structure will look like the one below:
pom.xmlREADMELICENSE- Under “src/main/resources” –
atlassian-plugin.xml,space-admin.properties, css folder, images folder, js folder, and META-INF folder (all folders contained their default files) - Under “src/main/resources/templates” –
space-admin-action.vm - Under “src/main/java” –
com.javacodegeeks.examplepackage and under itMyAction.java
The MyAction.java and space-admin-action.vm don’t exist yet. We will be creating them later. Execute atlas-mvn eclipse:eclipse to create .classpath and .project so that we can import this Maven project into Eclipse.
4. Add the Plug-in Modules to the Add-on Descriptor
Add the Web Item Plug-in Module and XWork Plug-in Module in atlassian-plugin.xml just before the </atlassian-plugin> closing tag. Our add-on descriptor will look like the one below:
atlassian-plugin.xml
<atlassian-plugin key="${atlassian.plugin.key}" name="${project.name}" plugins-version="2">

    <!-- other contents omitted -->

    <!-- Item in Space Tools -->
    <web-item key="space-admin-item" name="Space Admin Screen" section="system.space.tools/addons" weight="100">
        <label key="space.admin.item.label" />
        <link linkId="space-admin-link-id">/plugins/${project.artifactId}/sas.action?key=$generalUtil.urlEncode($helper.spaceKey)</link>
        <conditions type="AND">
            <condition class="com.atlassian.confluence.plugin.descriptor.web.conditions.SpacePermissionCondition">
                <param name="permission">administer</param>
            </condition>
            <condition class="com.atlassian.confluence.plugin.descriptor.web.conditions.SpaceSidebarCondition"/>
        </conditions>
    </web-item>

    <xwork name="Space Admin Action" key="space-admin-action">
        <description>Action for Space Admin</description>
        <package name="space-admin-xwork-package" extends="default" namespace="/plugins/${project.artifactId}">
            <default-interceptor-ref name="validatingStack"/>
            <action name="sas" class="com.javacodegeeks.example.MyAction">
                <result name="input" type="velocity">/templates/space-admin-action.vm</result>
                <result name="success" type="velocity">/templates/space-admin-action.vm</result>
            </action>
        </package>
    </xwork>
</atlassian-plugin>
The Web Item Module defines the link to the XWork Module which handles the actions and views of our plug-in. In our case, Web Item points to sas.action which is the name of the XWork action (sas). XWork then displays the view which is an Apache Velocity template (space-admin-action.vm). The class that will handle the action or provide the model to the template will be MyAction.java.
The template will be displayed in the Add-ons tab of the Space Tools section as indicated by system.space.tools/addons. The weight attribute determines the order in which the Web Item will appear. The lower weight/number is displayed first. The condition element determines if the Web Item will be displayed.
5. Modify the Properties File
Our Add-on tab needs a label. The key in the properties file is also the key in our Web Item label element. Add a label like below:
space-admin.properties
#put any key/value pairs here
space.admin.item.label=Your Plugin
6. Modify the pom.xml
We need to import the com.atlassian.confluence.plugin.descriptor.web.conditions package in our pom.xml since we are using some of its classes as seen in the condition element of the Web Item Module above. Add the package like below:
pom.xml
<?xml version="1.0" encoding="UTF-8"?>

<project xmlns="http://maven.apache.org/POM/4.0.0"
         xmlns:xsi="http://www.w3.org/2001/XMLSchema-instance"
         xsi:schemaLocation="http://maven.apache.org/POM/4.0.0 http://maven.apache.org/maven-v4_0_0.xsd">

    <!-- other contents omitted -->

    <instructions>
        <Atlassian-Plugin-Key>${atlassian.plugin.key}</Atlassian-Plugin-Key>

        <!-- Add package to export here -->
        <Export-Package>

        </Export-Package>

        <!-- Add package import here -->
        <Import-Package>
            com.atlassian.confluence.plugin.descriptor.web.conditions,
            org.springframework.osgi.*;resolution:="optional",
            org.eclipse.gemini.blueprint.*;resolution:="optional",
            *
        </Import-Package>

        <!-- Ensure plugin is spring powered -->
        <Spring-Context>*</Spring-Context>
    </instructions>

    <!-- other contents omitted -->
</project>
7. Create the Action Class
Extending SpaceAdminAction will check if the user has permission for the space. Our code looks like this:
MyAction.java
package com.javacodegeeks.example;

import com.atlassian.confluence.spaces.actions.SpaceAdminAction;

public class MyAction extends SpaceAdminAction {

    private static final long serialVersionUID = 1L;

    @Override
    public String doDefault()
    {
        return INPUT;
    }

}
8. Create the Velocity Template
This is the template that will be rendered. Please see Apache Velocity for more details about creating velocity templates. The $action is one of the Confluence object that is accessible from velocity. Our template looks like this:
space-admin-action.vm
<html>
    <head>
        <title>$action.getText("space.admin.item.label")</title>
        <meta name="decorator" content="main"/>
    </head>
    #applyDecorator("root")
        #decoratorParam("helper" $action.helper)
        ## Name of the tab to highlight: space-operations is also valid.
        #decoratorParam("context" "space-administration")

        #applyDecorator ("root")
            ## The .vmd to use - This one displays both in Space Admin and Space Tools.
            #decoratorParam ("context" "spaceadminpanel")
            ## Key of the web-item to highlight in Space Tools
            #decoratorParam ("selectedSpaceToolsWebItem" "space-admin-item")
            #decoratorParam ("helper" $action.helper)
            <body>
                <div class="pagecontent">
                    <p>Insert your input form here.</p>
                </div>
            </body>
        #end
    #end
</html>
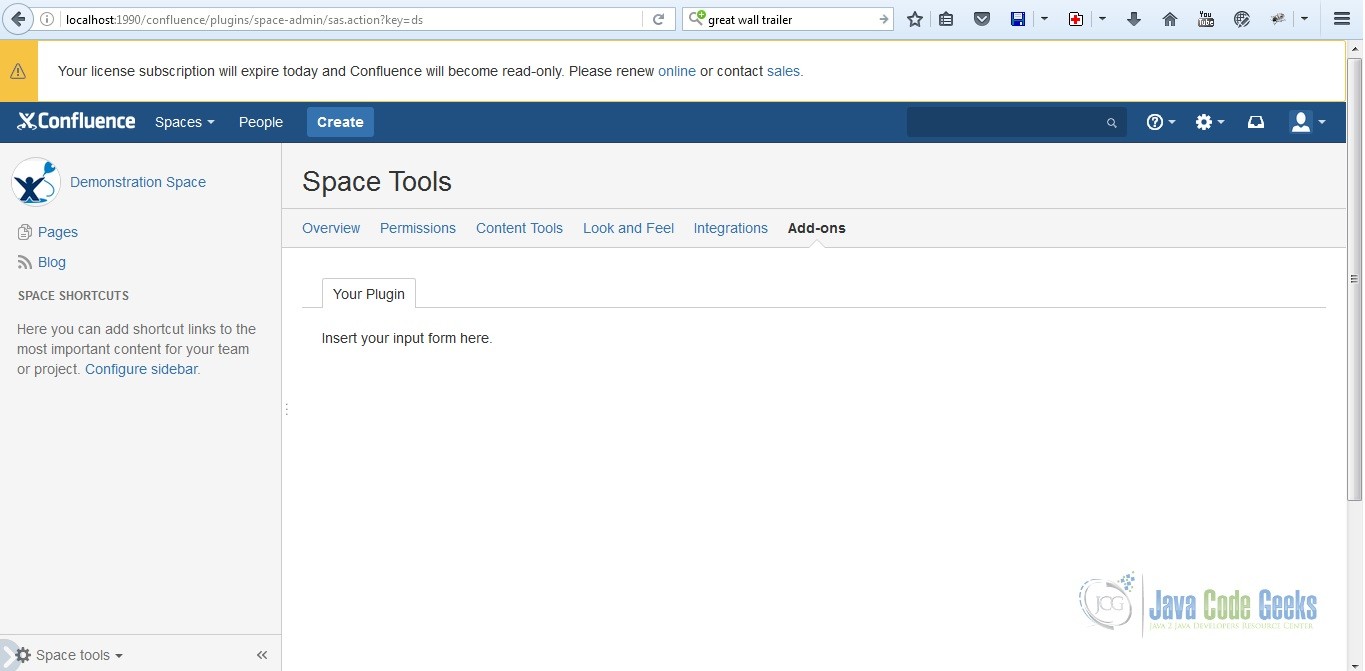
9. Try the Plug-in
To run the plug-in, execute atlas-run. Our Confluence Server is accessible at http://localhost:1990/confluence. Our username and password are the same. It’s admin. Click on Demonstration Space at the lower left corner of the dashboard page. At the lower left corner of the Demonstration Space page, click on Space Tools and then Add-ons. Our plug-in will be displayed in the Your Plug-in tab. Here we can add a form to accept configuration parameters for our add-on. Saving the parameters (Active Objects) and handling the form (Servlet Module) will be on another article. The final output looks like this:
10. How to Add a Space Admin Screen Summary
In this example, we were able to create a Space Admin Screen by following these steps:
- Gather the Tools
- Create the Add-on
- Modify the files
- Add the Plug-in Modules to the Add-on Descriptor
- Modify the Properties File
- Modify the pom.xml
- Create the Action Class
- Create the Velocity Template
- Try the Plug-in
11. Download the Source Code
This is an example of how to add a Space Admin Screen to your Confluence Add-on.
You can download the source code of this example here: How to Add a Space Admin Screen to Your Confluence Add-on.

Hello,
I follow the steps and able to upload plugin into Confluence using ‘Manage add-ons’ option.
However, Add-one tab on Space Tool is not visible to me. I am able to find out where I did mistake.
Please suggest how to debug it.
Thank you,
Manish
Hi Manish,
I don’t understand your question. You are able to find out where you made a mistake so that would mean you fixed it. How to debug? You need to create a remote debug target. More information here: https://developer.atlassian.com/server/framework/atlassian-sdk/creating-a-remote-debug-target/
Cheers,
Joel
Hi Joel,
Thanks for the response. I am now able to create and deploy plugin(example plugin given at Atlassian website). My requirement is to create a vm page/template which will read out flat csv/txt file and iterate to deactivate/delete users in bulk. Currently, we have to purchase plugin for bulk users deletion.
Thanks,
Manish
You are welcome Manish.
Hi, The link to download the source code is empty.
The link seems to be fine. Was able to download it. Did you click/tap on the text “How to Add a Space Admin Screen to Your Confluence Add-on”? Anyway, here is the link: https://examples.javacodegeeks.com/wp-content/uploads/2017/01/space-admin-screen.zip