In this article, we’re going to see one famous GUI on Python called: Tkinter library. Also, we’ll see some widgets used to build interfaces with this framework and create an example using it.
You can also check this tutorial in the following video:
1. Introduction
Tkinter library is a Python library to develop Graphical User Interface (GUI). It is embedded in the standard Python installation.
One advantage of Tkinter is that it’s easy to use. Also, as a native Python language library, we just need to import and start coding to work.
Furthermore, it’s cross-platform, so the same code works on Windows, macOS, and Linux.
In the next steps, we’ll see how to start a project and create a simple interface example.
2. Pre-requisites
The examples found in this article work in version 3.6 or above. You can find the most recent version of Python to download here.
Also, feel free to use any IDE/Code Editor with support for Python language and versions recommended above.
3. Getting Started with the Python Tkinter library
First, let’s discuss some concepts about a GUI. In following, we have the most common:
- Container – it’s the component to organize and store our interface’s objects. Imagine a real-life container, where we put everything together. In this case, the objects that we want to store are the widgets.
- Widgets – it’s any screen’s element. Can be a button, a label, a textbox, an icon, etc…
- Event Handler – it’s an action or routine that is executed when we click on a button for instance.
- Event Loop – an event loop verifies if another event was added. When this condition is confirmed, the event loop will execute the correspondent routine.
3.1 Starting a simple interface
The bottom example shows a simple interface created with the Tkinter library.
Simple Tkinter example
from tkinter import *

class Application:
    def __init__(self, master=None):
        pass
root = Tk()
Application(root)
root.mainloop()
Let’s understand the code above:
- Import all the component of Tkinter with
from tkinter import * - Create the
Applicationclass to start our code where we put all the interface’s controls. - Instantiate the
Tk()class in therootvariable. TheTk()class allows the widgets been used in the interface. - Send the root as a parameter to the Application class constructor.
- To conclude, we call the method (event loop)
root.mainloop()to show the screen. Without this event loop, the interface won’t be shown.
This code will create a very simple window when executed.

4. Working with Widgets
4.1 Container explained
To work with widgets, it’s necessary to understand the concept of containers. Below is an example to help us:
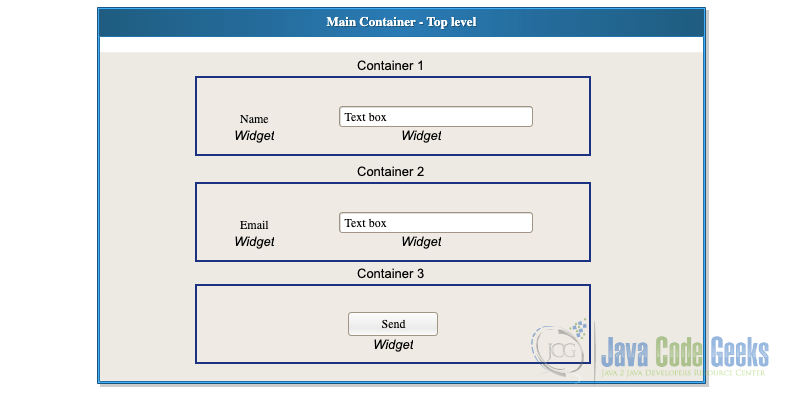
For a matter of organization, we define containers and inside each one, we put our widgets. Therefore, every time a container is created, we must define what is the top-level container.
After defining the hierarchy of containers and widgets, we should position the elements on the screen, indicating the position where the element will appear.
4.2 Creating a widget
Now, talking about widgets, a class defines each one in Tkinter. Here are some of the widgets available:
| Widget class | Description |
Label | A widget used to display text on the screen |
| Button | A button that can contain text and can perform an action when clicked |
| Entry | A text entry widget that allows only a single line of text |
| Text | A text entry widget that allows multiline text entry |
| Frame | A rectangular region used to group related widgets or provide padding between widgets |
In the bottom example, we’ll add our first widget in the code:
Fist widget Tkinter example
from tkinter import *

class Application:
    def __init__(self, master=None):
        self.container1 = Frame(master)
        self.container1.pack()
        self.msg = Label(self.container1, text="First widget")
        self.msg.pack()
root = Tk()
Application(root)
root.mainloop()
In the previous example, we add our first container using the Frame class. Next, we use the pack() method from the Frame class that defines the geometry management of our container. We’ll see more about geometry managers in the next sections.
Following, adding a label widget we insert a simple text (“First widget”). And then, use the method pack().
Note that we put our previously created container (container1) in the Label class constructor to inform the code what’s the parent (top-level) container of the widget.
And the result is here:
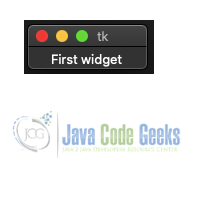
Compared with our first example, when we don’t have any widget, the screen reduced its size. This happens because when we don’t have any content defined, the screen assumes the default size.
However, when we insert some content (a widget for instance), the main window assumes the size of this element. As we didn’t define size in the pack() method, the screen assumed the widget size.
4.3 Geometry management
As we see before, after defining our containers and widget’s hierarchy, we should position those elements on the screen, indicating the position that the element will appear.
For that, Tkinter has 3 options to use:
4.3.1 Pack
In our previously first widget example, we use the pack() geometry manager, one of the most used.
The pack places the widget in a Frame or window in a specified order. It computes a rectangular area (parcel) that holds the widget and fills the remaining window’s area with blank space.
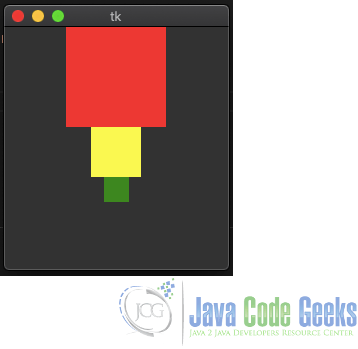
Pack example
import tkinter as tk

window = tk.Tk()

frame1 = tk.Frame(master=window, width=100, height=100, bg="red")
frame1.pack()

frame2 = tk.Frame(master=window, width=50, height=50, bg="yellow")
frame2.pack()

frame3 = tk.Frame(master=window, width=25, height=25, bg="green")
frame3.pack()

window.mainloop()
4.3.2 Grid
The grid() geometry manager is maybe more likely to use. It provides the same approach of pack(), but in an easier way to work and maintain.
Imagine that we’re working with a table kind interface with columns and lines. The grid() method splits them in the Frame class.
Grid example
import tkinter as tk

window = tk.Tk()

for rw in range(3):
    for cl in range(3):
        frame = tk.Frame(
            master=window,
            relief=tk.RAISED,
            borderwidth=1
        )
        frame.grid(row=rw, column=cl)
        label = tk.Label(master=frame, text=f"Row {rw}\nColumn {cl}")
        label.pack()

window.mainloop()
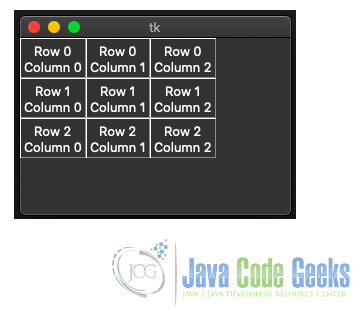
We can notice that grid() is called on each frame object created and applied to the window object (top-level).
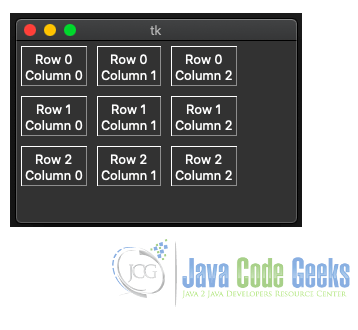
Another change we can do is put some padding in our columns and lines, adding this on our code:
Padding on grid example
frame.grid(row=rw, column=cl, padx=5, pady=5)
And see the result here:
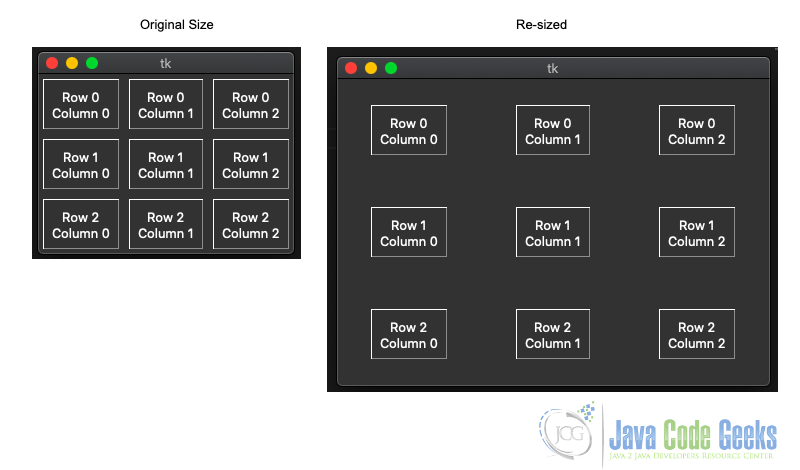
Also, to work with resizing our window, we can add this line to make the window more “responsive” for our re-sizing.
Re-sizing grid example
for rw in range(3):
    window.columnconfigure(i, weight=1, minsize=75)
    window.rowconfigure(i, weight=1, minsize=50)
4.3.3 Place
We can use place() manager to put an element in a specific place in our interface.
Just specifying an x-y coordinate, we put our element in the position that we want to place our element.
Place example
import tkinter as tk

window = tk.Tk()

frame = tk.Frame(master=window, width=250, height=250, bg="white")
frame.pack()

label1 = tk.Label(master=frame, text="I'm at (0, 0)", bg="red")
label1.place(x=0, y=0)

label2 = tk.Label(master=frame, text="I'm at (150, 150)", bg="green")
label2.place(x=150, y=150)

window.mainloop()

5. Simple application example
I’ve attached in this article a simple application interface to create a user. There, we’ll see everything we used until here and store our data in a simple SQLite.
SQLite is not the target of this article, so you don’t need to be concerned about that.
The application is divided into layers as follows:
- App.py – is where we have our container and widgets of our application.
- Users.py – is our model class for user data.
- Db.py – is our database class to work with SQLite.
The application calls user_register_app inside the examples .zip file.
6. Conclusion
In conclusion, we saw the use of the Tkinter library to build interfaces in Python. Also, we could understand the concepts involving containers and widgets and see some examples to know how to use geometry management in our interfaces.
7. Download the source code
You can download the full source code of this example here: Python GUI Programming with Tkinter
