Hello readers. In this tutorial, we will bring in the postgres (running as a Docker container) to integrate with graphql and implement the CRUD operations. The application will expose different endpoints with the help of the apollo server.
1. Introduction
GraphQL is an API syntax that defines how to fetch data from one or more databases. It was developed by Facebook to optimize the RESTful api calls.
- It is a data query and manipulation language for api’s. It is faster, simple, and easier to implement
- It follows the client-driven architecture and gives a declarative way to fetch and update the data
- It has a graphical structure where objects are represented by nodes and edges represent the relationship between the nodes
- Provides high consistency across all platforms
- It doesn’t have any automatic caching system
1.1 Application components in GraphQL
In graphql, there are two types of application components.
- Server-side components
- Client-side components
1.1.1 Service-side components
The server-side component allows parsing the queries coming from the graphql client applications and consists of 3 components i.e. query, resolver, and schema. Apollo is the most popular graphql server.
| Component | Description |
| Query | A query is a client request made by the graphql client for the graphql server. It is used to fetch values and can support arguments and points to arrays. field and arguments are two important parts of a query |
| Resolver | Helps to provide directions for converting graphql operation into data. Users define the resolver functions to resolve the query to the data. They help to separate the db and api schema thus making it easy to modify the content obtained from the db |
| Schema | It is the center of any graphql server implementation. The core block in a schema is known as a type |
1.1.2 Client-side components
The client-side components represent the client which is a code or a javascript library that makes the post request to the graphql server. It is of two types i.e.
- GraphiQL – Browser-based interface used for editing and testing graphql queries and mutations
- Apollo client – State management library for javascript that enables local and remote data management with graphql. Supports pagination, prefetching data, and connecting the data to the view layer
1.2 Setting up Node.js
To set up Node.js on windows you will need to download the installer from this link. Click on the installer (also include the NPM package manager) for your platform and run the installer to start with the Node.js setup wizard. Follow the wizard steps and click on Finish when it is done. If everything goes well you can navigate to the command prompt to verify if the installation was successful as shown in Fig. 1.

2. Postgres and Graphql
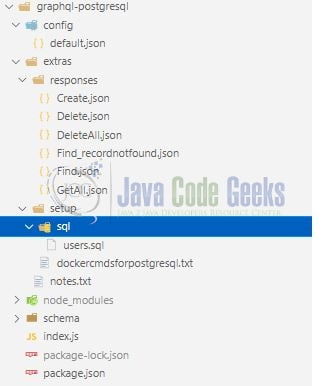
To set up the application, we will need to navigate to a path where our project will reside and I will be using Visual Studio Code as my preferred IDE. Let a take a quick peek at the project structure.
2.1 Pre-requirement – Postgres Setup
Usually, setting up the database is a tedious step but with technological advancements, this process has become simple with the help of Docker. Readers can watch the video available at this link to understand the Docker installation on Windows OS. Open the terminal and trigger the following commands to get the postgres up and running on the local machine.
Docker commands
-- command to run postgres on docker --
-- remember to change the password --
docker run -d -p 5433:5432 -e POSTGRES_PASSWORD= --name postgres postgres

-- command to stop the Postgres docker container --
docker stop postgres

-- command to remove the Postgres docker container --
docker rm postgres
Remember to enter the password of your choice. If everything goes well the postgresql database server would be up and running on a port number – 5433 and you can connect with the pgAdmin gui tool for connecting to the server.

2.1.1 Setting up the mock data
To play with the application we need to create mock data. Once the connection with postgresql is made I will be using the below sql script to create the required data.
users.sql
drop database if exists "learning";
create database "learning";
DROP TABLE IF EXISTS "users";
CREATE TABLE "users" (
id SERIAL PRIMARY KEY,
name varchar(255) default NULL,
email varchar(255) default NULL,
age integer NULL
);
INSERT INTO users (name,email,age) values ('Uma Montoya','rutrum.justo@hotmail.edu',35);
INSERT INTO users (name,email,age) values ('Burton Tran','urna.nec.luctus@outlook.couk',37);
INSERT INTO users (name,email,age) values ('Catherine Allen','risus.nulla.eget@google.org',24);
INSERT INTO users (name,email,age) values ('Willow Hoffman','facilisis@protonmail.edu',36);
INSERT INTO users (name,email,age) values ('Marny Bishop','consectetuer@protonmail.org',40);
INSERT INTO users (name,email,age) values ('Jane doe','jandoe@protonmail.org',27);
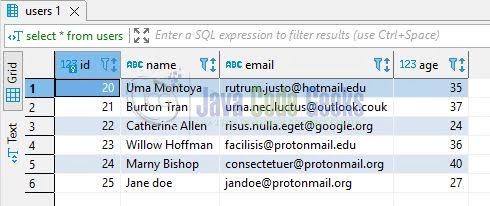
select * from "users";
If everything works fine the sql select statement will show the data.
2.2 Setting up project dependencies
Navigate to the project directory and run npm init -y to create a package.json file. This file holds the metadata relevant to the project and is used for managing the project dependencies, script, version, etc. Replace the generated file with the code given below –
package.json
{
  "name": "graphql-postgresql",
  "version": "1.0.0",
  "description": "understanding graphql and apollo server with postgresql",
  "main": "index.js",
  "scripts": {
    "dev": "nodemon index.js",
    "start": "node index.js",
    "test": "echo \"Error: no test specified\" && exit 1"
  },
  "keywords": [
    "express",
    "apollo-server",
    "apollo-server-express",
    "graphql",
    "nodemon",
    "learning",
    "postgresql",
    "database",
    "knex",
    "pg"
  ],
  "author": "geek",
  "license": "MIT",
  "dependencies": {
    "apollo-server-express": "^3.8.1",
    "config": "^3.3.7",
    "express": "^4.18.1",
    "knex": "^2.1.0",
    "pg": "^8.7.3"
  },
  "devDependencies": {
    "nodemon": "^2.0.16"
  }
}
Once the file is replaced trigger the below npm command in the terminal window to download the different packages required for this tutorial.
Downloading dependencies
npm install
2.3 Setting up the type definition
typeDefs represents the graphql schema language string and the following file present in the schema directory represents the same. You’re free to modify it as per your needs.
typedefs.js
const { gql } = require("apollo-server-express");

const typeDefs = gql`
  type User {
    id: Int!
    name: String!
    email: String!
    age: Int!
  }

  type Link {
    status: String!
  }

  # Queries
  type Query {
    getAll: [User!]!

    find(id: Int!): [User!]!
  }

  # Mutation
  type Mutation {
    create(name: String!, email: String!, age: Int!): Link!

    delete(id: Int!): Link!

    deleteAll: Link!
  }
`;

module.exports = { typeDefs };
2.4 Setting up config for resolver
The below file created in the config will hold the values required to connect to the database. For security reasons, the database connection details of this tutorial have been replaced with the mock details in the below file. You are required to add the details as per your confirmation.
config.json
{
  "database": {
    "dev": {
      "host": "ENDPOINT",
      "user": "USERNAME",
      "password": "PASSWORD",
      "database": "DATABASE_NAME",
      "table": "TABLE_NAME"
    },
    "driver": "pg"
  }
}
2.5 Setting up the resolver
resolvers in graphql are the functions that resolve a value for the type or a field in the schema and the following file present in the schema directory represents the same. You’re free to modify it as per your needs. The file makes a connection to the database with the help of the knex library and exposes methods to connect with the database and share the result from the sql table users.
resolvers.js
const config = require("config");

const table = config.get("database.dev.table");

const knex = require("knex")({
  client: config.get("database.driver"),
  debug: false,
  connection: {
    host: config.get("database.dev.host"),
    user: config.get("database.dev.user"),
    password: config.get("database.dev.password"),
    database: config.get("database.dev.database")
  }
});

const resolvers = {
  Query: {
    getAll: () => {
      console.log("fetching all users");
      return knex(table).select("*");
    },

    find: (parent, args) => {
      let key = args.id;
      console.log("fetching %s", key);
      return knex(table).where("id", key);
    }
  },

  Mutation: {
    create: (parent, args) => {
      console.log("inserting new user");
      knex(table)
        .insert({ name: args.name, email: args.email, age: args.age })
        .returning("id")
        .then(([res]) => {
          console.log("%s inserted", res.id);
        });

      return { status: `inserted` };
    },

    delete: (parent, args) => {
      let key = args.id;
      console.log("deleting %s", key);
      return knex(table)
        .del()
        .where({ id: key })
        .then(() => {
          return { status: `${key} deleted` };
        });
    },

    deleteAll: () => {
      console.log("deleting all");
      return knex(table)
        .del()
        .then(() => {
          return { status: "all records deleted" };
        });
    }
  }
};

module.exports = { resolvers };
2.6 Setting up implementation file
Create a file in the root directory that acts as an entry point for the application. The file contains the configuration required to start the apollo server on port number 3005 and the server can be accessed on the url http://localhost:3005/graphql
index.js
const { ApolloServer } = require("apollo-server-express");
const { typeDefs } = require("./schema/typedefs");
const { resolvers } = require("./schema/resolvers");

const server = new ApolloServer({ typeDefs, resolvers });

const express = require("express");
const app = express();

// browser url - http://localhost:3005/graphql

const app_port = 3005;
server.start().then(() => {
  server.applyMiddleware({ app });
  app.listen({ port: app_port }, () => {
    console.log(`Service endpoint :: http://localhost:${app_port}/graphql`);
  });
});
3. Run the Application
To run the application navigate to the project directory and enter the following command as shown below in the terminal. The application will be started successfully on the port number – 3005.
Run command
$ npm run start
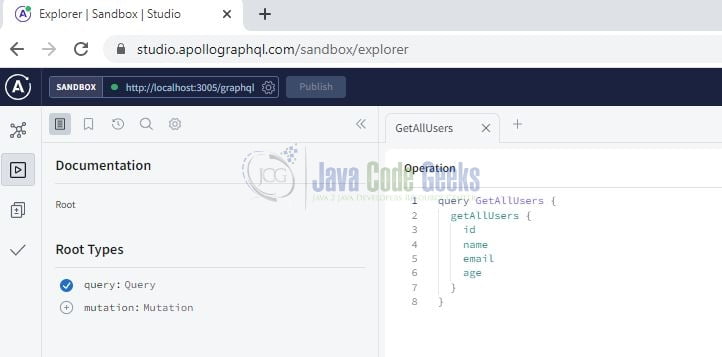
Once the application is started successfully open the browser and hit the below endpoint to view the query explorer. If you will be a first-time user welcome page will be shown otherwise the query explorer.
Application endpoint
http://localhost:3005/graphql
You can download the sample queries and mutations specified in the resolver from the Downloads section. That is all for this tutorial and I hope the article served you with whatever you were looking for. Happy Learning and do not forget to share!
4. Summary
In this tutorial, we saw a brief introduction to graphql and integrated it with the database. You can download the source code from the Downloads section.
5. Download the Project
This was a tutorial to perform crud operations in graphql with the help of the postgresql database.
You can download the full source code of this example here: Postgres and Graphql
