In this article, we will explain OpenCV for Python through examples.
You can also check this tutorial in the following video:

1. What is Computer Vision or CV
Computer vision is a field that seeks to develop techniques to help an artificial system to extract information from images and videos. It tries to replicate parts of the human vision so a system can process, analyze, and make use of these pieces of information. Systems like these are “Self-driving cars”, “Robotic Navigation”, in Military and Medicine applications, etc.
2. OpenCV for Python
OpenCV is an open-source library for computer vision. OpenCV supports different programming languages like Python, Java, C++, etc. It is integrated with the “Numpy” library which is optimized for numerical operations.
3. Installing OpenCV for Python
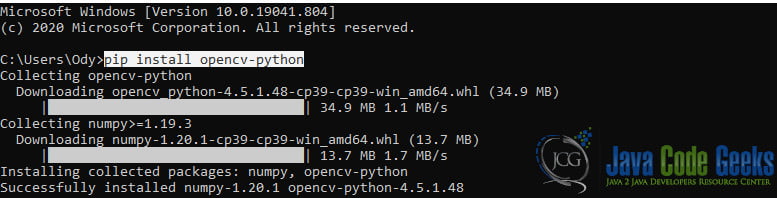
First of all, it is necessary to have Python and PIP preinstalled. Next, you open the terminal and you type the command pip install opencv-python. When it finishes you will get a “Successfully installed” message.
4.Basic Operations
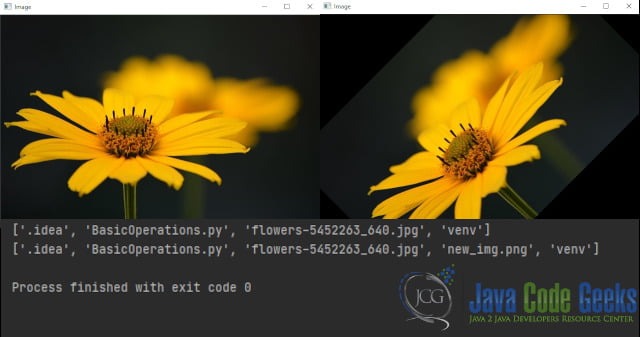
In this example, we will see how we can load an image with OpenCV for Python, view the image, apply a simple rotation of 45 degrees and then save it with a given name and extension of our choice.
BasicOperations.py
import os
import cv2
import numpy

img = cv2.imread("flowers-5452263_640.jpg", cv2.IMREAD_COLOR)

cv2.imshow("Image", img)
cv2.waitKey(0)

img_center = tuple(numpy.array(img.shape[1::-1]) / 2)
rotation_matrix = cv2.getRotationMatrix2D(img_center, 45, 1.0)
img = cv2.warpAffine(img, rotation_matrix, img.shape[1::-1], flags=cv2.INTER_LINEAR)

cv2.imshow("Image", img)
cv2.waitKey(0)

print(os.listdir())

cv2.imwrite("new_img.png", img)

print(os.listdir())

cv2.destroyAllWindows()
- line 5: we load our image by giving the file name. The image must be in the same folder as our python file.
- line 7: creates a new window with a preview of our loaded image
- line 10: we find the center of our image. To accomplice this we pass our image into a
numpy.array()and then we divided.img.shape()returns an array with 4 variables (Image Height, Image Width, Number of Channels) - line 11: we generate a rotation matrix. This is a special function based on specific coordinates and degrees, that we can apply to image
- line 12: applying our rotation matrix to our image
- line 19: we saving our new image by giving a new name
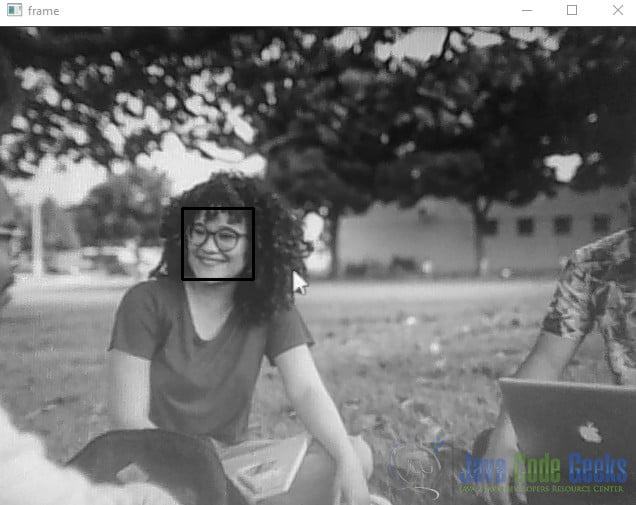
5. Face Detection using a Webcam
Now we will try to detect human faces, using just our webcam on our pc or laptop.
VideoCapture.py
import cv2

capture = cv2.VideoCapture(0)
cascade = cv2.CascadeClassifier('haarcascade_frontalface_default.xml')

codec = cv2.VideoWriter_fourcc(*'MPEG')
writer = cv2.VideoWriter('video.avi', codec, 30.0, (640, 480), 0)

while capture.isOpened():

    rtrn, frame = capture.read()

    grayscale = cv2.cvtColor(frame, cv2.COLOR_BGR2GRAY)

    faces = cascade.detectMultiScale(grayscale, scaleFactor=1.1, minNeighbors=5, minSize=(30, 30),
                                        flags=cv2.CASCADE_SCALE_IMAGE)
    if len(faces) != 0:
        for (x, y, w, h) in faces:
            cv2.rectangle(grayscale, (x, y), (x + w, y + h), (0, 255, 0), 2)

    writer.write(grayscale)

    cv2.imshow('frame', grayscale)

    if cv2.waitKey(1) & 0xFF == ord('q'):
        break

capture.release()
writer.release()
cv2.destroyAllWindows()
- line 3: first of all we must set our source video to the default camera. The parameter ‘0’ indicates that we want to use our default camera e.g if we have a laptop it will use the built-in webcam.
- line 4: the CascadeClassifier() method takes as an input an XML file that contains data, specific for the shape of the objects that we want to detect
- line 6-7: in order to save our video, we need to specify the encoder we want to use and then initialize a VideoWriter() that will create the file. The VideoWriter() method takes 4 parameters: the name and extension that our file we want to have, the codec, the ‘frames per second’, and the resolution. In our case, we want to work with grayscaled images, so we have to specify it by adding the 0 parameter
- line 11: we read the exact frame of the webcam at the current time
- line 13: in order for the detection algorithm to work, we need to convert the frame in grayscale
- line 15: this is the most important part of our code. Here, the detection is happening. We use the
detectMultiScale()method on the cascade we previously made. This method takes as parameters: our grayscaled image, a scale factor, and the minimum neighbors its rectangle must have in order to retain it. It returns the positions of detected faces - line 18-19: here we draw on our grayscaled image the rectangles based on the position of the detected faces
- line 21: now we write the image on our video file
6. Summary
In these examples, we learned some basic methods that OpenCV gives us, and demonstrated, how we can easily use OpenCV to create simple programs that detect faces. OpenCV offers us a big variety of methods that we can use and manipulate in different ways images and video files.
7. Download the source code
This was an OpenCV Python Tutorial.
You can download the full source code of this example here: OpenCV Python Tutorial
