Hello readers. In this tutorial, we will understand and implement mutations in graphql.
1. Introduction
GraphQL is an API syntax that defines how to fetch data from one or more databases. It was developed by Facebook to optimize the RESTful API calls.
- It is a data query and manipulation language for API’s. It is faster, simple, and easier to implement
- It follows the client-driven architecture and gives a declarative way to fetch and update the data
- It has a graphical structure where objects are represented by nodes and edges represent the relationship between the nodes
- Provides high consistency across all platforms
- It doesn’t have any automatic caching system
1.1 Application components in GraphQL
In graphql, there are two types of application components.
- Server-side components
- Client-side components
1.1.1 Service-side components
The server-side component allows parsing the queries coming from the graphql client applications and consists of 3 components i.e. query, resolver, and schema. Apollo is the most popular graphql server.
| Component | Description |
| Query | A query is a client request made by the graphql client for the graphql server. It is used to fetch values and can support arguments and points to arrays. field and arguments are two important parts of a query |
| Resolver | Helps to provide directions for converting graphql operation into data. Users define the resolver functions to resolve the query to the data. They help to separate the db and api schema thus making it easy to modify the content obtained from the db |
| Schema | It is the center of any graphql server implementation. The core block in a schema is known as a type |
| Mutation | It allows to modify the server data and return an object based on the operation performed |
1.1.2 Client-side components
The client-side components represent the client which is a code or a javascript library that makes the post request to the graphql server. It is of two types i.e.
- GraphiQL – Browser-based interface used for editing and testing graphql queries and mutations
- Apollo client – State management library for javascript that enables local and remote data management with graphql. Supports pagination, prefetching data, and connecting the data to the view layer
2. Mutations in graphql
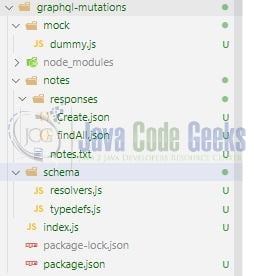
To set up the application, we will need to navigate to a path where our project will reside and I will be using Visual Studio Code as my preferred IDE. Let a take a quick peek at the project structure.
2.1 Setting up project dependencies
Navigate to the project directory and run npm init -y to create a package.json file. This file holds the metadata relevant to the project and is used for managing the project dependencies, script, version, etc. Replace the generated file with the code given below –
package.json
{
  "name": "graphql-mutations",
  "version": "1.0.0",
  "description": "Understanding mutations in graphql",
  "main": "index.js",
  "scripts": {
    "dev": "nodemon index.js",
    "start": "node index.js",
    "test": "echo \"Error: no test specified\" && exit 1"
  },
  "keywords": [
    "graphql",
    "graphql-apolloserver",
    "apollo-server",
    "apollo-server-express",
    "express",
    "mutations"
  ],
  "author": "geek",
  "license": "MIT",
  "dependencies": {
    "apollo-server-express": "^3.8.2",
    "express": "^4.18.1"
  },
  "devDependencies": {
    "nodemon": "^2.0.16"
  }
}
Once the file is replaced trigger the below npm command in the terminal window to download the different packages required for this tutorial.
Downloading dependencies
npm install
2.2 Setting up mock data
Create a file responsible to mock the database. The below file in the mock directory is responsible to hold the employees’ data. The primary focus of this tutorial is to understand the mutations and hence we skipped the real database part.
dummy.js
let employees = [
  {
    id: 1,
    name: "Hunter Miles",
    gender: "male",
    email: "huntermiles@example.com"
  },
  {
    id: 2,
    name: "Jane done",
    gender: "female",
    email: "janedoe@example.com"
  }
];

module.exports = { employees };
2.3 Setting up resolvers
Create a file in the schema directory responsible to interact with the database and address the incoming query and mutation from the client.
resolvers.js
const { employees } = require("../mock/dummy");

const resolvers = {
  Query: {
    findAll: (parent, args) => {
      console.log("fetching all");
      return employees;
    }
  },

  Mutation: {
    create: (parent, args) => {
      console.log("inserting new user");
      const ids = employees.map((o) => o.id);
      const max = Math.max(...ids);
      const emp = {
        id: max + 1,
        name: args.name,
        gender: args.gender,
        email: args.email
      };
      employees.push(emp);
      return { code: 201, message: `${emp.id} inserted` };
    }
  }
};

module.exports = { resolvers };
2.4 Setting up type definitions
Create a file in the schema directory responsible to represent the type definition required for the tutorial. The file lists the query (findAll) and mutation (create) methods.
typedefs.js
const { gql } = require("apollo-server-express");

const typeDefs = gql`
  type Employee {
    id: Int!
    name: String!
    gender: String!
    email: String!
  }

  type Response {
    code: Int!
    message: String!
  }

  #Query
  type Query {
    findAll: [Employee!]!
  }

  #Mutation
  type Mutation {
    create(name: String!, gender: String!, email: String!): Response!
  }
`;

module.exports = { typeDefs };
2.5 Creating the implementation file
Create a file in the root directory that acts as an entry point for the application. The graphql server will be exposed on a port number – 3005 and you can use the apollo server gui to play around with the application.
index.js
const { ApolloServer } = require("apollo-server-express");
const { typeDefs } = require("./schema/typedefs");
const { resolvers } = require("./schema/resolvers");

const server = new ApolloServer({ typeDefs, resolvers });

const express = require("express");
const app = express();

// browser url - http://localhost:3005/graphql

const app_port = 3005;
server.start().then(() => {
  server.applyMiddleware({ app });
  app.listen({ port: app_port }, () => {
    console.log(`Service endpoint :: http://localhost:${app_port}/graphql`);
  });
});
3. Run the Application
To run the application navigate to the project directory and enter the following command as shown below in the terminal. The application will be started successfully on the port number – 3005.
Run command
$ npm run start
Once the application is started successfully open the browser and hit the below endpoint to view the query explorer. If you will be a first-time user welcome page will be shown otherwise the query explorer.
Application endpoint
http://localhost:3005/graphql

You can download the sample query and mutation used in this tutorial from the Downloads section. That is all for this tutorial and I hope the article served you with whatever you were looking for. Happy Learning and do not forget to share!
4. Summary
In this tutorial, we saw a brief introduction to graphql and practical implementation of mutation in graphql. You can download the source code from the Downloads section.
5. Download the Project
This was a tutorial to understand mutations in graphql.
You can download the full source code of this example here: Mutations in graphql
