In this Example series, we will see how to have a REST (Web) Application in Scala.
The following table shows an overview of the entire article:
Table of Contents
- 1. Pre-Requisites
- 2. Environment
- 3. REST
- 4. Scalatra
- 4.1 Installing Scalatra
- 4.2 Pre-requisites – Installing Conscript and Giter8
- 4.3 SBT (Scala Build Tool)
- 4.4 Configuring Scalatra via SBT
- 4.5 Customizing the SBT build file for JSON libraries
- 4.6 First Project – Hello Scalatra
- 4.7 Starting the Server (Jetty)
- 4.8 Test the Application – via Browser
- 4.9 Test the Application – via RESTClient
- 5. Example Application – Customer Management – Scala
- 6. Example Application – Customer Management – Scalatra
- 6.1 MyScalatraServlet – GET All customers
- 6.2 Stop and Start Jetty – for Code Changes
- 6.3 REST Client – GET All customres
- 6.4 MyScalatraServlet – Get a specific customer
- 6.5 REST Client – Get a specific customer
- 6.6 MyScalatraServlet – POST
- 6.7 REST Client – POST
- 6.8 MyScalatraServlet – DELETE
- 6.9 REST Client – DELETE
- 6.10 Exit SBT
- 7. Conclusion
- 8. References
- 9. Download the Source Code
1. Pre-requisites
The readers are expected to know the following pre-requisites for this Scala-REST example.
- Hands on Java Programming
- Hands on Scala Programming – Basics
- Hands on Java Web (Servlet) Programming – At least for the basic HTTP Methods (Get/Post and the Routing)
- Exposure to REST Style / Architecture – We will cover the minimal introduction in this article
- JSON data format
2. Environment
The examples in this article are executed in the Command Prompt / Shell with the Scalatra with the REST Client – an Add-on for Firefox browser. But they are guaranteed to work with any of the IDEs having a proper support for Scala, Scalatra and REST (like Eclipse – Scala IDE, IntelliJ IDEA etc.,) through the respective plugins. The examples are executed with the Scalatra Version 2.4.0.RC1 and Scala Version: 2.11.7 in Windows 7.
You may refer to my previous tutorial here on how to install Scala, if you are a beginner with Scala.
3. REST
REST stands for Representational State Transfer, which is a new buzzword and an architectural pattern for the request/response paradigm for the Service Oriented Architecture.
3.1 What is REST
According to Wikipedia, the definition of REST is as follows.
In computing, representational state transfer (REST) is the software architectural style of the World Wide Web. The purpose of REST architecture is to induce performance, scalability, simplicity, modifiability, visibility, portability, and reliability. More precisely, REST is an architectural style consisting of a coordinated set of components, connectors, and data elements within a distributed hypermedia system, where the focus is on component roles and a specific set of interactions between data elements rather than implementation details.
The term representational state transfer (REST) was introduced and defined in 2000 by Roy Fielding in his doctoral dissertation at UC Irvine. REST has been applied to describe desired web architecture, to identify existing problems, to compare alternative solutions and to ensure that protocol extensions would not violate the core constraints that make the web successful. Fielding used REST to design HTTP 1.1 and Uniform Resource Identifiers (URI).
To the extent that systems conform to the constraints of REST they can be called RESTful. RESTful systems typically, but not always, communicate over Hypertext Transfer Protocol (HTTP) with the same HTTP verbs (GET, POST, PUT, DELETE, etc.) that web browsers use to retrieve web pages and to send data to remote servers. REST systems interface with external systems as web resources identified by Uniform Resource Identifiers (URIs), for example
/people/tom, which can be operated upon using standard verbs such asGET /people/tom.
In Web application programming, we have most of the interactions happen through Request-Response mechanism. REST has made it much simplified and meaningful to have a better understanding of the client requests by simply looking at the URL. For example, the requests will be confirming to one of the HTTP methods which look like verbs in Simple English as follows.
- GET to retrieve an existing resource from the System. Example
/customer/1will retrieve the customer whose Id is1, whereas/customerswill retrieveallin the System. - POST to submit a resource (mostly for creating a new resource). Example
/customer/createcan create a new customer when submitted the request via HTTP Post method - PUT for putting back with changes (for Update). Example
/customer/1with a HTTP methodPUTwill update the customer with Id 1 with the data submitted along with this request. - DELETE for removing an existing resource. Example
cusomter/1with a HTTP methodDELETEwill remove the customer with the Id 1 from the System. - OPTIONS is to retrieve the list of operations supported by the Server
- Few other Verbs – HEAD, TRACE, CONNECT etc., which are not very common as those of the above
For more detailed understanding of the HTTP Verbs, please refer to this Wikipeida – HTTP Verbs
3.2 REST Client
For the most famous HTTP verbs like GET and POST, we can trigger the requests with a Web application using a direct hyperlink which defaults to GET or with a HTML form by placing the appropriate HTTP verb for the method attribute of the form element as below.
<form name=’myForm’ action=’/MyAction’ method=’POST’>
However, for the other HTTP methods like PUT, DELETE etc., we should better use a HTTP client that facilitates not just the passing of HTTP request with an appropriate method, but also to capture the response retrieved in both RAW HTML output as well as the formatted/highlighted one (post rendering). This way the HTTP client will be a simple and better tool that would eradicate the need of a separate web application with the HTML form that again requires an extra work of desining the form and deploying it in the Web Server.
One such client we will use is REST Client, which is an add-on for the Firefox browser. REST Client is a simple and easy to use add on (tool) to work with Firefox. It is more similar to the Postman extension to the Google chrome browser. Every browser will have its own compatible add-on/extensions to work with. The readers can do a Google search to find the appropriate HTTP client. There are few CLI (Command Line) tools like Httpie (prounced as Http Pie, which is a CLI, cURL-like tool for humans) – that will work like a command line application in your desktop.
The REST client Addon for Firefox looks like below.
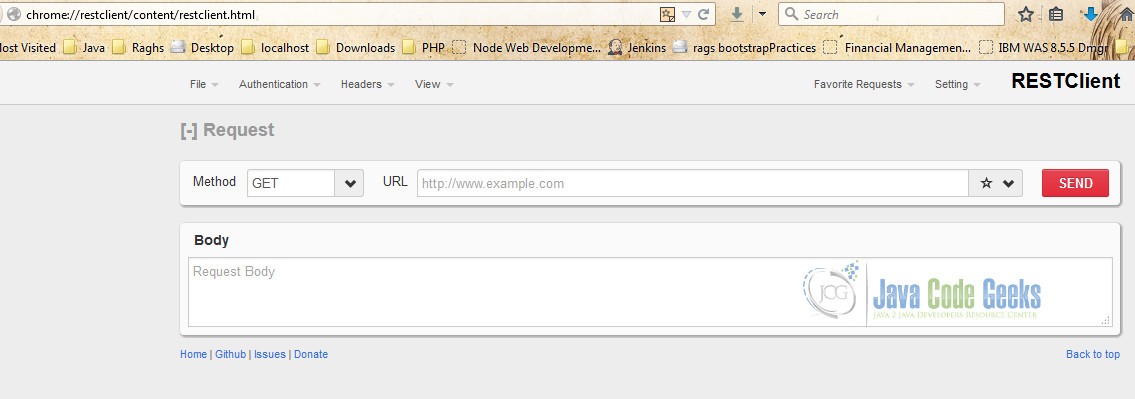
The REST Client Add-on is pretty simple and the sections are self-explanatory. The input section starts with a drop down on the top left which has the list of HTTP verbs – by default GET selected. Next to that on the right is the actual URL to be triggered , for example http://localhost:8080/customers, if your server is running on the localhost listening to the port number 8080. You can replace the values accordingly.
The bottom text area has the Request Body, which is to have the request data to be sent along with the Request. It may not be needed for GET requests, but will be very much useful and needed for the POST and PUT methods. Once we are good with our request particulars, we can click the Send button on the right side with the red background color, which will take the request information (URL, Body, HTTP Method) and trigger an appropriate request to the Server (that is taken from the URL itself).
Installing the RESTClient add-on is a pretty simple task. You can hit the URL – RESTClient – Firefox Addon on your firefox browser and then follow the onscreen installation to get the extension added to your browser. You may need to restart your browser for this extension to get this running post installation. Please read the documentation for further information and customization if any on the extension.
3.3. Common Use Cases
For our example, we will work with the most common use cases which are GET, POST and DELETE. You can use the same style for the rest of the HTTP methods if you wish to extend your application further with the support of those other HTTP verbs/methods.
We will have a customer management application in which we will expose our services as a RESTful API that will have – GET, POST and DELETE using which the clients (can be a human or any other system/machine) will have an opportunity to retrieve all or specific customer, create a new customer and remove a customer from the System.
In a real world example, the REST APIs may be followed by an Authentication mechanism to validate the clients thereby preventing the unauthorized access to the System.
As it is beyond the scope of this article, we will not have any authentication mechanism for our example.
4. Scalatra
Scalatra is a simple, accessible and free web micro-framework. It combines the power of the JVM with the beauty and brevity of Scala, helping you quickly build high-performance web sites and APIs.
A little more detailed introduction from Wikipedia goes as follows.
Scalatra is a free and open source web application framework written in Scala. It is a port of the Sinatra framework written in Ruby. Scalatra is an alternative to the Lift, Play!, and Unfiltered frameworks.
Scalatra is an example of a microframework, a web software development framework which attempts to be as minimal as possible.
We will see how to install and work with Scalatra below.
4.1 Installing Scalatra
Installing Scalatra is very simple. It requires Scala as a pre-requisite. You may have Java JDK installed in your machine prior to this installation.
As per this URL, this is a two step process. Installation of Scalatra depends on giter8 which is again depending upon Conscript which are simple utilities facilitating the installation of Scalatra from Github repositories at the latest branch. Post which we will use giter8 to install Scalatra-SBT which is a Simple Build Tool (SBT) for Scala that helps us to build any Scala application.
These tools need an active Internet connection as they need to grab the source code and binaries from
GitHubrepositories.
4.2 Pre-requisites – Installing Conscript and Giter8
Conscript is a tool for installing and updating Scala code and giter8 is a tool for downloading the project templates from the Github Repositories. It is the recommended way to generate Scalatra project skeletons.
Please read this URL for downloading and installing Conscript in your System. It requires an executable .jar file to be downloaded first.
For the first time, execution of the Jar file it takes a good amount of time, depending upon your Internet Connection speed, to pull the binaries from GitHub repositories. Please be informed of this and be patient until the installation gets completed as per the instruction given in the Concscript website.
By default it gets installed in the %USER_HOME%/.conscript directory. In case of Windows, for example, it gets installed in to C:\Users\rags\.conscript in my Windows 7 Desktop. You may have to add the installation directory of conscript to your PATH environment variable, in case you wish to execute the cs executable command from anywhere in your desktop, else you need to navigate to the bin directory of the conscript installation directory to execute cs command to install the other tools/dependencies via Conscript.
Once the Conscript is successfully installed, it will generate a cs.bat (or cs.sh if you are using a *nix/Mac OS) file in the Conscript installation directory (C:\Users\rags\.conscript).
Post successful installation of Conscript tool, you can refer to this URL to install giter8 in your System.
The official definition of the giter8 tool from the GitHub project home page is as follows.
Giter8 is a command line tool to generate files and directories from templates published on github or any other git repository. It’s implemented in Scala and runs through the sbt launcher, but it can produce output for any purpose.
Please remember that Conscript is a pre-requisite for installing giter8. You need to navigate to the %CONSCRIPT_HOME%/bin directory of Conscript Installation directory and issue the following command in the terminal. cs foundweekends/giter8 to install giter8 in your System. This will invoke the cs – conscript executable by passing the giter8 which is present in the foundweekends navigation path.
Once again, installing
giter8might take a bit of time depending on your Internet Connection speed, as giter8 will download its own Scala libraries as its pre-requisites.
Once the giter8 tool is successfully installed, it will generate a g8.bat (or g8.sh if you use *nix/Mac OS) file in the Conscript Installation directory (C:\Users\rags\.conscript).
4.3 SBT (Scala Build Tool)
SBT stands for Simple Build Tool. It is an interactive build tool (like Ant, Maven etc.,) for Scala with the task definition (build.scala) file to determine the dependencies required for a project to be set up.
It is much like Maven where you can configure your project dependencies and the corresponding version for each of the dependency libraries. While executing, SBT will pull all the dependent libraries from the Internet (mostly from Maven or GitHub repositories) of the appropriate version. At the end it will also give you a status of whether it was able to download all the dependencies successfully or it had procuded any warnings/errors so as to indicate the user to take any corrective meausures against the odds.
For our example, we do NOT need to install SBT separately. Using giter8, it will have
scalatra-sbt downloaded as part of the Scalatra project from the template. The downloaded and configured project will have the ‘sbt’ installed implicitly.4.4 Configuring Scalatra via SBT
Now that we had installed the required dependencies, let us go ahead and download the Scalatra via SBT using giter8.
You can refer this URL for installing scalatra-sbt using giter8. The installation will ask several questions as the user’s choice for the significant properties, being an interactive tool. In case you don’t want to specify an explicit value, you can press enter to go with the default value supplied within the square brackets.
For example, the scalata-sbt tool is configured as follows.
Please remember that I have added the
bindirectory of%CONSCRIPT_HOME%directory which isC:\Users\rags\.conscriptin my machine to thePATHenvironment variable. With which I am free to invoke theg8command anywhere in my System.
Installing scalatra-sbt
C:\rags\scalaPgms\javacodegeeks\scalaRestExample\scalatra> g8 scalatra/scalatra-sbt
organization [com.example]: com.example.javacodegeeks.scala.rest
name [My Scalatra Web App]: ScalaRESTWebApp
version [0.1.0-SNAPSHOT]:
servlet_name [MyScalatraServlet]:
package [com.example.app]: com.example.javacodegeeks.scala.rest
scala_version [2.11.8]:
sbt_version [0.13.11]:
scalatra_version [2.4.1]: 2.4.0.RC1

Template applied in .\scalarestwebapp


C:\rags\scalaPgms\javacodegeeks\scalaRestExample\scalatra
Please be informed that wherever I have required a specific version/value I have entered them in the command line. Rest of them had taken the default values supplied by the scalatra-sbt tool. The options are self-explanatory. However you may read this URL for a detailed explanation of the terms.
This will download the project with the given name scalarestwebapp in our case, in the directory in which the g8 command was issued with the options specified.
I have given 2.4.0.RC1 as a Scalatra version for using JSON format in our example, because as on date, the latest version has an issue with JSON. You can refer this URL for the same.
4.5 Customizing the SBT build file for JSON libraries
In order to work with JSON outputs, we need to download few JSON libraries explicitly, as they are not available by default.
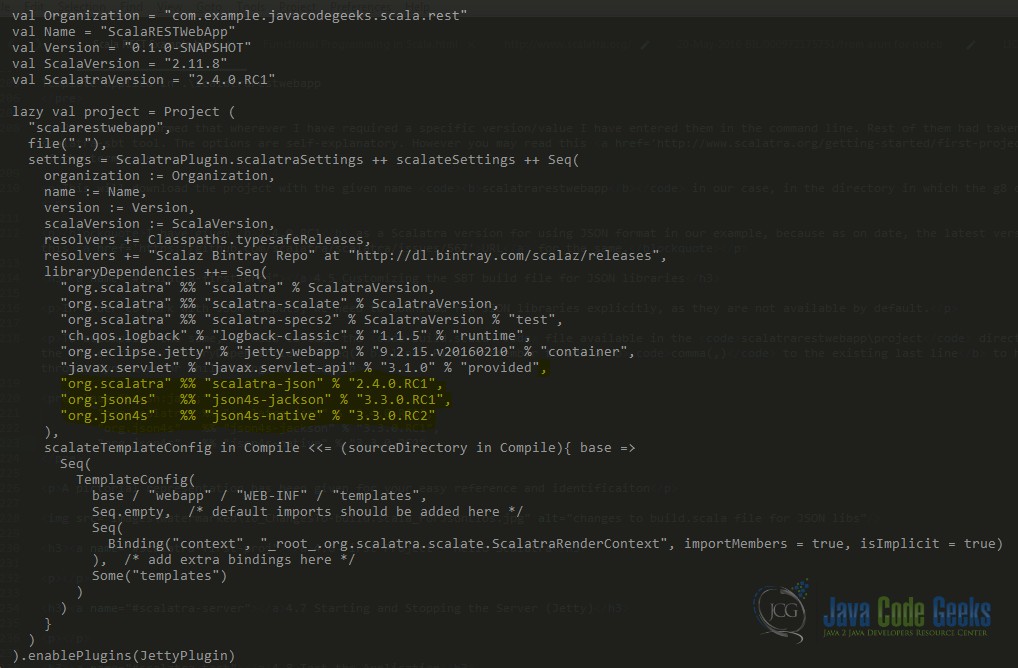
To accomplish the same, we need to edit the build.scala file available in the scalatrarestwebapp\project directory as follows. Add the following lines at the end of the libraryDependencies += Seq( line. Please remember to add a comma(,) to the existing last line to have a continuation, otherwise the SBT will throw a Syntax error while being executed.
changes to build.scala file for JSON libs
        "org.scalatra" %% "scalatra-json" % "2.4.0.RC1",
        "org.json4s"   %% "json4s-jackson" % "3.3.0.RC1",
        "org.json4s"   %% "json4s-native" % "3.3.0.RC2"
A pictorial representation has been given for your easy reference and identification
4.6 First Project – Hello Scalatra
Now that we have configured our scalatra-sbt project successfully, let us run our first project. Beforehand, let us have a look at our Servlet – which is a scala class for MyScalatraServlet as per our choice during the installation.
MyScalatraServlet.scala
package com.example.javacodegeeks.scala.rest

import org.scalatra._

class MyScalatraServlet extends ScalarestwebappStack {

  get("/") {
    <html>
      <body>
        <h1>Hello, world!</h1>
        Say <a href="hello-scalate">hello to Scalate</a>.
      </body>
    </html>
  }
}
It is a simple Servlet class that routes the URL on the main application (“/”) with the HTTP GET method, for which it prints the typical Hello, World on the browser with a hyperlinked text to a different URL /hello-scalate.
Scalate stands for Scala Templat Engine is a template engine supporting Jade as the mark up language to be used in the HTML pages. It is purely for the Web pages and hence stands out of scope for this article.
4.7 Starting the Server (Jetty)
As it is a Web application, we need a Web Server to run this application. We have already configured a Servlet as part of scalatra-sbt. Luckily and thankfully, Scaltra comes with a built-in Web Server and a Servlet Container Jetty which is an Open Source Web Server like Apache Tomcat.
For starting our Jetty Webserver, we need to execute the SBT first, which prepares the runtime environment for Jetty along with the required libraries. Remember the build.scala file which we have edited a while ago to add the JSON library dependencies. SBT uses this build file to download and keep all the required dependencies for the application to run smoothly.
Let us run the SBT now. You need to be present in the salarestwebapp directory of your Scalatra-sbt installation directory..
Execute SBT
C:\rags\scalaPgms\javacodegeeks\scalaRestExample\scalatra\scalarestwebapp
sbt
[info] Loading project definition from C:\rags\scalaPgms\javacodegeeks\scalaRestExample\scalatra\scalarestwebapp\project
[info] Updating {file:/C:/rags/scalaPgms/javacodegeeks/scalaRestExample/scalatra/scalarestwebapp/project/}scalarestwebapp-build...
[info] Resolving org.fusesource.jansi#jansi;1.4 ...
[info] Done updating.
[info] Compiling 1 Scala source to C:\rags\scalaPgms\javacodegeeks\scalaRestExample\scalatra\scalarestwebapp\project\target\scala-2.10\sbt-0.13\classes...
[info] Set current project to ScalaRESTWebApp (in build file:/C:/rags/scalaPgms/javacodegeeks/scalaRestExample/scalatra/scalarestwebapp/)
>
As you can see above, the sbt command loads the project definition from the project sub-directory and it downloads all the dependencies on the 3rd line – which will be dynamically updating as an when SBT downloads each dependency mentioned in the build.scala file. Once it has completed downloading all the dependencies and it is ready, it will give a message as Done updating inthe command line.
After which, it will compile the source code – which as of now we have only one MyScalatraServlet.scala and it will throw errors if any. If there are no errors, it does not give any intimation on the successful compilation.
Please note that the SBT tool prints out a right arrow mark > to indicate that it is waiting for your command/input further to work.
Now Let us start our Jetty Web Server, as follows.
Start Jetty Web Server
C:\rags\scalaPgms\javacodegeeks\scalaRestExample\scalatra\scalarestwebapp> sbt
[info] Loading project definition from C:\rags\scalaPgms\javacodegeeks\scalaRestExample\scalatra\scalarestwebapp\project
[info] Updating {file:/C:/rags/scalaPgms/javacodegeeks/scalaRestExample/scalatra/scalarestwebapp/project/}scalarestwebapp-build...
[info] Resolving org.fusesource.jansi#jansi;1.4 ...
[info] Done updating.
[info] Compiling 1 Scala source to C:\rags\scalaPgms\javacodegeeks\scalaRestExample\scalatra\scalarestwebapp\project\target\scala-2.10\sbt-0.13\classes...
[info] Set current project to ScalaRESTWebApp (in build file:/C:/rags/scalaPgms/javacodegeeks/scalaRestExample/scalatra/scalarestwebapp/)
> jetty:start
[info] Updating {file:/C:/rags/scalaPgms/javacodegeeks/scalaRestExample/scalatra/scalarestwebapp/}scalarestwebapp...
[info] Resolving org.scala-lang.modules#scala-parser-combinators_2.11;1.0.1 ...
[info] Done updating.
[info] Compiling Templates in Template Directory: C:\rags\scalaPgms\javacodegeeks\scalaRestExample\scalatra\scalarestwebapp\src\main\webapp\WEB-INF\templates
SLF4J: Failed to load class "org.slf4j.impl.StaticLoggerBinder".
SLF4J: Defaulting to no-operation (NOP) logger implementation
SLF4J: See http://www.slf4j.org/codes.html#StaticLoggerBinder for further details.
[info] Compiling 1 Scala sources to C:\rags\scalaPgms\javacodegeeks\scalaRestExample\scalatra\scalarestwebapp\target\scala-2.11\classes...
[info] Packaging C:\rags\scalaPgms\javacodegeeks\scalaRestExample\scalatra\scalarestwebapp\target\scala-2.11\scalarestwebapp_2.11-0.1.0-SNAPSHOT.jar ...
[info] Done packaging.
[info] starting server ...
2016-05-21 22:05:54.584:INFO::main: Logging initialized @117ms
2016-05-21 22:05:54.645:INFO:oejr.Runner:main: Runner
2016-05-21 22:05:54.773:INFO:oejs.Server:main: jetty-9.2.1.v20140609
[success] Total time: 22 s, completed May 21, 2016 10:05:55 PM
> 2016-05-21 22:06:01.355:WARN:oeja.AnnotationConfiguration:main: ServletContainerInitializers: detected. Class hierarchy: empty
22:06:01.928 [main] INFO  o.scalatra.servlet.ScalatraListener - The cycle class name from the config: ScalatraBootstrap
22:06:02.012 [main] INFO  o.scalatra.servlet.ScalatraListener - Initializing life cycle class: ScalatraBootstrap
22:06:02.211 [main] INFO  o.f.s.servlet.ServletTemplateEngine - Scalate template engine using working directory: C:\Users\raghs\AppData\Local\Temp\scalate-4744013053113056578-workdir
2016-05-21 22:06:02.214:INFO:oejsh.ContextHandler:main: Started o.e.j.w.WebAppContext@6f4d33{/,file:/C:/rags/scalaPgms/javacodegeeks/scalaRestExample/scalatra/scalarestwebapp/target/webapp/,AVAILABLE}{file:/C:/rags/scalaPgms/javacodegeeks/scalaRestExample/scalatra/scalarestwebapp/target/webapp/}
2016-05-21 22:06:02.215:WARN:oejsh.RequestLogHandler:main: !RequestLog
2016-05-21 22:06:02.231:INFO:oejs.ServerConnector:main: Started ServerConnector@18c149e7{HTTP/1.1}{0.0.0.0:8080}
2016-05-21 22:06:02.231:INFO:oejs.Server:main: Started @7791ms
As you see, we started with the input at first to start the Jetty with – jetty:start and the Jetty server outputs its state at regular intervals and phases, which were highlighted in the snippet above. Finally the Server is started successfully which we can see in the console as "Started @7791ms" that indicates how much time in milliseconds the Server has taken to boot up.
You may note that on line # 30, the Jetty Web Server prints out on the console that which IP address and port number it listens to. In our case, it is {HTTP/1.1}{0.0.0.0:8080} which means the localhost (127.0.0.1) indicated as 0.0.0.0 and on Port number 8080.
4.8 Test the Application – via Browser
Now that we have downloaded and configured our Scalatra Server and we also have our first Servlet Ready with our Jetty WebServer, let us go ahead and test it with our Jetty Webserver which we have started successfully.
We can trigger a request to the URL http://localhost:8080 in our browser. For our example, we use Firefox web browser.
Localhost Home Page – Firefox
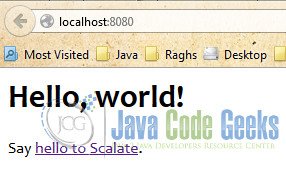
Congratulations!. We have our Scalatra Web Server running successfully. Let us test the same with our RESTClient Addon for Firefox Browser.
4.9 Test the Application – via REST Client
As we will be using REST Client Add-on for the rest of all RESTful APIs, let us test this URL with the REST Client with which we will also explore the different sections in the add-on.
Localhost – RESTClient – Request and Response Headers

Localhost – RESTClient – Raw HTML Response
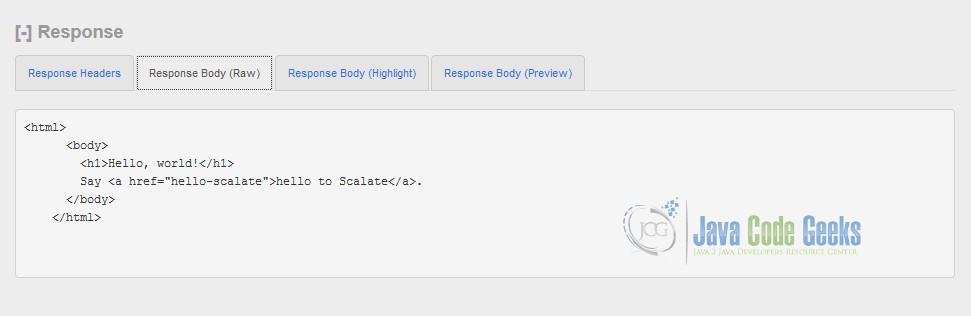
Localhost – RESTClient – Response Body HTML
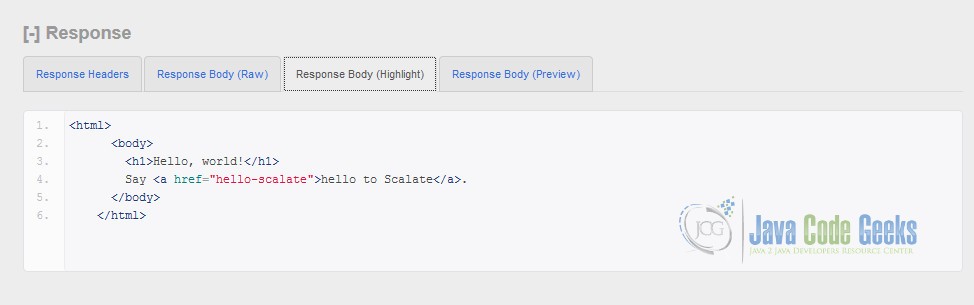
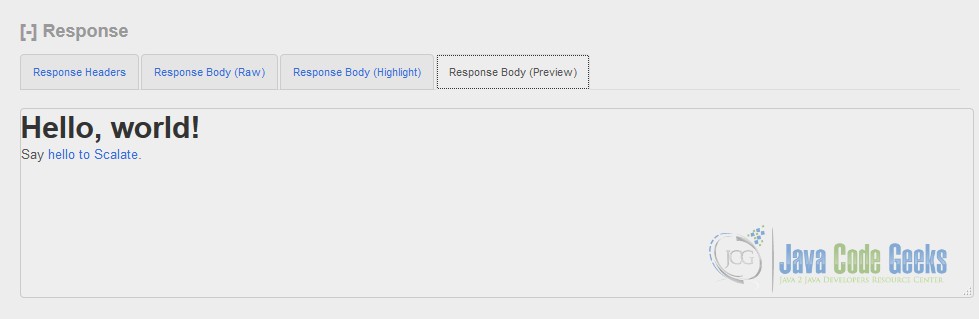
Localhost – RESTClient – Response Preview
5. Example Application – Customer Management – Scala
In this example, we will have a Customer Management application wherein we will have our services exported as a RESTful API, as follows.
- List all customers – through
/cusotmersvia HTTP Get method - List a specific customer – through
/customer/<Id>via HTTP Get method - Create a new customer – through
/customer/createvia HTTP Post method - Delete a specific customer – through
/customer/<Id>via HTTP Delete Method
We will first build our Server side code ready in Scala. For the sake of simple example, we will have the customer information backed up in a Map which will exist as long as the Server is running. However you can use JDBC to keep this stored permanently in a Relational Database like MySQL, Oracle etc.,
5.1. Customer class
Let us create the main domain class – Customer.scala to capture the essential information pertaining to a customer. For the sake of simplicity, we will have an Id of a customer which will be auto-generated, the first and last names of the customers.
Customer.scala
package com.example.javacodegeeks.scala.rest

//JSON related libraries
import org.json4s.{DefaultFormats, Formats}

//JSON handling support from Scalatra
import org.scalatra.json._

// JSON library for converting the POJO toString as Json
import org.json4s.native.Json

class Customer(val id:Int, var firstName:String, var lastName:String) {

        println("Customer - Constructor  BEGIN .... ")

        // overloaded or auxillary constructor that will invoke the
        // increment method for having a new Id value
        def this(firstName:String, lastName:String) {
                this(Customer.inc, firstName, lastName)
        }

        //toString info with all fields to be printed in JSON format
        override def toString = Json(DefaultFormats).write(this)

        println("Customer - Constructor END .... ")
}

object Customer {
        private var id = 0

        // increment the id by 1 everytime and return the new value
        private def inc = {
                id += 1;
                id
        }
}
This is a simple Scala class having the attributes of Customer class with the inc method in its singleton object that will be called everytime a Customer class is instantiated, so that we get a new Id everytime to be unique for a customer.
We have an overloaded toString method that will print all the fields of this class in a JSON format, for which we import the required libraries on top of the class.
5.2. CustomerMap class
Now that we have our main Customer class ready, we will have a Map as a container to store and retrieve the Customer information. This is to simulate a database in realtime, which may otherwise be used with a JDBC Driver for the corresponding Databae of our choice – MySQL, DB2, Oracle etc.,
CustomerMap.scala
package com.example.javacodegeeks.scala.rest

import scala.collection._

class CustomerMap {

        println("CustomerMap - Constructor BEGIN... ")

        var map:Map[Int, Customer] = Map()

        //method to intialize the map with an initial entry to start with
        init()

        // method to add one Customer instance to the Map
        def init() {
                this.add("Raghavan", "Muthu")
        }

        def add(firstName:String, lastName:String):Int = {
                var c:Customer = new Customer(firstName, lastName)
                map += (c.id -> c)
                c.id
        }

        def add(c:Customer):Customer = {
                map += (c.id -> c)
                c
        }

        def get(id:Int):Customer = {
                map(id)
        }

        def remove(id:Int) = {
                map = map - id
        }

        def update(id:Int, c:Customer) {
                map += (id -> c)
        }

        override def toString = s"Map :: ${map}"

        println("CustomerMap - Constructor END....")
}
This is a scala class having a Map collection to have the Customer instances stored. It has got several self-explaining meaningful methods to add, retrieve, update and delete a Cusotmer instance from the collection. To start with, we have one Customer instance added, which will be invoked through the init() method.
6. Example Application – Customer Management – Scalatra
Now that we have all our domain classes ready, let us get into Scaltra Servlet where we can configure our URL pattern and the routing with which we can map our request to the action.
For our ease of use, Scalatra defined the Servlet methods matching with the HTTP method names – get, post, delete, put etc.,
6.1 MyScalatraServlet – GET All customers
First of all, let us have a look at a simplest of all – GET request.
In order to get the customer details in a JSON format, we will import the required JSON libraries on top of the class.
MyScalatraServlet.scala for GET all customers
package com.example.javacodegeeks.scala.rest

import org.scalatra._

//JSON related libraries
import org.json4s.{DefaultFormats, Formats}

//JSON handling support from Scalatra
import org.scalatra.json._

class MyScalatraServlet extends ScalarestwebappStack with JacksonJsonSupport {

  // Sets up automatic case class to JSON output serialization, required by
  // the JValueResult trait.
  protected implicit lazy val jsonFormats: Formats = DefaultFormats

  // Before every action runs, set the content type to be in JSON format
  before() {
        contentType = formats("json")
  }

  // an instance of CustomerMap to hold the collection
  var customerMap = new CustomerMap()

  get("/") {
    <html>
      <body>
        <h1>Hello, world!</h1>
        Say <a href="hello-scalate">hello to Scalate</a>.
      </body>
    </html>
  }

  get("/customers") {
        customerMap.map
  }

}
The MyScaltraServlet now has been changed to accommodate the HTTP Get method in such a way that it will list all the customers. For the very first time, we need to have some customers. That was the reason we had an init() method in the CustomerMap.scala class, otherwise this will be empty at the very first time. It is purely an user’s choice. If you dont’ want this behavior, you can take off the init() method.

The get("/customers") method will be invoked for the HTTP request ending with /customers and it will print the map instance variable of the customerMap variable which is of type CustomerMap. The CustomerMap class has an overloaded toString() that will print out the contents of the Map. As we need the contents to be displayed in JSON format, we had imported the required classes on top of the classes – line numbers 6, 9 indicate the importing and the line number 10 indicates that MyScalatraServlet class will have the support of JacksonJsonSupport trait, which is more of Java’s Interface being implemented by a class.
The line number 19 indicates the setting of the contentType to application/json MIME type. This is for setting the HTTP Header Content-Type: application/json behind the scenes. If we wish, we can have this line as the first line in every method like get, post etc., However, we can have a general method called before() to have such common lines which will be applicable for every other method invoked in this class thereby saving our time and obtaining an efficiency.
6.2 Stop and Start Jetty – for Code Changes
Now that we have made some code changes, we need to let Jetty know of this changes, otherwise the changes will not have any effect. It is like deploying the latest code to Servers location so that the Server could act on the latest changes we made.
For which we can issue the command as follows.
Stopping Jetty Web Server
C:\rags\scalaPgms\javacodegeeks\scalaRestExample\scalatra\scalarestwebapp\
...
[SLF4J: See http://www.slf4j.org/codes.html#StaticLoggerBinder for further details.
[info] starting server ...
[success] Total time: 1 s, completed May 21, 2016 10:16:00 PM
> 2016-05-21 22:16:00.338:INFO::main: Logging initialized @51ms
2016-05-21 22:16:00.344:INFO:oejr.Runner:main: Runner
2016-05-21 22:16:00.455:INFO:oejs.Server:main: jetty-9.2.1.v20140609
jetty:stop
[info] waiting for server to shut down...
[success] Total time: 0 s, completed May 21, 2016 10:16:06 PM
>
As you can see, we issued a similar command jetty:stop at line numer 9 post which the Server stopped gracefully. The Jetty Server printed the successful stopping of the server in the console at line number 11.
Once again, you can issue the command jetty:start so that the server will compile the source code afresh and deploy with the latest changes.
Instead of stopping and starting the server everytime, we can issue the following command so that the Server will keep looking for changes in the source code and whenever it finds a source file being modified, it will compile that file and redeploy it without you issue the stop/start.
Facilitating Hot deployment of modified source code in Jetty
C:\rags\scalaPgms\javacodegeeks\scalaRestExample\scalatra\scalarestwebapp\
.....
2016-05-21 22:22:07.521:INFO:oejs.Server:main: Started @7183ms
~;copy-resources
[info] Compiling Templates in Template Directory: C:\rags\scalaPgms\javacodegeeks\scalaRestExample\scalatra\scalarestwebapp\src\main\webapp\WEB-INF\templates
SLF4J: Failed to load class "org.slf4j.impl.StaticLoggerBinder".
SLF4J: Defaulting to no-operation (NOP) logger implementation
SLF4J: See http://www.slf4j.org/codes.html#StaticLoggerBinder for further details.
[info] Compiling 3 Scala sources to C:\rags\scalaPgms\javacodegeeks\scalaRestExample\scalatra\scalarestwebapp\target\scala-2.11\classes...
[success] Total time: 8 s, completed May 21, 2016 10:34:15 PM
1. Waiting for source changes... (press enter to interrupt)
As you can see through the highlighted lines, we issued the command ;copy-resources to copy the resources if any being changed. At line number 11, Jetty printed out the message stating that it is waiting for the source file to be changed so that it can recompile the changed file and redeploy it with the modifications. In case you don’t want it to keep waiting, you can press Enter to come back to the SBT prompt where you can issue further commands.
6.3 REST Client – GET All customers
Now that we have restarted Jetty to take the modifications being done to the MyScalatraServlet to accommodate the GET request for /customers, let us test the same in REST Client.
RESTClient – Get All customers
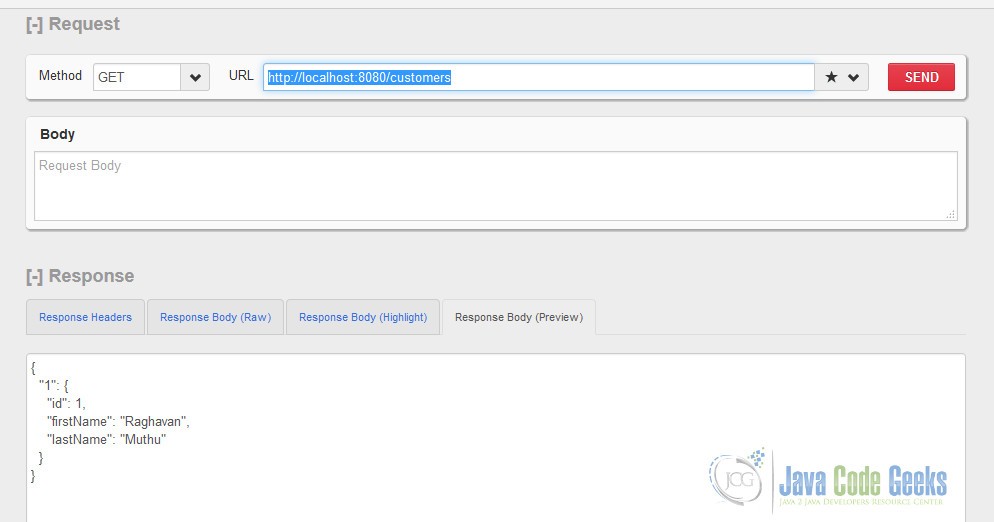
As we have got only one customer – which was initially loaded, we got that a result of /customers for HTTP Get method – which is to indicate that Get all customers. The latest code changes what we made in Scalatra is working fine now as we see in the output response below in the RESTClient tool.
6.4 MyScalatraServlet – Get a specific customer
Let us now add another piece of code to retrieve a specific customer based on the Id passed.
We need to add this piece into a different method – as in the same get() method but with a different URL pattern to match the specific customer Id being passed along with the request.
MyScalatraServlet.scala for GET a specific customer
 get("/customer/:Id") {
        var IdInt = Integer.parseInt(params("Id"))
        println("GET - Customer Id - arg. passed :: " + IdInt)
        customerMap.get(IdInt)
  }
The URL pattern here is get("/customer/:Id") – which is to say that Id will be the variable name to this method for handing over the value being passed after the string /cusotmer/ in the URL. We can make use of this Id parameter to retrieve the customer whose Id matches with this value.
Please remember that the
Idparameter being passed will be aString. We need to get that converted into anIntegerbefore we could actually make use of it for retrieving the matching customer.
Line number 3 indicates the plain old Java style conversion from a String to Integer. For the sake of simplicity it is assumed that the value passed will be only an integer and hence no exception handling is done. However, for the real examples in Production, we can’t trust the user inputs and hence it is recommended and advisable to have such validation and sanity checks.
Line number 5 fetches the matching customer by passing the numerical value of IdInt, which will handover the matching customer information if any from the get() method of the CustomerMap class.
6.5 REST Client – Get a specific customer
Let us now test the same with the RESTClient for a specific customer with his Id. Please remember to have the Server (re)started or ;copy-resources to have the latest code change for serving the requests.
RESTClient – Get a specific customer
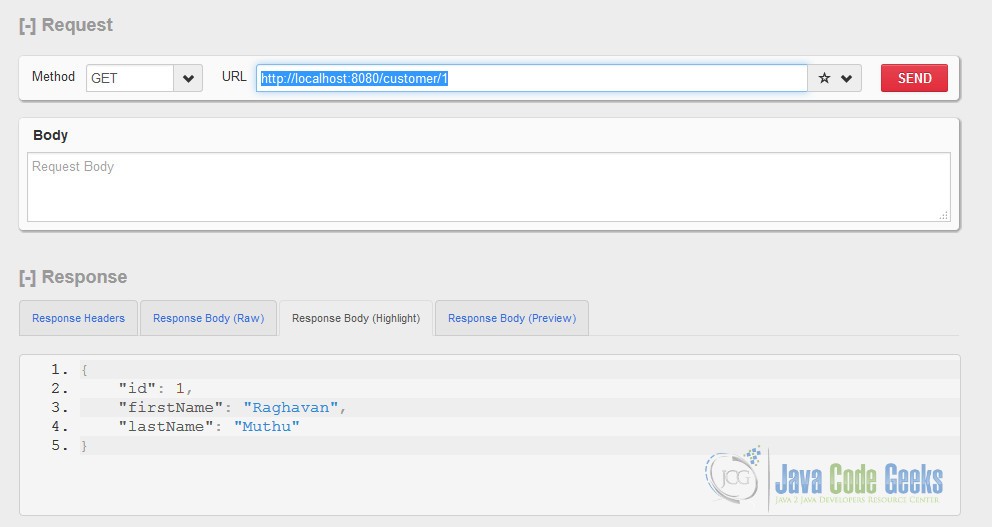
We passed the customer’s Id 1 with the URL as /customer/1 in the HTTP Get method to indicate that Get the customer whose Id is 1. The output shows the successful retrieval of the customer having an Id 1.
Please pay attention to the URL patterns. For getting all customers, it is
/customers– in plural, whereas to get a specific customer it is/customer/Id– in singular to indicate that it will fetch utmost ONE customer.
6.6 MyScalatraServlet – POST
Let us now have the method to create a new customer. We have already implemented the code base for CustomerMap class. We just need to have the routing done in the Servlet for mapping the request values to be used for creating a Customer.
This is achieved via HTTP Post method. However we need to do a little extra thing by passing the customer information to be created in the HTTP request, via the Request Body of the RESTClient. Inside the Servlet, we need to read and parse the HTTP Request body to read the information passed and get it as a Customer Instance. Luckily Scalatra has a way to do it easily.
MyScalatraServlet.scala for POST – create a new customer
    post("/customer/create") {
            var customer = parsedBody.extract[Customer]
            customerMap.add(customer)
      }
First of all, we added a new method named post matching with the HTTP Post verb, with an argument /cusotmer/create to indicate that a new cusotmer needs to be created.
On line number 3, we have a method named extract of the parsedBody of the Servlet that takes an instance reference – which in our case is Customer. This indicates that whatever request data was passed along, will be read and parsed as a Customer Instance. In this case, we have a new Customer instance created with the data extracted out of the request data. The newly created customer instance is received in the customer variable, which is then passed onto customerMap.add method.
At the end of the method, we return the newly added customer back to the client. This time it will have the newly created Id value in the result to distinguish and higlight that the new customer is successfully created.
6.7 REST Client – POST
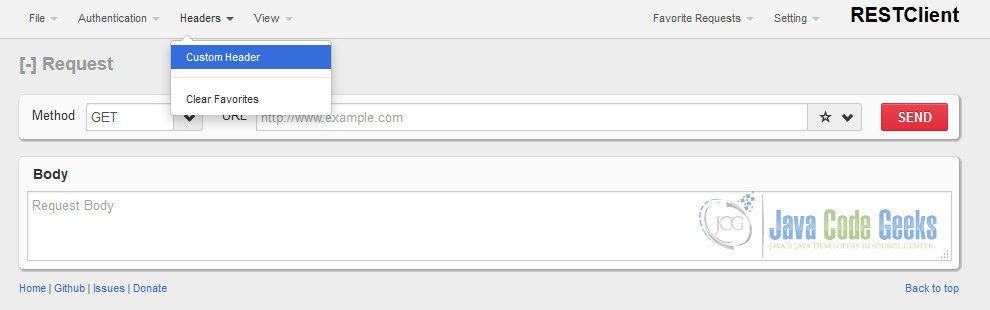
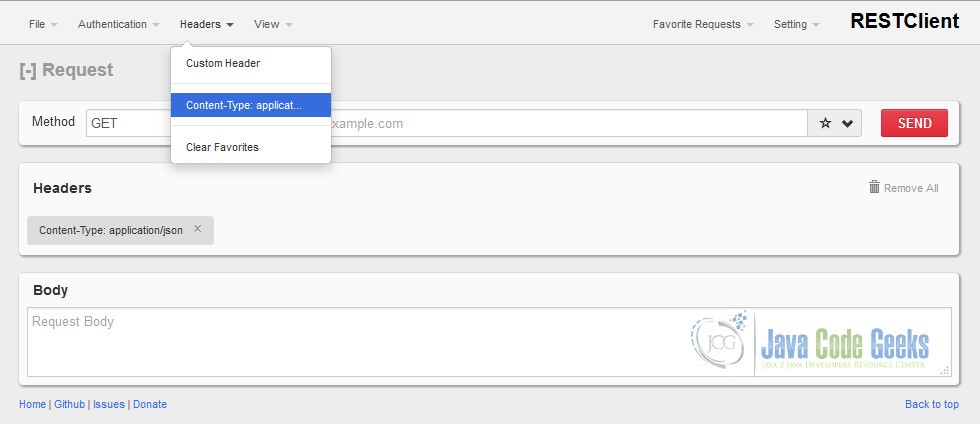
Testing this POST request also is little special and different from GET method. As we are passing the data in JSON format to be compatabile with the output format, we will have to mention the ‘Request Header’ as a custom one – which otherwise defaults to plain text. RESTClient has an option to set that.
RESTClient – Set Custom Header for JSON – Menu
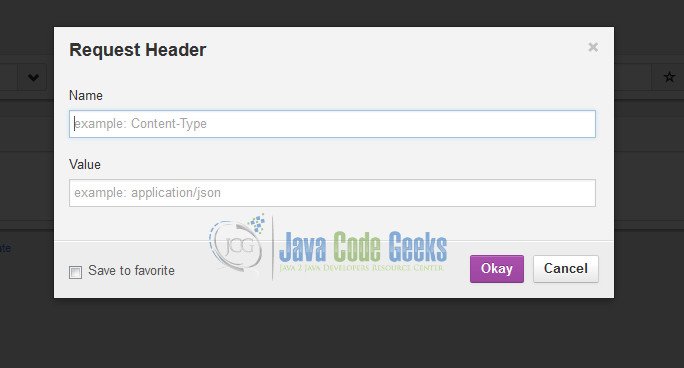
RESTClient – Custom Request Header – Dialog Box
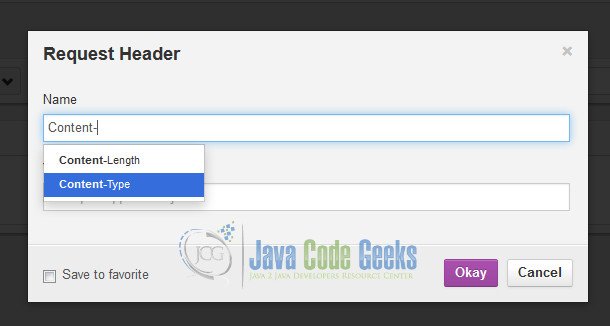
RESTClient – Custom Request Header – Autocompletion
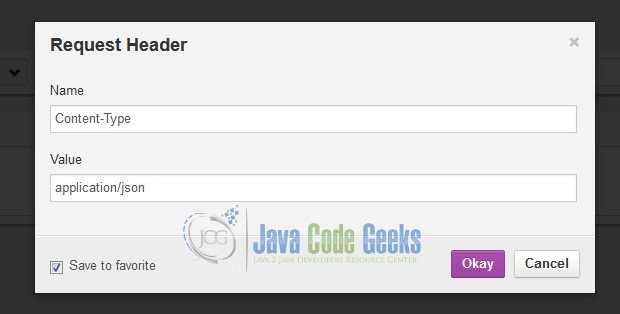
RESTClient has an option to set a Request Header to be a favorite, so that it can be fetched with a click of a mouse. You can check the box at the bottom of the Dialog box to do the same.
RESTClient – Custom Request Header – JSON – Saved as Favorite
As you can see, in the Headers Menu, we can see the latest header we set for Content-Type: application/json being saved in favorites.
RESTClient – Custom Request Header – Favorite Saved in Menu
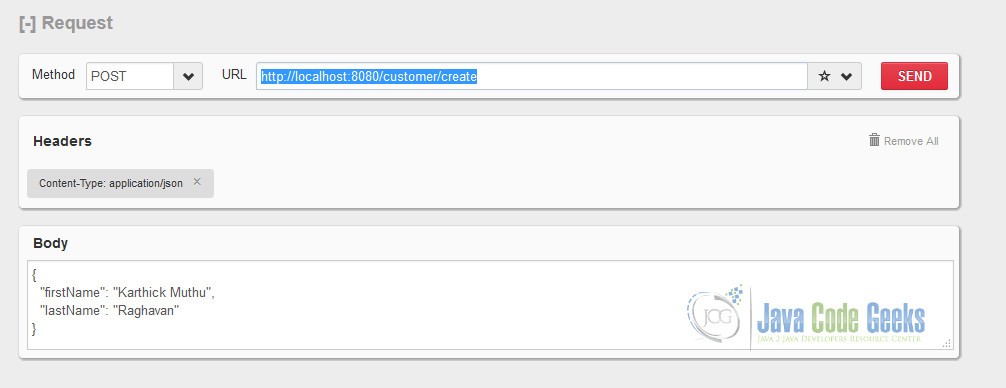
It is now time for us to make a create request. There are few important things to note, without which your request may fail.
- First and foremost, change the HTTP Request method from GET to POST on the top left in the drop down menu.
- Change the URL to
http://localhost:8080/customer/createto hit the appropriatepost()method in theMyScalatraServlet - Ensure you set the appropriate request header –
Content-Type: application/json. We have recently set that. You can see that on the Headers section on the request portion of the RESTClient - Ensure you add the actual request data in the Request Body in JSON format. You can copy paste the output from
/customersGET request, and alter the contents for the new customer to be created. - You don’t need to have the Id field in the request, as that will be created newly everytime for the request
RESTClient – Create Request with POST – Request
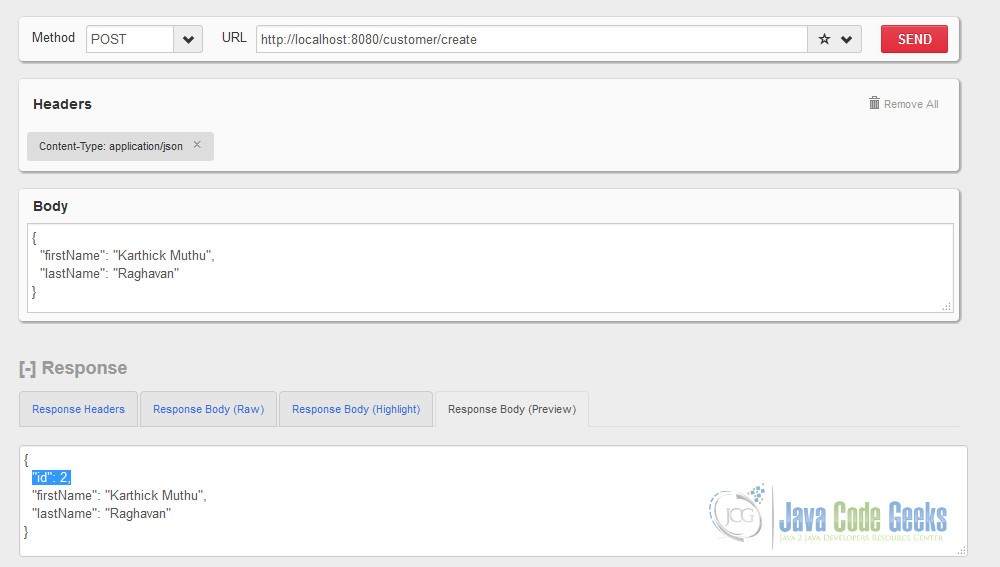
Once the request is triggered, watch out the output. In the post method we returned the newly created customer, with which we will get the customer details along with the newly created Id field of the customer. You can see the newly created Id 2 in our case, being highlighted in the response below.
RESTClient – Create Request with POST – Response
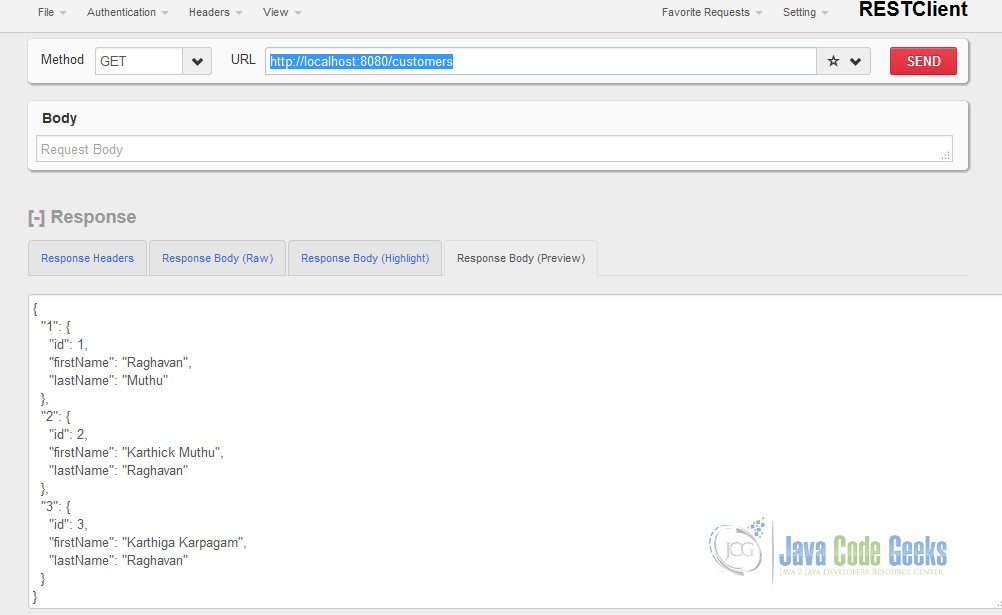
We can issue the /customers with a GET request once again to verify whether we get the newly added customer in the response.
RESTClient – Verify all the customers after creation

Yes, we are able to successfully retrieve as well as add the customers into our repository (Map) via the REST APIs so far.
6.8 MyScalatraServlet – DELETE
Now, let us try to delete a customer with his specific customer Id. Let us do the code change in the MyScalatraServlet.scala first. It is more like get() method where we need to pass a variable Id for the customer’s id which needs to be converted to an Integer first before being used for deletion.
MyScalatraServlet.scala for POST – create a new customer
      delete("/customer/:Id") {
            var IdInt = Integer.parseInt(params("Id"))
            customerMap.remove(IdInt)
            customerMap.map
      }
We have created a new method delete matching with the HTTP Verb – Delete. This method has an Id parameter which we get it converted to an Integer, using which we attempt to remove a matching cusotmer with the remove() method of the customerMap instance.
As a result, we pass back the resultant entries in Map in the response to indicate in the response showing the left out entries.
6.9 REST Client – DELETE
The Delete operation is similar to GET in RESTClient. We need to ensure we select the DELETE method on the top left corner and change the URL to customer/Id. We don’t need to pass any request body.
Let us assume that we have 3 different customers present in the collection, as follows.
RESTClient – Verify all the customers before deletion
Let us give a request to delete the customer with the Id 1
RESTClient – Delete a specific customer – Request

We can see from the response below that the specific customer with the Id 1 being removed and as a result we get the rest of the customers – matching with Ids 2 and 3 passed back.
RESTClient – Delete a specific customer – Response

6.10 Exit SBT
At the end, you can issue the jetty:stop command to stop the Jetty Web Server. However we may wish to stop the SBT as well to come out of execution.
Exiting SBT
C:\rags\scalaPgms\javacodegeeks\scalaRestExample\scalatra\scalarestwebapp\
.........
jetty:stop
[info] waiting for server to shut down...
[success] Total time: 0 s, completed May 21, 2016 10:16:06 PM
> exit

C:\rags\scalaPgms\javacodegeeks\scalaRestExample\scalatra\scalarestwebapp\
As you can see, we issue the command exit at the prompt with which the SBT tool came out of execution and it came back to the Operating System Terminal.
7. Conclusion
Hope this example series gave you a good understanding on how to work with REST application in Scala using Scalatra. You may please refer to the documentation of Scalatra for a better understanding of the tool for the rest of REST APIs for your application.
8. References
You may please refer the following URLs for further reading.
- Scala Tutorial for Beginners – JCG
- Scalatra
- Wikipedia – Scalatra
- Infoq Article – Introduction to Scalatra (Sinatra like Web Framework for Scala)
- Scalatra In Action – Manning Publications
- Manning – Introducing Scalatra (Free PDF)
- Conscript – Distributed Download Mechanism for Scala
- Conscript – GitHub Repository
- giter8 – Project Template download Utility for Scalatra
- Scalatra 2.4 Guide – Installation
- Scalatra 2.4 Guide – First Project
- Scalatra 2.4 Guide – Project Structure
- Scalatra 2.4 Guide – HTTP Routes
- Scalatra 2.4 Guide – HTTP Request and Responses
- Wikipeida – HTTP Verbs
- Scalatra Users – Google Groups
- Scala SBT – Documentation
- Wikipedia – REST
- REST Client – Addon for Firefox Browser
- JSON website
- JSON4S – Github website
- JSON formatting in Scalatra
- Jetty – Wikipedia
- Eclipse Jetty
9. Download the Source Code
All the examples in this article are tested in the Command Prompt / Shell against with Scalatra 2.4.0.RC1 on top of Scala Version 2.11.7.
Due to size restrictions (30.1MB), the auto-generated and downloaded scala libraries are removed as they can be generated afresh during execution of SBT
You can download the full source code of this example here: Scala REST Example.
