In this Example series, we will see how to work with HTTP (Hyper Text Transfer Protocol) through a Web Application in Scala using Scalatra and Scalate.
The following table shows an overview of the entire article.
Table of Contents
- 1. Pre-Requisites
- 2. Environment
- 3. HTTP
- 4. Scalatra, a Web Framework
- 5. Scalate – a Template Engine for Scala
- 5.1 Installing Scalate
- 5.2 Template Languages
- 5.3 SSP – Scala Server Pages
- 5.4 Hello Scalate – Sample
- 5.5 SSP – Views
- 5.6 SSP – Layout
- 5.7 SSP – Style
- 5.8 Scalate – Output Content Types
- 5.9 SSP – Expressions
- 5.10 SSP – Invoking Scala Code
- 5.11 SSP – Attributes
- 5.12 SSP – Conditionals
- 5.13 SSP – Import
- 5.14 SSP – Looping
- 6. Scalatra and HTTP
- 7. Example Application – Customer Management
- 8. Conclusion
- 9. References
- 10. Download the Source Code
1. Pre-requisites
The readers are expected to know the following pre-requisites for this Scala-REST example.
- Hands on Java Programming
- Hands on Scala Programming – Basics
- Hands on Java Web (Servlet) Programming – At least for the basic HTTP Methods (Get/Post and the Routing)
- Introduction to Scalatra – a micro web framework for Scala. Introductory article on Scalatra as part of Scala REST Example can be found at the References below.
2. Environment
The examples in this article are executed in the Command Prompt / Shell with the Scalatra with the REST Client – an Add-on for Firefox browser. But they are guaranteed to work with any of the IDEs having a proper support for Scala, Scalatra and REST (like Eclipse – Scala IDE, IntelliJ IDEA etc.,) through the respective plugins. The examples are executed with the Scalatra Version 2.4.0.RC1 and Scala Version: 2.11.7 in Windows 7.
You may refer to my previous tutorial here on how to install Scala, if you are a beginner with Scala.
3. HTTP
HTTP stands for Hyper Text Transfer Protocol which plays a vital role in the information exchange over Web. We will see the details about HTTP in the subsequent sub sections.
3.1 What is HTTP
HTTP is a medium using which any information can be shared over web (otherwise known as WWW – World Wide Web). Being a protcol, it governs the information exchange between two parties (Client – one who needs the information and the Server – one who knows how to process the request) specifying the following factors.
- Type of information being exchanged
- Type of platform – Operating System
- Type of client / agent facilitating the exchange (ex. Browser)
- Format of the data being exchanged (example, Plain text, JSON, csv etc.,)
- Request Method indicating the HTTP Verb (Get, Post etc.,)
Any information being passed between Client and Server are termed as Request and Response. When the information is exchanged through HTTP protocol, they are specifically named as HTTP Request and HTTP Response.
Typically, HTTP can be used for serving the requests for static (unchanged and fixed) information. In such case, a Web Server (like Apache, Nginx) will be sufficient to process the requests. However whenever we have a need to process the request information and generate a dynamic information (like User specific response as opposed to a fixed information for everyone), we need a server side component working with the Web Server. The Server side component can be a scripting language or any programming language that has the capabilities to process the information and generate a HTTP Response. For example, PHP, Java Servlet Programming etc., are the Server Side languages used for such purposes.
3.2 HTTP Request
Any information being passed from the client to Server via HTTP Protocol is wrapped in a composite object called HTTP Request. Typically the Web Server wraps the information from client into an object / entity called HTTP Request, which at the server side we can receive and use it further for our business needs.
Typically, the HttpRequest contains the following.
- Actual request data submitted by the User
- Target URL (Uniform Resource Locator)
- HTTP method (verb) to be applied on the resource (GET to fetch a resource from Server, POST to submit an information/resource
- Character Set being accepted/supported
- Supported file formats/extensions which the client is prepared to receive etc.,
There are several different HTTP Verbs like GET, POST, PUT, DELETE, OPTIONS, HEAD etc., You can check out the References section below for the Wikipedia link. We will see an example using GET and POST in this article. The rest of them can be extended in a similar manner.
3.3. HTTP Response
Similar to HTTP Request, any response being generated at the Web Server (either directly by itself or with the help of any Server side languages) is wrapped in an object called HTTP Response.
Usually the HTTP Response contains the following.
- Acutal Response body (whatever the information requested by the Client)
- Response Code (a 3 digit number indicating the nature / type of the response, 200 means OK, 404 means Resource Not Found etc.,)
- Data format of the response being supplied (compressed or not, csv/json/text/html etc.,)
- Date and time in which the response is generated at the Server etc.,
3. Scalatra, a Web Framework
As we had seen earlier, a Web Server is needed bare minimum to work with HTTP Request and Responses for a static resources. However we need a Web Container (in Java terms) to work with the dynamic response based on the request data. Scalatra is a simple web micro framework for Scala. It is an Open Source application written in Scala itself. The speciality of Scala is that is a micro-web framework hence it offers a very simple way of dealing with the HTTP request/responses. It is much like Sinatra for Ruby as it is forked from Sinatra.
Typically in a Java Web Programming (using Servlets and JSP – Java Server Pages), we need an explicit Web Container like Apache Tomcat to work with the Web applications using HTTP Request and Response. However, Scalatra has an inbuilt Web Server named Jetty, which comes pre built when you install and configure via SBT (Simple Build Tool).
Please read the example article about Installing Scalatra and working with the in-built Jetty Web Server in a Console, as part of Scala REST article here. However, we will use the package
com.javacodegeeks.example.scala.http in this article instead of com.javacodegeeks.example.scala.rest.5. Scalate – a Template Engine for Scala
The template engine plays a very important role in the HTTP Response, as most of the common use cases in a Web application require the dynamic response to be generated and served. However most part will need the same set of data to be used across many web pages, which leads to a maintenance overhead if allowed to reside in every other page. Hence the template engine comes to a rescue by allowing a single place to define such common things like – stylesheet, header, footer etc., to be declared and used across every other web page in application. The Template Engine will generally facilitate the quick and easy access for the language constructs like conditionals, expressions, accessing attributes, looping etc., so that the developers will find it easy to work with the User Interface (UI). We will see the few common and significant aspects of the template engine in this article.
Scalatra comes pre-built with such a nice template engine called Scalate – an acronym stands for Scala Template Engine.
5.1 Installing Scalate
Scalatra comes with a built-in Scalate template engine and hence we are not required to install the same explicitly. You can verify the same in the LibrarySeq section of the %PROJECT_MAIN_DIR%/project/build.scala file.
Scalate does not need to be installed explictly as it comes pre-built with the
Scalatra.5.2 Template Languages
As a Template Engine, Scalate acts as a platform for more than one language. They are – SSP – Scala Server Pages which is much similar but advanced to JSP, Scaml – stands for Scala Markup Language, mustache, jade etc., We will see the SSP in this article, as that is the simplest of all and easy to work with.
You can read a good introductory documentation about Scalate here.
5.3 SSP – Scala Server Pages
SSP stands for Scala Server Pages which is much similar to JSP (Java Server Pages). SSP is much similar to JSP however it has got several different advancements due to Scala. It is the simplest of all to work with Scalate.
5.4 Hello Scalate – Sample
If you had installed Scalatra successfully via SBT and started the Jetty Web Server in the console, we are good to go further.
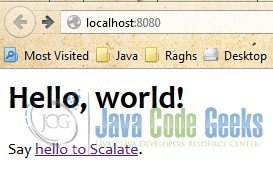
Let us see the famous Hello World example in Scalate. Without you doing anything, this example is already set up for you, as part of the Scalatra set up and configuration. Let us have a look at the Servlet class – MyScalatraServlet at its initial stage after being installed and configured through giter8.
MyScalatraServlet.scala
package com.example.javacodegeeks.scala.http

import org.scalatra._

class MyScalatraServlet extends ScalahttpexampleStack {

  get("/") {
    <html>
      <body>
        <h1>Hello, world!</h1>
        Say <a href="hello-scalate">hello to Scalate</a>.
      </body>
    </html>
  }
}
It is a simple Servlet class that routes the URL on the main application (“/”) with the HTTP GET method, for which it prints the typical Hello, World on the browser with a hyperlinked text to a different URL /hello-scalate.
We can trigger a request to the URL http://localhost:8080 in our browser. For our example, we use Firefox web browser.
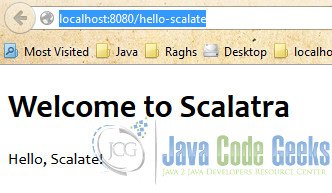
Let us click the hyperlink which will trigger a request to the URL http://localhost:8080/hello-scalate in the browser. The output will be as follows.
By default, Scalatra comes with Scalate using the Jade language. However, we will use SSP (Scala Server Pages) for our example. For which, we need to delete the files default.jade and hello-scalatra.jade in the %PROJECT_DIR%/src/main/webapp/WEB-INF/templates/layout and %PROJECT_DIR%/src/main/webapp/WEB-INF/templates/views directory respectively.
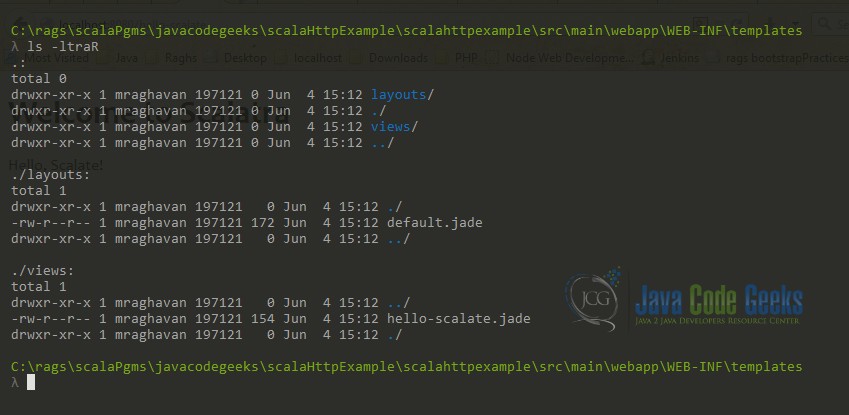
5.5 SSP – Views
Let us have a look at the new files to be added. First, let us create a new file ssp-demo.ssp in the directory %PROJECT_DIR%/src/main/webapp/WEB-INF/templates/views directory. The views directory will contain all the User Interface related pages/scripts. All our .ssp files will have to be present in this views folder.
ssp-demo.ssp
Hello <b>Scalate</b> - using <i><u>SSP</u></i> (Scala Server Pages)!
It is a simple HTML file saved with the .ssp extension. For now,it may not make a big difference. Hold on for sometime, we will see the nuances of SSP and its capabilities to work with the language constructs.
5.6 SSP – Layout
Next, let us create a new file default.ssp in the directory %PROJECT_DIR%/src/main/webapp/WEB-INF/templates/layouts directory. The layouts directory will contain all the skeleton/template files to be used for the views or User Interface related pages/scripts, so as to have a reusability and better maintenance for any changes should be done on the common details. They are also a .ssp files and they will have to be present in this layouts folder.
Please remember that the template layout file should be
default.ssp, until and unless you want to override it for a different UI page through code. For most part, it works withdefault.ssp.
default.ssp
    <%@ val body:String %>
    <html>
            <head>
                    <title>Scala HTTP Example</title>
            </head>
            <body>
                    <h1>Scala HTTP Example - with Scalate using SSP</h1>
                    <hr color="green"/>
                    <%= unescape(body) %>
            </body>
    </html>
It is a simple HTML file saved with the .ssp extension. For now, it may not make a big difference. Hold on for sometime, we will see the nuances of SSP and its capabilities to work with the language constructs.
The html file above is self explanatory except the line 9 which has an script <%= unescape(body) %> that instructs Scalate to insert the data carried by the body (which is a reserved word!) without any escaping of HTML characters – so as to render the HTML output as it is in the browser. The line 1 is a scala style declaration of the body which otherwise may throw a compiler error because Scala is a statically typed language like Java.
For any view file (.ssp file from the
%PROJECT_DIR%/src/main/webapp/WEB-INF/templates/viewsdirectory) being served, Scalate ensures that the view will be wrapped around in thisdefault.ssplayout file present in the%PROJECT_DIR%/src/main/webapp/WEB-INF/templates/layoutdirectory. The exact output from the view will be inserted at line 9 which requests to place the same without escaping.
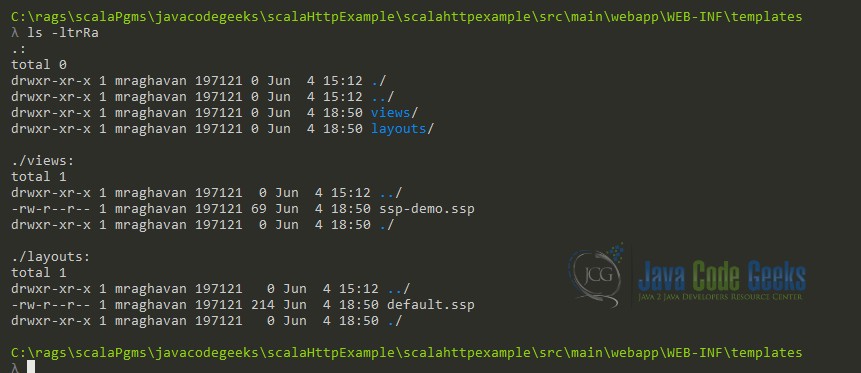
Now that we have changed the default .jade files with .ssp files, let us have a look at the modified files in the directory.
5.7 SSP – Style
Adding a style is very simple as how you would do it for the basic HTML and CSS.
- If you are to add the inline style – anywhere between the HTML file, you can very well have the styling wrapped around between the <style> element.
- If you need to have the styles defined in a stylesheet – a .css file that needs to be linked, you can use
<link rel=stylesheet type=text/css href=css/style.css/>, which is again no different from the HTML/CSS.
Please remember that the
.css file should be placed in the directory named css under the directory %PROJECT_DIR%/src/main/webapp.Let us add a stylesheet named style.css and place it inside the css directory under the %PROJECT_DIR%/src/main/webapp directory.
style.css
    h1 {
            font-size: 115%;
            color: navy;
    }
    h2 {
            font-size: 110%;
            color: maroon;
    }
    h3 {
            font-size: 105%;
            color: teal;
    }
Let us modify our default.ssp file with the stylesheet linking, as follows.
default.ssp
    <%@ val body:String %>
    <html>
            <head>
                    <title>Scala HTTP Example</title>
                    <link rel="stylesheet" type="text/css" href="css/style.css"/>
            </head>
            <body>
                    <h1>Scala HTTP Example - with Scalate using SSP</h1>
                    <hr color="green"/>
                    <%= unescape(body) %>
            </body>
    </html>
5.8 Scalate – Output Content Types
The default format of the output is plain text and the MIME for the same is "text/plain". Let us see it in action.
Let us add a new route to our Servlet – MyScalatraServlet to produce the output of ssp-demo.ssp file.
MyScalatraServlet.scala
package com.example.javacodegeeks.scala.http

import org.scalatra._

class MyScalatraServlet extends ScalahttpexampleStack {

  get("/") {
    <html>
      <body>
        <h1>Hello, world!</h1>
        Say <a href="hello-scalate">hello to Scalate</a>.
      </body>
    </html>
  }

  get("/ssp-demo")  {
    ssp("ssp-demo.ssp")
  }
}
Please pay attention to the following:
- get(“/”) : It is the default route for the URL path
/, which produces the raw HTML output inside the get() method. - get(“/ssp-demo”) : A new method we have written now to process the URL path
/ssp-demo, which will be to address the URL in address such ashttp://localhost:8080/ssp-demo. However, we do NOT want to generate the HTML output at the Server side code, which is not a good practice and may have a maintenance overhead. Instead we want the output to be generated from a view file – which isssp-demo.ssp.
Scalatra offers a convenient helper method to use the appropriate template language. ssp() is for using SSP, jade() for using Jade etc., This method will take few arguments based on the several different needs. We will see a different version of this ssp() method later in this example, where we need to pass an argument to the .ssp file invoked.
Please remember that the forward slash (“/”) is mandatory for the URL (“/ssp-demo”) whereas it is optional for the argument to ssp() method – ssp(“ssp-demo.ssp”).
Remember you need to either stop-start the Jetty Web Server (by using
jetty:stop and jetty:start in the console for the code changes to have an effect. To avoid repeated restarting, you can use ~;copy-resources in the sbt console of the project where you run your Jetty Web Server.Let us see the output by hitting this URL in browser.
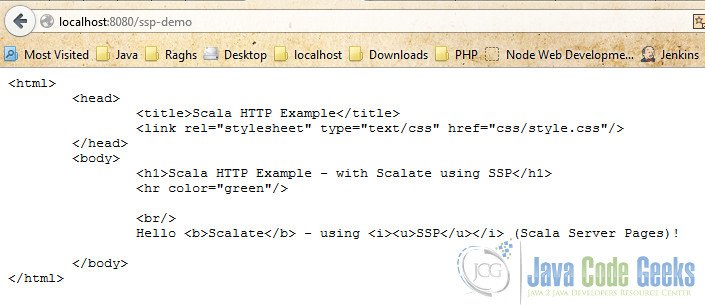
As you see, the default output format is plain text. Even though we have the HTML tags present in the output, they are not rendered when displayed in the browser. The reason being the Response content type is given as “text/plain”, which we can get it confirmed with the HTTP Response Headers below with the help of Firefox Browser’s Network menu option inside the Developer menu item.
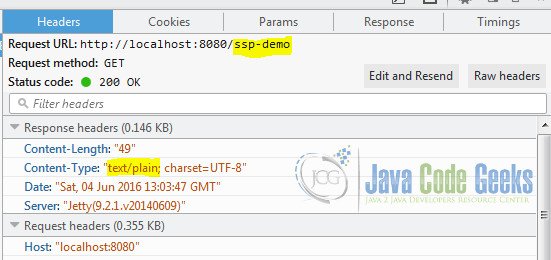
The image above shows the response header Content-Type as text/plain.
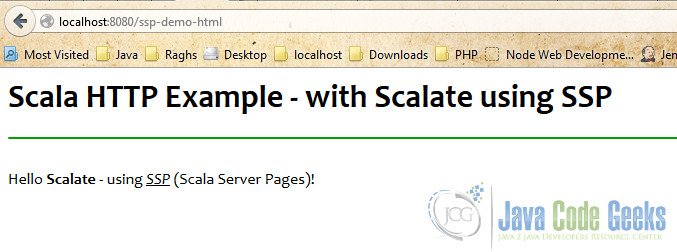
However, we can use other MIME Type as text/html for sending our response in Rich Text, where the HTML tags will be rendered when the output is displayed in the browser. To do this, we need to set the Http Header Content-Type to text/html in our Servlet.
In order to distinguish this, let us add a new route with a different target URL for this rich text html output as follows.
MyScalatraServlet.scala
package com.example.javacodegeeks.scala.http

import org.scalatra._

class MyScalatraServlet extends ScalahttpexampleStack {

  get("/ssp-demo")  {
    ssp("ssp-demo.ssp")
  }

  get("/ssp-demo-html") {
    contentType = "text/html"
    ssp("ssp-demo.ssp")
  }
}
As you see, the only change in the code is to set the response content type which is done by setting a value to the variable contentType. We are handing over the same ssp-demo.ssp page for this URL as well, in order to distinguish and verify the output. Let us hit this URL http://localhost:8080/ssp-demo-html in the browser.
As you see, the default output format is plain text. Even though we have the HTML tags present in the output, they are not rendered when displayed in the browser. The reason being the Response content type is given as “text/plain”, which we can get it confirmed with the HTTP Response Headers below with the help of Firefox Browser’s Network menu option inside the Developer menu item.
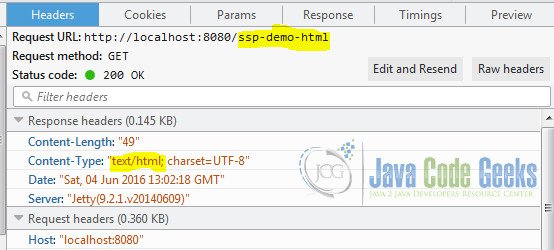
As you can see, the headers and the output in browser confirm the html rendered output. Likewise you can play around with other MIME types like ‘application/json’ for JSON data type, ‘text/csv’ for comma separated values etc.,
Now, we will see how to work with SSP (Scala Server Pages) on the mundane tasks like conditional, looping, expressions etc., You may read the SSP Sytax reference at this here.
5.9 SSP – Expressions
Working with expresssions is very easy in SSP. Like in JSP, you need to surround the expression with <%= and %>. In addition, you can also do this with by surrounding with ${}.
ssp-demo-1-expression.ssp
    <h2>SSP - Expressions</h2>
    <li><b>Scala List : </b>
    <li><b>String Concatenation : </b> ${"Hello" + " Scalate"}
    <li><b>Number Addition : </b> ${2 + 4}
If you access this URL in the browser, the output will be as shown below.
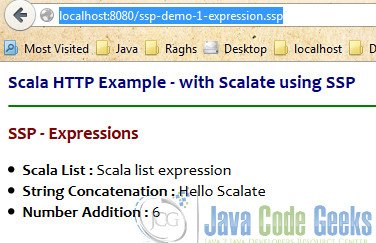
The output displayed is straight forward and self explanatory.
5.10 SSP – Invoking Scala Code
You can very well have a piece of Scala code declared between the set of <% and %>, which you can use it at a later point in the same SSP script via either ${..} or .
ssp-demo-2-scalaCode.ssp
    <h2>SSP - Scala Code</h2>
    <%
       var firstName = "Raghavan"
       var lastName = "Muthu"
       var name = firstName + ", " + lastName
    %>
    <li><b>Name of Person (Scala Code) : </b> ${name}
    <li><b>Name of Person (Expression) : </b> <%= name %>
The output of this ssp-demo-2-scalaCode.ssp file will be as shown below.
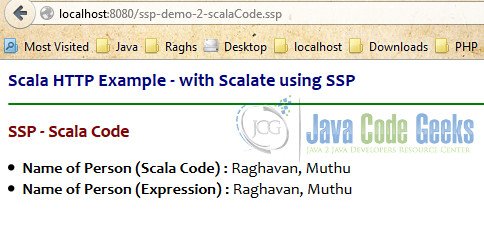
The output displayed is straight forward and self explanatory. We had attempted to access the Scala code through Properties and both the expressions.
5.11 SSP – Attributes
Accessing the attributes of an instance of a class is achieved through the dot notation with an instance reference, which is surrounded within the curly braces prefixed with a dollar sign – ${instance.property}
ssp-demo-3-attributes.ssp
    <h2>SSP - Attributes</h2>
    <%
       case class Person(name:String, city:String)

       val p = new Person("Kannan", "Hong Kong")
    %>

    <p>
            Hello <b>${p.name}</b>, what is the weather like in <i><u>${p.city}</u></i>?
    </p>
The output of this ssp-demo-3-attributes.ssp file will be as shown below.
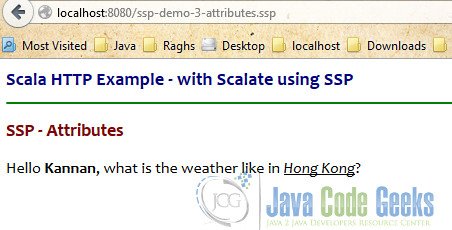
The output displayed is straight forward and self explanatory. We had declared a Person class and also created an instance of it named p, which later we used it to access its properties using the object notation syntax surrounded by the curly braces.
5.12 SSP – Conditionals
The conditionals can be achieved in SSP via if, else and else-if constructs with the # prefixed for each of the words.
ssp-demo-4-conditionals.ssp
    <h2>SSP - Conditional</h2>
    <%@ val name:String = "Raghavan" %>
    <%@ val name2:String = "Saravanan" %>

    <h3>If Statement</h3>
    #if (name=="Raghavan")
            <b>Yes!</b>. Name matches <i><u>Raghavan</u></i>
    #end

    <h3>If-else Statement</h3>

    #if(name2=="Raghavan")
            <b>Yes!</b>. Name matches <i><u>Raghavan</u></i>
    #else
            <b>No</b>. Name does not match <i><u>Raghavan</u></i>
    #end

    <h3>If-elseif Statement</h3>

    #if(name2=="Raghavan")
            <b>Yes!</b>. Name matches <i><u>Raghavan</u></i>
    #elseif(name2=="Saravanan")
            <b>ElseIf-Yes!</b>. Name matches <i><u>Saravanan</u></i>
    #else
            <b>No</b>. Name does not match <i><u>Raghavan</u></i>
    #end
The output of this ssp-demo-4-conditionals.ssp file will be as shown below.
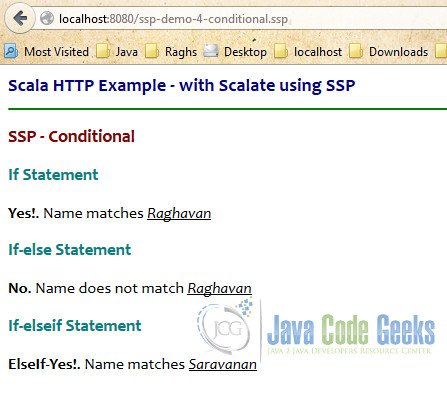
The output displayed is straight forward and self explanatory. In order to work with the conditional constructs through if and else, we had declared two different variables named name and name2 at the top of the script using the usual Scala declaration, which is typical Scala code inside the SSP file but with an @ symbol at the opening tag after the <%= characters.
5.14 SSP – Import
A Scala or Java class can be imported in the SSP script through #{ and }# pair of operators.
ssp-demo-5-import.ssp
    <h2>Import Java/Scala Code</h2>

    #{
            import java.util.Date
            val date = new Date()
    }#

    <b>Present Date : </b> via imported java.util.date is :: <i><u>${date}</u></i>
The output of this ssp-demo-5-import.ssp file will be as shown below.
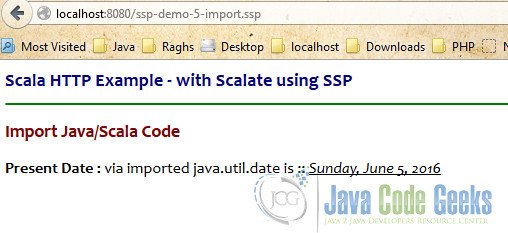

The above script imported the java.util.Date inside the SSP script and accessed the date variable using the expession syntax to produce the current System date when executed and displayed.
5.15 SSP – Looping
A Scala or Java collection can be iterated to access them in a loop, by using the foreaach loop.
ssp-demo-6-looping.ssp
    <h2>SSP - Looping</h2>

    <table width=40%>
            <tr>
                    <td>
                            <h3>For Loop with List</h3>

                            #import (scala.collection._)

                            #{ val myList = List(1, 2, 3, 4, 5) }#

                            <p>List is : ${myList} <br/>
                               <b>Size : </b> ${myList.size} <br/>
                               List members : <br/>
                                    <ul>
                                    #for(i <- 0 to myList.size-1)
                                            <li>${myList(i)}</li>
                                    #end
                                    </ul>
                            </p>
                    </td>
                    <td>
                            <h3>For Loop with Map</h3>

                            #{ val vowelMap = Map("a" -> 1, "e" -> 2, "i" -> 3, "o" -> 4, "u" -> 5) }#

                            <p>Vowel Map is : ${vowelMap}  <br/>
                               <b>Size : </b> ${vowelMap.keys.size}<br/>
                               Vowel Map Members : <br/>
                                    <ul>
                                          #for((k,v) <- vowelMap)
                                                  <li>${k} : ${v}</li>
                                          #end
                                    </ul>
                            </p>
                    </td>
            </tr>
    </table>
The output of this ssp-demo-6-looping.ssp file will be as shown below.
The output displayed above self explanatory. The script declared a List with few integers and iterated the list using a foreach loop construct to display the numbers in an unordered list. Likewise, a Map was imported, declared and initalized with the vowels and it was iterated to display the Key, Value pairs.
Remember that map is unordered collection, so the output may not have any particular guaranteed.
6. Scalatra and HTTP
As we have already seen, Scalatra offers a very convenient way to deal with the HTTP verbs. get() for working with HTTP GET, post() for HTTP POST etc., We will see the most famous GET and POST in this example article, with which you can work with the rest of the methods on demand.
We also had seen that Scalatra offers a convenient way to work with SSP (Scala Server Pages) via ssp() method inside any of the get(), post() etc. methods.
6.1 Scalatra HTTP Get
As we have already seen in our Servlet, the following holds good for HTTP Get in Scalatra.
- HTTP Get is used to fetch a resource from the Server. It is more like a Ready-only operation.
- We define the get(“/url”) to address a specific URL to be processed.
- We can write any number of such get() methods for addressing many URLs. We have already written two different get() methods – one to produce the plain text output and other one was to generate HTML response.
- We can dispatch the output by handing over the
sspfile through the ssp() method by passing the respectivexyz.sspfile as an argument to the ssp() method.
Please remember that the URLs are case sensitive and they should be always prefixed with a forward slash (“/”).
6.2 Scalatra HTTP Post
Like get() method, we have post() method to deal with the HTTP POST method. All the factors we discussed for get() holds good for post() except that it is NOT for fetching the information from Server instead it is to push/submit to the server, as the name post indicates. It will modify the state of the Server, if the data is successfully posted/submitted. Hence, one should be careful in dealing with POST requests as it might potentially result in duplicate submissions if not handled properly.
6.3 Scalatra – HTTP Request Parameters
Irrespective of the http specific methods we work, we need to have a way to extract the inputs passed by the client in our Server side code. Since Scala is running on JVM and Scalatra already offers the Servlet API in itself through the SBT declarations build.scala, we can directly access the request object in our Servlet code to access the getParameter() method for retrieving the value of a specific attribute. It is exactly the same as how we do it in Java Servlet Programming.
request.getParameter("name") will give you the value of the input variable name submitted by the User when submitting the information.
6.4 Scalatra – Handing over SSP Pages as Response
We had already seen that we could use the ssp() method to handover or dispatch a particular .ssp file as a response of processing a particular URL. However, we have a different set of options while invoking the ssp() method, of which will see the three of them below.
- ssp(“fileName.ssp”) – will hand over the SSP view file
fileName.sspfrom the../WEB-INF/template/views/directory. - ssp(“fileName.ssp”, “key” -> value) – will pass an value
valueto the attributekeyto thefileName.ssp. The SSP file should declare this attribute explicitly and will receive the value passed from this ssp() method. - ssp(“fileName.ssp”, “key1” -> value1, “Key2” -> value2) – will pass the values for more than one attributes to the target SSP view file.
- ssp(“fileName.ssp”, “key” -> value, “layout” -> “/WEB-INF/template/layouts/customLayout.ssp”) – will invoke the SSP view file
fileName.sspwith a custom layout (other thandefault.sspfrom the../WEB-iNF/template/layouts/directory). It will be useful if a specific/different layout to be used for a specific target URL.
7. Example Application – Customer Management
Let us see a real time example of working with a Customer Management application, where we will use a Map to store and retrieve the Customer Information, for simple usages.
7.1. Customer – CRUD
CRUD is an acronym stands for Create, Read, Update and Delete which typically describes the most fundamental use cases of dealing with the data in an application. We will see the Create, Read parts here for demonstrating the Scala and HTTP. You can work with the rest of them very easily.
In order to work with this example, we need a Customer POJO class. Let us declare a class at the end of our Servlet.
MyScalatraServlet.scala
class MyScalatraServlet extends ScalahttpexampleStack {

    ...
    get("/ssp-demo") {
        ....
    }

    case class Customer(var firstName:String, var lastName:String) {
            override def toString = s"FirstName : " + firstName + ", LastName : " + lastName
    }

    get("/http-get") {
        val c = new Customer("Raghavan", "Muthu")
        println("Customer :: " + c)
        contentType = "text/html"
        ssp("http-get.ssp", "customer" -> c)
    }
}
7.2. Customer – View
We need to use HTTP Get for viewing a Customer information. For which, we will use a different and new get() method. Let us add this new method to our Servlet.
MyScalatraServlet.scala
class MyScalatraServlet extends ScalahttpexampleStack {

    ....

    get("/http-get") {
        val c = new Customer("Raghavan", "Muthu")
        println("Customer :: " + c)
        contentType = "text/html"
        ssp("http-get.ssp", "customer" -> c)
    }
}
We added a new route for the meaningful URL /http-get. Inside the get() method, we created a new Customer instance c to hold the customer information which we had just now created, and we pass this instance as a value to the attribute customer in the SSP file http-get.ssp.
Let us now write the http-get.ssp file.
http-get.ssp
    <br/>
    <%@ val customer: com.javacodegeeks.example.scala.http.Customer %>
    <b>Customer is : </b> ${customer}
If we access this /http-get URL in the browser, the output will be as follows.
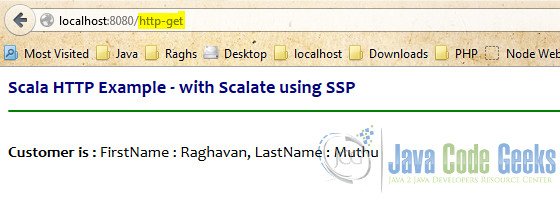
We could see that the output carried the information passed in the instance of type Customer.
7.3. Customer – Add
Let us now create a new customer and add it into a Map so that we can keep track of the new customers being created and see the total list of customers in the next section Get All.
For creating a new customer, we need to send the details from client to Server and using those information we need to add/post/submit to the Server. Hence, we need to use HTTP Post for this use case.
We need two different URLs here.
- First is a get() to access the form to insert the customer information, which while being submitted will post the information to server.
- To carry out the actual customer creation, we will use the post() method with the appropriate URL – /create.
MyScalatraServlet.scala
class MyScalatraServlet extends ScalahttpexampleStack {

    ....

    get("/http-post") {
        contentType = "text/html"
        ssp("http-post.ssp")
    }

    var map:Map[String, Customer] = Map()

    post("/create") {
        contentType = "text/html"

        var firstName = request.getParameter("firstName")
        var lastName = request.getParameter("lastName")

        println("REQUEST PARAMS :: firstName -> " + firstName + ", lastName -> " + lastName)

        val c = new Customer(firstName, lastName)
        map += (firstName -> c)
        println("Map :: " + map)

        ssp("http-post.ssp", "customer" -> c)
    }
We have done the following changes in the highlighted line numbers of the Servlet class.
- Line # 5 – Added a new route to handle the URL /http-post via HTTP Get method. This is to get the HTML form to enter the customer information.
- Line # 7 – Despatch the
http-post.sspview file to display the HTML form to capture the inputs. - Line # 10 – Declared a
Mapof typeCustomerwhose key is aString, with the first name of a Customer. - Line # 12 – Added another new route to handle the URL /create to receive the inputs entered and process the request by creating a new customer.
- Line # 15, 16 – Extracting the inputs submitted by user through the
request.getParameter()method and capture them in separate variables. - Line # 21 – Added the newly created Customer instance (on line # 20) to a Map collection in a Scala way.
- Line # 24 – Despatch the same SSP view file
http-post.sspafter successfully processing the request on the URL /create, by passing the newly created customer instance c as an attribute to the ssp() method.
Let us now write the SSP file http-post.ssp to handle the two scenarios. One is to first show the HTML form to capture the customer information and another is to display the newly created Customer information. The distinguishing factor between these two scenarios is the customer attribute value.
http-post.ssp
<br/>
<%@ val customer: com.javacodegeeks.example.scala.http.Customer = null %>
#if(customer!=null)
<b>Customer created is : </b> ${customer}
#else
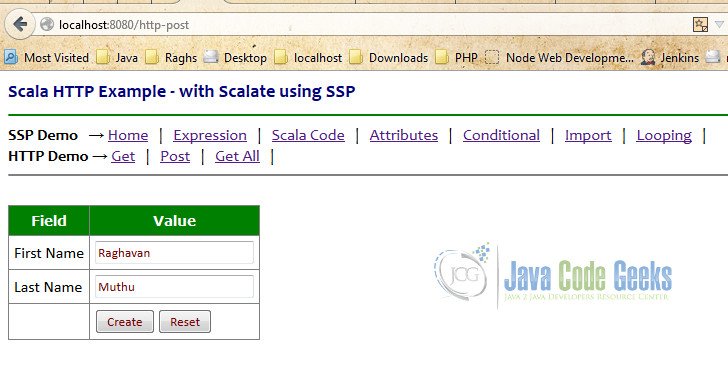
<form name=customerForm action="create" method="post">
<table>
<tr>
<th>Field</th>
<th>Value</th>
</tr>
<tr>
<td>First Name</td>
<td><input name=firstName value="Kannan" placeholder="Kannan"></td>
</tr>
<tr>
<td>Last Name</td>
<td><input name=lastName value="Muthu" placeholder="Muthu"></td>
</tr>
<tr>
<td></td>
<td>
<input type=submit name=Create value=Create>
<input type=reset name=Reset value=Reset>
</td>
</tr>
</table>
</form>
#end
If we access this /http-get URL in the browser simply, it will invoke the get() method and will display the HTML form for capturing the inputs.
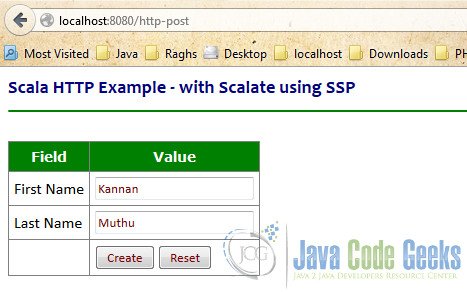
Once we submit the form after filling the necessary customer information and when we press the Submit button (submitting the form), it will invoke the URL /create thereby resulting in accessing the post() method and will display the captured customer’s information.
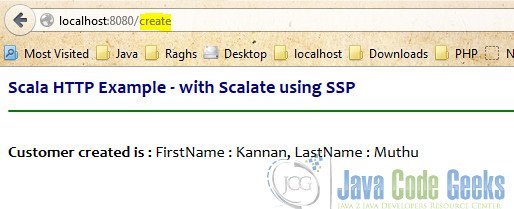
We could see that the output carried the information passed in the instance of type Customer, with the information entered just a while ago.
7.4. Customer – View All
Let us see all the customers added in to our collection – Map of customers, with a new route /http-getAll invoked with HTTP GET – get().
Let us make the code changes to Servlet first.
MyScalatraServlet.scala
class MyScalatraServlet extends ScalahttpexampleStack {

    ....

    get("/http-getAll") {
        contentType = "text/html"
        ssp("http-getAll.ssp", "customerMap" -> map)
    }
We have done the following changes in the highlighted line numbers of the Servlet class.
- Line # 5 – Added a new route to handle the URL /http-getAll via HTTP Get method.
- Line # 7 – Despatch the SSP view file
http-getAll.sspby passing the customer Map instance map as an attribute to the customerMap key in the ssp() method.
Let us now write the SSP file http-getAll.ssp to iterate the collection (map) for displaying the customer information.
http-getAll.ssp
    #import (scala.collection._)
    <%@ val customerMap: Map[String, com.javacodegeeks.example.scala.http.Customer] = null %>

    #if(customerMap==null || customerMap.size<=0)
            <span class="error">Customers are not yet created.</span>
    #else
            <h3>Customers Map</h3>
            <p><b>Size : </b> ${customerMap.size}</p>
            <table class=getAll>
                    <tr>
                            <th>Key</th>
                            <th>Customer Instance</th>
                    </tr>
                  #for((k,v) <- customerMap)
                          <tr>
                                  <td>${k}</td>
                                  <td>${v}</td>
                          </tr>
                  #end
            </table>
    #end
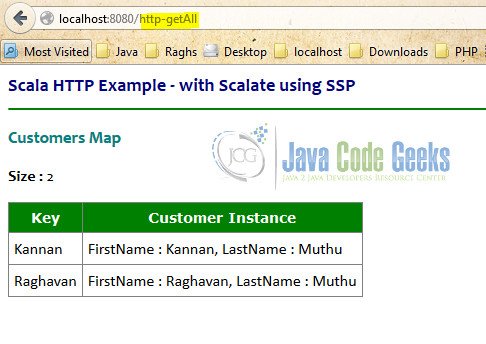
If we access this /http-getAll URL in the browser simply, it will invoke the get() method and will render the output with the customerMap attribute received. Imagine, we have created two customers till now.
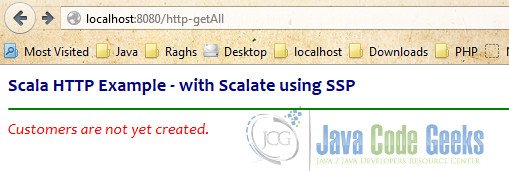
Imagine, if there were no customers created so far, the output will be as follows, as per the logic we have handled in the if-else clause in the SSP file.
7.5. Completed Application
The completed application will have the following display, with some styling added in the style.css. This has all the links we have worked so far, to have a quick and easy access.
8. Conclusion
Hope this example series gave you a good understanding on how to work with HTTP Protocol in Scala using Scalatra and Scalate with SSP (Scala Server Pages). You may please refer to the documentation of Scalatra and Scalate for a better understanding on the tools for your application.
9. References
You may please refer the following URLs for further reading.
- JCG – Scala Tutorial for Beginners
- JCG – Scala REST Example covering Scalatra Installation
- Scalatra
- Scalatra 2.4 Guide – Installation
- Scalatra 2.4 Guide – Project Structure
- Scalatra 2.4 Guide – HTTP Routes
- Scalatra 2.4 Guide – HTTP Request and Responses
- Wikipedia – HTTP Verbs
- Scalatra Users – Google Groups
- Scala SBT – Documentation
- Scalate – GitHub Home Page
- Scalate FAQ
- Scalatra User Guide on Scalate
- Scala Server Pages (SSP) – Reference
10. Download the Source Code
All the examples in this article are tested in the Command Prompt / Shell against with Scalatra 2.4.0.RC1 on top of Scala Version 2.11.7.
Due to size restrictions (30.1MB), the auto-generated and downloaded scala libraries are removed as they can be generated afresh during execution of SBT.
You can download the full source code of this example here: (Scala HTTP Example).
