1. Introduction
In this example we will talk about Apache Tomcat Servlet/JSP container also referred to as Tomcat server and the web.xml file that provides different options to configure Tomcat. Apache Tomcat is developed as an open source software and is available under Apache License version 2.
Apache Tomcat is a light server that is aimed at performance rather than extensive functionality coverage, and therefore it is used by many large-scale web applications that require speed and ease of configuration and deployment. Tomcat server is not only popular because of its performance, but also because of its ease of set-up and configuration. Tomcat supports server and web application level configuration. Such flexibility allows fine tuning of the server performance, and security. The main purpose of using Tomcat is as a platform for developing and deploying web applications and web services.
You may skip tomcat installation and startup and jump directly to the
web.xml configuration below.2. Background
There are many versions of the Tomcat server. In this example we will talk about Apache Tomcat Servlet/JSP container version 8.0.20 that implements the Servlet 3.1 and JavaServer Pages 2.3 specifications. In this example 64-bit Windows 7 Professional SP1 was used. JDK 7 for Windows 7 64-bit was installed and configured.
Note that in this article we use Windows specific directory path separator “\”, which is different from the one used on Linux like systems. Below are critical directories for the Tomcat:
TOMCAT_ROOT_DIR(known as$CATALINA_HOME, where catalina is the project name of the Tomcat server) is the directory where you have placed Apache Tomcat folder, e.g.C:\apache-tomcat-8.0.20-windows-x64\apache-tomcat-8.0.20in our example. In addition, Tomcat server can be configured for multiple instances by defining$CATALINA_BASEfor each instance of the Tomcat server. By default both folders refer to the single Tomcat server installation.TOMCAT_ROOT_DIR\binis the directory, where server startup, shutdown, and other scripts are located.TOMCAT_ROOT_DIR\confis the directory that contains configuration files and related to those files DTDs (Document Type Definition). The files in this folder are used for the server level performance tuning, security, load balancing, etc. We will talk aboutweb.xmlconfiguration file located in this folder.TOMCAT_ROOT_DIR\logsis the directory, where the log files are stored by default.TOMCAT_ROOT_DIR\webappsis the directory, where the webapps you place in the server are stored.
All Tomcat server related configurations from above folders are read at the server’s start-up. Thus, if you change any of the Tomcat server’s configuration files, you need to restart the server. Also note that the configurations discussed in this article are mainly applicable to Tomcat 8, but may not be applicable to earlier or later versions. Please refer to the official documentation here for the version you want to install.
Now let’s look at web.xml deployment descriptor configuration file, which is one of the main configuration files for the Tomcat server. It is located in the TOMCAT_ROOT_DIR\conf folder. This configuration file is used for basic web application’s configuration shared by all web applications that will be deployed on the Tomcat server instance. Each of the web application may optionally override shared configurations by defining their own web.xml file located in TOMCAT_ROOT_DIR\webapps\PROJECT_DIR\WEB-INF folder. Note that web application specific configurations should NEVER be placed in the shared web.xml. Describing options for the per web application configuration file is outside of the scope of this article, but you can read more about it here or here.
From now on, whenever we say web.xml, we refer to the Tomcat server’s web.xml located in the TOMCAT_ROOT_DIR\conf and shared by all web applications deployed on that server. Note that the ordering of the configuration elements in the server’s web.xml must be followed as specified by the Java Servlet 3.1. Read more about Java Servlet 3.1 here.
3. Tomcat Server Installation
In this example we will install Tomcat 8 on the Windows 7 Professional 64-bit system, which has JDK 7 installed. If you need a refresher on how to set up JDK 7 on Windows 7 please refer here.
Once you checked that you have JDK 7 setup, get Tomcat server distribution package from the Apache Tomcat’s official website. As of writing of this article the latest version of Tomcat server is Tomcat 8 and it is available from here. The Tomcat distribution used in this example is a zip of the binary core for 64-bit Windows.
We will not discuss in details installation steps for Tomcat, but you can refer to the Apache Tomcat server’s official installation howto here on how to setup the Tomcat 8.
Assuming you have installed Tomcat, let’s look at how to verify if it is working.
To run Tomcat server on Windows you need to configure it as a Windows service. This needs to be done each time you restart your computer. To manually start Tomcat you need to open Windows’s command line prompt by searching for cmd in the start-up menu. Then, in the command line prompt navigate to TOMCAT_ROOT_DIR\bin folder and run “service.bat” script with “install” option. Below is the screen shot of running service.bat install.
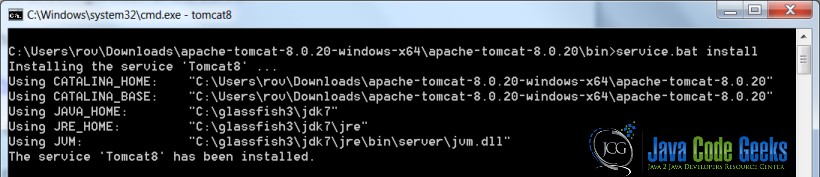
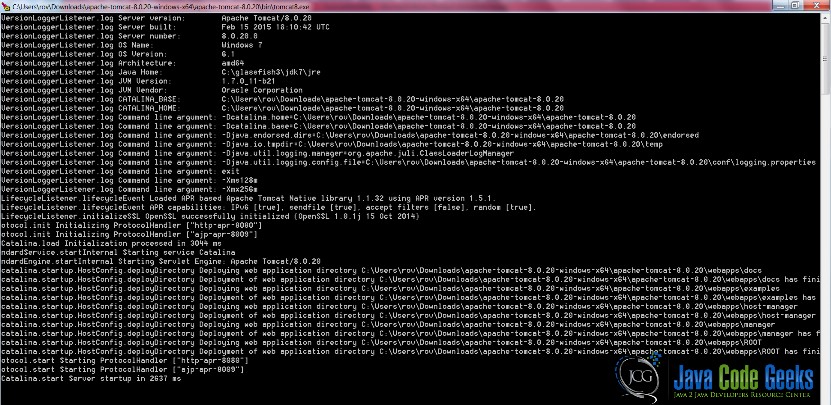
Note: you must have administrative privileges to run Tomcat server from the command line prompt. To verify that the Tomcat 8 is running on the Windows type tomcat8 command into the open command line prompt. It will open a new command line window with Tomcat startup information as shown in the picture below.
Freshly installed Tomcat has some default web application in the TOMCAT_ROOT_DIR\webapps directory. We will not discuss those web applications in depth here, but you can read about them here and here.
4. Using Tomcat Server Management App
We can verify that the Tomcat server was installed and configured correctly in several ways. One of the ways is by using manager web application provided by default with Tomcat. To access the manager web app several steps need to be performed. First, verify that the Tomcat was registered with Windows as a service as explained in previous section. Then, add a user and a role elements in the TOMCAT_ROOT_DIR\config\tomcat-users.xml configuration file as shown below:
1 2 3 4 | <tomcat-users xmlns=http://tomcat.apache.org/xml xmlns:xsi=http://www.w3.org/2001/XMLSchema-instance xsi:schemaLocation=http://tomcat.apache.org/xml tomcat-users.xsd version="1.0"> <role rolename="manager-gui"/> <user username="tomcat" password="tomcat" roles="manager-gui"/></tomcat-users> |
The above entry in the tomcat-users.xml allows access to the manager web app provided by default with each Tomcat instance. The user name and the password in the example could be any legal value. Once you have added above entry in the tomcat-users.xml configuration file, restart the Tomcat server by closing the status command line prompt, and starting it again with tomcat8 command as explained earlier.
Read more on how to configure and run manager web application here.
Once you setup the user name and password and started Tomcat service you can open the following URL in the web-browser of your choice http://localhost:8080/manager/status. The screenshot of the web page is below:
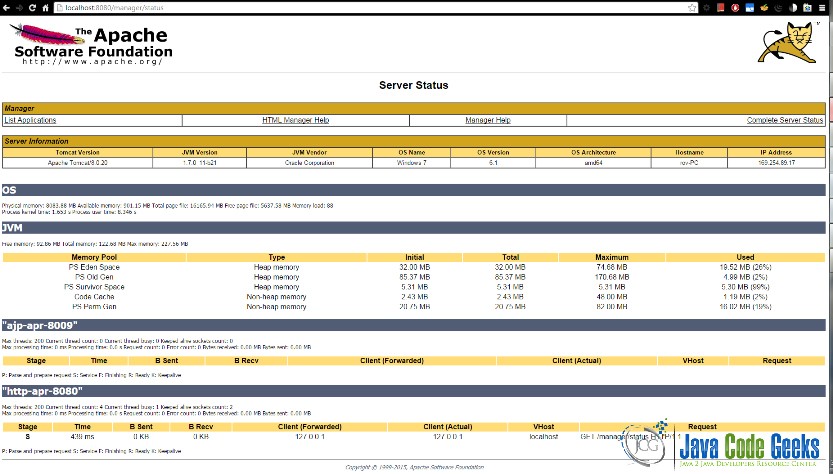
The screenshot above was taken from the web page opened in Google Chrome browser version 41.0.X. The above URL contains basic information on Tomcat’s version, OS it runs on, and JVM properties. Note in the screenshot that the initial maximum heap-memory size is relatively small. It is generally recommended to increase that limit to a higher value depending on your system capabilities and expected requirements of the web applications that will be hosted. Read more on Tomcat’s heap-memory settings here.
5. Tomcat server’s web.xml configuration file
Up to this point, we have registered Tomcat as a Windows service, and now we are ready to look at web.xml configuration file located in TOMCAT_ROOT_DIR\conf folder. Below is the web.xml with no options:
1 2 3 4 5 6 7 8 | <?xml version="1.0" encoding="ISO-8859-1"?> xsi:schemaLocation="http://xmlns.jcp.org/xml/ns/javaeeversion="3.1"> …</web-app> |
The above simplified web.xml contains <web-app> element which will contain options for operating all web applications deployed in this Tomcat instance. The <web-app> element represents the configuration options for a web application. It is required that all deployment descriptors must confirm to XML schema for the Servlet 3.1. Web-app is the root element for the deployment descriptor, web.xml file.
5.1. Configuring Shared DataSource configuration using JNDI DataSource
In this section, configuration of the shared data source across all web applications is described. Note that per web application data source configuration is also possible and is a common choice for small projects. In this section, we will look at adding MySQL data source. Note that you are expected to be familiar with Context, context configured per web application running within a Tomcat server, and Host, host configured per Tomcat instance in the TOMCAT_ROOT_DIR \conf\server.xml file, configurations.
Get the MySQL JDBC and add it to the library of the shared resource located in the TOMCAT_ROOT_DIR\lib folder. In our case we copy Connector/J 3.0.11-stable (the official JDBC Driver) jar into the TOMCAT_ROOT_DIR\lib folder.
Perform MySQL server configuration as described in here section “1. MySQL configuration”.
Next perform Context configurations as described in here section “2. Context configuration”.
Next configure web.xml as shown below:
1 2 3 4 5 6 | <resource-ref> <description>MySQL Datasource example</description> <res-ref-name>jdbc/TestDB</res-ref-name> <res-type>javax.sql.DataSource</res-type> <res-auth>Container</res-auth></resource-ref> |
Note that it is expected that resource with name “jdbc/TestDB” was configured in the Context. <resource-ref> element represents the resource manager connection factory reference, such as JDBC DataSource. The sub elements of the <resource-ref> represent the following:
<description>is a description of this resource reference<res-ref-name>is a JNDI name and must be unique within deployment environment, e.g. web application.<res-type>is the type of the data source . This type is expected to be implemented by the data source. For the example data sourcejavax.sql.DataSourceread more here<res-auth>specifies if the deployment component code signs on programmatically to the resource manager, or if the container will sign on to the resource manager for the deployment component. In the latter, the container needs information to sign on from the web application.
For more extended list for different database configurations refer here.
5.2. Configuring Jasper 2 Java Server Pages (JSP) Engine
Tomcat 8.0 implements JavaServer Pages 2.3 specification with Jasper 2 JSP engine. This version of the JSP engine was redesigned for better performance compared to the previous version. An extended list of parameters and their purpose could be found here.
01 02 03 04 05 06 07 08 09 10 11 12 13 14 15 16 17 18 19 | <servlet> <servlet-name>jsp</servlet-name> <servlet-class>org.apache.jasper.servlet.JspServlet</servlet-class> <init-param> <param-name>fork</param-name> <param-value>false</param-value> </init-param> <init-param> <param-name>xpoweredBy</param-name> <param-value>false</param-value> </init-param> <load-on-startup>3</load-on-startup> </servlet>… <servlet-mapping> <servlet-name>jsp</servlet-name> <url-pattern>*.jsp</url-pattern> <url-pattern>*.jspx</url-pattern> </servlet-mapping> |
The above <servlet> element is a small Java program that runs with a Tomcat server. A servlet receives and responds requests from the Web clients. The JSP compiler servlet is the mechanism used by Tomcat server to support JSP pages. Below is explanation for sub elements:
<servlet-name>must be unique within web application<servlet-class>read more on org.apache.jasper.servlet.JspServlet hereFork=falseoption tells Ant not to fork compiles of JSP pages, but to compile them on the JVM that Tomcat is running on (default is true)XpoweredBy=falseoption disables adding X-Powered-By response header by generated servlet (default is false)<load-on-startup>with value 3 means this servlet will be loaded after servlets with a lower value<url-pattern>is the pattern for which any matched URL request will be serviced by this servlet
JSP servlet’s options may be used for optimization of Tomcat server request processing. One of such optimizations could be settings development option to false, which will disable on access checks for JSP page’s compilation. To see the full list of options go here.
5.3. Configuring SSI (Server Side Includes)
SSI are directives that are placed within HTML tags and evaluated on the server during page processing. SSI allows you adding dynamically generated content to the HTML pages without the need to serve the whole HTML page. SSI support on Tomcat is available as both a servlet and a filter. Only one of two SSI types should be used.
By default SSI support is disabled on Tomcat. You can read more about this web.xml option here. Note that SSI directives could be used to execute external to Tomcat JVM programs, which may result in the security vulnerability to your Tomcat instance.
To use SSI look for SSI filter or SSI servlet in the default web.xml in TOMCAT_ROOT_DIR\conf\web.xml. Read comments and uncomment appropriate sections of the configuration file to enable SSI.
5.4. Configuring CGI (Common Gateway Interface)
CGI defines a way for a web server to interact with external content-generating programs that conform to the CGI spec requirements.
By default SSI support is disabled on Tomcat. You can read more about this web.xml option here. Note that CGI scripts could be used to execute external to Tomcat JVM programs, which may result in the security vulnerability to your Tomcat instance.

To use CGI look for CGI servlet and servlet-mapping elements in the default web.xml in TOMCAT_ROOT_DIR\conf\web.xml. Read comments and uncomment appropriate sections of the configuration file to enable CGI servlet.
5.5. Configuring Default Servlet
Default servlet serves static resources and directory listing (if directory listing is enabled). It is declared in TOMCAT_ROOT_DIR\conf\web.xml and it is defined on all Tomcat instances. Below is an web.xml entry for the Default Servlet:
01 02 03 04 05 06 07 08 09 10 11 12 13 14 15 16 17 18 19 20 | <servlet> <servlet-name>default</servlet-name> <servlet-class> org.apache.catalina.servlets.DefaultServlet </servlet-class> <init-param> <param-name>debug</param-name> <param-value>0</param-value> </init-param> <init-param> <param-name>listings</param-name> <param-value>false</param-value> </init-param> <load-on-startup>1</load-on-startup> </servlet>... <servlet-mapping> <servlet-name>default</servlet-name> <url-pattern>/</url-pattern> </servlet-mapping> |
A description of each of the sub elements in the build in default <servlet> element is below:
<servlet-name>is the canonical name of this servlet. The name must be unique within the web application.<servlet-class>is the fully qualified class name of this servlet<init-param>is the optional parameter for this servlet that contains a name value pair that is used when the servlet is initialized. This element contains two sub elements <param-name> and <param-value>, which represent parameter’s name and value<load-on-startup>is the indicator of the load order for this servlet. If the value is a lowest positive integer, the servlet loaded first. To load the servlet at any time the value should be set to a negative integer or should be leaved undefined
In the second part of the web.xml, we define <servlet-mapping> element which is a servlet mapping for the build in default servlet. Note that each servlet defined in the web.xml must be mapped as in the default servlet example either in the server’s web.xml or web application’s web.xml. A description of each of the sub elements in the <servlet-mapping> element is below:
<servlet-name>a canonical name of the servlet. Note the<servlet-name>sub element’s value in the<servlet-mapping>must match the value specified in the<servlet>element’s similar sub element.<url-pattern>the url pattern which will be used to map all requests with matching patterns to the servlet
As you can see from configuration of the default servlet the default servlet is loaded at Tomcat server startup, directory listing is disabled, and debugging is disabled. To see extended list of options that you can modify go here. There you can find the available parameters descriptions and settings.
Most of the Tomcat server related security configurations are set in the Default Servlet element in the TOMCAT_ROOT_DIR\conf\web.xml. There are three main attributes of this element that need to be mentioned:
readonlyconfiguration should be set to true to prevent clients from deleting or modifying static resources on the server, and prevent clients from uploading new resources to the server.listingconfiguration should be set to false to prevent directory listing which if misused could use significant CPU and lead to DOS (Denial of Service) attacks.showServerInfoshould be set to false (true by default). If directory listing is enabled Tomcat version number will be included in the info which is undesired.
For additional security it is recommended to have web.xml for each individual web application with appropriate directory listing settings. On security settings read more here.
5.6. Default Session Configuration
You can set session timeout for all web application in the web.xml. By default the session timeout is 30 minutes as shown below:
1 2 3 | <session-config> <session-timeout>30</session-timeout></session-config> |
To change the value for when the session should be deleted change the <session-timeout> value.
5.7. Default MIME Type Mappings
You can configure mapping for the data types that could be processed by the web applications in this Tomcat instance. There are many MIME types set by default in the web.xml for all web applications. Tomcat will generate a header entry for the content type automatically based on the static resource’s file name extension using the MIMTE types specified here. Below some of the MIME types from the long list:
01 02 03 04 05 06 07 08 09 10 11 12 13 14 15 16 | <mime-mapping> <extension>gif</extension> <mime-type>image/gif</mime-type></mime-mapping> <mime-mapping> <extension>java</extension> <mime-type>text/x-java-source</mime-type></mime-mapping> <mime-mapping> <extension>wav</extension> <mime-type>audio/x-wav</mime-type></mime-mapping> <mime-mapping> <extension>xhtml</extension> <mime-type>application/xhtml+xml</mime-type></mime-mapping> |
Each <mime-mapping> element represents mapping between resource type and its “Content-Type” header value. <extension> sub element stands for the resource’s extension, and <mime-type> stands for the mime type that the file extension will map to.
5.8. Default Welcome File List
When a request is made to a directory the Default Servlet tries to find the “welcome file” in that directory. This listing is recommended to be overwritten in the per web application deployment configuration file (web.xml). If no “welcome file” found Tomcat returns 404.
1 2 3 4 5 | <welcome-file-list> <welcome-file>index.html</welcome-file> <welcome-file>index.htm</welcome-file> <welcome-file>index.jsp</welcome-file></welcome-file-list> |
<welcome-file-list> element contains default welcome files to be retrieved when any web application is accessed. Each <welcome-file> in the list is attempted to be accessed from top to bottom. If none are present in the folder being requested a 404 status is returned.
5.9. Configuring Clustering/Session Replication
For enabling clustering several steps need to be performed, and one of them is to add <distributable/> element in the TOMCAT_ROOT_DIR\conf\web.xml.
In addition other than web.xml server configuration files need to be modified as explained in here. Note that the request session gets distributed in the cluster to each web application that has <distributable/> element in it. It is recommended that all Tomcat instances configured the same.
6. Conclusion
The above options are some of the main Tomcat server’s configuration options that are shared by all web applications deployed on the server. There are more web.xml options that could be set up on the Tomcat server that are not discussed here. For the complete list of the possible Tomcat server’s web.xml configuration file options and their description refer to the Java Servlet 3.1 specifications here. For more extended explanation of the Apache Tomcat server and related to infrastructure please refer here and here.

Hi Rovshen,
I have deployed one app war file on tomcat. it has auth file that I replaced with apps auth file. My tomcat is by default running on 9090. The tomcat is running successfully. When I try to start that app it is giving me 404 error. Please help me out with this issue.
Thank you,
Tejashree