How To Configure Tomcat To Support SSL Or Https
In this short example we are going to see how to configure Tomcat to support SSL protocol, and thus https connections.
1. Create a Self – Signed Certificate for the Server
For SSL to work (properly) it is obligatory for the Server to identify himself to the client. To do that, the Server will need a certificate. Of course, when deploying a sercure Web Server in the wild, you need a Certificate that is signed from a well known and trusted Certificate Authority, like Verisign. But in this example we are going to create a Self – Signed certificate. That is, a Certificate signed by the issuer himself. As you will see, the browser (the client) will recognise that and will require our attention on whether to trust the server or not.
It is very easy to create a Self – Signed Certificate. There are many tools to choose from, that perform that kind of operations, like openssl. In our example we are going to use keytool which is command line utility that comes with Java JDK. It is located in your JDK_HOME/bin folder.
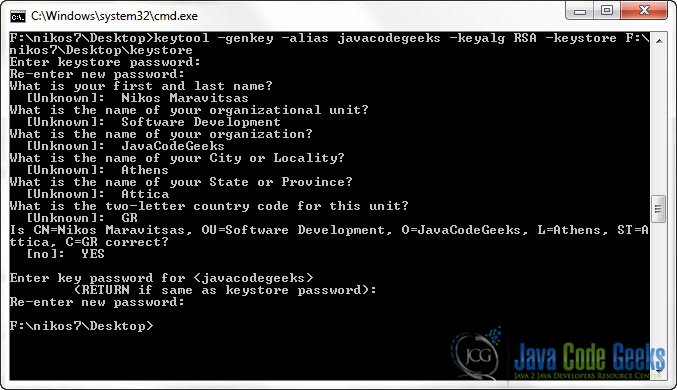
That is the command that I’ve issued to create a Self – Signed Certificate :
F:\nikos7\Desktop>keytool -genkey -alias javacodegeeks -keyalg RSA -keystore F:\nikos7\Desktop\keystore
Here is an image of the terminal:
There are the options that were used:
-genkey: to generate a Public and a Private key pair. The public key will be available on the Server’s Certificate. The private key must remain private to the Server.-alias: to define a unique alias for the keystore.-keyalg: to define the Algorithm to use for generating the key pair. In our case we use RSA.-keystore: to define the location to store the certificate and the key pair.
A keystore is a secure storage facility for cryptographic keys and certificates. Each one of them is accessed by a unique alias and a password.
2. Configure Tomcat to Use SSL.
Now we need to configure Tomcat to accept connections with HTTPS. We need to dicate to the server to use our keystore to provide a valid certificate to the client.
You need to go to CATALINA_BASE/conf folder and edit the server.xml file that you will find there. Paste the following XML code it it:
server.xml:
.
.
.
 <Connector port="8444" protocol="HTTP/1.1" SSLEnabled="true"
               maxThreads="150" scheme="https" secure="true"
               clientAuth="false" sslProtocol="TLS"
         keystoreFile="F:\nikos7\Desktop\keystore"
         keystorePass="1234567" />
.
.
.
This will define a new Tomcat Connector. A Connector is the Tomcat module that enables the server to accept requests, pass them to the requested Web Application, and forward responses and dynamic content to the outside world. To define a Connector you need to specify the port it’s going to listen, the protocol to accept as well as several other aspects like maximun number of threads to deploy etc. In our case we also turn on the SSL flags and we specify the path and the password to our keystore. Finally, you need to restart Tomcat.
Now, when you put that URL on your browser:
https://localhost:8444/
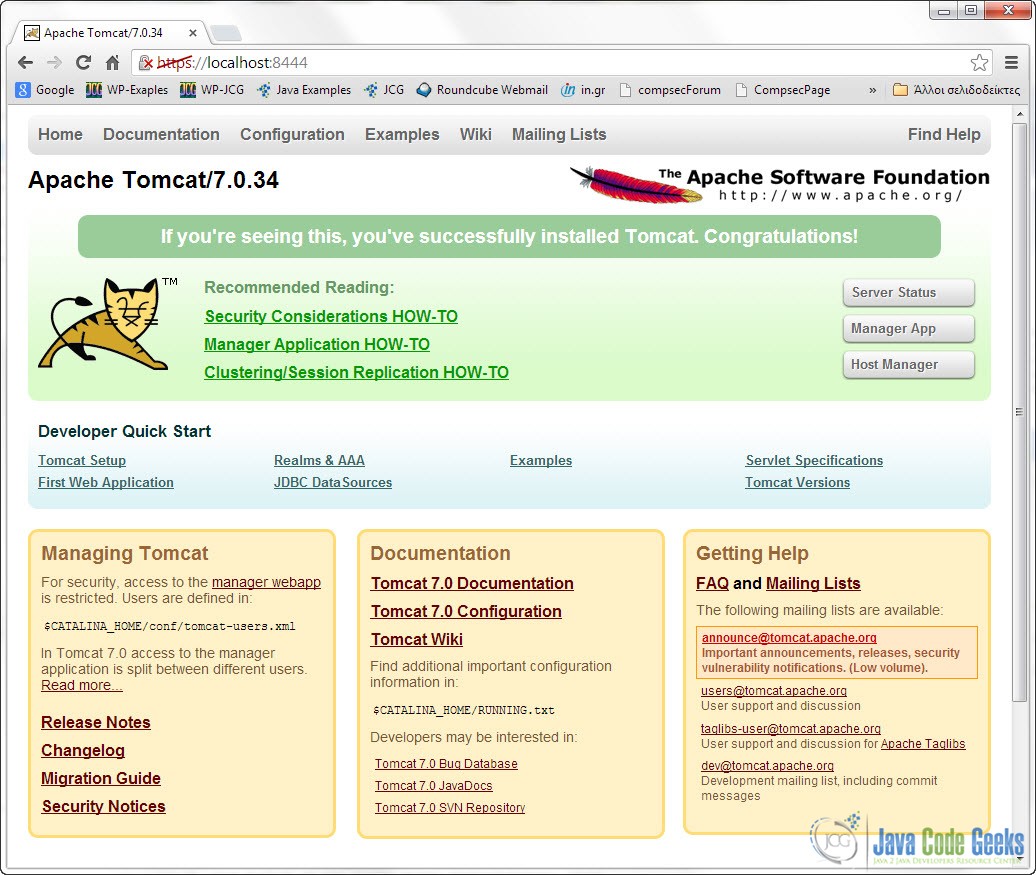
You are propably going to get a worning saying that you are about to visit an untrusted Web Site. If you accept the risk and continue you should get something like this in your browser:
Notice the red https mark on the URL bar. That means that our browser does not trust the Web Site, because he cannot validate the Certificate Authority that signed the Certificated provided by the Server.
This was an example on how to configure Tomcat to Support SSL or https.


