1. Overview
In this tutorial, we will get to know about Google Web Toolkit (GWT). GWT is a development toolkit for creating optimized web application while programming in Java.
GWT allows you to build a complete web application in Java. Eclipse IDE supports its development using plugin “Google Plugin”. GWT compiler compiles Java code into optimized Java Scripts compatible for multiple browsers. GWT allows easy development of AJAX based web application and provides a rich library of UI widgets to support faster development.
GWT Web Application can be customized using CSS files. GWT widgets provides the Java APIs for styling widgets.
GWT provides its own RPC (Remote Procedure Call) framework to communicate between client and server. The implementation of GWT RPC service is based on Java Servlet architecture that enables exchange of Java object over HTTP. GWT handles serialization of the Java objects passing back and forth & the arguments in the method calls and the return value.
Pre-requisite: The readers are expected to know the basics of Java Programming (SE & EE).
2. Sample Web Application using GWT
2.1 Download Eclipse, install Google plugin and GWT SDK
For the GWT development, Google provides Eclipse plugin and that can be downlodaded from here. If you don’t have Eclipse installed yet, go to the Eclipse Download and get it done. As part of this article, we will be using Eclipse 4.5 (marsh).
2.2 Steps to install Eclipse plugin for GWT development
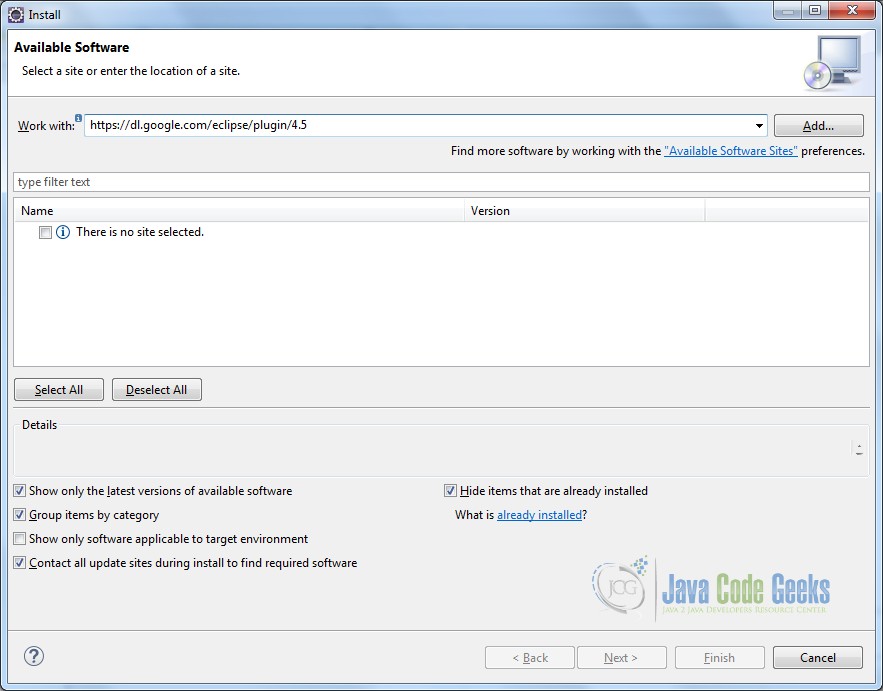
Go to Help -> Install New Software…

Enter the URL to download Google Plugin which one is compatible with your Eclipse version. Here I am using Eclipse 4.5. Click on ‘Add’ button.
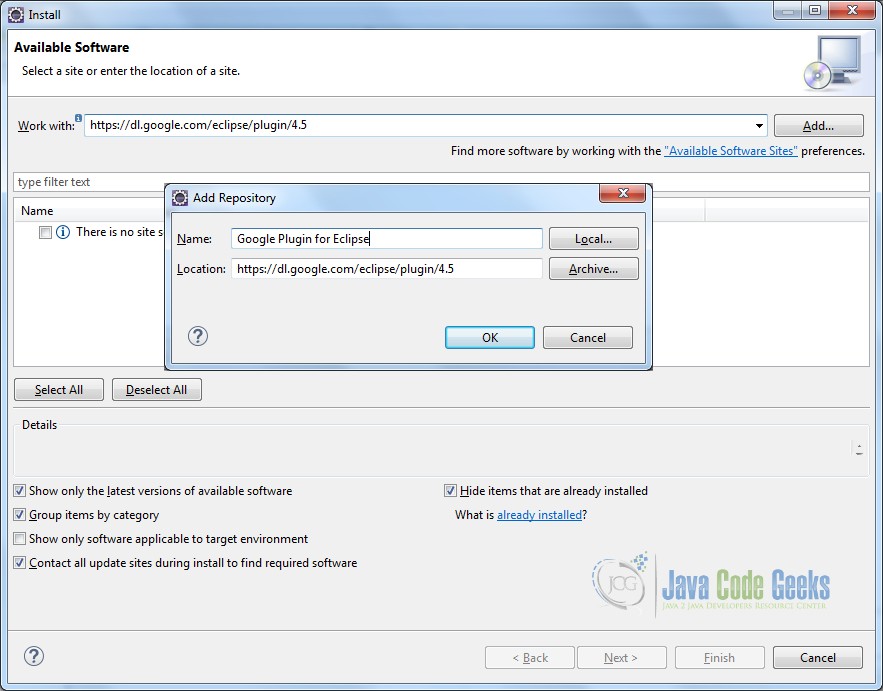
A pop-up will appear to Add repository. Provide a relevant name and URL to download Google Plugin. Click on ‘OK’ button.
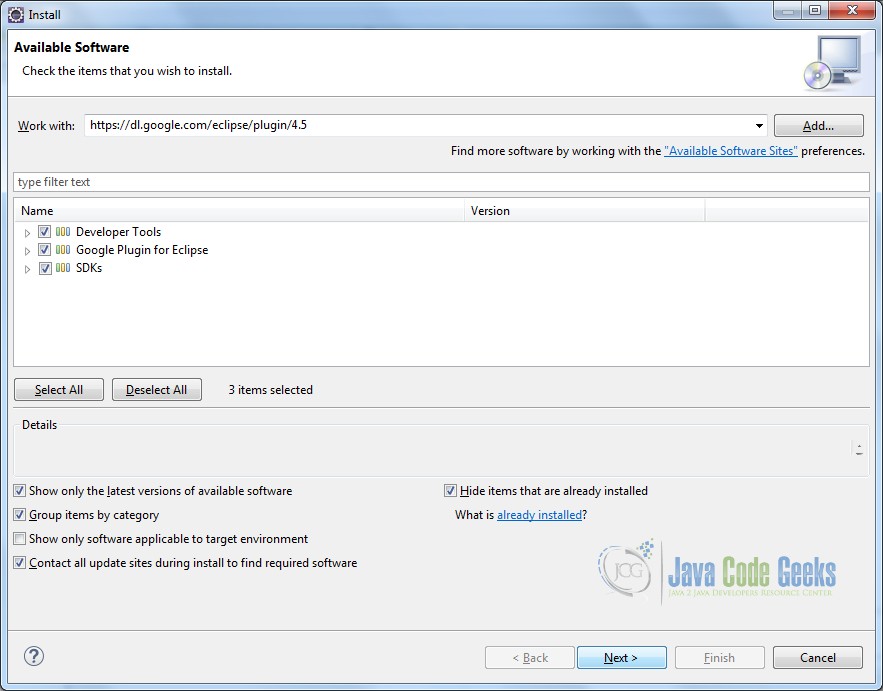
It might take few seconds to locate available software within given repository. Once it showsthe available softare under given repository, select the check box for ‘Google Plugin for Eclipse’, ‘Developer Tool’ and ‘SDK’. Click on ‘Next’ button.
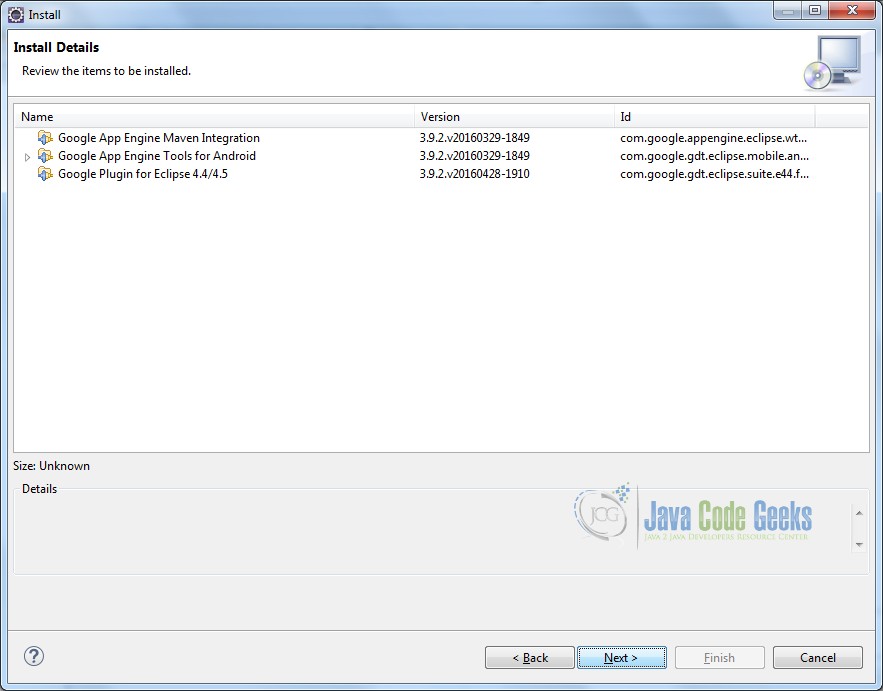
It will show plugin details for review just before installing it. Click on ‘Next’ button.
After this, accept the license agreement and finish the Google Plugin installation. After Eclipse restart, Goolge Plugin is visible on Eclipse’s toolbar.

2.3 Creating Sample Web Application in GWT
2.3.1 Create a new project using GWT Development toolkit
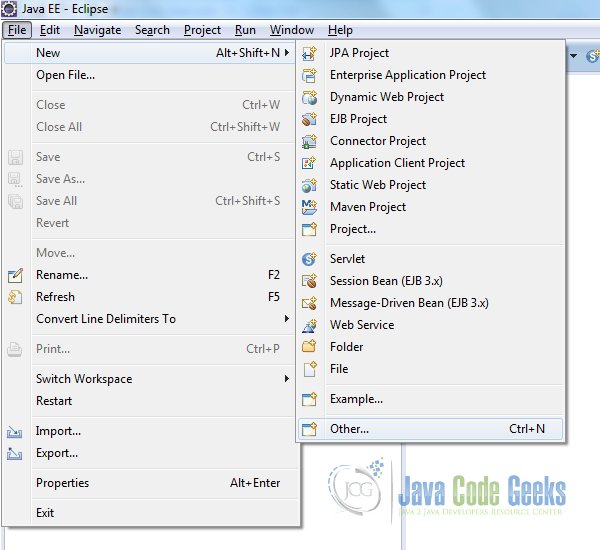
Go to File -> New -> Other…
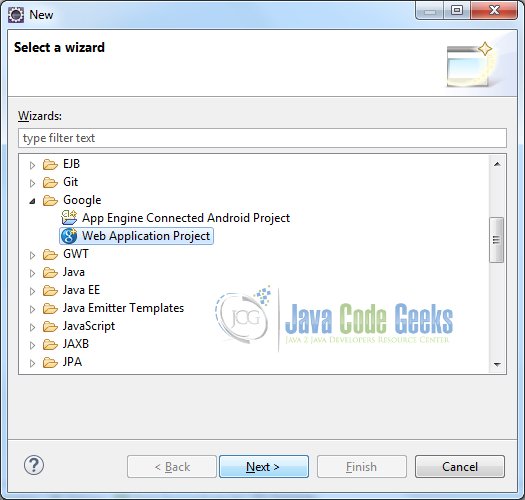
Select Google Web Application wizard and click on ‘Next’ button.
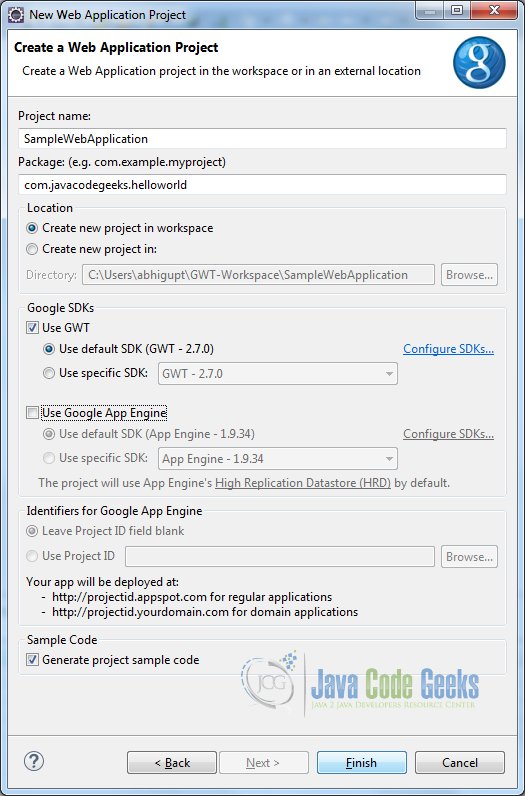
Provide project name and package name. Make sure that you have selected the checkbox to ‘Use GWT’. Here my intention is not using the Google App Engine that may slow down Eclipse significantly. Moreover, if you have created a Google Web Toolkit project you don’t necessarily need to deploy it to Google App Engine. For example, you can deploy the web application on Tomcat or Jboss or any other java based web container.
Here the option to generate sample code is remains checked. This basically create entire example project. Although I am not going to use most of its generated files but this will going to help while understanding the GWT Web Application architecture in details. Click on ‘Finish’ button.
2.3.2 GWT Web Application Project Structure
2.3.2.1 Client and Source packages
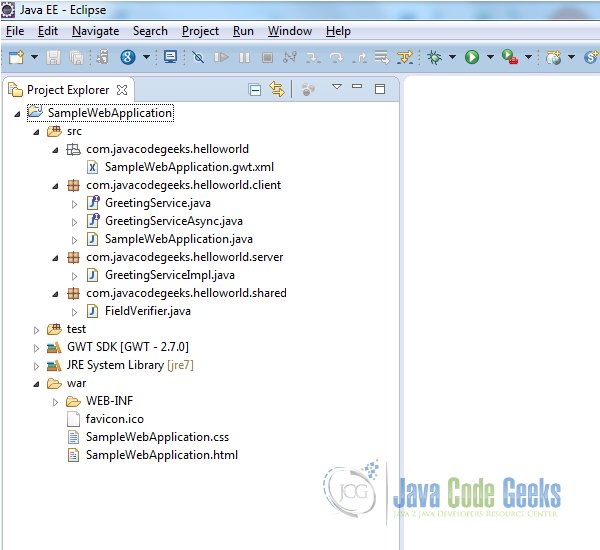
Now when you open the source package you can see a client package that basically contains GUI code, a server package that contains server-side implementation and a shared package which basically for shared classes between various parts of the project.
2.3.2.2 Entry Point Class
Considering the scope of this tutorial, I am not bothered to server side implementation, so I am going to delete shared package and classes inside server package. There are references to server-side code inside client package named as GreetingService.java and GreetingServiceAsynch.java, these classes are also need to be deleted. There is a class SampleWebApplication.java I am going to keep this file because the is Entry Point for a GWT application.
Although this file required to be cleaned as there are many references to server-side code inside it. There is a method onModuleLoad(), this is the Entry Point of the program or the very first method that gets executed when running the GWT Web Application. This is very similar to public static void main(String args[]) method in a conventional java program.
SampleWebApplication.java
package com.javacodegeeks.helloworld.client;

import com.google.gwt.core.client.EntryPoint;

/**
 * Entry point classes define onModuleLoad()
 */
public class SampleWebApplication implements EntryPoint {

	/**
	 * This is the entry point method.
	 */
	public void onModuleLoad() {
		// TODO
	}
}
2.3.2.3 Deployment Descriptor
If you are familiar with J2EE programming you will be aware of web.xml that is deployment descriptor for the Servlet-based Java Web Application and used for configuration. As we define servlet’s entry in web.xml, now for this autogenerated code, GWT created servlets are also defined here. As we have deleted server-side code, now these entries in web.xml are redundant specification tags. These tags need to be removed as well.
I am going to keep the welcome file that is SampleWebApplication.html, as this is going to be start page for our GWT Web Application.
web.xml
<?xml version="1.0" encoding="UTF-8"?>
<web-app xmlns:xsi="http://www.w3.org/2001/XMLSchema-instance"
         xsi:schemaLocation="http://java.sun.com/xml/ns/javaee
              http://java.sun.com/xml/ns/javaee/web-app_2_5.xsd"
         version="2.5"
         xmlns="http://java.sun.com/xml/ns/javaee">

  <!-- Servlets -->


  <!-- Default page to serve -->
  <welcome-file-list>
    <welcome-file>SampleWebApplication.html</welcome-file>
  </welcome-file-list>

</web-app>
2.3.2.4 Module Descriptor
File SampleWebApplication.gwt.xml under package com.javacodegeeks.helloworld is GWT specific configuration file. Let’s have a close look into tags defined into this file.
Tag inherits includes library from core GWT. If we are willing to add any third party library we can add here using tag inharits. It references a default style which is based on how GWT control looks.
Tag entry-point defines the entry point class that contains the entry point of the GWT Web Application; in this case it is SampleWebApplication.java.
Besides these, as GWT needs to know which code need to be converted into Java Scripts from Java code, it also contains the references of client package and shared package.
SampleWebApplication.gwt.xml
<?xml version="1.0" encoding="UTF-8"?>
<!--
  When updating your version of GWT, you should also update this DTD reference,
  so that your app can take advantage of the latest GWT module capabilities.
-->
<!DOCTYPE module PUBLIC "-//Google Inc.//DTD Google Web Toolkit 2.7.0//EN"
  "http://gwtproject.org/doctype/2.7.0/gwt-module.dtd">
<module rename-to='samplewebapplication'>
  <!-- Inherit the core Web Toolkit stuff.                        -->
  <inherits name='com.google.gwt.user.User'/>

  <!-- Inherit the default GWT style sheet.  You can change       -->
  <!-- the theme of your GWT application by uncommenting          -->
  <!-- any one of the following lines.                            -->
  <inherits name='com.google.gwt.user.theme.clean.Clean'/>
  <!-- <inherits name='com.google.gwt.user.theme.standard.Standard'/> -->
  <!-- <inherits name='com.google.gwt.user.theme.chrome.Chrome'/> -->
  <!-- <inherits name='com.google.gwt.user.theme.dark.Dark'/>     -->

  <!-- Other module inherits                                      -->

  <!-- Specify the app entry point class.                         -->
  <entry-point class='com.javacodegeeks.helloworld.client.SampleWebApplication'/>

  <!-- Specify the paths for translatable code                    -->
  <source path='client'/>
  <source path='shared'/>

  <!-- allow Super Dev Mode -->
  <add-linker name="xsiframe"/>
</module>
2.3.2.5 Welcome file
Now let’s have a close look into SampleWebApplication.html. We will discuss about several tags and its importance in reference with GWT application.
There is a CSS file reference using tag link intended for styling. There is SampleWebApplication.css file as part of auto-generated files with some default values.
The tag title Web Application Starter Project where you can mention anything that you want to be displayed as title on you web application GUI.
You can see the tag scripts. This tag is responsible for including the java scripts code generated from java code after compilation into HTML file. When we compile java code using GWT compiler, the java code gets converted into optimized Java Scripts and this tag includes the generated Java Scripts into HTML file. If this tag is not here, the GWT code is not going to be included into your web application project.
At the end of the file there is body tag that contains some markups to render HTML file, I am going to delete that.
SampleWebApplication.html
<!doctype html>
<!-- The DOCTYPE declaration above will set the     -->
<!-- browser's rendering engine into                -->
<!-- "Standards Mode". Replacing this declaration   -->
<!-- with a "Quirks Mode" doctype is not supported. -->

<html>
  <head>
    <meta http-equiv="content-type" content="text/html; charset=UTF-8">

    <!--                                                               -->
    <!-- Consider inlining CSS to reduce the number of requested files -->
    <!--                                                               -->
    <link type="text/css" rel="stylesheet" href="SampleWebApplication.css">

    <!--                                           -->
    <!-- Any title is fine                         -->
    <!--                                           -->
    <title>Web Application Starter Project</title>

    <!--                                           -->
    <!-- This script loads your compiled module.   -->
    <!-- If you add any GWT meta tags, they must   -->
    <!-- be added before this line.                -->
    <!--                                           -->
    <script type="text/javascript" language="javascript" src="samplewebapplication/samplewebapplication.nocache.js"></script>
  </head>

  <!--                                           -->
  <!-- The body can have arbitrary html, or      -->
  <!-- you can leave the body empty if you want  -->
  <!-- to create a completely dynamic UI.        -->
  <!--                                           -->
  <body>
    <!-- RECOMMENDED if your web app will not function without JavaScript enabled -->
    <noscript>
      <div style="width: 22em; position: absolute; left: 50%; margin-left: -11em; color: red; background-color: white; border: 1px solid red; padding: 4px; font-family: sans-serif">
        Your web browser must have JavaScript enabled
        in order for this application to display correctly.
      </div>
    </noscript>


  </body>
</html>
2.3.2.6 Adding UI components into GWT Web Application Project
Before going through this section I will suggest to look into GWT Showcase where you will get familiar with available widgets to develop GUI.
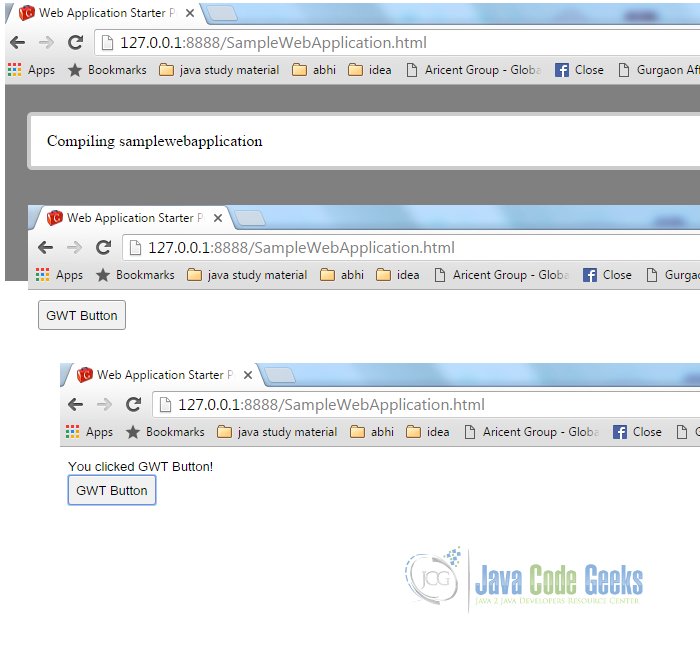
Now we can move to our Entry Point Class and will do some coding for UI development. Here we have developed a very basic GWT Web Application GUI that shows a button and a label and that label gets updated on click of the button.
Here is the GWT Web Application code that comprises very basic UI Widgets: a GWT Label and a GWT Button. GWT Label is getting updated on click of GWT Button. All these widgets are added into a GWT Vertical Panel and this panel is added into Root Panel of Welcome HTML page.
SampleWebApplication.java
package com.javacodegeeks.helloworld.client;

import com.google.gwt.core.client.EntryPoint;
import com.google.gwt.event.dom.client.ClickEvent;
import com.google.gwt.event.dom.client.ClickHandler;
import com.google.gwt.user.client.ui.Button;
import com.google.gwt.user.client.ui.Label;
import com.google.gwt.user.client.ui.RootPanel;
import com.google.gwt.user.client.ui.VerticalPanel;

/**
 * Entry point classes define onModuleLoad().
 */
public class SampleWebApplication implements EntryPoint {

	/*
	 * A vertical panel that hold other components over UI.
	 */
	VerticalPanel vPanel;
	/*
	 * A label that gets updated on click of button.
	 */
	Label lbl;

	/**
	 * This is the entry point method.
	 */
	public void onModuleLoad() {

		vPanel = new VerticalPanel();
		lbl = new Label();

		/*
		 * Button and its click handlar.
		 */
		Button btn = new Button("GWT Button");
		btn.addClickHandler(new ClickHandler() {

			@Override
			public void onClick(ClickEvent event) {
				lbl.setText("You clicked GWT Button!");
			}
		});

		/*
		 * adding label and button into Vertical Panel.
		 */
		vPanel.add(lbl);
		vPanel.add(btn);

		/*
		 * Adding vertical panel into HTML page.
		 */
		RootPanel.get().add(vPanel);

	}
}
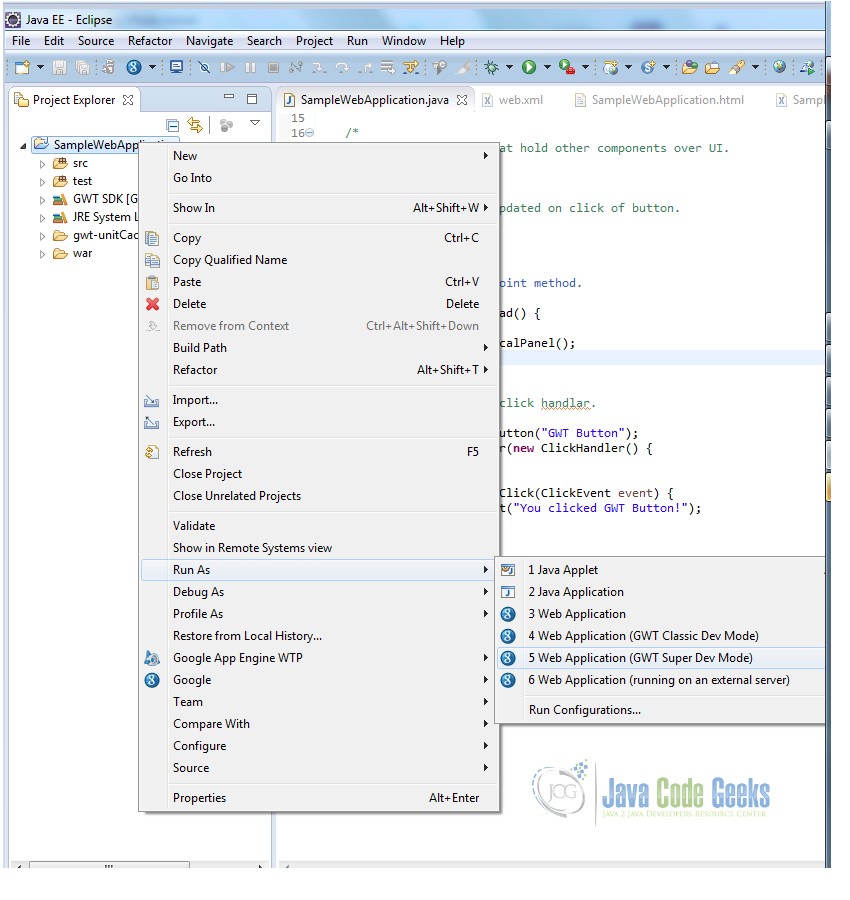
2.3.2.7 Running GWT Web Application
GWT Web Application can run into two modes, Development mode and Production mode. In development mode java code runs on JVM whereas in production mode GWT compiler compiles java code and creates java scripts that run on browser.
Here we run our GWT Web Application into ‘GWT Super Dev Mode’ that compiles java code at run time and this runs java scripts on browser and that can be debugged at browser level. Here I recommend using Google Chrome that provides debug at ease.
Now copy the URL.
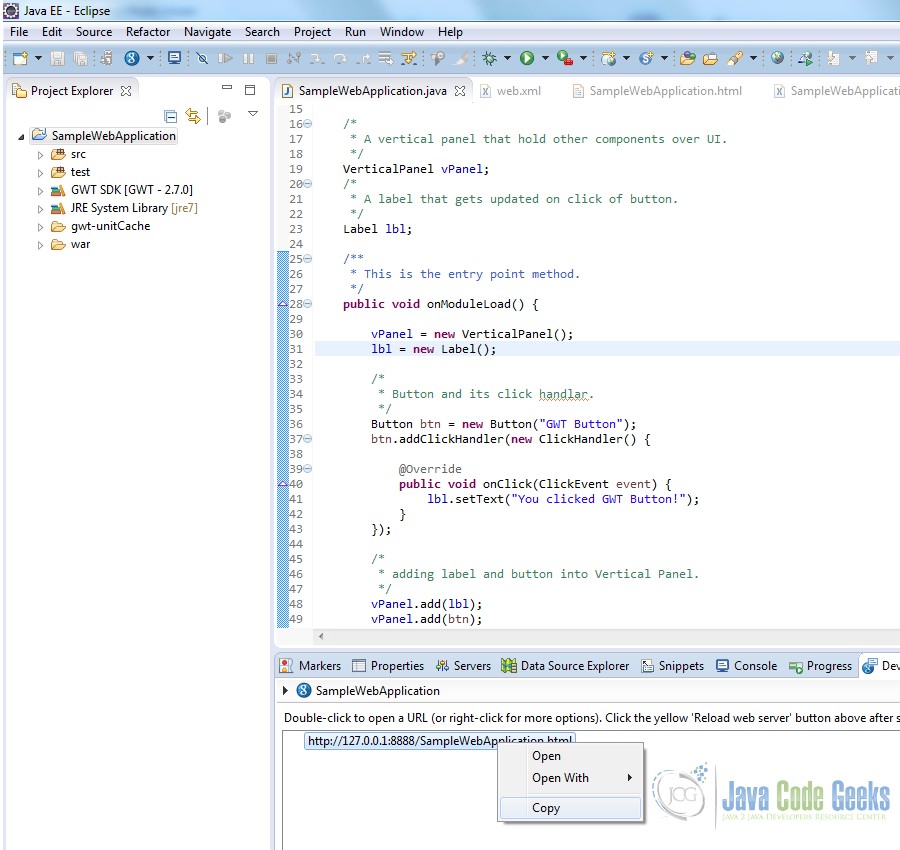
Paste the URL into browser. You can see GWT Web Application is compiling on browser and finally it is running on browser.
3. Debugging GWT Web Application
With newer Chrome version, you will not able to run GWT Web Application in classic development mode as its support is now closed from Google. This is because of newer chrome version provides support for ‘Super Dev Mode’ and enable user to debug using asserts, console logging and error messages.
From GWT Website,
GWT Development Mode will no longer be available for Chrome sometime in 2014, so we improved alternate ways of debugging. There are improvements to Super Dev Mode, asserts, console logging, and error messages.
4. References
• GWT Overview
• GWT Getting Started
• GWT Latest Tutorial
• GWT Product Release Notes
• GWT Sample Showcase
5. Conclusion
This tutorial covers the development of Client side of a GWT Web Application. I would suggest to explore more about UI development and hands on GWT Widgets.
We can explore more on Server communication in following tutorial.
6. Download Eclipse Project
You can download the full source code of this example here: GWTTutorialforBeginners
