In this example we will learn how to build a simple GWT application from scratch. Google Web Toolkit is a development framework for creating Ajax-enabled web applications in Java. It’s open source, completely free. Tools and technologies used in this example are Java 1.8, Eclipse Luna 4.4.2, Eclipse GWT Plugin 2.6
1. Introduction
The GWT SDK provides a set of core Java APIs and Widgets. These allow us to write AJAX applications in Java and then compile the source to highly optimized JavaScript that runs across all browsers, including mobile browsers for Android and the iPhone. The GWT SDK contains the Java API libraries, compiler, and development server. It lets us write client-side applications in Java and deploy them as JavaScript.
Constructing AJAX applications in this manner is more productive thanks to a higher level of abstraction on top of common concepts like DOM manipulation and XHR communication. We aren’t limited to pre-canned widgets either. Anything we can do with the browser’s DOM and JavaScript can be done in GWT, including interacting with hand-written JavaScript.
We can debug AJAX applications in our favorite IDE just like we would a desktop application, and in our favorite browser just like we would if you were coding JavaScript. The GWT developer plugin spans the gap between Java bytecode in the debugger and the browser’s JavaScript. Thanks to the GWT developer plugin, there’s no compiling of code to JavaScript to view it in the browser. We can use the same edit-refresh-view cycle we’re used to with JavaScript, while at the same time inspect variables, set breakpoints, and utilize all the other debugger tools available to us with Java. And because GWT’s development mode is now in the browser itself, we can use tools like Firebug and Inspector as we code in Java.
GWT contains two powerful tools for creating optimized web applications. The GWT compiler performs comprehensive optimizations across your codebase — in-lining methods, removing dead code, optimizing strings, and more. By setting split-points in the code, it can also segment your download into multiple JavaScript fragments, splitting up large applications for faster startup time. Performance bottlenecks aren’t limited to JavaScript. Browser layout and CSS often behave in strange ways that are hard to diagnose. Speed Tracer is a new Chrome Extension in GWT that enables you to diagnose performance problems in the browser.
When you’re ready to deploy, GWT compiles your Java source code into optimized, stand-alone JavaScript files that automatically run on all major browsers, as well as mobile browsers for Android and the iPhone.
2. GWT SDK
With the GWT SDK, you write your AJAX front-end in the Java programming language which GWT then cross-compiles into optimized JavaScript that automatically works across all major browsers. During development, you can iterate quickly in the same “edit – refresh – view” cycle you’re accustomed to with JavaScript, with the added benefit of being able to debug and step through your Java code line by line. When you’re ready to deploy, the GWT compiler compiles your Java source code into optimized, standalone JavaScript files.
Unlike JavaScript minifiers that work only at a textual level, the GWT compiler performs comprehensive static analysis and optimizations across your entire GWT codebase, often producing JavaScript that loads and executes faster than equivalent handwritten JavaScript. For example, the GWT compiler safely eliminates dead code – aggressively pruning unused classes, methods, fields, and even method parameters – to ensure that your compiled script is the smallest it can possibly be. Another example: the GWT compiler selectively inlines methods, eliminating the performance overhead of method calls.
3. Installing Eclipse GWT Plugin
You can install the Google Plugin for Eclipse using the software update feature of Eclipse. Below we describe the steps for installing this plugin:
- Start Eclipse
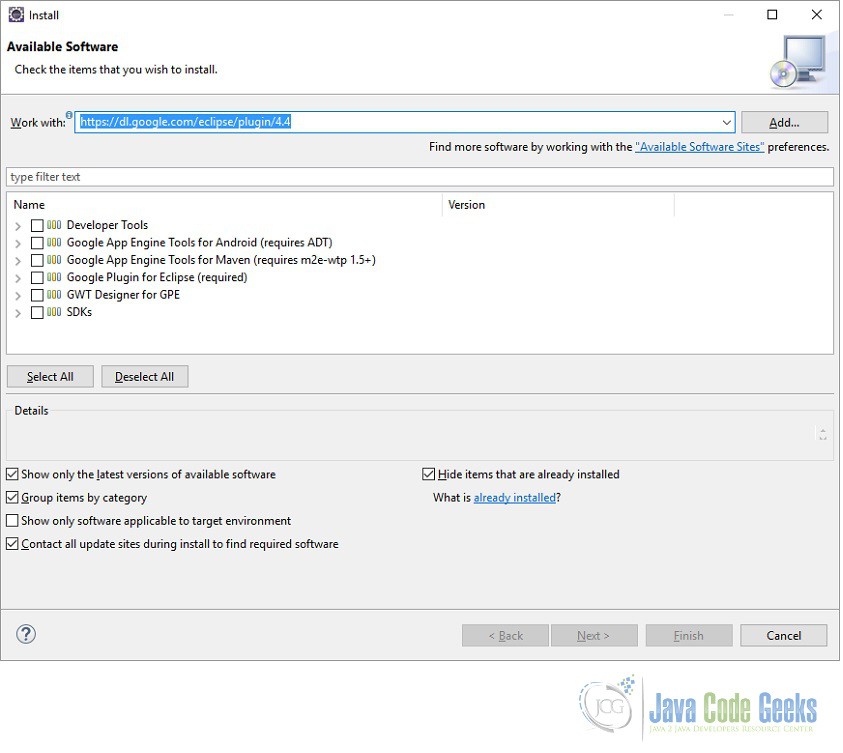
- Select Help > Install New Software… In the dialog that appears, enter the update site URL into the Work with text box: ‘https://dl.google.com/eclipse/plugin/4.4‘. Press the Enter key.

Figure 1. GWT Plugin - The required component is Google Plugin for Eclipse. Select the checkbox next to Google Plugin for Eclipse(required). Click Next.
- Review the features that you are about to install. Click Next.
- Read the license agreements and then select I accept the terms of the license agreements. Click Finish.
- Click OK on the Security Warning.
- You will then be asked be asked if you would like to restart Eclipse. Click Restart Now.
4. Creating GWT project
In this section we will learn how to create a new GWT project using Eclipse plugin. To test that the project is configured correctly we will run the application in development mode before deploying it in the reals application server. One of the benefits of using GWT is that we can leverage the tools, such as refactoring, code completion, and debugging, available in a Java IDE. Below are the steps needed to create a new GWT project using Eclipse.
- Open Eclipse. Click File=>New=>Web Application Project. If we don’t find ‘Web Application Project’ option in the list, click on ‘Other’ and in the Wizards search box write ‘Web Application Project’.
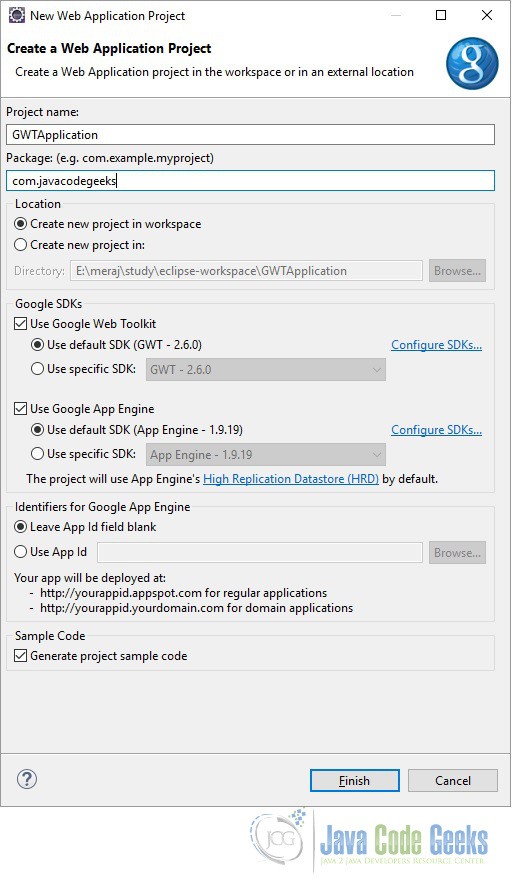
- In the Project name text box enter the name of the project (GWTApplication). In the Package text box enter the package name (com.javacodegeeks).

Figure 2. Project Setup - Ensure that the ‘Use default SDK {$GWT-version}’ option is selected.
- (Optional) If you are using Google App Engine, make sure Use Google App Engine is checked and that Use default SDK (App Engine) is selected.
- If you did not install the SDKs when you installed the Google Plugin for Eclipse, you should click Configure SDKs… to specify the directory where GWT (and the App Engine SDK if necessary) was unzipped.
- Make sure the check box under Sample Code (Generate project sample code) is selected.
- Click ‘Finish’ button.
5. Development Mode
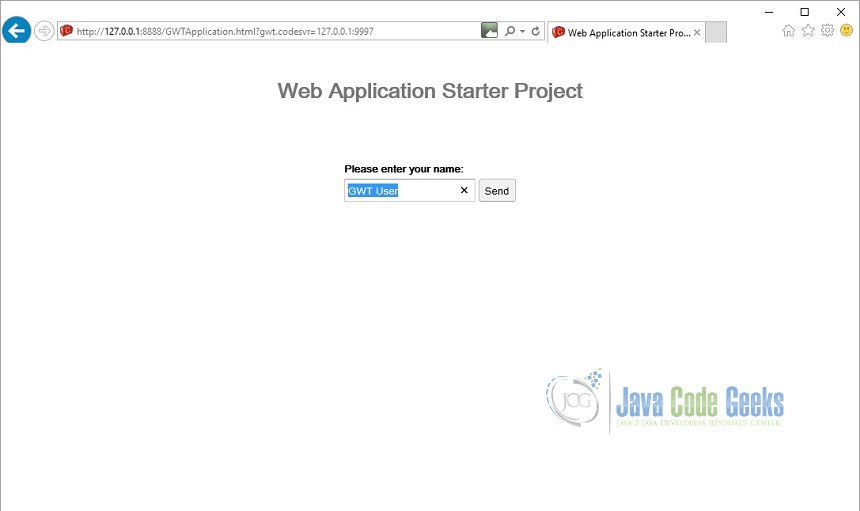
We can run the GWT application in a development mode which is a very useful feature. This feature can be used to diagnose any UI issues. To start a GWT application in development mode Right click on the GWT project and choose ‘Debug As’=>’Web Application’. This creates a Web Application launch configuration for you and launches it. The web application launch configuration will start a local web server and GWT development mode server. You will find a Web Application view next to the console window. Inside you will find the URL for the development mode server. Paste this URL into Firefox, Internet Explorer, Chrome, or Safari. If this is your first time using that browser with the development mode server, it will prompt you to install the GWT Developer Plugin. Follow the instructions in the browser to install.
Once the application is running in a development mode you can make some changes (client-side) and can immediately see the result when refreshing the browser page.
6. Testing the default project configuration
In this section we will see how we can test that the project setup is done correctly. To check that all the project components were created, run the starter application in development mode. In development mode, you can interact with the application in a browser just as you would when it’s eventually deployed.
- In the Package Explorer window right click on the Project.
- Select Run As=>Web Application (GWT Classic Dev Mode)
- Copy the URL displayed in the Development Mode window and paste it in the browser and press Enter.
Below is what gets output in the Console window when we run the application:
Initializing App Engine server
Feb 26, 2016 12:23:59 PM com.google.apphosting.utils.config.AppEngineWebXmlReader readAppEngineWebXml
INFO: Successfully processed E:\meraj\study\eclipse-workspace\GWTApplication\war\WEB-INF/appengine-web.xml
Feb 26, 2016 12:23:59 PM com.google.apphosting.utils.config.AbstractConfigXmlReader readConfigXml
INFO: Successfully processed E:\meraj\study\eclipse-workspace\GWTApplication\war\WEB-INF/web.xml
Feb 26, 2016 12:23:59 PM com.google.appengine.tools.development.SystemPropertiesManager setSystemProperties
INFO: Overwriting system property key 'java.util.logging.config.file', value 'E:\meraj\study\eclipse\plugins\com.google.appengine.eclipse.sdkbundle_1.9.19\appengine-java-sdk-1.9.19\config\sdk\logging.properties' with value 'WEB-INF/logging.properties' from 'E:\meraj\study\eclipse-workspace\GWTApplication\war\WEB-INF\appengine-web.xml'
Feb 26, 2016 12:24:00 PM com.google.apphosting.utils.jetty.JettyLogger info
INFO: Logging to JettyLogger(null) via com.google.apphosting.utils.jetty.JettyLogger
Feb 26, 2016 12:24:00 PM com.google.appengine.tools.development.DevAppServerImpl setServerTimeZone
WARNING: Unable to set the TimeZone to UTC (this is expected if running on JDK 8)
Feb 26, 2016 12:24:00 PM com.google.apphosting.utils.jetty.JettyLogger info
INFO: jetty-6.1.x
Feb 26, 2016 12:24:02 PM com.google.apphosting.utils.jetty.JettyLogger info
INFO: Started SelectChannelConnector@0.0.0.0:8888
Feb 26, 2016 12:24:02 PM com.google.appengine.tools.development.AbstractModule startup
INFO: Module instance default is running at http://localhost:8888/
Feb 26, 2016 12:24:02 PM com.google.appengine.tools.development.AbstractModule startup
INFO: The admin console is running at http://localhost:8888/_ah/admin
Feb 26, 2016 12:24:02 PM com.google.appengine.tools.development.DevAppServerImpl doStart
INFO: Dev App Server is now running
Once you have started the development mode and entered the URL into the browser, the browser will attempt to connect. If this is your first time running a GWT application in development mode, you may be prompted to install the Google Web Toolkit Developer Plugin. Follow the instructions on the page to install the plugin, then restart the browser and return to the same URL.
7. Project components
Let’s examine some of the generated files and see how they fit together to form a GWT project.
7.1 GWT Configuration file
The module file is located at src/com/javacodegeeks/GWTApplication.gwt.xml. It contains the definition of the GWT module, the collection of resources that comprise a GWT application or a shared package. By default, it inherits the core GWT functionality required for every project. Optionally, you can specify other GWT modules to inherit from.
<?xml version="1.0" encoding="UTF-8"?>
<!--
When updating your version of GWT, you should also update this DTD reference,
so that your app can take advantage of the latest GWT module capabilities.
-->
<!DOCTYPE module PUBLIC "-//Google Inc.//DTD Google Web Toolkit 2.6.0//EN"
"http://google-web-toolkit.googlecode.com/svn/tags/2.6.0/distro-source/core/src/gwt-module.dtd">
<module rename-to='gwtapplication'>
  <!-- Inherit the core Web Toolkit stuff. -->
  <inherits name='com.google.gwt.user.User'/>

  <!-- Inherit the default GWT style sheet. You can change -->
  <!-- the theme of your GWT application by uncommenting -->
  <!-- any one of the following lines. -->
  <inherits name='com.google.gwt.user.theme.clean.Clean'/>
  <!-- <inherits name='com.google.gwt.user.theme.standard.Standard'/> -->
  <!-- <inherits name='com.google.gwt.user.theme.chrome.Chrome'/> -->
  <!-- <inherits name='com.google.gwt.user.theme.dark.Dark'/> -->

  <!-- Other module inherits -->

  <!-- Specify the app entry point class. -->
<entry-point class='com.javacodegeeks.client.GWTApplication'/>

  <!-- Specify the paths for translatable code -->
  <source path='client'/>
  <source path='shared'/>

  <!-- allow Super Dev Mode -->
  <add-linker name="xsiframe"/>
</module>
In the module XML file, you specify your application’s entry point class. In order to compile, a GWT module must specify an entry point. If a GWT module has no entry point, then it can only be inherited by other modules. It is possible to include other modules that have entry points specified in their module XML files. If so, then your module would have multiple entry points. Each entry point is executed in sequence.
By default, the application uses two style sheets: the default GWT style sheet, standard.css (which is referenced via the inherited theme), and the application style sheet, GSTApplication.css which was generated by Eclipse GWT plugin.
7.2 Landing page
The code for a web application executes within an HTML document. In GWT, we call this the host page. For example, the host page for the GWTApplication project is GWTApplication.html. The host page references the application style sheet, GWTApplication.css. The host page references the path of JavaScript source code (generated by GWT) responsible for the dynamic elements on the page. The contents of the entire body element can be generated dynamically, for example, as it is with starter application. However, when you implement the StockWatcher application, you will use a mix of static and dynamic elements. You’ll create an HTML <div> element to use as placeholder for the dynamically generated portions of the page.
To provide better cross-browser compatibility, GWT sets the doctype declaration to HTML 4.01 Transitional. This, in turn, sets the browser’s rendering engine to “Quirks Mode”. If you instead want to render the application in “Standards Mode”, there are a number of other doctypes you can use to force the browser to this render mode. In general, GWT applications will work in “Standards Mode” just as well as “Quirks Mode”, but in some cases using widgets like panels and such may not render correctly. This problem has been greatly improved since GWT 1.5, and more work is being done to solve this problem once and for all.
GWT provides a mechanism for helping your application meet users’ expectations of a web page, specifically in their ability to use the browser’s back button in such situations as a multi-page wizard or a shopping cart/checkout scenario. The host page contains the iframe tag necessary for incorporating history support in your GWT application.
7.3 Stylesheet
A style sheet is associated with each project. By default, the application style sheet, GWTApplication.css, contains style rules for the starter application. Just as for any web page, you can specify multiple style sheets. List multiple style sheets in their order of inheritance; that is, with the most specific style rules in the last style sheet listed.
7.4 Java code
Currently, GWTApplication.java contains the Java source for the starter application. The GWTApplication class implements the GWT interface EntryPoint. It contains the method onModuleLoad(). Because the GWTApplication class is specified as the entry point class in GWTApplication’s module definition, when you launch GWTApplication the onModuleLoad() method is called.
The GWTApplication class inherits functionality via other GWT modules you included in GWTApplication’s module definition (GWTApplication.gwt.xml). For example, when building the user interface, you’ll be able to include types and resources from the package com.google.gwt.user.client.ui because it is part of the GWT core functionality included in the GWT module com.google.gwt.user.User.
8. Download the source file
This was an example of developing a GWT application.
You can download the full source code of this example here: GWT Application Example. Please note that to save space the jar files from the lib folder have been removed.
