This is a JavaFX Input Event example. An input event indicates a user input, for example, clicking the mouse, pressing a key, touching a touch screen, and so forth. JavaFX supports many types of input events. All input event-related classes are in the javafx.scene.input package.
The InputEvent class is the superclass of all input event classes. Typically, nodes execute the user-registered input event handlers before taking the default action. If the user event handlers consume the event, nodes do not take the default action.
Suppose you register key-typed event handlers for a TextField, which consume the event. When you type a character, the TextField will not add and display it as its content. Therefore, consuming input events for nodes gives you a chance to disable the default behavior of the Node.
The following table shows an overview of the whole article:
Table Of Contents
The following examples use Java SE 7 and JavaFX 2.2.
1. Handling Mouse Events
An object of the MouseEvent class represents a mouse event. The MouseEvent class defines the following mouse-related event types constants. All constants are of the type EventType<MouseEvent>.
The Node class contains the convenience onXXX properties for most of the mouse event types that can be used to add one event handler of a specific mouse event type for a node:
- ANY: It is the supertype of all mouse event types. If a node wants to receive all types of mouse events, you would register handlers for this type. The
InputEvent.ANYis the supertype of this event type. - MOUSE_PRESSED: Pressing a mouse button generates this event. The
getButton()method of theMouseEventclass returns the mouse button that is responsible for the event. A mouse button is represented by theNONE,PRIMARY,MIDDLE, andSECONDARYconstants defined in theMouseButtonenum. - MOUSE_RELEASED: Releasing a mouse button generates this event. This event is delivered to the same node on which the mouse was pressed. For example, you can press a mouse button on a circle, drag the mouse outside the circle, and release the mouse button. The
MOUSE_RELEASEDevent will be delivered to the circle, not the node on which the mouse button was released. - MOUSE_CLICKED: This event is generated when a mouse button is clicked on a node. The button should be pressed and released on the same node for this event to occur.
- MOUSE_MOVED: Moving the mouse without pressing any mouse buttons generates this event.
- MOUSE_ENTERED: This event is generated when the mouse enters a node. The event capture and bubbling phases do not take place for this event. That is, event filters and handlers of the parent nodes of the event target of this event are not called.
- MOUSE_ENTERED_TARGET: This event is generated when the mouse enters a node. It is a variant of the
MOUSE_ENTEREDevent type. Unlike theMOUSE_ENTERevent, the event capture and bubbling phases take place for this event. - MOUSE_EXITED: This event is generated when the mouse leaves a node. The event capture and bubbling phases do not take place for this event, that is, it is delivered only to the target node.
- MOUSE_EXITED_TARGET: This event is generated when the mouse leaves a node. It is a variant of the
MOUSE_EXITEDevent type. Unlike theMOUSE_EXITEDevent, the event capture and bubbling phases take place for this event. - DRAG_DETECTED: This event is generated when the mouse is pressed and dragged over a node over a platform-specific distance threshold.
- MOUSE_DRAGGED: Moving the mouse with a pressed mouse button generates this event. This event is delivered to the same node on which the mouse button was pressed, irrespective of the location of the mouse pointer during the drag.
1.1 Getting Mouse Location
1.1.1 The Code
FxInputEventExample1.java
import javafx.application.Application;
import javafx.event.EventHandler;
import javafx.geometry.Insets;
import javafx.scene.Scene;
import javafx.scene.control.TextArea;
import javafx.scene.input.MouseEvent;
import javafx.scene.layout.HBox;
import javafx.scene.layout.VBox;
import javafx.scene.paint.Color;
import javafx.scene.shape.Circle;
import javafx.scene.shape.Rectangle;
import javafx.stage.Stage;
public class FxInputEventExample1 extends Application
{
// Create the LoggingArea
private TextArea loggingArea = new TextArea("");
public static void main(String[] args)
{
Application.launch(args);
}
@Override
public void start(Stage stage)
{
// Create the Circle
Circle circle = new Circle (50, 50, 50);
circle.setFill(Color.CORAL);
// Create the Rectangle
Rectangle rect = new Rectangle(100, 100);
rect.setFill(Color.TAN);
// Create the HBox
HBox hbox = new HBox();
// Set Padding and Spacing for the HBox
hbox.setPadding(new Insets(20));
hbox.setSpacing(20);
// Add the children to the HBox
hbox.getChildren().addAll(circle, rect);
// Create the VBox
VBox root = new VBox();
// Set Padding and Spacing for the VBox
root.setPadding(new Insets(20));
root.setSpacing(20);
// Add the children to the VBox
root.getChildren().addAll(hbox, loggingArea);
// Add a MOUSE_CLICKED event handler to the stage
stage.addEventHandler(MouseEvent.MOUSE_CLICKED, new EventHandler<MouseEvent>()
{
public void handle(MouseEvent event)
{
handleMouseMove(event);
}
});
// Set the Padding and Border for the VBox
root.setStyle("-fx-padding: 10;" +
"-fx-border-style: solid inside;" +
"-fx-border-width: 2;" +
"-fx-border-insets: 5;" +
"-fx-border-radius: 5;" +
"-fx-border-color: blue;");
// Create the Scene
Scene scene = new Scene(root);
// Add the Scene to the Stage
stage.setScene(scene);
// Set the Title of the Stage
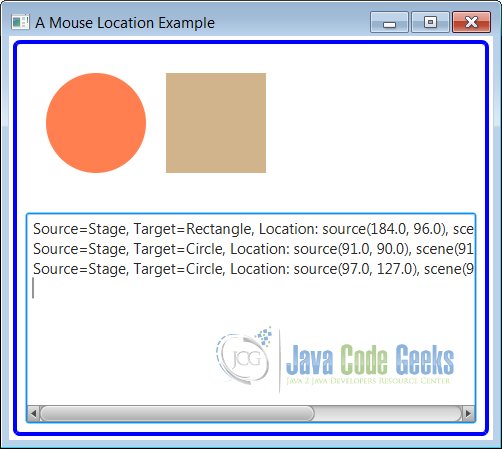
stage.setTitle("A Mouse Location Example");
// Display the Stage
stage.show();
}
public void handleMouseMove(MouseEvent e)
{
// Get the source and target of the Event
String source = e.getSource().getClass().getSimpleName();
String target = e.getTarget().getClass().getSimpleName();
// Get the Mouse location relative to the event source
double sourceX = e.getX();
double sourceY = e.getY();
// Get the Mouse location relative to the scene
double sceneX = e.getSceneX();
double sceneY = e.getSceneY();
// Get the Mouse location relative to the screen
double screenX = e.getScreenX();
double screenY = e.getScreenY();
// Log the Informations
this.loggingArea.appendText
(
"Source=" + source + ", Target=" + target +
", Location:" + " source(" + sourceX + ", " + sourceY + ")" +
", scene(" + sceneX + ", " + sceneY + ")" +
", screen(" + screenX + ", " + screenY + ")\n"
);
}
}
The MouseEvent class contains methods to give you the location of the mouse when a mouse event occurs. You can obtain the mouse location relative to the coordinate systems of the event source node, the Scene, and the screen. The getX() and getY() methods give the (x, y) coordinates of the mouse relative to the event source node. The getSceneX() and getSceneY() methods give the (x, y) coordinates of the mouse relative to the scene to which the node is added. The getScreenX() and getScreenY() methods give the (x, y) coordinates of the mouse relative to the screen to which the node is added.
1.1.2 The GUI
The above class contains the program to show how to use the methods in the MouseEvent class to know the mouse location. It adds a MOUSE_CLICKED event handler to the stage, and the stage can receive the
notification when the mouse is clicked anywhere in its area.
Run the program and click anywhere in the stage, excluding its title bar if you are running it on the desktop. Each mouse click prints a message describing the source, target, and location of the mouse relative to the source, scene, and screen.
1.2 Representing Mouse Buttons
Typically, a mouse has three buttons. You will also find some that have only one or two buttons. Some platforms provide ways to simulate the missing mouse buttons. The MouseButton enum in the javafx.scene.input package contains constants to represent mouse button.
The location of the primary and second mouse buttons depends on the mouse configuration. Typically, for right-handed users, the left and right buttons are configured as the primary and secondary buttons, respectively. For the left-handed users, the buttons are configured in the reverse order. If you have a two-button mouse, you do not have a middle button.
1.3 State of Mouse Buttons
The MouseEvent object that represents a mouse event contains the state of the mouse buttons at the time the event occurs. The MouseEvent class contains many methods to report the state of mouse buttons.
In many circumstances, the getButton() method may return MouseButton.NONE, for example, when a mouse event is triggered on a touch screen by using the fingers instead of a mouse or when a mouse event, such as a mouse-moved event, is not triggered by a mouse button.
It is important to understand the difference between the getButton() method and other methods, for example, isPrimaryButtonDown(), which returns the pressed state of buttons. The getButton() method returns the button that triggers the event. Not all mouse events are triggered by buttons.
For example, a mouse-move event is triggered when the mouse moves, not by pressing or releasing a button. If a button is not responsible for a mouse event, the getButton() method returns MouseButton.NONE. The isPrimaryButtonDown() method returns true if the primary button is currently pressed, whether or not it triggered the event.
For example, when you press the primary button, the mouse-pressed event occurs. The
getButton() method will return MouseButton.PRIMARY because this is the button that triggered the mouse-pressed event. The isPrimaryButtonDown() method returns true because this button is pressed when the mouse-pressed event occurs. Suppose you keep the primary button pressed and you press the secondary button. Another mouse-pressed event occurs. However, this time, the getButton() returns MouseButton.SECONDARY and both isPrimaryButtonDown() and isSecondaryButtonDown() methods return true, because both of these buttons are in the pressed state at the time of the second mouse-pressed event.
A pop-up menu, also known as a context, contextual, or shortcut menu, is a menu that gives a user a set of choices that are available in a specific context in an application. For example, when you click the right mouse button in a browser on the Windows platform, a pop-up menu is displayed. Different platforms trigger pop-up menu events differently upon use of a mouse or keyboard. On the Windows platform, typically it is a right-mouse click or Shift + F10 key press.
The isPopupTrigger() method returns true if the mouse event is the pop-up menu trigger event for the platform. Otherwise, it returns false. If you perform an action based on the returned value of this method, you need to use it in both mouse-pressed and mouse-released events. Typically, when this method returns true, you let the system display the default pop-up menu.
1.4 State of Modifier Keys
A modifier key is used to change the normal behavior of other keys. Some examples of modifier keys are Alt, Shift, Ctrl, Meta, Caps Lock, and Num Lock. Not all platforms support all modifier keys. The Meta key is present on Mac, not on Windows. Some systems let you simulate the functionality of a modifier key even if the modifier key is physically not present, for example, you can use the Windows key on Windows to
work as the Meta key. The MouseEvent method contains methods to report the pressed state of some of the modifier keys when the mouse event occurs.
1.5 Picking Mouse Events on Bounds
1.5.1 The Code
FxInputEventExample2.java
import javafx.application.Application;
import javafx.event.ActionEvent;
import javafx.event.EventHandler;
import javafx.geometry.Insets;
import javafx.scene.Group;
import javafx.scene.Scene;
import javafx.scene.control.CheckBox;
import javafx.scene.control.TextArea;
import javafx.scene.input.MouseEvent;
import javafx.scene.layout.HBox;
import javafx.scene.layout.VBox;
import javafx.scene.paint.Color;
import javafx.scene.shape.Circle;
import javafx.scene.shape.Rectangle;
import javafx.stage.Stage;
public class FxInputEventExample2 extends Application
{
// Create the LoggingArea
private TextArea loggingArea = new TextArea("");
// Create the CheckBox
private CheckBox checkbox = new CheckBox("Pick on Bounds");
// Create the Circle
private Circle circle = new Circle(50, 50, 50, Color.LIGHTGRAY);
public static void main(String[] args)
{
Application.launch(args);
}
@Override
public void start(Stage stage)
{
// Create the Rectangle
Rectangle rectangle = new Rectangle(100, 100);
rectangle.setFill(Color.RED);
// Create the Group
Group group = new Group();
// Add the children to the Group
group.getChildren().addAll(rectangle, circle);
// Create the HBox
HBox hbox = new HBox();
// Set Padding and Spacing for the HBox
hbox.setPadding(new Insets(20));
hbox.setSpacing(20);
// Add the children to the HBox
hbox.getChildren().addAll(group, checkbox);
// Create the VBox
VBox root = new VBox();
// Set Padding and Spacing for the VBox
root.setPadding(new Insets(20));
root.setSpacing(20);
// Add the children to the VBox
root.getChildren().addAll(hbox, loggingArea);
// Add MOUSE_CLICKED event handlers to the Circle
circle.setOnMouseClicked(new EventHandler<MouseEvent>()
{
public void handle(MouseEvent event)
{
handleMouseClicked(event);
}
});
// Add MOUSE_CLICKED event handlers to the Rectangle
rectangle.setOnMouseClicked(new EventHandler<MouseEvent>()
{
public void handle(MouseEvent event)
{
handleMouseClicked(event);
}
});
// Add an Action handler to the CheckBox
checkbox.setOnAction(new EventHandler<ActionEvent>()
{
@Override
public void handle(ActionEvent event)
{
handleActionEvent(event);
}
});
// Set the Padding and Border for the VBox
root.setStyle("-fx-padding: 10;" +
"-fx-border-style: solid inside;" +
"-fx-border-width: 2;" +
"-fx-border-insets: 5;" +
"-fx-border-radius: 5;" +
"-fx-border-color: blue;");
// Create the Scene
Scene scene = new Scene(root);
// Add the Scene to the Stage
stage.setScene(scene);
// Set the Title of the Stage
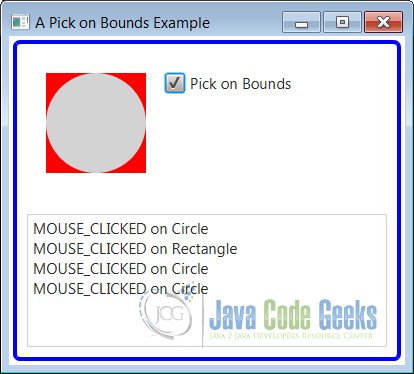
stage.setTitle("A Pick on Bounds Example");
// Display the Stage
stage.show();
}
public void handleMouseClicked(MouseEvent e)
{
// Get the source and type of the Event
String target = e.getTarget().getClass().getSimpleName();
String type = e.getEventType().getName();
// Log the Informations
this.loggingArea.appendText(type + " on " + target + "\n");
}
public void handleActionEvent(ActionEvent e)
{
if (checkbox.isSelected())
{
circle.setPickOnBounds(true);
}
else
{
circle.setPickOnBounds(false);
}
}
}
The Node class has a pickOnBounds property to control the way mouse events are picked (or generated) for a node. A node can have any geometric shape, whereas its bounds always define a rectangular area. If the property is set to true, the mouse events are generated for the node if the mouse is on the perimeter or inside of its bounds. If the property is set to false, which is the default value, mouse events are generated for the node if the mouse is on the perimeter or inside of its geometric shape. Some nodes, such as the Text node, have the default value for the pickOnBounds property set to true.
1.5.2 The GUI
The upper class displays a window as shown in the following image. The program adds a Rectangle and a Circle to a Group.
1.6 Mouse Transparency
1.6.1 The Code
FxInputEventExample3.java
import javafx.application.Application;
import javafx.event.ActionEvent;
import javafx.event.EventHandler;
import javafx.geometry.Insets;
import javafx.scene.Group;
import javafx.scene.Scene;
import javafx.scene.control.CheckBox;
import javafx.scene.control.TextArea;
import javafx.scene.input.MouseEvent;
import javafx.scene.layout.HBox;
import javafx.scene.layout.VBox;
import javafx.scene.paint.Color;
import javafx.scene.shape.Circle;
import javafx.scene.shape.Rectangle;
import javafx.stage.Stage;
public class FxInputEventExample3 extends Application
{
// Create the LoggingArea
private TextArea loggingArea = new TextArea("");
// Create the CheckBox
private CheckBox checkbox = new CheckBox("Mouse Transparent");
// Create the Circle
private Circle circle = new Circle(50, 50, 50, Color.LIGHTGRAY);
public static void main(String[] args)
{
Application.launch(args);
}
@Override
public void start(Stage stage)
{
// Create the Rectangle
Rectangle rectangle = new Rectangle(100, 100);
rectangle.setFill(Color.RED);
// Create the Group
Group group = new Group();
// Add the Children to the group
group.getChildren().addAll(rectangle, circle);
// Create the HBox
HBox hbox = new HBox();
// Set Padding and Spacing for the HBox
hbox.setPadding(new Insets(20));
hbox.setSpacing(20);
// Add the children to the HBox
hbox.getChildren().addAll(group, checkbox);
// Create the VBox
VBox root = new VBox();
// Set Padding and Spacing for the VBox
root.setPadding(new Insets(20));
root.setSpacing(20);
// Add the children to the VBox
root.getChildren().addAll(hbox, loggingArea);
// Add MOUSE_CLICKED event handlers to the Circle
circle.setOnMouseClicked(new EventHandler<MouseEvent>()
{
public void handle(MouseEvent event)
{
handleMouseClicked(event);
}
});
// Add MOUSE_CLICKED event handlers to the Rectangle
rectangle.setOnMouseClicked(new EventHandler<MouseEvent>()
{
public void handle(MouseEvent event)
{
handleMouseClicked(event);
}
});
// Add an Action Handler to the CheckBox
checkbox.setOnAction(new EventHandler<ActionEvent>()
{
@Override
public void handle(ActionEvent event)
{
handleActionEvent(event);
}
});
// Set the Padding and Border for the VBox
root.setStyle("-fx-padding: 10;" +
"-fx-border-style: solid inside;" +
"-fx-border-width: 2;" +
"-fx-border-insets: 5;" +
"-fx-border-radius: 5;" +
"-fx-border-color: blue;");
// Create the Scene
Scene scene = new Scene(root);
// Add the Scene to the Stage
stage.setScene(scene);
// Set the Title of the Stage
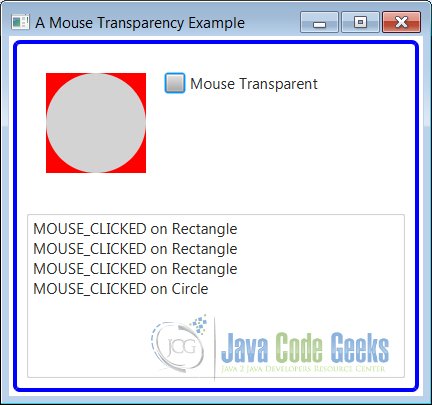
stage.setTitle("A Mouse Transparency Example");
// Display the Stage
stage.show();
}
public void handleMouseClicked(MouseEvent e)
{
// Get the source and type of the Event
String target = e.getTarget().getClass().getSimpleName();
String type = e.getEventType().getName();
// Log the Informations
this.loggingArea.appendText(type + " on " + target + "\n");
}
public void handleActionEvent(ActionEvent e)
{
if (checkbox.isSelected())
{
circle.setMouseTransparent(true);
}
else
{
circle.setMouseTransparent(false);
}
}
}
The Node class has a mouseTransparent property to control whether or not a node and its children receive mouse events. Contrast the pickOnBounds and mouseTransparent properties: The former determines the area of a node that generates mouse events, and the latter determines whether or not a node and its children generate mouse events, irrespective of the value of the former. The former affects only the node on which it is set. The latter affects the node on which it is set and all its children.
1.6.2 The GUI
The above program shows the effects of the mouseTransparent property of a Circle.
1.7 Handling Mouse Entered and Exited Events
1.7.1 The Code
FxInputEventExample4.java
import javafx.application.Application;
import javafx.event.EventHandler;
import javafx.geometry.Insets;
import javafx.scene.Scene;
import javafx.scene.control.TextArea;
import javafx.scene.input.MouseEvent;
import javafx.scene.layout.VBox;
import javafx.scene.paint.Color;
import javafx.scene.shape.Circle;
import javafx.stage.Stage;

public class FxInputEventExample4 extends Application
{
	// Create the LoggingArea
	private TextArea loggingArea = new TextArea("");

	public static void main(String[] args)
	{
		Application.launch(args);
	}

	@Override
	public void start(Stage stage)
	{
		// Create the Circle
		Circle circle = new Circle (50, 50, 50);
		circle.setFill(Color.GRAY);

		// Create the VBox
		VBox root = new VBox();
		// Set Padding and Spacing for the VBox
		root.setPadding(new Insets(20));
		root.setSpacing(20);
		// Add the children to the VBox
		root.getChildren().addAll(circle, loggingArea);

		// Create a Mouse Event handler
		EventHandler<MouseEvent> handler = new EventHandler<MouseEvent>()
		{
            public void handle(MouseEvent event)
            {
            	// Get the Type, Source and Target of the Event
            	String type = event.getEventType().getName();
        		String source = event.getSource().getClass().getSimpleName();
        		String target = event.getTarget().getClass().getSimpleName();

        		// Log the informations
        		loggingArea.appendText( "Type=" + type + ", Target=" + target +
        			", Source=" + source + "\n");
            }
        };

		// Add mouse-entered and mouse-exited event handlers to the VBox
		root.addEventHandler(MouseEvent.MOUSE_ENTERED, handler);
		root.addEventHandler(MouseEvent.MOUSE_EXITED, handler);

		// Add mouse-entered and mouse-exited event handlers to the Circle
		circle.addEventHandler(MouseEvent.MOUSE_ENTERED, handler);
		circle.addEventHandler(MouseEvent.MOUSE_EXITED, handler);

		// Set the Padding and Border for the VBox
		root.setStyle("-fx-padding: 10;" +
				"-fx-border-style: solid inside;" +
				"-fx-border-width: 2;" +
				"-fx-border-insets: 5;" +
				"-fx-border-radius: 5;" +
				"-fx-border-color: blue;");

		// Create the Scene
		Scene scene = new Scene(root);
		// Add the Scene to the Stage
		stage.setScene(scene);
		// Set the Title of the stage
		stage.setTitle("An Example of Mouse Entered and Exited Events");
		// Display the Stage
		stage.show();
	}
}
FxInputEventExample5.java
import javafx.application.Application;
import javafx.event.EventHandler;
import javafx.geometry.Insets;
import javafx.scene.Scene;
import javafx.scene.control.CheckBox;
import javafx.scene.control.TextArea;
import javafx.scene.input.MouseEvent;
import javafx.scene.layout.HBox;
import javafx.scene.layout.VBox;
import javafx.scene.paint.Color;
import javafx.scene.shape.Circle;
import javafx.stage.Stage;

public class FxInputEventExample5 extends Application
{
	// Create the LoggingArea
	private TextArea loggingArea = new TextArea("");
	// Create the CheckBox
	private CheckBox checkbox = new CheckBox("Consume Events");

	public static void main(String[] args)
	{
		Application.launch(args);
	}

	@Override
	public void start(Stage stage)
	{
		// Create the Circle
		Circle circle = new Circle (50, 50, 50);
		circle.setFill(Color.GRAY);

		// Create the HBox
		HBox hbox = new HBox();
		// Set Padding and Spacing for the HBox
		hbox.setPadding(new Insets(20));
		hbox.setSpacing(20);
		// Add the children to the HBox
		hbox.getChildren().addAll(circle, checkbox);

		// Create the VBox
		VBox root = new VBox();
		// Set Padding and Spacing for the VBox
		root.setPadding(new Insets(20));
		root.setSpacing(20);
		// Add the children to the VBox
		root.getChildren().addAll(hbox, loggingArea);

		// Create mouse event handlers
		EventHandler<MouseEvent> circleHandler = new EventHandler<MouseEvent>()
		{
            public void handle(MouseEvent event)
            {
            	handleCircle(event);
            }
        };

        EventHandler<MouseEvent> circleTargetHandler = new EventHandler<MouseEvent>()
		{
            public void handle(MouseEvent event)
            {
            	handleCircleTarget(event);
            }
        };

		EventHandler<MouseEvent> hBoxTargetHandler = new EventHandler<MouseEvent>()
		{
            public void handle(MouseEvent event)
            {
            	handleHBoxTarget(event);
            }
        };

		// Add mouse-entered-target and mouse-exited-target event handlers to VBox
		root.addEventFilter(MouseEvent.MOUSE_ENTERED_TARGET, hBoxTargetHandler);
		root.addEventFilter(MouseEvent.MOUSE_EXITED_TARGET, hBoxTargetHandler);

		// Add mouse-entered-target and mouse-exited-target event handlers to the Circle
		circle.addEventHandler(MouseEvent.MOUSE_ENTERED_TARGET, circleTargetHandler);
		circle.addEventHandler(MouseEvent.MOUSE_EXITED_TARGET, circleTargetHandler);

		// Add mouse-entered and mouse-exited event handlers to the Circle
		circle.addEventHandler(MouseEvent.MOUSE_ENTERED, circleHandler);
		circle.addEventHandler(MouseEvent.MOUSE_EXITED, circleHandler);

		// Set the Padding and Border for the VBox
		root.setStyle("-fx-padding: 10;" +
				"-fx-border-style: solid inside;" +
				"-fx-border-width: 2;" +
				"-fx-border-insets: 5;" +
				"-fx-border-radius: 5;" +
				"-fx-border-color: blue;");

		// Create the Scene
		Scene scene = new Scene(root);
		// Add the Scene to the Stage
		stage.setScene(scene);
		// Set the Title of the Stage
		stage.setTitle("A Mouse Entered and Exited Target Events Example");
		// Display the Stage
		stage.show();
	}

	// Helper Methods for Event Handling
	public void handleCircle(MouseEvent e)
	{
		print(e, "Circle Handler");
	}

	public void handleCircleTarget(MouseEvent e)
	{
		print(e, "Circle Target Handler");
	}

	public void handleHBoxTarget(MouseEvent e)
	{
		print(e, "HBox Target Filter");

		if (checkbox.isSelected())
		{
			e.consume();
			this.loggingArea.appendText("HBox consumed the " + e.getEventType() + " event\n");
		}
	}

	public void print(MouseEvent e, String msg)
	{
		// Get the Type, Source and Target of the Event
		String type = e.getEventType().getName();
		String source = e.getSource().getClass().getSimpleName();
		String target = e.getTarget().getClass().getSimpleName();

		// Log the Informations
		this.loggingArea.appendText(msg + ": Type=" + type + ", "
			+ "Target=" + target + 	", Source=" + source + "\n");
	}
}
Four mouse event types deal with events when the mouse enters or exits a node:
- MOUSE_ENTERED
- MOUSE_EXITED
- MOUSE_ENTERED_TARGET
- MOUSE_EXITED_TARGET
You have two sets of event types for mouse-entered and mouse-exited events. One set contains two types called MOUSE_ENTERED and MOUSE_EXITED and another set contains MOUSE_ENTERED_TARGET and MOUSE_EXITED_TARGET. They both have something in common, such as when they are triggered. They differ in their delivery mechanisms. I will discuss all of them this section.
When the mouse enters a node, a MOUSE_ENTERED event is generated. When the mouse leaves a node, a MOUSE_EXITED event is generated. These events do not go through the capture and bubbling phases. That is, they are delivered directly to the target node, not to any of its parent nodes.
The MOUSE_ENTERED and MOUSE_EXITED event types provide the functionality needed in most cases. Sometimes you need these events to go through the normal capture and bubbling phases, so parent nodes can apply filters and provide default responses. The MOUSE_ENTERED_TARGET and MOUSE_EXITED_TARGET event types provide these features. They participate in the event capture and bubbling phases.
The MOUSE_ENTERED and MOUSE_EXITED event types are subtypes of the MOUSE_ENTERED_TARGET and MOUSE_EXITED_TARGET event types. A node interested in the mouse-entered event of its children should add event filters and handlers for the MOUSE_ENTERED_TARGET type. The child node can add MOUSE_ENTERED, MOUSE_ENTERED_TARGET, or both event filters and handlers.
When the mouse enters the child node, parent nodes receive the MOUSE_ENTERED_TARGET event. Before the event is delivered to the child node, which is the target node of the event, the event type is changed to the MOUSE_ENTERED type. Therefore, in the same event processing, the target node receives the MOUSE_ENTERED event, whereas all its parent nodes receive the MOUSE_ENTERED_TARGET event.
Because the MOUSE_ENTERED event type is a subtype of the MOUSE_ENTERED_TARGET type, either type of event handler on the target can handle this event. The same would apply to the mouse-exited event and its corresponding event types.
Sometimes, inside the parent event handler, it is necessary to distinguish the node that fires the MOUSE_ENTERED_TARGET event. A parent node receives this event when the mouse enters the parent node itself or any of its child nodes. You can check the target node reference, using the getTarget() method of the Event class, for equality with the reference of the parent node, inside the event filters and handlers, to know whether or not the event was fired by the parent.
1.7.2 The GUI
The following image shows how mouse-entered and mouse-exited events are delivered.
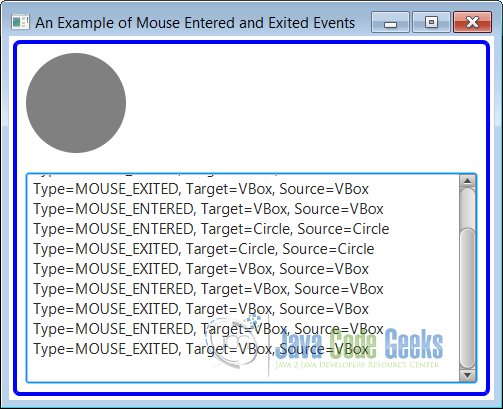
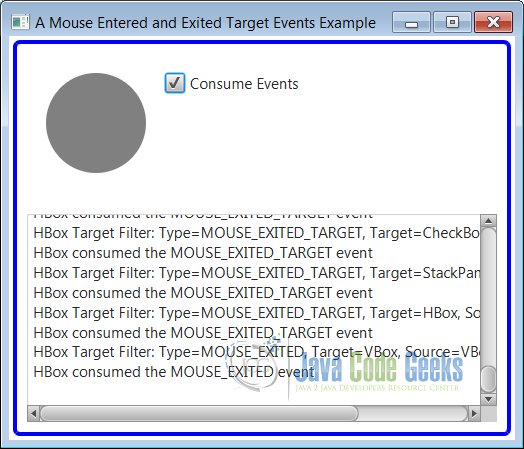
The followin image shows a circle with gray fill inside an HBox. Event handlers for mouse-entered and mouse-exited events are added to the HBox and the Circle.
Run the program and move the mouse in and out of the circle. When the mouse enters the white area in the window, its MOUSE_ENTERED event is delivered to the HBox. When you move the mouse in and out of the circle, the output shows that the MOUSE_ENTERED and MOUSE_EXITED events are delivered only to the Circle, not to the HBox.
2. Handling Key Events
A key event is a type of input event that denotes the occurrence of a keystroke. It is delivered to the node that has focus. An instance of the KeyEvent class, which is declared in the javafx.scene.input package, represents a key event. Key pressed, key released, and key typed are three types of key events.
The key-pressed and key-released events are lower-level events compared to the key-typed event. They occur with a key press and release, respectively, and depend of the platform and keyboard layout.
The key-typed event is a higher-level event. Generally, it does not depend on the platform and keyboard layout. It occurs when a Unicode character is typed. Typically, a key press generates a key-typed event. However, a key release may also generate a key-typed event. For example, when using the Alt key and number pad on Windows, a key-typed event is generated by the release of the Alt key, irrespective of the number of keystrokes entered on the number pad.
A key-typed event can also be generated by a series of key presses and releases. For example, the character A is entered by pressing Shift + A, which includes two key presses (Shift and A). In this case, two key presses generate one key-typed event. Not all key presses or releases generate key-typed events. For example, when you press a function key (F1, F2, etc.) or modifier keys (Shift, Ctrl, etc.), no Unicode character is entered, and hence, no key-typed event is generated.
The KeyEvent class maintains three variables to describe the keys associated with the event: code, text, and character.
It is interesting to note that the return type of the getCharacter() method is String, not char. The design is intentional. Unicode characters outside the basic multilingual plane cannot be represented in one character. Some devices may produce multiple characters using a single keystroke. The return type of String for the getCharacter() method covers these odd cases.
The KeyEvent class contains isAltDown(), isControlDown(), isMetaDown(), isShiftDown(), and isShortcutDown() methods that let you check whether modifier keys are down when a key event occurs.
2.1 Handling Key-pressed and Key-released Events
2.1 Handling Key-pressed and Key-released Events
FxInputEventExample6.java
import javafx.application.Application;
import javafx.event.EventHandler;
import javafx.geometry.Insets;
import javafx.scene.Scene;
import javafx.scene.control.Label;
import javafx.scene.control.TextArea;
import javafx.scene.control.TextField;
import javafx.scene.input.KeyCode;
import javafx.scene.input.KeyEvent;
import javafx.scene.layout.HBox;
import javafx.scene.layout.VBox;
import javafx.scene.text.Text;
import javafx.stage.Stage;

public class FxInputEventExample6 extends Application
{
	// Create the LoggingArea
	TextArea loggingArea = new TextArea("");

	public static void main(String[] args)
	{
		Application.launch(args);
	}

	@Override
	public void start(Stage stage)
	{
		// Create the Label
		Label label = new Label("Name:");
		// Create the TextField
		TextField textfield = new TextField();

		// Create the HBox
		HBox hbox = new HBox();
		// Set Padding and Spacing for the HBox
		hbox.setPadding(new Insets(20));
		hbox.setSpacing(20);
		// Add the children to the HBox
		hbox.getChildren().addAll(label, textfield);

		// Create the VBox
		VBox root = new VBox();
		// Set Padding and Spacing for the VBox
		root.setPadding(new Insets(20));
		root.setSpacing(20);
		// Add the children to the VBox
		root.getChildren().addAll(hbox, loggingArea);

		// Add key pressed and released events to the TextField
		textfield.setOnKeyPressed(new EventHandler<KeyEvent>()
		{
            public void handle(final KeyEvent keyEvent)
            {
            	handleEvent(keyEvent);
            }
        });

		textfield.setOnKeyReleased(new EventHandler<KeyEvent>()
		{
            public void handle(final KeyEvent keyEvent)
            {
            	handleEvent(keyEvent);
            }
        });

		// Set the Padding and Border for the VBox
		root.setStyle("-fx-padding: 10;" +
				"-fx-border-style: solid inside;" +
				"-fx-border-width: 2;" +
				"-fx-border-insets: 5;" +
				"-fx-border-radius: 5;" +
				"-fx-border-color: blue;");

		// Create the Scene
		Scene scene = new Scene(root);
		// Add the Scene to the Stage
		stage.setScene(scene);
		// Set the Title of the Stage
		stage.setTitle("A Key Pressed and Released Events Example");
		// Display the Stage
		stage.show();
	}

	// Helper Methods for Event Handling
	public void handleEvent(KeyEvent e)
	{
		// Get the Type of the Event
		String type = e.getEventType().getName();

		// Get the KeyCode of the Event
		KeyCode keyCode = e.getCode();

		// Log the Information
		loggingArea.appendText(type + ": Key Code=" + keyCode.getName() +
		", Text=" + e.getText()+"\n");

		// Show the help window when the F1 key is pressed
		if (e.getEventType() == KeyEvent.KEY_PRESSED && e.getCode() == KeyCode.F1)
		{
			displayHelp();
			e.consume();
		}
	}

	public void displayHelp()
	{
		// Create the Text
		Text text = new Text("Please enter a name.");

		// Create the HBox
		HBox root = new HBox();
		// Set the Style of the HBox
		root.setStyle("-fx-background-color: yellow;");
		// Add the Children to the HBox
		root.getChildren().add(text);
		// Create the Scene
		Scene scene = new Scene(root, 300, 200);

		// Create the Stage
		Stage helpStage = new Stage();
		// Add the Scene to the Stage
		helpStage.setScene(scene);
		// Set the Title of the Stage
		helpStage.setTitle("Help");
		// Display the Stage
		helpStage.show();
	}
}
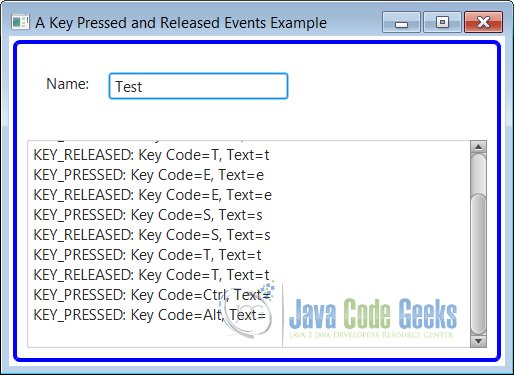
Key-pressed and key-released events are handled simply by adding the event filters and handlers to nodes for the KEY_PRESED and KEY_RELEASED event types. Typically you use these events to know which keys were pressed or released and to perform an action. For example, you can detect the F1 function key press and display a custom Help window for the node in focus.
The above code shows how to handle key-pressed and key-released events. It displays a Label and a TextField. When you run the program, the TextField has focus. Notice the following points when you use keystrokes while running this program:
Press and release some keys. Output will show the details of events as they occur. A key-released event does not occur for every key-pressed event.
The mapping between key-pressed and key-released events is not one-to-one. There may be no key-released event for a key-pressed event (refer to the next item). There may be one key-released event for several key-pressed events. This can happen when you keep a key pressed for a longer period. Sometimes you do it to type the same character multiple times. Press the A key and hold it for some time and then release it. This will generate several key-pressed events and only one key-released event.
Press the F1 key. It will display the Help window. Notice that pressing the F1 key does not generate an output for a key-released event, even after you release the key.
Can you think of the reason for this? On the key-pressed event, the Help window is displayed, which grabs the focus. The TextField on the main window no longer has focus. Recall that the key events are delivered to the node that has focus, and only one node can have focus in a JavaFX application. Therefore, the key-released event is delivered to the Help window, not the TextField.
2.1.2 The GUI
The above program shows how to handle key-pressed and key-released events. It displays a Label and a TextField. When you run the program, the TextField has focus.
2.2 Handling the Key-typed Event
2.2.1 The Code
FxInputEventExample7.java
import javafx.application.Application;
import javafx.event.EventHandler;
import javafx.geometry.Insets;
import javafx.scene.Scene;
import javafx.scene.control.Label;
import javafx.scene.control.TextArea;
import javafx.scene.control.TextField;
import javafx.scene.input.KeyEvent;
import javafx.scene.layout.HBox;
import javafx.scene.layout.VBox;
import javafx.stage.Stage;

public class FxInputEventExample7 extends Application
{
	// Create the LoggingArea
	private TextArea loggingArea = new TextArea("");

	public static void main(String[] args)
	{
		Application.launch(args);
	}

	@Override
	public void start(Stage stage)
	{
		// Create the Label
		Label label = new Label("Name:");
		// Create the TextField
		TextField textfield = new TextField();

		// Create the HBox
		HBox hbox = new HBox();
		// Set Padding and Spacing for the HBox
		hbox.setPadding(new Insets(20));
		hbox.setSpacing(20);
		// Add the children to the HBox
		hbox.getChildren().addAll(label, textfield);

		// Create the VBox
		VBox root = new VBox();
		// Set Padding and Spacing for the VBox
		root.setPadding(new Insets(20));
		root.setSpacing(20);
		// Add the children to the VBox
		root.getChildren().addAll(hbox, loggingArea);

		// Add key pressed and released events to the TextField
		textfield.setOnKeyTyped(new EventHandler<KeyEvent>()
		{
            public void handle(final KeyEvent keyEvent)
            {
            	handleEvent(keyEvent);
            }
        });

		// Set the Padding and Border for the VBox
		root.setStyle("-fx-padding: 10;" +
				"-fx-border-style: solid inside;" +
				"-fx-border-width: 2;" +
				"-fx-border-insets: 5;" +
				"-fx-border-radius: 5;" +
				"-fx-border-color: blue;");

		// Create the Scene
		Scene scene = new Scene(root);
		// Add the Scene to the Stage
		stage.setScene(scene);
		// Set the Title of the Stage
		stage.setTitle("A Key Typed Event Example");
		// Display the Stage
		stage.show();
	}

	public void handleEvent(KeyEvent e)
	{
		// Consume the event if it is not a letter
		String str = e.getCharacter();

		int len = str.length();

		for(int i = 0; i < len; i++)
		{
			Character c = str.charAt(i);
			if (!Character.isLetter(c))
			{
				e.consume();
			}
		}

		// Print the details if it is not consumed
		if (!e.isConsumed())
		{
			String type = e.getEventType().getName();
			this.loggingArea.appendText(type + ": Character=" + e.getCharacter() + "\n");
		}
	}
}
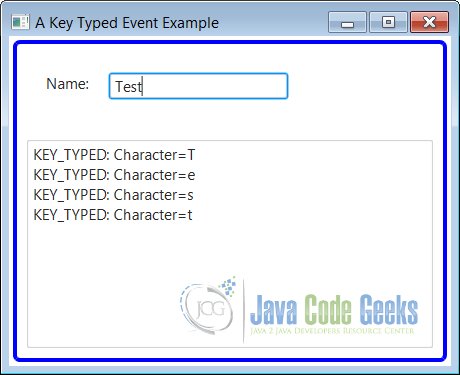
The typical use of the key-typed event is to detect specific keystrokes to prevent some characters from being entered. For example, you may allow users to only enter letters in a name field. You can do so by consuming all key-typed events for the field associated with all nonletters.
The above code snippet shows a Label and a TextField. It adds a key-typed event handler to the TextField, which consumes the event if the character typed is not a letter. Otherwise, it prints the character typed on the standard output. Run the program. You should be able to enter letters in the TextField. When you press any nonletter keys, for example, 1, 2, 3, nothing happens.
This example is not a correct solution to stop users from entering nonletter characters. For example, users can still paste nonletters using the context menu (right-click on Windows) or using the keyboard shortcut Ctrl + V. The correct solution lies in detecting and handling the event on the TextField that is generated, irrespective of the method used. For now, this example serves the purpose of showing how to use key-typed events.
2.2.2 The GUI
The following image shows the result of the above program.
3. Handling Window Events
3.1 The Code
FxInputEventExample8.java
import javafx.application.Application;
import javafx.event.ActionEvent;
import javafx.event.EventHandler;
import javafx.event.EventType;
import javafx.geometry.Insets;
import javafx.scene.Scene;
import javafx.scene.control.Button;
import javafx.scene.control.CheckBox;
import javafx.scene.control.TextArea;
import javafx.scene.layout.HBox;
import javafx.scene.layout.VBox;
import javafx.stage.Stage;
import javafx.stage.WindowEvent;

public class FxInputEventExample8 extends Application
{
	// Create the LoggingArea
	private TextArea loggingArea = new TextArea("");
	// Create the CheckBox
	private CheckBox checkbox = new CheckBox("Can Close Window");

	public static void main(String[] args)
	{
		Application.launch(args);
	}

	public void start(final Stage stage)
	{
		// Create the Buttons
		Button closeButton = new Button("Close");
		Button hideButton = new Button("Hide");

		// Add the Event Handlers to the Buttons
		closeButton.setOnAction(new EventHandler<ActionEvent>()
		{
            public void handle(ActionEvent event)
            {
            	stage.close();
            }
        });

		hideButton.setOnAction(new EventHandler<ActionEvent>()
		{
            public void handle(ActionEvent event)
            {
            	showDialog(stage);
            	stage.hide();
            }
        });

		// Create the HBox
		HBox hbox = new HBox();
		// Set Padding and Spacing for the HBox
		hbox.setPadding(new Insets(20));
		hbox.setSpacing(20);
		// Add the children to the HBox
		hbox.getChildren().addAll(checkbox, closeButton, hideButton);

		// Create the VBox
		VBox root = new VBox();
		// Set Padding and Spacing for the VBox
		root.setPadding(new Insets(20));
		root.setSpacing(20);
		// Add the children to the VBox
		root.getChildren().addAll(hbox, loggingArea);

		// Add window event handlers to the Stage
		stage.setOnShowing(new EventHandler<WindowEvent>()
		{
            public void handle(WindowEvent event)
            {
            	handleEvent(event);
            }
        });

		stage.setOnShown(new EventHandler<WindowEvent>()
		{
            public void handle(WindowEvent event)
            {
            	handleEvent(event);
            }
        });

		stage.setOnHiding(new EventHandler<WindowEvent>()
		{
            public void handle(WindowEvent event)
            {
            	handleEvent(event);
            }
        });

		stage.setOnHidden(new EventHandler<WindowEvent>()
		{
            public void handle(WindowEvent event)
            {
            	handleEvent(event);
            }
        });

		stage.setOnCloseRequest(new EventHandler<WindowEvent>()
		{
            public void handle(WindowEvent event)
            {
            	handleEvent(event);
            }
        });

		// Set the Padding and Border for the VBox
		root.setStyle("-fx-padding: 10;" +
				"-fx-border-style: solid inside;" +
				"-fx-border-width: 2;" +
				"-fx-border-insets: 5;" +
				"-fx-border-radius: 5;" +
				"-fx-border-color: blue;");

		// Create the Scene
		Scene scene = new Scene(root);
		// Add the Scene to the Stage
		stage.setScene(scene);
		// Set the Title of the Stage
		stage.setTitle("A Window Events Example");
		// Display the Stage
		stage.show();
	}

	public void handleEvent(WindowEvent e)
	{
		// Consume the event if the CheckBox is not selected
		// thus preventing the user from closing the window
		EventType<WindowEvent> type = (EventType<WindowEvent>) e.getEventType();

		if (type == WindowEvent.WINDOW_CLOSE_REQUEST && !checkbox.isSelected())
		{
			e.consume();
		}

		// Log the Information
		this.loggingArea.appendText(type + ": Consumed=" + e.isConsumed() + "\n");
	}

	public void showDialog(final Stage mainWindow)
	{
		// Create the Stage
		final Stage popup = new Stage();

		// CReate the Button
		Button closeButton = new Button("Click to Show Main Window");
		// Add the Event Handler to the Button
		closeButton.setOnAction(new EventHandler<ActionEvent>()
		{
            public void handle(ActionEvent event)
            {
            	popup.close();
            	mainWindow.show();
            }
        });

		// Create the HBox
		HBox root = new HBox();
		// Set Padding and Spacing for the HBox
		root.setPadding(new Insets(20));
		root.setSpacing(20);
		// Add the children to the HBox
		root.getChildren().addAll(closeButton);

		// Create the Scene
		Scene scene = new Scene(root);
		// Add the Scene to the Stage
		popup.setScene(scene);
		// Set the Title of the STage
		popup.setTitle("Popup");
		// Display the Stage
		popup.show();
	}
}
A window event occurs when a window is shown, hidden, or closed. An instance of the WindowEvent class in the javafx.stage package represents a window event.
The window-showing and window-shown events are straightforward. They occur just before and after the window is shown. Event handlers for the window-showing event should have time-consuming logic, as it will delay showing the window to the user, and hence, degrading the user experience.
Initializing some window-level variables is a good example of the kind of code you need to write in this event. Typically, the window-shown event sets the starting direction for the user, for example, setting focus to the first editable field on the window, showing alerts to the user about the tasks that need his attention, among others.
The window-hiding and window-hidden events are counterparts of the window-showing and
window-shown events. They occur just before and after the window is hidden. The window-close-request event occurs when there is an external request to close the window. Using
the Close menu from the context menu or the Close icon in the window title bar or pressing Alt + F4 key combination on Windows is considered an external request to close the window. Note that closing a window programmatically, for example, using the close() method of the Stage class or Platform.exit() method, is not considered an external request. If the window-close-request event is consumed, the window is not closed.
The program in Listing 9-13 shows how to use all window events. You may get a different output than that shown below the code. It adds a check box and two buttons to the primary stage. If the check box is unselected, external requests to close the window are consumed, thus preventing the window from closing.
The Close button closes the window. The Hide button hides the primary window and opens a new window, so the user can show the primary window again. The program adds event handlers to the primary stage for window event types.
When the show() method on the stage is called, the window-showing and window-shown events are generated. When you click the Hide button, the window-hiding and window-hidden events are generated.
When you click the button on the pop-up window to show the primary window, the window-showing and window-shown events are generated again. Try clicking the Close icon on the title bar to generate the window-close-request event. If the Can Close Window check box is not selected, the window is not closed. When you use the Close button to close the window, the window-hiding and window-hidden events are generated, but not the window-close-request event, as it is not an external request to close the window.
3.2 The GUI
The following image shows the result of the execution of the above code.

4. Download Source Code
This was an example of javafx.scene.input
You can download the full source code of this example here: JavaFxInputEventExample.zip

Only working KEY_PRESSED EVENT is Enter not Tab, KP_LEFT, KP_RIGHT,
KP_DOWN or others give a proper answer your post is not helping me to solve this problem.. I m not satisfied to use your key event handling post. Improve it..