In this article we will learn about Project View of IDEA IntelliJ.
1. Introduction
IntelliJ is one of the most widely used Integrated Development Environment (IDE) by Java Developers. It is developed by JetBrains (formerly known as IntelliJ), and is available as an Apache 2 Licensed community edition and in a proprietary commercial edition. Both can be used for commercial development. It supports a lot of languages apart from Java, such as Clojure, Earlang, Go, Groovy etc. IntelliJ IDEA analyzes your code, looking for connections between symbols across all project files and languages. Using this information it provides indepth coding assistance, quick navigation, clever error analysis, and, of course, re-factoring. Ctrl+Shift+Space gives you a list of the most relevant symbols applicable in the current context. The list of features available can be found in IDEA features.
2. Project View
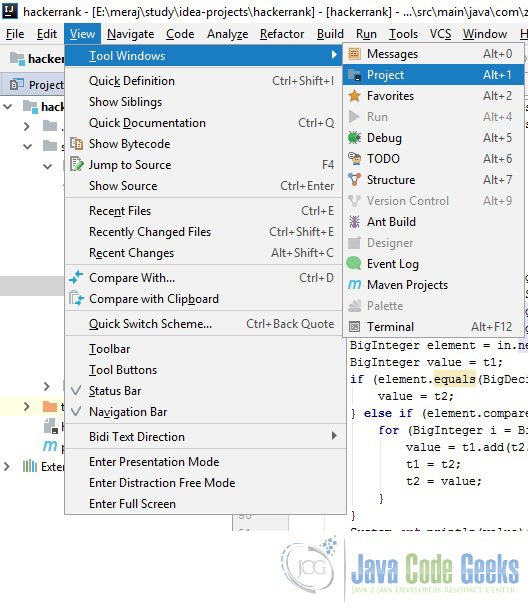
The Project tool window lets you look at your project from various viewpoints and perform the tasks such as creating new items (directories, files, classes, etc.), opening files in the editor, navigating to the code fragment of interest, and more. Most of the functions in this tool window are accessed as context menu commands in the content pane and associated shortcuts. The Project window can be open by going to View => Tool Windows => Project. You can also use the shortcut ‘ALT+1’.
2.1 Views
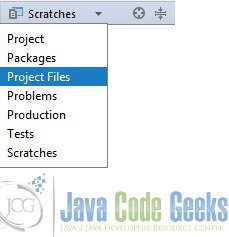
The tool window provides a number of views. Different views emphasize different project aspects and, generally, define which items are shown and how:
- Project view. In this view, all the project items along with their dependencies (SDKs and libraries) are shown. The emphasis is on the directory structure (though the packages are also shown).
- Packages view. The emphasis is on the package structure of the project. The modules, SDKs and libraries, by default, are not shown.
- Scopes views (Project Files, Problems, etc.). What is shown in the content pane is limited to the corresponding predefined or user-defined scope. In other respects, depending on the currently selected view options, a scope view may resemble the Project or the Packages view.
- Scratches view. This view lets you manage your scratch files and database consoles.
The necessary view is selected from the list in the left-hand part of the title bar or, if the views are represented by tabs, by clicking the corresponding tab.
The context menu that appears by right-clicking on the title bar, provides settings for project views , viewing modes, as well as for switching between the views, resizing the tool window, and more.
Flatten Packages: If this option is off, the packages are shown as a hierarchy. If this option is on, all the packages appear at the same level and are identified by their qualified names.

Compact Empty Middle Packages or Hide Empty Middle Packages: If the Flatten Packages option is off, the option is called Compact Empty Middle Packages; if the Flatten Packages option is on, the option name is Hide Empty Middle Packages. This option lets you specify how or whether empty packages are to be shown. (Empty packages are the ones that contain nothing but other packages). If the option is on, empty packages are shown compacted or not shown at all (hidden).
Show Members: If this option is on, the files in the tree that contain classes turn into nodes. When such node is unfolded, the contained classes with their fields, methods, and other members of the selected item are shown.
Autoscroll to Source: If this option is on, IntelliJ IDEA will automatically open the selected item in the editor.
Autoscroll from Source: If this option is on, IntelliJ IDEA automatically locates documents that you open in the editor in the Project tool window.
Sort by Type If the option is off, the items (files, classes, etc.) are sorted alphabetically. If the option is on, the files are sorted by their extensions. The .java files appear in the following order: interfaces, classes, enumerations, etc.
Folders Always on Top: If the option is on, all the folders are shown before the files. Otherwise, all the items are sorted alphabetically, and the files and folders appear intermixed.
Move to: To associate the tool window with a different tool window bar , select this command, and then select the destination tool window bar (Top, Left, Bottom or Right).
Resize: To resize the tool window by moving one of its borders, select this command, and then select the necessary Stretch to option.Resize. To resize the tool window by moving one of its borders, select this command, and then select the necessary Stretch to option. Note that this command is not available for the floating mode.
3. Conclusion
In this article we learnt about IDEA IntelliJ and it’s features. Then we discussed about the Project View, how to access it and what are the shortcuts which we can use. We also discussed about the various views available. In the end we discussed about few of the options available in the context menu.
