In this article we will see how we can run a test with coverage using IDEA IntelliJ.
1. Introduction
IntelliJ in a Java Integrated Development Environment (IDE) used for developing software programs. Now you can use IntelliJ for other programming languages as well. It is developed by JetBrains (formerly known as IntelliJ), and is available as an Apache 2 Licensed community edition, and in a proprietary commercial edition. Both can be used for commercial development. Software testing is a process of executing a program or application with the intent of finding the software bugs. It can also be stated as the process of validating and verifying that a software program or application or product meets the business and technical requirements that guided it’s design and development.
Test Coverage is an important part in Software testing and Software maintenance and it is the measure of the effectiveness of the testing by providing data on different items. Amount of testing performed by a set of test cases is called Test Coverage. By amount of testing we mean what parts of the application program are exercised when we run a test suite. In other words, test coverage is defined as a technique which determines whether our test cases are actually covering the application code and how much code is exercised when we run those test cases.
2. Coverage Settings
In this section we will learn about the different setting which we can use for calculating the code coverage. To change the settings go to File | Settings | Build, Execution, Deployment | Coverage for Windows and Linux, IntelliJ IDEA | Preferences | Build, Execution, Deployment | Coverage for macOS.
Here you can change the settings. Below we will describe the options available and what they mean.
- Show options before applying coverage to the editor – This option should be chosen if you want to show the Code Coverage dialog every time you launch a new run configuration with code coverage. The coverage options dialog is displayed, when different coverage data have been produced.
- Do not apply collected coverage – This option should be chosen if you want to cancel applying the new code coverage results.
- Replace active suites with the new one – This option should be chosen if you have the active suites replaced with the new one every time you launch a new run configuration with code coverage.
- Add to active suites – Choose this option to have the new code coverage suite added to the active suites every time you launch a new run configuration with code coverage.
- Activate coverage view – Select this check box to have the Coverage tool window opened automatically when an application or test is run with coverage.
3. Example
In this section we will create a simple class then will write a simple test for it. We will run the test with the coverage option to see how good out tests are. First we will see how to create a simple Maven project in IntelliJ.
3.1 Create Maven Project
To create a maven project go to File => New => Project and choose Maven.
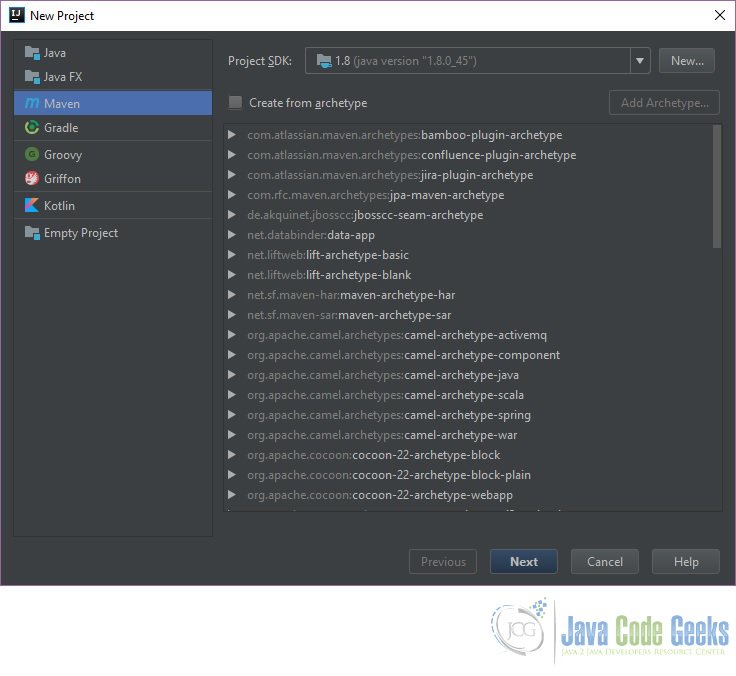
Click Next. Give the GroupId and ArtifactId name. For this example we will choose Group Id as com.javacodegeeks and Artifact id as code-coverage.

Click Next. Choose a project name and location and click Finish. Intellij will create a basic structure of the maven project for you.
3.2 Java Class
In this section we will write a simple java class. The class will have only one simple method with an if-else statement. This method will be used to demonstrate the working of testing coverage. Go to src => main => java and right click on the java folder. Choose New => package. Give the package name click OK. Now right click on the package we just created and choose New => Java Class. Give the class name and click OK. Below is the representation of the class used in this example:
Solution.java
package com.javacodegeeks;

import java.util.Arrays;
import java.util.Collections;

public class Solution {

    private Integer[] arr = {2, 67, 43, 890, 5, 78, 98, 23, 100, 201};

    public Integer[] sort(boolean ascending) {
        if(ascending) {
            Arrays.sort(arr);
        } else {
            Arrays.sort(arr, Collections.reverseOrder());
        }
        return arr;
    }
}
3.3 Test Class
In this section we will write the unit test class for testing the Solution class. Go to src/test/java, right click and choose New => package. Give the package name as com.javacodegeeks. You can choose some other package but make sure it’s good practice to keep the package name of the test class same as the class been tested. For writing this test we need to define an extra dependency in out pom file. Below is what the POM file will look like:
<?xml version="1.0" encoding="UTF-8"?>
<project xmlns="http://maven.apache.org/POM/4.0.0"
         xmlns:xsi="http://www.w3.org/2001/XMLSchema-instance"
         xsi:schemaLocation="http://maven.apache.org/POM/4.0.0 http://maven.apache.org/xsd/maven-4.0.0.xsd">
    <modelVersion>4.0.0</modelVersion>

    <groupId>com.javacodegeeks</groupId>
    <artifactId>code-coverage</artifactId>
    <version>1.0-SNAPSHOT</version>

    <dependencies>
        <dependency>
                <groupId>junit</groupId>
                <artifactId>junit</artifactId>
                <version>4.12</version>
                <scope>test</scope>
        </dependency>
    </dependencies>

</project>
Now we will write the test class. We will make use of three classes/interfaces of junit framework to write the test. The Assert class has a set of assertion methods useful for writing tests. We will also make use of the @Before annotation which is used to initialize our Testing class. When writing tests, it is common to find that several tests need similar objects created before they can run. Annotating a public void method with @Before causes that method to be run before the org.junit.Test method. The @Before methods of superclasses will be run before those of the current class, unless they are overridden in the current class. No other ordering is defined.
The @Test annotation tells JUnit that the public void method to which it is attached can be run as a test case. To run the method, JUnit first constructs a fresh instance of the class then invokes the annotated method. Any exceptions thrown by the test will be reported by JUnit as a failure. If no exceptions are thrown, the test is assumed to have succeeded.
Below we describe our test class.
SolutionTest.java
package com.javacodegeeks;

import org.junit.Assert;
import org.junit.Before;
import org.junit.Test;

public class SolutionTest {

    private Solution solution;

    @Before
    public void setUp() {
        solution = new Solution();
    }

    @Test
    public void testSort() {
        Integer[] asc = solution.sort(true);
        Assert.assertTrue(asc[0] == 2);
    }
}
4. Run test with coverage
In this section we will see how to run the above test with coverage option. Open the test class and go to Run => Run ‘SolutionTest.testSort’ with coverage

IntelliJ will run the test class with the coverage option on.
---- IntelliJ IDEA coverage runner ----
sampling ...
include patterns:
com\.javacodegeeks\..*
exclude patterns:
Process finished with exit code 0
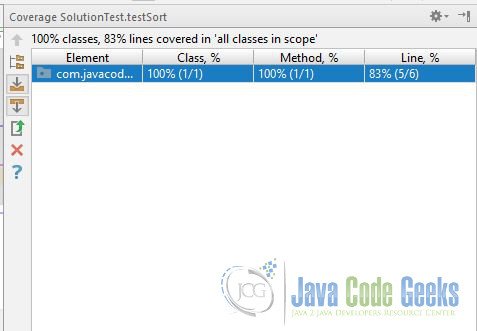
In the coverage window you can see the result. It will display what percentage of the code has been covered by the test. You can see the the coverage result on class, methods or line basis. For our example we see that the Method percentage was 100% as there was only one method but the Line percentage was 83% because we didn’t write the test to cover the else condition.
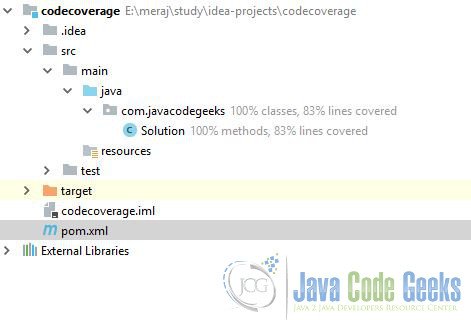
Viewing code coverage helps you detect pieces of your source code that are not affected by simulation. If you close the above window by mistake you can see the coverage data by going to Analyze => Show Coverage Data and then select the coverage Suite. IntelliJ also displays the result in the Project window. This is very useful as you can clearly see which module/package has the worst code coverage and then can write tests for them.
You can also generate the code coverage report from the Coverage window. The coverage report in generated as HTML and will look similar to below:

5. Conclusion
In this article we learned about IntelliJ and Testing, what it is and why it’s important. Then we looked at what Code/Test Coverage is and why it’s an important tool to have. We discussed about the various code coverage settings available in IntelliJ. Then we demonstrated the code coverage generation by using a simple example. We discussed how to write a simple test case and how to run it with coverage option on. We saw how to interpret the result displayed in the coverage window. In the end we also discussed how to generate an HTML coverage report using IntelliJ.
