In this example we will learn about IntelliJ project structure. IntelliJ is one of the most commonly used IDE by Java developers. For this example we will use 2017.2.2 version of IntelliJ. Please note that some of the instructions could change if you are using another version of IntelliJ.
1. Introduction
A project is a top-level organizational unit for your development work in IntelliJ IDEA. In its finished form, a project may represent a complete software solution. A project is a collection of:
- Your work results: source code, build scripts, configuration files, documentation, artifacts, etc.
- SDKs and libraries that you use to develop, compile, run and test your code.
- Project settings that represent your working preferences in the context of a project.
A project has one or more modules as its parts. IntelliJ IDEA stores the configuration data for projects and their components in plain text XML files making it easy to manage and share project configuration data with others. Two formats are available for storing the project configuration data: directory-based and file-based. An artifact is an assembly of your project assets that you put together to test, deploy or distribute your software solution or its part. Examples are a collection of compiled Java classes or a Java application packaged in a Java archive, a Web application as a directory structure or a Web application archive, etc.
An artifact can be an archive file or a directory structure that includes Compilation output for one or more of your modules, Libraries included in module dependencies, Collections of resources (web pages, images, descriptor files, etc.), Other artifacts, Individual files, directories and archives.
2. Project Structure
The Project Structure dialog lets you manage your project and IDE-level elements such as modules, facets, libraries, artifacts and SDKs. In most of the cases, there are two panes in the left-hand part that implement a two-level selector. The only exception is when you select Project. There is only one selector pane in this case. To open the Project Structure go to File => Project Structure… You can also use the shortcut ‘CTRL+ALT+SHIFT+S’.
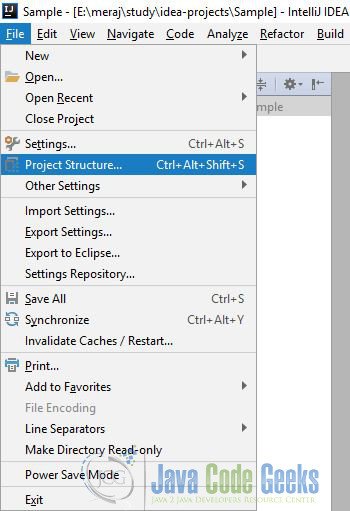
Click on the ‘Project Structure…’, IntelliJ will display the details of the project in the pop-up
2.1 Project

In this section you can see the name of the project and you can modify it as well. You can also see the details of the SDK used by the project. This is the default SDK which will be used by all the modules of the project. You can still change the SDK for specific module. To develop applications, you need a Software Development Kit (SDK). A typical SDK example is the Java Development Kit (also known as JDK or Java SDK). This is an SDK for producing Java applications. IntelliJ IDEA does not include an SDK. So, before you start writing your code, you have to download and install at least one SDK, and define it in IntelliJ IDEA. (You can specify an SDK when creating your first project or at a later time.)
The third detail is about the Project language level. The selected level will be used as the project default.
In the last you can define the output path. This path is used to store all project compilation results.
2.2 Modules
The next section in the Project Structure is Module
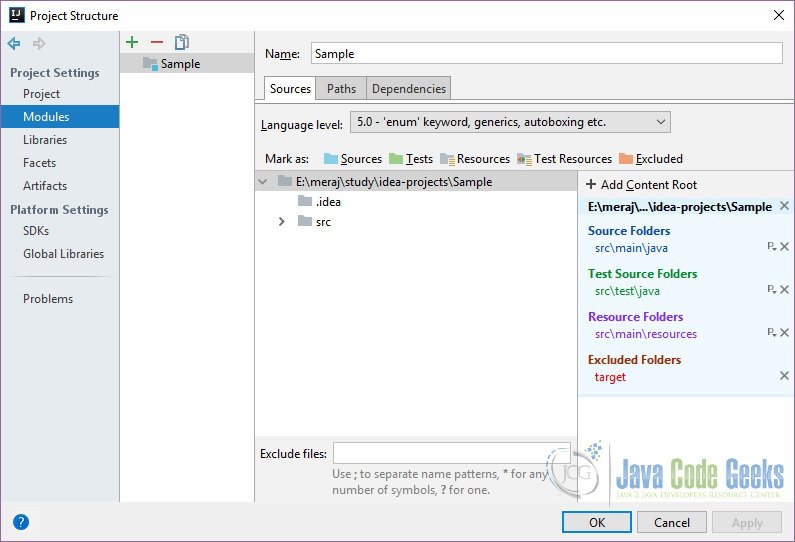
In this section on the left hand side you can see the list of modules. You can see/modify the setting of a specific module by selecting it and then changing the values. Use the Sources tab of the Module page to select the supported language level for Java and to configure the module contents. The module contents are configured by adding and removing the module content roots as well as by assigning individual folders (within the content roots) to categories such as sources and test sources, and also by excluding the folders. Use the Language Level list to select the Java language level for the module. The available options correspond to JDK versions. You can select the level set for the project (the option <Use project language level>) or set an individual level for the module.
The left-hand pane shows a tree of folders for a module content root. If the module has more than one content root, the structure shown corresponds to the content root selected in the right-hand pane. The folders belonging to different categories have different icons. At the bottom you can also define some specific files to be excluded from the compilation.
The right-hand pane shows the module content roots. For each content root, a categorized view of the module folders is provided. The categories are the source folders, test source folders, etc. The “ordinary” folders are not shown in this view. The individual folders within the categories are identified by their paths. The folder paths are all relative to the module root folder (content root). The folder paths, functionally, are hyperlinks that let you jump to the corresponding folders in the tree shown in the left-hand pane. If a module has more than one content root, selecting a content root in the right-hand pane also switches the tree view in the left-hand pane. That is, when you click somewhere within the content root area, the folder structure of this particular content root is shown in the left-hand pane.

Use the Paths tab of the Module page to configure the compiler output paths for the module, and also to specify the locations of external JavaDocs and external annotations associated with the module.

The third and last tab is the Dependencies tab. Here you can see the dependencies required by the project, you can add more dependencies or can remove some.
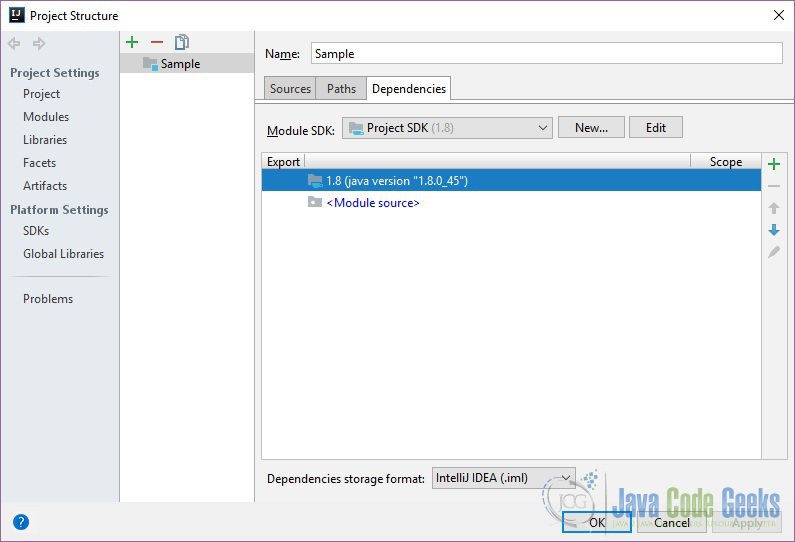
You can sort the dependencies by their names and scopes by clicking the cells in the header row. If you click a cell once, the list is sorted by the corresponding column in ascending order. The sorting marker appears in the cell. When you click the cell for the second time, the information is sorted in descending order. To show this, the sorting marker changes its appearance. Finally, when you click the cell for the third time, the initial unsorted state is resorted. Note that the sorting operations don’t change the actual order of dependencies. When the list is sorted, the icons for changing the order of dependencies are inactive.
2.3 Libraries
A library is a collection of compiled code that you use as it is. A Java library, for example, can include class files, archives and directories with class files as well as directories with Java native libraries. Libraries may optionally include the source code for the library classes as well as corresponding API documentation. Including the source files and documentation is optional. It adds the ability to use inline documentation extracted from the source code. Libraries let you reuse the code developed by others instead of implementing corresponding functionality yourself. You can define the libraries at the global (IDE), project, and module levels.
The level of a library defines the scope of its potential or actual use. Global libraries can be used in any of your projects. That is, they can be added to dependencies of any module in any project. Project libraries can be used in any of the modules within the corresponding project. However, they are not available outside of the project in which they are defined. Module libraries exist only as dependencies of the corresponding module. You can see the global libraries by selecting ‘Global Libraries’. If you want to see the project specific libraries used select ‘Libraries’ under Project Settings.
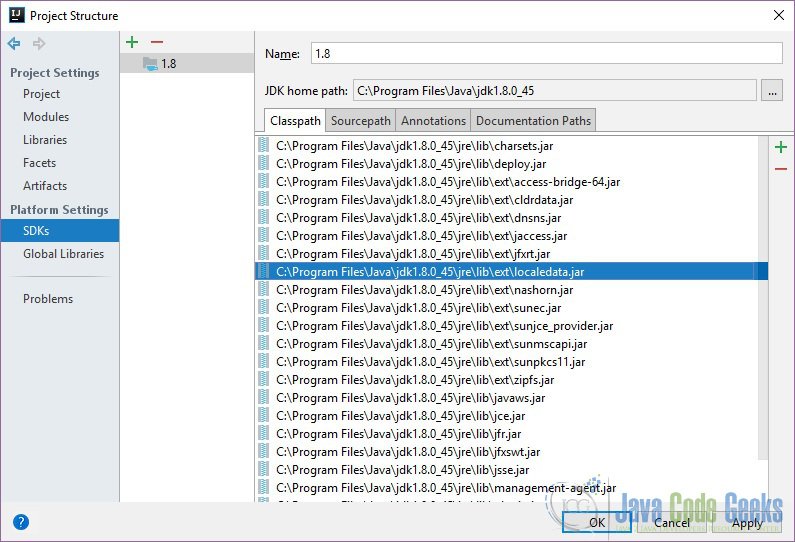
2.4 SDKs
The SDKs sections let you view all the SDKs available. To define a new SDK, click + select the SDK type (e.g. JDK), and then specify the SDK installation directory. Note that if you change the project SDK, all the modules that are using the default project SDK will change their SDK accordingly. To see which SDK is used by a module, select Modules, select the module of interest, and then select Dependencies.
3. Conclusion
In this article we discussed about the various options that are available in the Project Structure window of Intellij. We discussed where these values correspond to and how we can change it. We also discussed what are the project level settings and what are the module specific settings. There are few other options available in the project structure window (Facets, Artifacts etc) but they are not relevant for a simple java project so we haven’t discussed about them here.

why does the world feels so good irl feels so good so u feel ur way how u want it to be