Gradle OSGi Plugin Example: BNDTools Bundle Integration
In this example we will talk about how to integrate OSGi frameworks with Gradle build tool. This work consists in build JAR files and customizing Manifest file through Gradle build Script and Deploying them in a OSGi Container like Apache Felix.
1. Introduction to Gradle and OSGi Integration
Gradle is an automatic build tool of more use today, so it’s almost necessary to integrate the different types of projects with Gradle, to automate the process of build and liberation. In this example we will see how using Gradle can compile, build, install and run a bundle in an OSGi environment. The main goal is to understand Gradle integration with OSGi BND tools.
1.1 Basic Concepts
There are some basic concepts that we must check before starting the example.
- Gradle: Our tool to build and automate the process.
- OSGi: It’s the framework to make Java Modular applications and the environment where to deploy.
- BND Tools: It’s a framework or library pack, that makes OSGi development process more friendly and give to us a lot of capabilities to customize out OSGi bundles. OSGi and BND Tools are required each other.
- Gradle-Osgi Plugin: It’s a Gradle Plugin developed by Renato Athaydes to make the OSGi integration easier.
- Apache Felix, Eclipse Equinox: Are the main OSGi implementations, are containers to deploy OSGi bundles. Think in OSGi bundles like a war file and Apache Felix like Tomcat container.
I want to make this example so simple, so we start.
2. What do We Need?
- IDE: Eclipse Luna 4.4, you can download here
- Gradle 2.x or superior, you can download Gradle 2.5 here
- Java JDK 1.7_75 or superior, download here
- BND Tools 2.4, this is a Eclipse Plugin that we can download in Eclipse Marketplace
- Gradle-Osgi Plugin, you can get more detail here
3. Environment Configuration
To make simpler the example, we assume that you have already installed your Eclipse, JDK, Gradle and environment variables for both tools (JAVA_HOME and GRADLE_HOME).
How to Install OSGi?
It’s the most simple installation ever, you only need to download Eclipse! Eclipse is one the projects that use OSGi for your development and release process, so OSGi, Equinox and Felix frameworks are already installed as Eclipse’s plugins.
Next Step, Install BND Tools Eclipse Plugin.
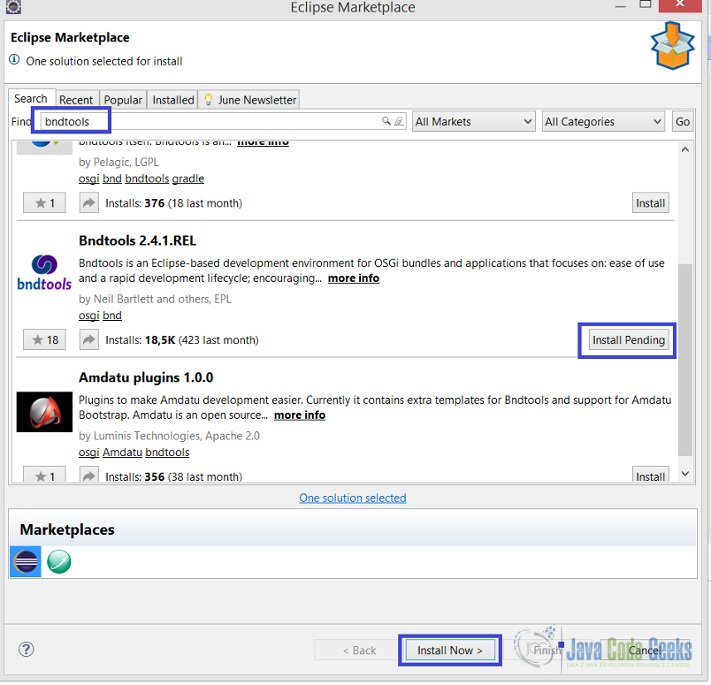
Please download and install from Eclipse Marketplace using the menu: Help > Eclipse Marketplace > type “bndtools”.
4. Creating OSGi Project
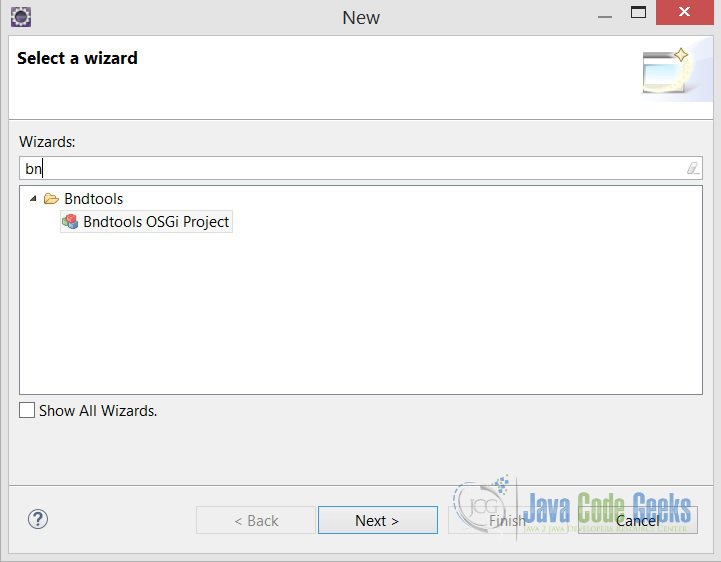
Create a new OSGi bundle project using File > New > Other > Bndtools > Bndtools OSGi project
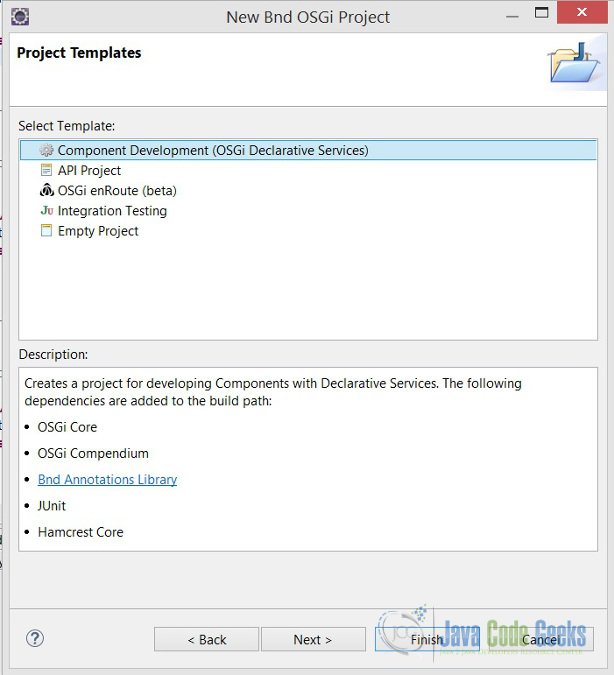
Then, type a project’s name and keep all the other settings as they are, then click next to choose project template, in this case, we use OSGi component development by default.
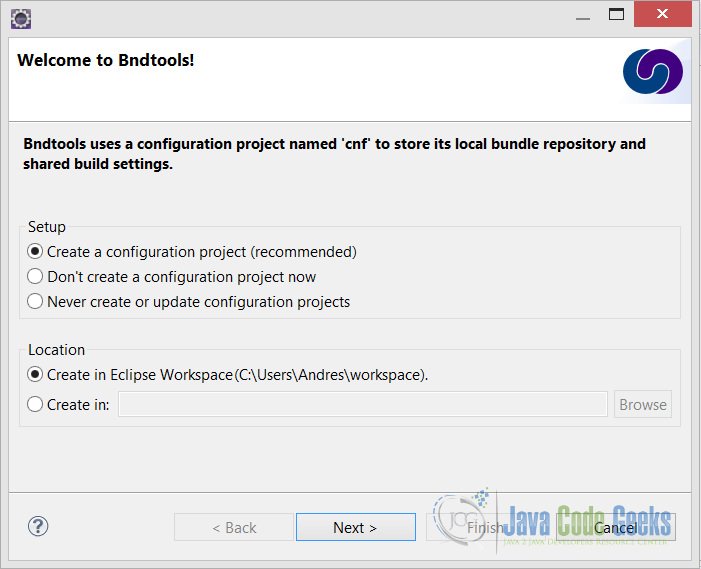
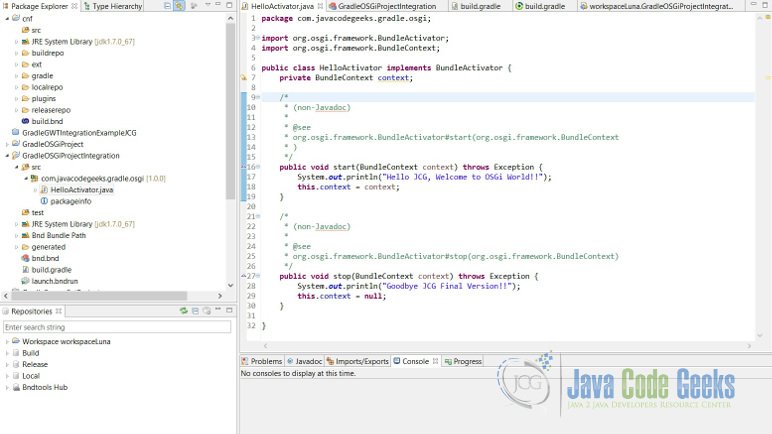
So, when we create the first OSGi project, bnd tools ask to create a cnf project, that will store all OSGi configuration and libraries downloaded from external repositories. Only click next and leave all configurations by default, at the end we have 2 projects cnf (bnd tools configuration) and our Gradle OSGi project.
Then, define a package for the Bundle Activator and create a new class, we call HelloActivator.java
HelloActivator.java
package com.javacodegeeks.gradle.osgi;

import org.osgi.framework.BundleActivator;
import org.osgi.framework.BundleContext;

public class HelloActivator implements BundleActivator {
	private BundleContext context;

	public void start(BundleContext context) throws Exception {
		System.out.println("Hello JCG, Welcome to OSGi World!!");
		this.context = context;
	}

	/*
	 * (non-Javadoc)
	 *
	 * @see
	 * org.osgi.framework.BundleActivator#stop(org.osgi.framework.BundleContext)
	 */
	public void stop(BundleContext context) throws Exception {
		System.out.println("Goodbye JCG");
		this.context = null;
	}

}
5. Deploying OSGi Project
The last step before injects Gradle is to deploy the Bundle in an OSGi container, in this example we use Apache Felix. To make possible this, we need to configure bnd.bnd file.
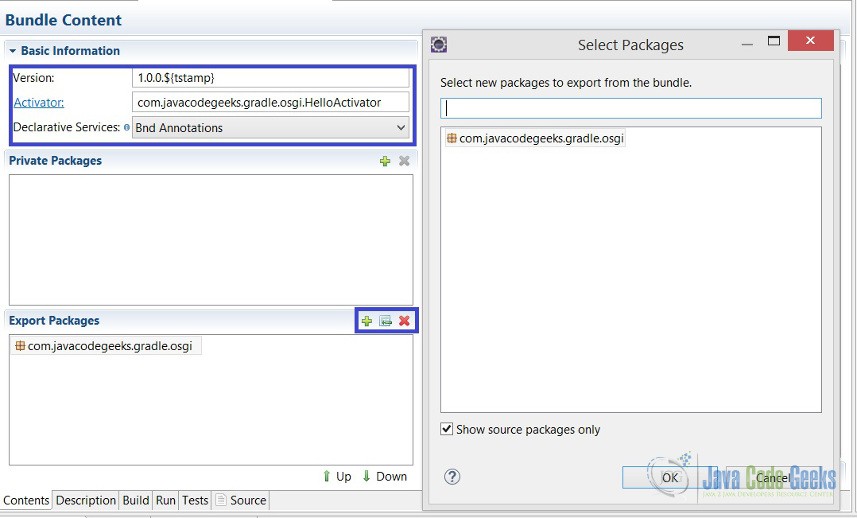
Define a version number, choose the Activator that we created before. In the Export Packages please choose the green plus sign, and add the main package that contains the Activator.
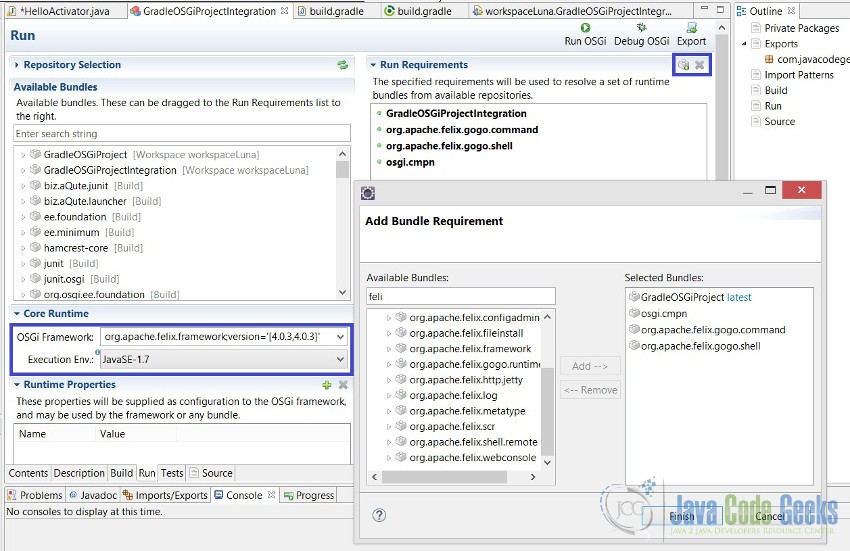
In the Run Tab, we must configure 3 options.
- Core Runtime, establish the OSGi Framework and JDK to execution, for this case choose Apache Felix 4.0.3 and Java 1.7.
- Run Requirements, add all 4 bundles that appears in the caption, project itself (GradleOSGiProject in this case), osgi.cmpn, felix.command and felix.shell.
- In the bottom of the Run tab, add the same bundles at Run Bundles configuration
Finally, we can run the project using Run OSGi button in Run tab of bnd.bnd file, so this is the output. We can see the installed bundles typing lb on Apache Felix Gogo Shell, so when we start or stop OSGiGradle Bundle, start and stop Activator’s methods are executed.
Hello JCG, Welcome to OSGi World!!
____________________________
Welcome to Apache Felix Gogo

g! lb
START LEVEL 1
   ID|State      |Level|Name
    0|Active     |    0|System Bundle (4.4.1)
    1|Active     |    1|GradleOSGiProjectIntegration (1.0.0.201507130549)
    2|Active     |    1|Apache Felix Gogo Command (0.14.0)
    3|Active     |    1|Apache Felix Gogo Runtime (0.12.1)
    4|Active     |    1|Apache Felix Gogo Shell (0.10.0)
g!
6. Gradle Integration
To “Gradlify” the OSGi Project we need to create a Gradle Build script and configure it correctly. So, create a new File in root project, New > File > type name “build.gradle”.
This is the file, so we’ll look in detail each instruction.
build.gradle
/*
 * Author: Andres Cespedes
 * Date: 01 July 2015
 * Example: Gradle OSGi Integration Example
 * Site: www.javacodegeeks.com
 * */
buildscript {
	repositories {
		jcenter()
		mavenCentral()
	}
	dependencies {
		classpath "com.athaydes.gradle.osgi:osgi-run-core:1.2"
	}
}

// repositories to download external files, like apache felix
repositories {
	jcenter()
	mavenCentral()
}

// java version source compatibility
sourceCompatibility = 1.7

apply plugin: 'osgi-run'

// osgi-run plugin task that add OSGi subprojects as a bundle files to deploy.
runOsgi {
  bundles += subprojects
}

jar {
    manifest { // Manifest.MF file customization
        instruction 'Private-Package','com.javacodegeeks.gradle.osgi'
        instruction 'Bundle-Vendor', 'JavaCodeGeeks'
        instruction 'Bundle-Description', 'First OSGi Bundle Created By Gradle JCG Tutorial'
        instruction 'Bundle-Activator', 'com.javacodegeeks.gradle.osgi.HelloActivator'
        instruction 'Bundle-ManifestVersion', '2'
        instruction 'Bundle-Version', '1.0.0.${tstamp}'
        instruction 'Bundle-Name', 'GradleOSGiProjectIntegration'
        instruction 'Bundle-SymbolicName', 'GradleOSGiProjectIntegration'
        instruction 'Export-Package', 'com.javacodegeeks.gradle.osgi;version="1.0.0";uses:="org.osgi.framework"'
    }
}
The first part buildscript, define the repositories and dependencies to import Gradle Bnd OSGi Plugin. In line 18, we set repositories to download and import external libraries to Gradle, this part it’s important as some think they just simply repositories defined in the buildscript block, are necessary to get libraries like apache felix, these libraries are downloaded to ‘%USER_HOME%\.gradle\caches\modules-2\files-2.1’ directory.
In line 20, apply the external OSGi plugin developed by Renato Athaydes, because Gradle’s official plugin doesn’t add value at all, don’t adds tasks more than customize the Manifest.
Line 23 and 27 are the main part of the script, then we add the project to the bundles to deploy and then can configure OSGi Manifest, each Manifest property is added as instruction, you can check OSGi documentation for available properties.
7. Running Gradle OSGi Integration
This is how integration works.
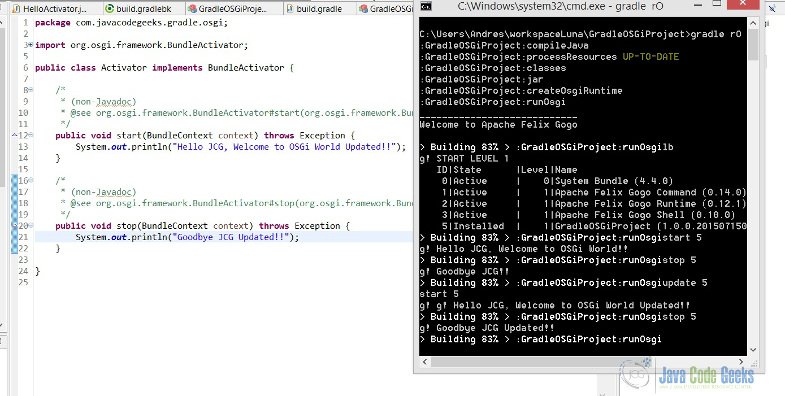
Select build.gradle file and press Ctrl+Alt+D to open windows command shell, then execute this Gradle command to run the OSGi environment.gradle runOsgi or gradle rO as shortened way.
Microsoft Windows [Versión 6.3.9600]
(c) 2013 Microsoft Corporation. Todos los derechos reservados.

C:\Users\Andres\workspaceLuna\GradleOSGiProject>gradle rO
:GradleOSGiProject:compileJava UP-TO-DATE
:GradleOSGiProject:processResources UP-TO-DATE
:GradleOSGiProject:classes UP-TO-DATE
:GradleOSGiProject:jar
:GradleOSGiProject:createOsgiRuntime
:GradleOSGiProject:runOsgi
____________________________
Welcome to Apache Felix Gogo

> Building 83% > :GradleOSGiProject:runOsgilb
g! START LEVEL 1
   ID|State      |Level|Name
    0|Active     |    0|System Bundle (4.4.0)
    1|Active     |    1|Apache Felix Gogo Command (0.14.0)
    2|Active     |    1|Apache Felix Gogo Runtime (0.12.1)
    3|Active     |    1|Apache Felix Gogo Shell (0.10.0)
> Building 83% > :GradleOSGiProject:runOsgiinstall file:../GradleOSGiProject.jar

g! Bundle ID: 4
> Building 83% > :GradleOSGiProject:runOsgi
When apache felix gogo shell is active, type lb to see all available Bundles, if your bundle don’t appears yet, so let install it, how? Execute this simple command install file:../GradleOSGiProject.jar, obviously considering the name of your jar; apache gogo shell will tell you the Bundle ID, in this case is 4.
8. Testing Gradle OSGi
Gradle already setup OSGi environment, so, executing apache gogo shell commands we can interact in Gradle thread with the OSGi Bundle, updating Manifest or Activator itself.
Then, if we modify any artifact or java file only executing update BundleID in Gradle OSGI environment shell, in this case update 5 we get updated Bundle, if we start or stop the Bundle can get updated messages.
For the last part of this example, the Manifest is printed in console executing headers BundleID command, headers 5, useful to compare the deployed Bundle with Gradle Manifest configuration.
> Building 83% > :GradleOSGiProject:runOsgiheaders 5
g!
GradleOSGiProject (5)
---------------------
Bnd-LastModified = 1436938982133
Bundle-Activator = com.javacodegeeks.gradle.osgi.Activator
Bundle-ManifestVersion = 2
Bundle-Name = GradleOSGiProject
Bundle-SymbolicName = GradleOSGiProject
Bundle-Version = 1.0.0.201507150543
Created-By = 1.7.0_67 (Oracle Corporation)
Export-Package = com.javacodegeeks.gradle.osgi;version="1.0.0";uses:="org.osgi.f
ramework"
Import-Package = org.osgi.framework;version="[1.3,2)"
Manifest-Version = 1.0
Private-Package = com.javacodegeeks.gradle.osgi
Require-Capability = osgi.ee;filter:="(&(osgi.ee=JavaSE)(version=1.7))"
Tool = Bnd-2.4.1.201501161923
> Building 83% > :GradleOSGiProject:runOsgi
9. Key Points
Tips
- Gradle Official plugin is poor to support OSGi integration
- Key point to Gradle-OSGi integration is to know how to install external bundles
- Unofficial Gradle Run Osgi Bundle plugin facilitates the integration process, thanks to Renato Athaydes for his job.
- Manage OSGi deployment through Gradle enhances the development process by automatization and isolation the execution from Eclipse
10. Download the Eclipse Project
This was an example of Gradle OSGi Plugin.
You can download the full source code of this example here Gradle OSGi Project

