This example offers a complete tutorial on how to integrate Gradle & GWT. Then, we see how build a GWT project with Gradle and how to run them on a Jetty Server.
1. Introduction to Gradle GWT Integration
GWT is the Google’s Toolkit to develop ajax applications using the Java language, these applications like Java EE’s Applications need a server, but, in this case, is a lightweight web server like Jetty to make them run. So, and why I need Gradle here? Gradle facilitates and improves the build process with the automatization of the tasks and allowing the application’s uncoupling of an IDE, making your release cycle easier!
Before we start with this example, we will cover some essentials topics about Gradle.
1.1 Gradle Plugins
Gradle as a build tool offers a set of basic tasks to perform simple compilations, such as wars generation, copying files and creating directories, but in more complex projects like GWT we need to add some plugins to execute advanced tasks. With adding this line at the top of your gradle build script, you are able to use another task.
apply plugin: 'PLUGIN_NAME'
For this example, we need to apply various plugins like war, java and eclipse plugins; with them we can execute this tasks:
compileJava:Compile Java Source files using javac.classes:Assembles the production classes directory.jar:Assembles the JAR file.war:Generates a war file with all the compiled classes.eclipse:Generates all Eclipse files.
1.2 Dependency Management
This is a Gradle’s critical feature with a main purpose, to centralize and automate management of libraries dependency, people thinks that dependency management is only an automated fetching of dependencies from a remote source, but this feature wants more like to includes automatically fetching dependencies, detecting transitive dependency conflicts, and so on. For this example, we work declaring dependencies via DSL.
dependencies {
compile 'com.google.gwt:gwt-user:2.7.0'
}
1.3 Source Sets (Java Plugin)
This is a key point from the Java Plugin, a source set is a collection of source files which are compiled together. But for this example we need to know that for this Java Plugin, source sets has a default configuration to works:
- Java source code directory:
src/main/java - Production resources:
src/main/resources - Test sources:
src/test/java - Test resources:
src/test/resources
2. What do we need?
- As IDE: Eclipse Luna 4.4
- Eclipse Gradle Plugin (Optional)
- GWT Eclipse Plugin
- JDK 1.7_75 or higher
- Gradle 2.3
- GWT 2.7.0
- GWT Steffen Schaefer plugin (Compile GWT Plugin)
We work in Eclipse as a prefer IDE, then we need to install Gradle and GWT Plugins for Eclipse. To make easier the integration we use GWT plugin, to do compilation from Java to Javascript files.
3. Environment Configuration
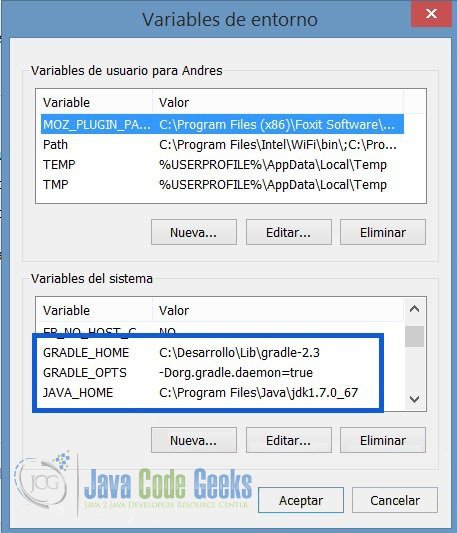
3.1 Gradle’s Installation
Start, with downloading the Gradle 2.3 version and setting environment variables correctly thus:
3.2 Eclipse Gradle & GWT Plugins
In the Eclipse Marketplace just type: ‘Eclipse Integration’ and install the plugin that matches with your Eclipse version (for this example 4.4).

To install the GWT Plugin you have to go Help > Install New Software, then add this site https://dl.google.com/eclipse/plugin/4.4
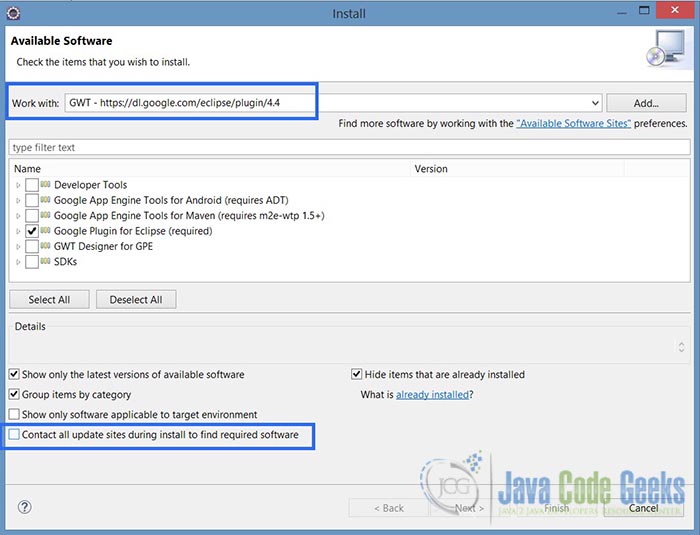
Please unmark the selected checkbox to avoid problems.
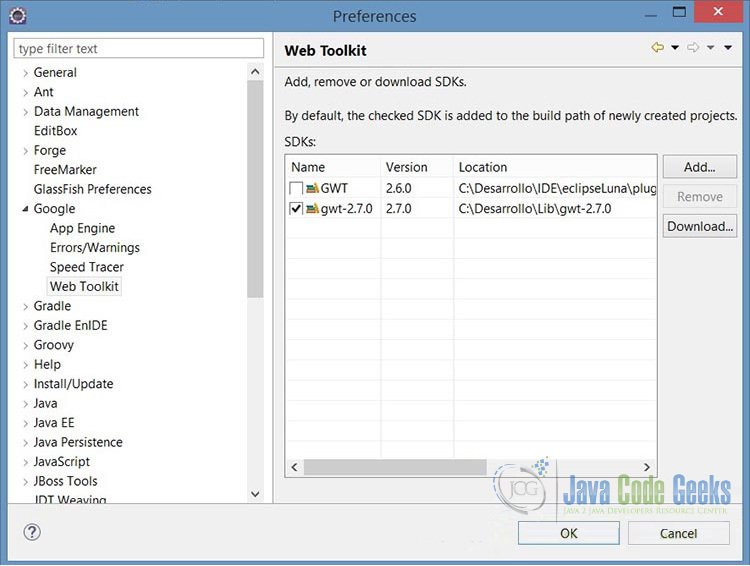
3.3 Install and Configure GWT SDK
Finally, download GWT 2.7 distribution and unzip in some directory, then set as the default GWT SDK in Eclipse. Go to the Menu, Window > Preferences > Google > Web Toolkit, so add your GWT specifying the unzip location
With these steps, we are done to work in the integration between Gradle and GWT.
4. Creating GWT Project
To start, we need to have already installed the GWT plugin in Eclipse. Then, using the Eclipse Wizard we will create a Google Web Application Project
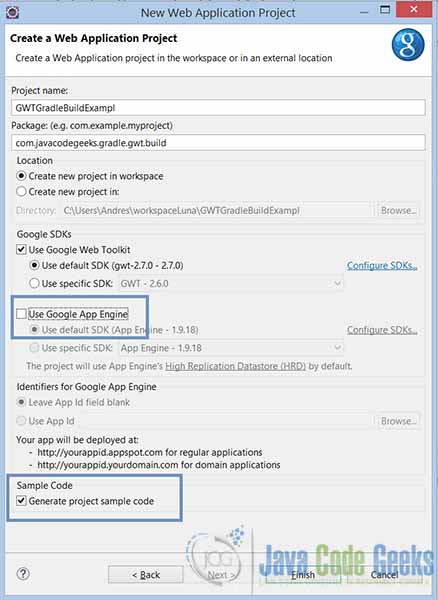
In this step is necessary to unmark the Google App Engine check because we don’t need to publish this example in the Google repositories and to verify that the sample code generation is checked. After that, we have a valid GWT project to build and run with Gradle.
But first, we need to test that the project runs on Super Dev Mode.
What is GWT Super Dev Mode?
To run a GWT Application on a Web Explorer, we need to install a gwt plugin for older versions like Firefox 24 or Chrome 21, but if we use this upgraded mode, we can run a GWT application without the annoying plugin. Be aware that the Super Dev Mode is only available GWT 2.5+
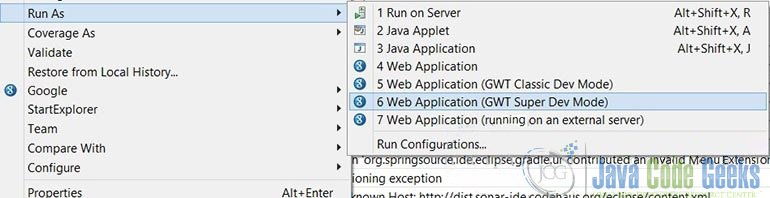
Then, make a right click on your GWT project > Run As > GWT Super Dev Mode.
Even if you want to run as a classic mode, you can do that only if you have the GWT Plugin installed in your web explorer. The main goal here is to test that the GWT Project runs correctly.
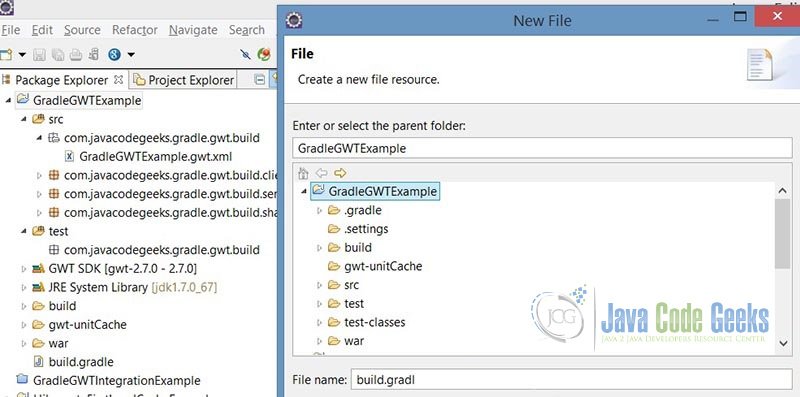
5. Setting Gradle in GWT Project
To continue, we have to create the main file, Gradle Build Script, so, make a new File called build.gradle in the root of the project.
Until this step, we only have set the workspace, GWT Project and created a build.gradle file. To next, we see how develop step by step our Gradle Build Script to make it works.
6. GWT Gradle Build Script (Step by step)
build.gradle
apply plugin: 'war'
apply plugin: 'java'
apply plugin: 'gwt'
apply plugin: 'eclipse'
apply plugin: 'jetty'

//Java version compatibility to use when compiling Java source.
sourceCompatibility = 1.7
//Java version to generate classes for.
targetCompatibility = 1.7
//Script Version
version = '1.0'

buildscript {
	repositories {
		jcenter() //repository where to fetch gwt gradle plugin
	}
	dependencies {
		classpath 'de.richsource.gradle.plugins:gwt-gradle-plugin:0.6'
	}
}

// central repository to load the GWT library
repositories {
	mavenCentral()
}

compileJava{
	//enable incremental compilation
	options.incremental = true
}

gwt {
	gwtVersion='2.7.0'
	modules 'com.javacodegeeks.gradle.gwt.integration.build.GradleGWTIntegrationExampleJCG'

	sourceSets {
		main {
			java {
				srcDir 'src'
			}
		}
	}

	logLevel = 'ERROR'

	minHeapSize = "512M";
	maxHeapSize = "1024M";

	superDev {
		noPrecompile=true
	}

	// The following is only needed if you don't use the Google Plugin for Eclipse.
	eclipse{
		addGwtContainer=false // Default set to true
	}

	//Specify the deployment Port
	jettyRunWar.httpPort = 8089
}

task jettyDraftWar(type: JettyRunWar) {
	dependsOn draftWar
	dependsOn.remove('war')
	webApp=draftWar.archivePath
}
6.1. Plugins and Dependencies
The first step is apply the plugins and set GWT Project dependencies to provide all the necessary libs and tasks to make the Build and Deployment.
apply plugin: 'war', basic plugin that adds assembling war tasks; it provides the main task War, that assembles the file itself.apply plugin: 'java', is the basis from other plugins and provides the capabilities to build and test the projects.apply plugin: 'gwt', this plugin is provided by the declared dependency in line 19. This plugin facilitates the assembly process of gwt-war, if we don’t use them, we would have to do the process of making directories, copy files, compile java files, etc.apply plugin: 'eclipse', this plugin provides configuration tasks to the eclipse project, is useful if you want to do a full synchronization between the Gradle generated files and the Eclipse Project.apply plugin: 'jetty', with this plugin we can deploy the war directly with no need run configuration in Eclipse.
The BuildScript block, this concept is used to define the external dependencies that are available to the classloader during the execution of Gradle build script. In the declaration of dependencies only be used the method classpath, and you can’t use the configurations compile , runtime, testCompile, etc. because this block is just to declare external libraries references available to the classpath, if you need to provide any configuration like compile or runtime you need to do outside of BuildScript block.
The repositories block (line 23), indicates where Gradle looks for any required dependency, in this case in the Maven central repository. For this example get gwt libraries and automatically fetch gwt dependencies; while the script is executing some lines like these appears in the console.
Download https://jcenter.bintray.com/de/richsource/gradle/plugins/gwt-gradle-plugin/0.6/gwt-gradle-plugin-0.6.pom

Download https://jcenter.bintray.com/de/richsource/gradle/plugins/gwt-gradle-plugin/0.6/gwt-gradle-plugin-0.6.jar

Download https://repo1.maven.org/maven2/com/google/gwt/gwt-codeserver/2.7.0/gwt-codeserver-2.7.0.pom

Download https://repo1.maven.org/maven2/com/google/gwt/gwt-codeserver/2.7.0/gwt-codeserver-2.7.0.jar
6.2. Gradle GWT Integration (Building and assembling)
The Main goal of this post is to understand how to integrate Gradle with GWT, and in this part is the key.
In the line 27 set the incremental compilation of java files, why do use this? If your GWT project it’s so large, indicates to Gradle exactly which input files were out of date compared to a previous execution and only compile those files, improving the compile performance.
The GWT task defined in line 32, is the main method of the build script, in here we need to define the GWT version that are we using, for this example is 2.7.0 distribution. In line 35, we need to set the name of the GWT Module, how we find them? It’s simple are composed by the package + name of the module in the gwt.xml file, then is com.javacodegeeks.gradle.gwt.integration.build. + GradleGWTIntegrationExampleJCG , look the name in the line 8.
<?xml version="1.0" encoding="UTF-8"?>
<!--
  When updating your version of GWT, you should also update this DTD reference,
  so that your app can take advantage of the latest GWT module capabilities.
-->
<!DOCTYPE module PUBLIC "-//Google Inc.//DTD Google Web Toolkit 2.7.0//EN"
  "http://gwtproject.org/doctype/2.7.0/gwt-module.dtd">
<module rename-to='gradlegwtintegrationexamplejcg'>
  <!-- Inherit the core Web Toolkit stuff.                        -->
  <inherits name='com.google.gwt.user.User'/>

  <!-- Inherit the default GWT style sheet.  You can change       -->
  <!-- the theme of your GWT application by uncommenting          -->
  <!-- any one of the following lines.                            -->
  <inherits name='com.google.gwt.user.theme.clean.Clean'/>
  <!-- <inherits name='com.google.gwt.user.theme.standard.Standard'/> -->
  <!-- <inherits name='com.google.gwt.user.theme.chrome.Chrome'/> -->
  <!-- <inherits name='com.google.gwt.user.theme.dark.Dark'/>     -->

  <!-- Other module inherits                                      -->

  <!-- Specify the app entry point class.                         -->
  <entry-point class='com.javacodegeeks.gradle.gwt.integration.build.client.GradleGWTIntegrationExampleJCG'/>

  <!-- Specify the paths for translatable code                    -->
  <source path='client'/>
  <source path='shared'/>

  <!-- allow Super Dev Mode -->
  <add-linker name="xsiframe"/>
</module>
The SourceSets in line 37, are an important part, because here we define the custom directories where are the classes, but we do this, Gradle look for classes in the default directory which is 'src/main/java'.
The logLevel property set the error level to print on the console; minHeapSize and maxHeapSize set the space of Java Heap, like an jvm args, would do.
The addGwtContainer sets if GWT_CONTAINER should be added to the eclipse classpath instead of using the Gradle dependencies, making dependency with GPE (GWT Plugin Eclipse) if is set to true, for this we prefer to set false.
For last property httpPort in line 60, allows us to customize deployment port.
The jettyDraftWar tasks will be used if you want to run in a draft mode, with a no production quality version. This task is a type of JettyRunWar, i.e. extending and inherits its properties.
7. Running the Example
Open a command shell on the root of the GWT Project, where is the Gradle build script.
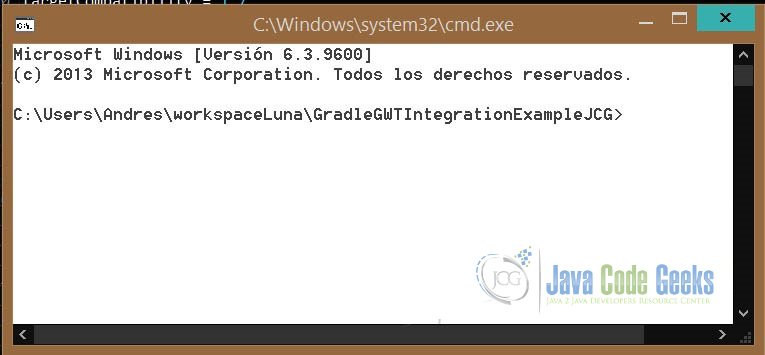
And is as easy as running this command to make all the job. gradle JettyRunWar
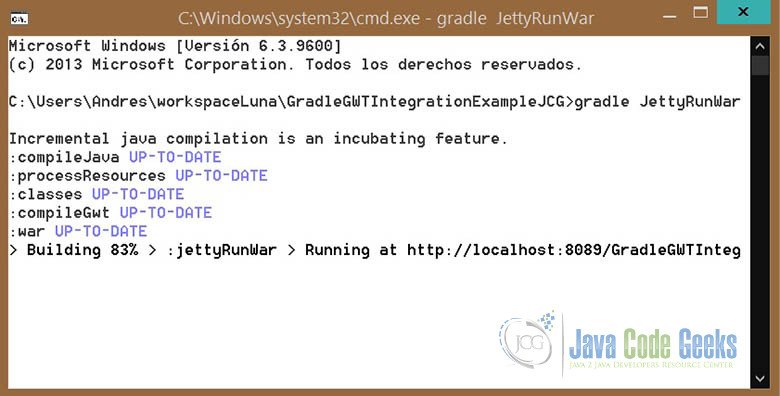
If we open the deployed URL, http://localhost:8089/GradleGWTIntegrationExampleJCG/. Look carefully name and port of your application.

8. Key Points
Tips
- You have to distinguish the difference between buildScript block and repositories and dependencies blocks, these are configuration items, that we use to set the classpath external libraries, URL Repositories and set the dependencies with other libraries.
- The use of SourceSets to set the custom directory of Java sources. The default directory in where Gradle search sources is ‘src/main/java’.
- The dependency of Gradle-Gwt-Plugin developed by Steffen Schaeffer, that provides all GWT compilation Gradle tasks and make so easier the Gradle GWT Integration.
- If you want to make Eclipse Project and GPE compatible, you have to set
addGwtContainerto true and update the classpath settings in eclipse, it’s likely to get some errors in Eclipse GWT Project. - When we run the task
compileGWT, the generated resources (cache, draftOut, extra, gen, out, work) are allocated inroot_project/build/gwt/directory. - All the libraries are downloaded to the directory:
'C:\Users\Andres\.gradle\caches\modules-2\files-2.1', i.e. your Gradle home,{gradle_home}/caches/modules-x/files-x.x/ - If you get some errors, check the log in the directory
{gradle_home}/daemon/2.3and try to fix them. (Prior activation of Gradle Daemon) - To get more information look in documentation of Gradle GWT Plugin here
- If you want more information about Gradle tasks and basic plugins look in documentation here
9. Download the Eclipse Project
You can download the full source code of this example here: Gradle GWT Integration Example
