Hello! This is an introduction to Python REST API. I’ll show you how to create RESTful web services in python by using the Flask and Connexion frameworks.
- Flask is a micro-framework as it does not require any particular tools or libraries. It has no database layer, form validations, or any other third-party library that provides common functions
- Connexion is a framework on top of the Flask micro-framework that automatically handles the HTTP endpoints defined using OpenAPI specification (formally known as the Swagger)
1. Introduction
REST stands for Representational state transfer and it fits in the HTTP protocol designed worldwide for the users. RESTful is –
- Uniform interface for client-server communication
- Stateless in nature meaning each request coming from the client should contain all the information required by the server in order to process the incoming request
- Cacheable in nature
- Support the HATEOAS principle in order to drive the links from the server-side rather than client hardcoding it
- RESTful web services provide different HTTP request methods. Out of all these, the most common ones are –
- GET – Obtaining information about the entity
- POST – Creating a new entity
- PUT – Updating the existing entity (if found) or creating a new one
- DELETE – Deleting an entity
- Does not restrict user for a specific format of the request. However in general the request is provided in the JSON format
To start with this tutorial we will need to install Python and set up some of the third-party Python libraries. Let us go ahead and install them one by one.
1.1 Setting up Python
If someone needs to go through the Python installation on Windows, please watch this link. You can download the Python from this link.
1.2 Setting up Flask
Once the python is successfully installed on your system you can install the Flask using a simple pip command. You can fire the below command from the command prompt and it will successfully download the module from pypi.org and install it.
Installation command
pip install -U Flask
1.3 Setting up Connexion & Connexion Swagger
Once the python is successfully installed on your system you can install the connexion and connexion-swagger modules using a simple pip command. You can fire the below commands from the command prompt and it will successfully download the modules from pypi.org and install it.
Installation commands
pip install -U connexion

pip install -U connexion[swagger-ui]
2. Introduction to Python REST API
Before going any deeper into the practice I am assuming that you are aware of the Python and OpenAPI basics. Let us dive in with the programming stuff now.
2.1 Creating an OpenAPI configuration
Add the following code to the OpenAPI/Swagger configuration file which will contain all the necessary information to define the application endpoints. The YML configuration file is written in a hierarchical manner where the indentation level represents the level of scope and ownership. The file consists of the following information –
swagger: Tells which version of Swagger API is to be usedinfo: Tells the API information such as API version, documentation title, etcconsumes: Tells the mime-type which is to be expected by the APIproduces: Tells what content type is expected by the API callerbasePath: Defines the API root- In our case, it will be –
/api
- In our case, it will be –
paths: Defines the application endpoints configurationget: Defines the HTTP method for the given endpointoperationId: Defines the python import path/function (i.e. a handler file) that will respond to the given endpoint request. In our case,- The
/api/employeeendpoint will be responded by theread_all(…)method written in theemployees.pyfile - Similarly the
/api/employee/{employee_id}endpoint will be responded by theread_one(…)method written in theemployees.pyfile
- The
tags: Define a grouping for the UI interfacedescription: Defines the implementation notes for the UI interfaceresponse: Defines the beginning of the expected response section
swagger.yml
swagger: '2.0'
info:
  version: 1.0.0
  title: Python Swagger REST article
  description: Swagger file that works in parallel with server to generate endpoints
consumes:
  - application/json
produces:
  - application/json
basePath: /api
# Paths supported by the server application
paths:
  /employee:
    get:
      operationId: employees.read_all
      tags:
        - Employee
      description: Read the list of employee
      responses:
        '200':
          description: Successful read employee list operation
          schema:
            type: array
            items:
              properties:
                id:
                  type: string
                first_name:
                  type: string
                last_name:
                  type: string
                joined_on:
                  type: string
  '/employee/{employee_id}':
    get:
      operationId: employees.read_one
      tags:
        - Employee
      description: Read one employee from the list
      parameters:
        - name: employee_id
          in: path
          description: Employee id of the employee
          type: string
          required: true
      responses:
        '200':
          description: Successful read employee from list operation
          schema:
            properties:
              id:
                type: string
              first_name:
                type: string
              last_name:
                type: string
              joined_on:
                type: string
2.2 Creating a Handler for Application endpoints
Add the following code to the handler script containing the methods that will handle the request from the application endpoints. Each method name corresponds to the operationId defined in the swagger configuration file. We are skipping the other REST operations (like POST, PUT, and DELETE) and only focusing on HTTP GET operation for brevity. You are free to add new endpoints and play around with them.
employees.py
# Modules
from datetime import datetime

from flask import abort


def get_timestamp():
    return datetime.now().strftime('%Y-%m-%d %H:%M:%S')


# Mock employees data
EMPLOYEES = {
    '101': {
        'id': '101',
        'first_name': 'John',
        'last_name': 'Doe',
        'joined_on': get_timestamp()
    },
    '102': {
        'id': '102',
        'first_name': 'Maxim',
        'last_name': 'Klee',
        'joined_on': get_timestamp()
    },
    '103': {
        'id': '103',
        'first_name': 'Nonnah',
        'last_name': 'Kirkland',
        'joined_on': get_timestamp()
    },
    '104': {
        'id': '104',
        'first_name': 'Kit',
        'last_name': 'Tite',
        'joined_on': get_timestamp()
    },
    '105': {
        'id': '105',
        'first_name': 'Grannie',
        'last_name': 'Coulman',
        'joined_on': get_timestamp()
    }
}


# Return all employees
def read_all():
    print('Fetching all employees')
    return [EMPLOYEES[key] for key in EMPLOYEES.keys()]


# Return employee by id
def read_one(employee_id):
    print('Finding employee id = {}'.format(employee_id))
    for key in EMPLOYEES.keys():
        if key == employee_id:
            return EMPLOYEES[key]
    else:
        abort(404, 'Employee id = {} not found'.format(employee_id))
2.3 Adding Connexion to the Server
Add the following code to the main script where will specify the swagger configuration file details to incorporate the connexion into the server. The application will create a connexion instance which in turn will create a Flask app internally but it will have some added functionalities.
app.py
# Modules
import connexion
from flask import jsonify

# Creating the application instance
app = connexion.App(__name__, specification_dir='./configure')

# Reading the swagger.yml file to configure the application endpoints
app.add_api('swagger.yml')


# Index endpoint
# URL - http://localhost:5000/
@app.route('/', methods=['GET'])
def home():
    print('Showing the index message')
    return jsonify({'message': 'Application is up and running'})


# Driver code
if __name__ == '__main__':
    app.run(debug=False)
Run this python script and let us understand the output.
3. Swagger UI
To bring up the swagger on the browser hit the following endpoint – http://localhost:5000/api/ui and the application will bring up a page as shown in Fig. 2.
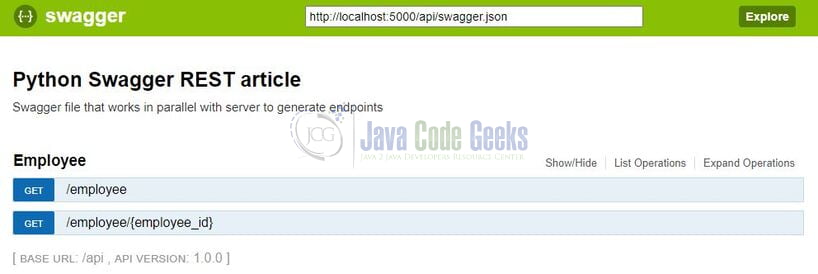
The page displays the initial swagger interface and shows the list of endpoints supported by our application at the following endpoints – http://localhost:5000. This is built automatically by connexion when it parses the swagger.yml file. You are free to try the endpoints and play with them too. That is all for this tutorial and I hope the article served you with whatever you were looking for. Happy Learning and do not forget to share!
4. Summary
In this tutorial, we learned:
- Introduction to Flask micro-framework and Connexion in python programming
- Sample program create an application via the OpenAPI specifications
You can download the source code of this tutorial from the Downloads section.
5. More articles
- Python JSON Example
- Introduction to the Flask Python Web App Framework
- Python Tutorial for Beginners
6. Download the Project
This was a python programming tutorial to understand the connexion in python programming. This is extremely useful as it gives you and your API users a way to explore and experiment with the API without having to write any code.
You can download the full source code of this example here: Introduction to Python REST API
