Hello in this tutorial, we will see how to use Flask WTForms in Python, through a simple application.
1. Introduction
WTF in python is used to create an interactive form in the flask web applications and also serves as the validation library for the form. What is useful:
- The form elements are sent with the request object from the client to the server-side
- Server-side script recreates the form element as there is no mapping between the client HTML form elements and variables used at the server-side
- WTF does not allow rendering HTML form data in real-time
1.1 WT form fields
The following table shows the standard form fields –
| Form Field | Description |
|---|---|
| TextField | Represent the text field HTML form element |
| BooleanField | Represent the checkbox HTML form element |
| DecimalField | Represent the text field to display the numbers with decimals |
| IntegerField | Represent the text field to display the integer values |
| RadioField | Represent the radio button HTML form element |
| SelectField | Represent the select form element |
| TextAreaField | Represent the text area HTML form element |
| PasswordField | Used to take the password as the form input from the user |
| SubmitField | It provides represents the <input type = ‘submit’ value = ‘Submit’> html form element |
2. Setting up Python and important modules
To start with this tutorial we will need to install Python and set up some of the python libraries. Let us go ahead and install them one by one.
2.1 Setting up Python
If someone needs to go through the Python installation on Windows, please watch this link. You can download the Python from this link.
2.2 Setting up Flask libraries
Once the python is successfully installed on your system you can install the Flask and Flask-WTF modules using a simple pip command. You can fire the below command from the command prompt and it will successfully download the modules from pypi.org and install it.
Installation command
pip install -U Flask Flask-WTF
3. How To Use Python Flask-WTForms
I am using JetBrains PyCharm as my preferred IDE. You’re free to choose the IDE of your choice.
3.1 Creating an implementation file
Add the following code to the python script. The file will contain the Flask app, routes, and form using the Flask WTF module. WT form will use the SECRET_KEY as a CSRF token to the application.
app.py
# python - wt forms tutorial

# modules
from os import urandom

from flask import Flask, render_template
from flask_wtf import FlaskForm
from wtforms import StringField, SubmitField
from wtforms.validators import DataRequired, Length

app = Flask(__name__, template_folder='.')
app.config['SECRET_KEY'] = urandom(16)


# user form class
class WelcomeUserForm(FlaskForm):
    name = StringField(label='Enter name: ',
                       validators=[
                           DataRequired(message='Name is required'),
                           Length(min=4, message='Name must be greater than %(min)d characters')
                       ])
    submit = SubmitField(label='Submit')


# application endpoint to render the html file and perform post op
# endpoint - http://127.0.0.1:5000/
@app.route('/', methods=['GET', 'POST'])
def welcome():
    form = WelcomeUserForm()
    if form.validate_on_submit():
        return f'''<h4>Hello {form.name.data}</h4>'''

    return render_template('form.html', form=form)


# driver code
if __name__ == '__main__':
    app.run(debug=False)
3.2 Creating an implementation file
Add the following code to the HTML file. We will use the form object to pass the WT form elements into the template parser for the Flask. The CSRF token protect the application against CSRF attacks.
form.html
<!DOCTYPE html>
<html lang="en">
<head>
    <meta charset="UTF-8"/>
    <link rel="stylesheet" href="https://maxcdn.bootstrapcdn.com/bootstrap/3.4.1/css/bootstrap.min.css">
    <title>Welcome</title>
</head>
<body>
<form method="POST" action="">
    <div class="form-row">
        <div class="form-group col-md-6">
            {{ form.csrf_token() }}
            <label class="control-label col-sm-2"> {{ form.name.label }}</label>
            <div class="col-sm-10">
                {{ form.name }}
            </div>
            {% for field, errors in form.errors.items() %}
            <small class="form-text text-muted">
                {{ ', '.join(errors) }}
            </small>
            {% endfor %}
        </div>
        <div class="form-group">{{ form.submit(class="btn btn-primary") }}</div>
    </div>
</form>
</body>
</html>
4. Run the application
Run this app.py script and the application will be started on the port number – 5000. Once the application is started successfully open the browser of your choice and hit the localhost endpoint.
http://127.0.0.1:5000/
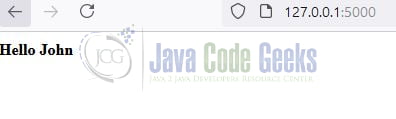
The index page will be shown to the user as shown in Fig. 1.

Enter a name in the input field and the greeting message will be shown to the user as per the route defined in the app.py script.

The HTML form also consists of the validation such as required or max length for the name field and will be shown to the user if the form validation fails as shown in Fig. 3.
That is all for this tutorial and I hope the article served you with whatever you were looking for. Happy Learning and do not forget to share!
5. Summary
This was the tutorial to learn about the WT forms in python programming where we saw that the WT forms are responsible to create interactive forms in flask web applications and also support form validation. You are free to change the source code and can download it from the Downloads section.
6. Download the Project
This was a tutorial on how to use WT forms in python programming.
You can download the full source code of this example here: How To Use Python Flask-WTForms
