1. Introduction
Amazon was founded in early 2000, prior to this experience with building Mercant.com, which offers e-commerce as a service platform for third-party retailers.
AWS stands for the acronym Amazon Web Service. This provides on-demand cloud computing platforms and API. The platform offers a model plan for these services called Pay-as-you-go, which is a fee of combination: usage, hardware, operating system, software, or networking feature and service options chosen by the subscriber. There are multiple farms that you can choose for your desired region which are located throughout the world. The most popular service is EC2 instances where you can start up a new instance with the desired operating system that is accessible through the Internet.
Working in a cloud infrastructure the AWS CLI is needed to automate some flows on your project, to easily do your job. Choosing CLI in detriment of the AWS interface to browse through all the services, you can leverage the benefits of this powerful engine (CLI) to manage your AWS services from a terminal session on your own client. Given that fact, you can automate that through scripts that run AWS CLI commands.
For more information about Amazon/AWS services, you can find it here.
2. What is AWSCLI?
The meaning of AWS we covered in the previous section. CLI stands for Command Line Interface used for managing your AWS services from the terminal, allowing you to control and configure multiple services from AWS, to be able to implement a level of automation. With just this tool installed and configured you will be able to control multiple AWS services.
Syntax for AWS CLI is:
aws [options] <command> <subcommand> [parameters]
For options you can set multiple values, e.g.: –debug (boolean – to enable logging), –endpoint-url (String – overwrite command’s default URL with the given URL), –no-verify-ssl (boolean – if you don’t overwrite this option the AWS CLI will verify certificates to communicate with AWS services.), –no-paginate (boolean – disable automatic pagination), –region (String – Region to use, this will overwrite the configuration/env settings), and others option you can find in the official documentation.
To find more information about a command in your command line type: aws command help and to list topics type: aws help topics.
For more information about AWS CLI and what you can control through it, you can find it in the official documentation.
3. How to install it on different platforms?
AWS offers different installers for different platforms to handle AWS services with CLI. According to the official documentation, it’s possible to install AWSCLI on the following platforms: Linux, macOS, and Windows. Besides the above platforms, you can run your CLI commands from a docker image that is already pushed on Docker HUB. Furthermore, in this article, we will cover installation on Windows, Linux, and running commands from Docker image.
3.1. Installing AWSCLI on Windows
The supported version of AWS CLI is 64-bit and you need your operating system to run on 64-bit.
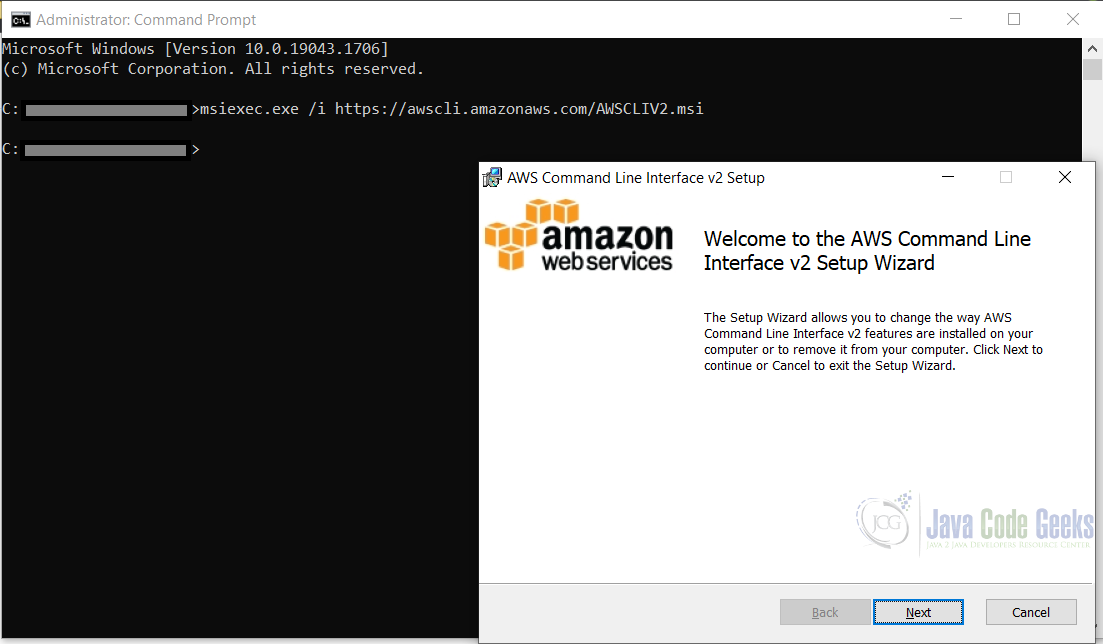
To install the AWS CLI you can download the installer from here or simply by running this command in your command line:
msiexec.exe /i https://awscli.amazonaws.com/AWSCLIV2.msi #automatically download and Install the AWS CLI
After you executed the above command, install windows for AWS CLI will show up and you have just to follow the installation steps.
After a successful installation, check your version by typing: aws --version
3.2. Installing AWSCLI on Linux
Installing on Linux is a bit similar to installing on Windows. You can choose the type of installer, on which Linux architecture you are running. Besides the installer, you need to already have installed an unzip tool to be able to unzip/extract a file. glibc, groff, and less should be already on the major distribution of Linux. Similarly, with Windows, AWS CLI supports running only on 64-bits of recent distributions of CentOS, Fedora, Ubuntu, Amazon Linux 1, Amazon Linux 2, and Linux ARM.
To install the CLI just copy this in your command line (for x86 – 64 bit):
curl "https://awscli.amazonaws.com/awscli-exe-linux-x86_64.zip" -o "awscliv2.zip"
unzip awscliv2.zip
sudo ./aws/install
For ARM:
curl "https://awscli.amazonaws.com/awscli-exe-linux-aarch64.zip" -o "awscliv2.zip"
unzip awscliv2.zip
sudo ./aws/install
Or just simply put that URL in your browser to download the installer.
To check the installed version just type in the console: aws --version
3.3. Running AWS CLI from docker
To run the AWS CLI from a docker image, you have to already install the docker on your machine. To check your docker version type: docker --version.
After you have installed docker you can check your AWS CLI by typing this command:
docker run --rm -it amazon/aws-cli --version
You can run similar code as you run with AWS CLI.
4. Examples of using CLI
If you want to run a command on AWS services you need to have an account prior. Amazon offers a free tier plan for most of the services just to get familiar before you dive into real-world tasks.
To configure the setup for login you need to set up your AWSCLI with aws configure. When you enter that command CLI you will be asking for 4 pieces of information about the configuration setup: Access Key Id, Secret Access Key, AWS Region and Output format. Before you type aws configure you need to generate/use the existing access key and secret access key. If you want to generate a new Access Key/Secret Access Key you need to create a new user with AWS credential type as Access key – Programmatic access. After you generated this you have to follow up on the steps aws configure to set up your credentials.
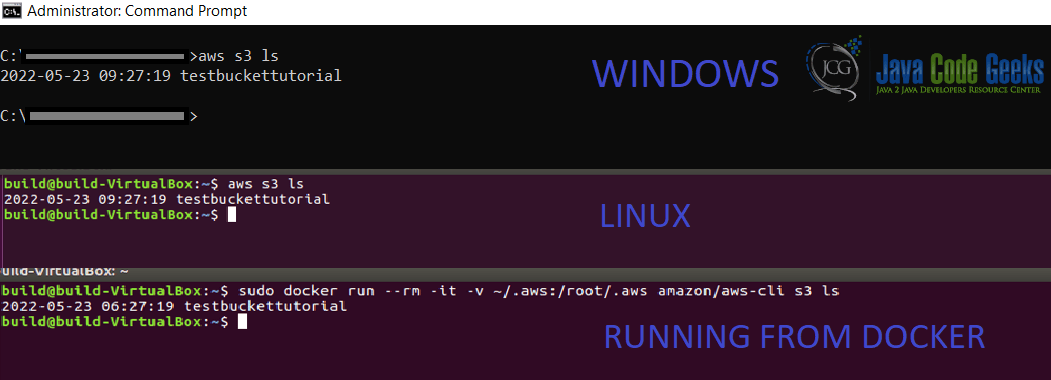
In the below image we will show the s3 command running on these 2 platforms (Windows and Linux) and also running the same command from the Docker image. The result for all of them will be the same.
5. Conclusion
Having these concepts in mind and the steps on how to install AWSCLI on different platforms will help you at a starting point.
This article covers the purpose of Amazon with a brief introduction to the company’s business. Besides that, we presented the concept of AWSCLI and its usability of it. Above all, we covered the steps on how to install it on different platforms and an example for all of these platforms.
