Git Fork and Clone Operations Explained
Git offers a flexible way to manage and collaborate on code and two fundamental operations that we will encounter when working with Git are git fork vs clone commands. In this article, we will explore these two Git operations.
1. Forking in Git
A fork is a copy of a Git repository owned by an individual (user) or an organization. Forking enables collaboration, allowing others to contribute to a project without altering the original repository. Once changes are made in a forked repository, they can be submitted as pull requests to the original project for review and potential inclusion by the maintainers of the project.
Below is a guide on how to fork a project:
- Create a GitHub Account If you don’t already have one and Log in to your account.
- Navigate to the project/repository you want to fork. This is typically in the format
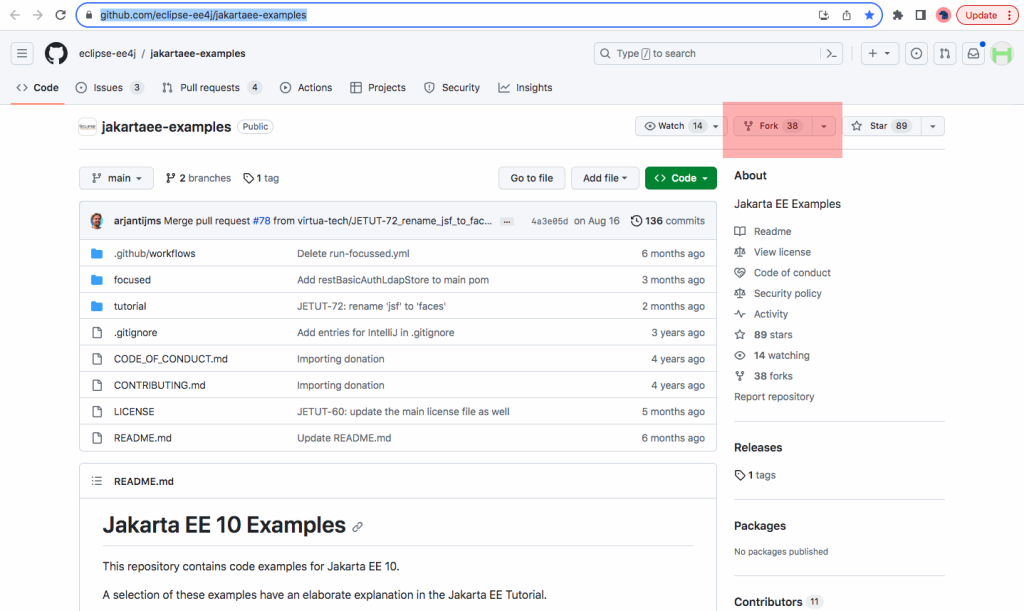
https://github.com/username/repo-namee.g.https://github.com/eclipse-ee4j/jakartaee-examples - Next, Fork the Project on the project’s page, by clicking on the
Forkbutton in the upper right corner of the page as shown in Fig 1 (screenshot shown below). Wait for the Fork to complete and you will be redirected to your own forked repository once it’s done.
To work on the project, we need to have it on our local machine by using Git to clone our forked repository.
1.1 Forking a project using the GitHub Command Line Interface (CLI)
The GitHub Command Line Interface (CLI) allows us to create a copy of a repository on GitHub from the command line. Here’s how we can fork a project using the GitHub CLI:
- If we have GitHub CLI already installed, then we need to authenticate with our GitHub account by running the command below, and following the prompts:
gh auth login
- Next, we need to use the
gh repo forkcommand, specifying the URL of the repository we want to fork.For example, If we wanted to fork a repository called
jakartaee-examplesowned byeclipse-ee4j, we would run the following command:
gh repo fork https://github.com/eclipse-ee4j/jakartaee-examples
2. Cloning in Git
Cloning a project in Git means creating a local copy of a remote Git repository on our computer. This allows us to work with the repository’s files, make changes, and collaborate with others. When we clone a repository, we download the entire project, including the project’s commit history, branches, and metadata.
To clone a repository, use the git clone command followed by the repository’s URL. Listed below are steps to clone a Git project:
- If you already have Git installed, Open a Terminal or Command Prompt and navigate to the directory where you want to clone the repository.
- Clone the Repository by using the git clone command. You will need the URL of the remote repository you want to clone. The basic syntax for cloning is
git clone repository_url. For example, you can clone thejakartaee-examplesrepository like this:
git clone https://github.com/eclipse-ee4j/jakartaee-examples.git
Note that If you are cloning a private repository or a repository that requires authentication, you might need to use an SSH URL or provide your username and password/token.
Once the cloning process is complete, we will have a local copy of the repository in our specified directory. We can navigate to this directory, work with the files in the repository, make changes, commit our changes, and push them back to the remote repository if we have write access.
3. Conclusion
Understanding Git fork vs clone operations is essential for effective collaboration in software projects. Forking allows developers to work independently, while cloning provides the means to work on a local copy of a project.


