Getting Started with Python FastAPI
Hello in this tutorial, we will understand how to use FastAPI in python programming to develop fast and high-performance Restful endpoints.
1. Introduction
FastAPI is a fast and high-performance web framework for building api with python 3.6+. It offers many features like:
- High performance
- Automatic interactive code generation
- Offers great editor support and documentation
In this tutorial, we will focus on the basic implementation of FastAPI and play around with it.
1.1 Setting up Python
If someone needs to go through the Python installation on Windows, please watch this link. You can download the Python from this link.
2. Variables in Python
I am using JetBrains PyCharm as my preferred IDE. You’re free to choose the IDE of your choice.
2.1 Creating a requirements file
Add the below code to the requirements file. The file will be responsible to download and install the packages required for this tutorial.
requirements.txt
fastapi
uvicorn
2.2 Creating an implementation file
Add the below code to the python script. The script will be responsible to expose the Restful endpoints using the FastAPI and will also generate the interactive swagger documentation automatically.
- Health check endpoint
- Get all todos endpoint
- Get todo by id endpoint
You’re free to play around with these methods as per your wish.
index.py
# fast api implementation.
# swagger documentation - http://localhost:5001/docs
# redocs documentation - http://localhost:5001/redoc

import uvicorn
from fastapi import FastAPI, APIRouter

TODOS = [
    {
        "id": 1,
        "text": "Learn about Polymer",
        "created_at": "Mon Apr 26 06:01:55 +0000 2015",
        "Tags": [
            "Web Development",
            "Web Components"
        ],
        "is_complete": "true"
    },
    {
        "id": 2,
        "text": "Watch Pluralsight course on Docker",
        "created_at": "Tue Mar 02 07:01:55 +0000 2015",
        "Tags": [
            "Devops",
            "Docker"
        ],
        "is_complete": "true"
    },
    {
        "id": 3,
        "text": "Complete presentation prep for Aurelia presentation",
        "created_at": "Wed Mar 05 10:01:55 +0000 2015",
        "Tags": [
            "Presentation",
            "Aureia"
        ],
        "is_complete": "false"
    },
    {
        "id": 4,
        "text": "Instrument creation of development environment with Puppet",
        "created_at": "Fri June 30 13:00:00 +0000 2015",
        "Tags": [
            "Devops",
            "Puppet"
        ],
        "is_complete": "false"
    },
    {
        "id": 5,
        "text": "Transition code base to ES6",
        "created_at": "Mon Aug 01 10:00:00 +0000 2015",
        "Tags": [
            "ES6",
            "Web Development"
        ],
        "is_complete": "false"
    }
]

# 1
app = FastAPI(
    title="Hello world app"
)

# 2
api_router = APIRouter()


# 3

# endpoint- http://localhost:5001/
@api_router.get("/", description="health check", status_code=200)
def index():
    return {
        "status": "ok",
        "message": "app is up and running"
    }


# endpoint- http://localhost:5001/todos
@api_router.get("/todos", description="get all todo items", status_code=200)
def get_todos():
    print("Getting all todo list")
    return {
        "status": "ok",
        "items": TODOS
    }


# endpoint- http://localhost:5001/todo/1
@api_router.get("/todo/{key}", description="get todo item by id", status_code=200)
def get_todo(key: int):
    print("Getting todo id={}".format(key))
    result = [todo for todo in TODOS if todo["id"] == key]
    if result:
        return {
            "status": "ok",
            "item": result[0]
        }
    else:
        return {
            "status": "not_found",
            "message": "resource not found"
        }


# 4
app.include_router(api_router)

# driver code
if __name__ == '__main__':
    uvicorn.run(app, host="localhost", port=5001, log_level="debug")
Run this python script once the module dependency is completed and if everything goes well the application will be started on the port number – 5001 as shown in the below logs.
Application logs
INFO:     Started server process [24428]
INFO:     Waiting for application startup.
INFO:     Application startup complete.
INFO:     Uvicorn running on http://localhost:5001 (Press CTRL+C to quit)
3. Demo
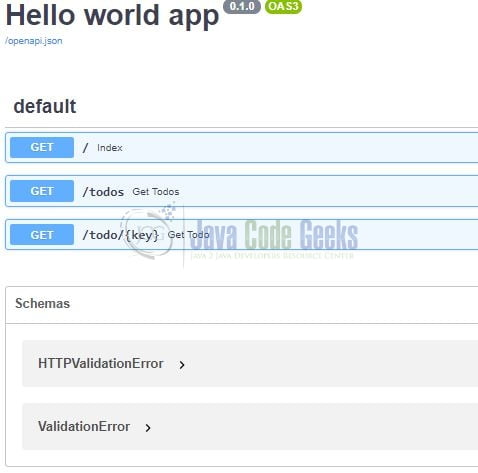
Open up the browser of your choice and hit the swagger documentation endpoint generated via the FastAPI. The documentation will list the endpoints created above.
Documentation endpoint
http://localhost:5001/docs
If everything goes well the documentation page will be shown as in Fig. 1.
That is all for this tutorial and I hope the article served you with whatever you were looking for. Happy Learning and do not forget to share!
4. Summary
In this tutorial, we learned about the FastAPI in python programming to generate the high-performance Restful endpoints. You can download the source code of this tutorial from the Downloads section.
5. Download the Project
This was a tutorial on how to implement FastAPI in python programming.
You can download the full source code of this example here: Getting Started with Python FastAPI


