Spring Batch Job Parameters Example
In this article we shall show you how you can pass job parameters to a spring batch job.
1. Introduction
A typical enterprise application requires a batch job that consists of one or more steps. Each step reads the input data, processes the input data, and writes the processed data to the configured output. In a batch job with more than one step, the output of a step is often used as an input of the next step.
Spring Batch provides reusable functions that are essential in processing large volumes of records, including logging/tracing, transaction management, job processing statistics, job restart, skip, and resource management.
2. Basic concept
A Spring Batch job consists of the following components:
- A spring batch job combines one or more steps that belong logically together in a flow. All steps in a job are processed sequentially. A job has different job instances and these job instances differ on the basis of job parameters.
JobParametersis a set of parameters used to start a batch job.JobParameterscan be used for identification or even as reference data during the job run.They have reserved names, so to access them we can use Spring Expression Language. For example to access a property ‘abc’ on job parameters: we can access it using the syntax#{jobParameters[abc]}. AJobExecutionhas all the information about what happened during the job run. - A
Steprepresents an independent logical task. - A
JobLauncherrepresents a simple interface for launching aJobwith a given set ofJobParameters. - An
ItemReaderreads the input data and provides the found items one by one. - An
ItemProcessortransforms the items into a form that is understood by theItemWriterone item at a time. - An
ItemWriterwrites an information of an item to the output one item at a time.
3. Sample Project
Let us see an example how we can pass and access JobParameters in a spring batch job.
3.1 Technologies used
I have used the following technologies to build this example.
- Spring sts 3.9
- JDK 1.8
In this project, I have a list of students in an XML format. I read it, I filter out the failed students i.e students with less than 30 marks, and I create a CSV file with all the passed students. I pass the name of the XML file and the CSV file using JobParameters to JobLauncher.
3.2 Project Structure
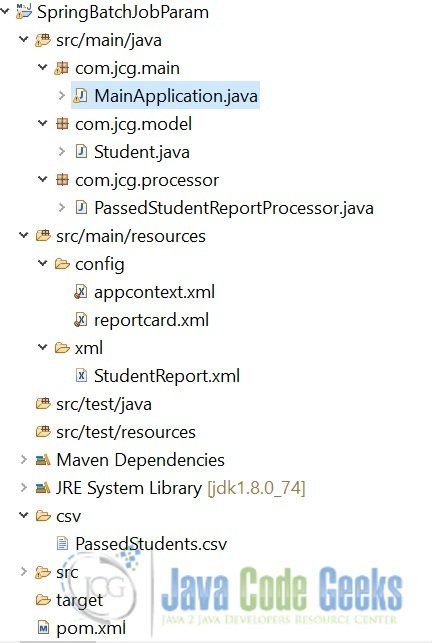
The following image shows the final project structure.
3.3 Project Creation
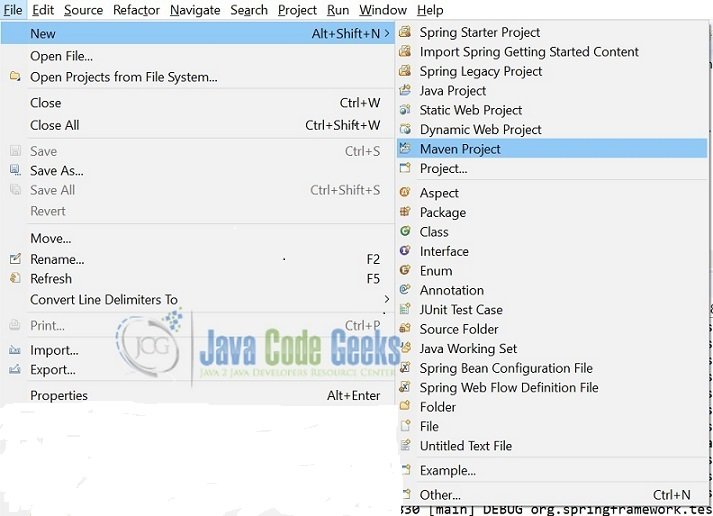
This section shows how to create a Java-based Maven project in Spring Sts. In Spring Sts go to File-->New-->Maven Project.
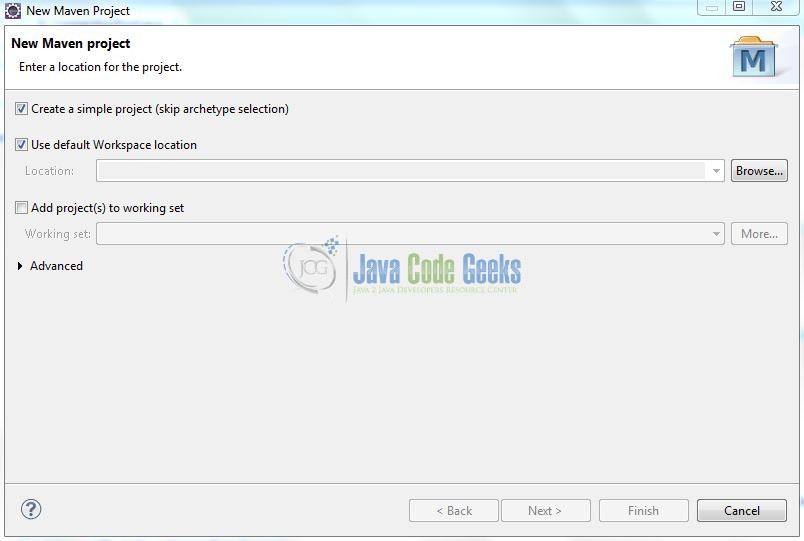
In the New Maven Project window, enable ‘Use default workspace location‘ and ‘Create a simple project (skip archetype selection)‘ checkbox and click on the next button to proceed.
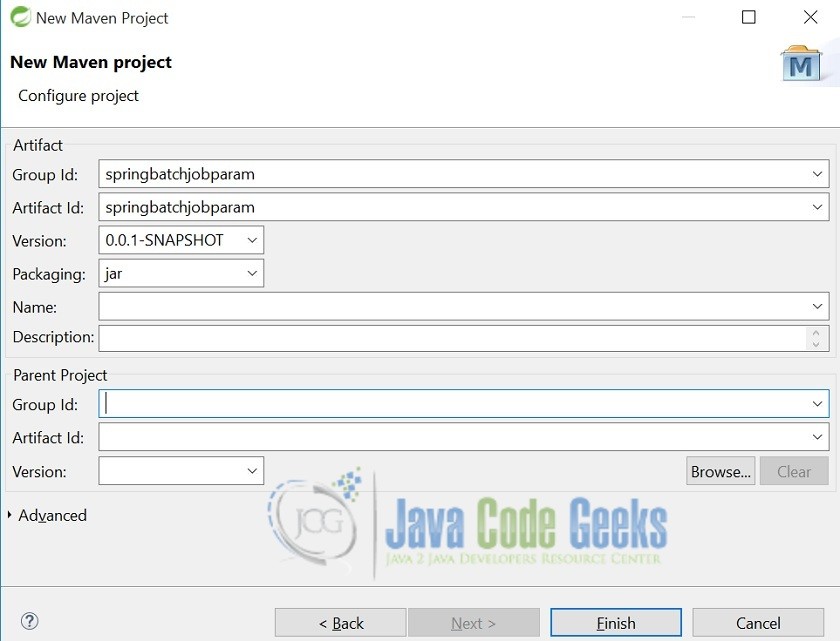
Enter the group details and the artifact id for the project as shown. The version number will be by default: 0.0.1-SNAPSHOT.
Click finish and a new maven project will be created.
3.4 Maven Dependencies
In the below xml file, I have defined the dependencies for spring batch, spring core and spring oxm.
pom.xml
<project xmlns="http://maven.apache.org/POM/4.0.0" xmlns:xsi="http://www.w3.org/2001/XMLSchema-instance" xsi:schemaLocation="http://maven.apache.org/POM/4.0.0 http://maven.apache.org/xsd/maven-4.0.0.xsd">
  <modelVersion>4.0.0</modelVersion>
  <groupId>SpringBatchJobParam</groupId>
  <artifactId>SpringBatchJobParam</artifactId>
  <version>0.0.1-SNAPSHOT</version>
  <dependencies>
        <!-- Spring Core -->
        <dependency>
            <groupId>org.springframework</groupId>
            <artifactId>spring-core</artifactId>
            <version>4.3.5.RELEASE</version>
        </dependency>

        <dependency>
            <groupId>org.springframework.batch</groupId>
            <artifactId>spring-batch-core</artifactId>
            <version>3.0.7.RELEASE</version>
        </dependency>

        		<!-- Spring XML to/back object -->
		<dependency>
			<groupId>org.springframework</groupId>
			<artifactId>spring-oxm</artifactId>
			<version>4.3.5.RELEASE</version>
		</dependency>
  </dependencies>
</project>
3.5 Java Class Creation
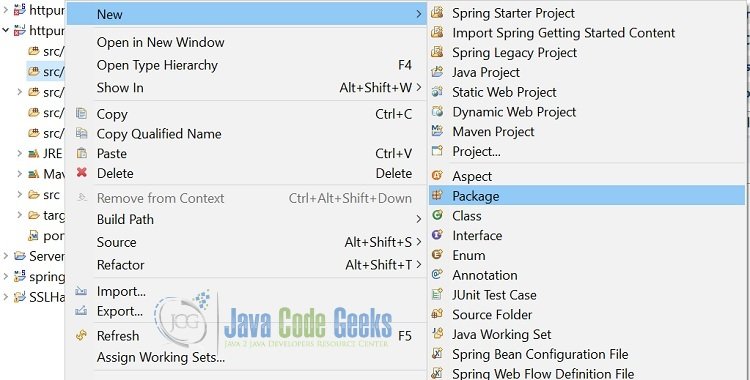
Let’s create the required Java files. Right-click on src/main/java folder, New -> Package.
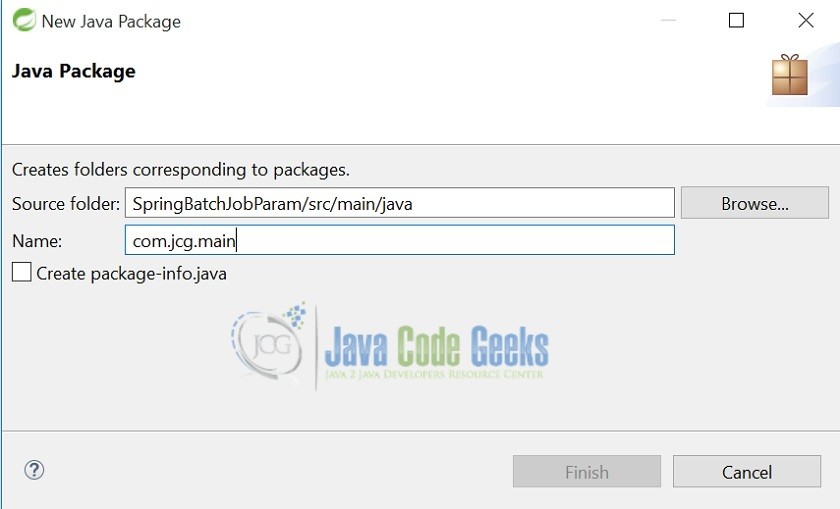
Enter the package name com.jcg.main in the popup window for package creation.
Following the above two steps for package creation, create two more packages com.jcg.model and com.jcg.processor.
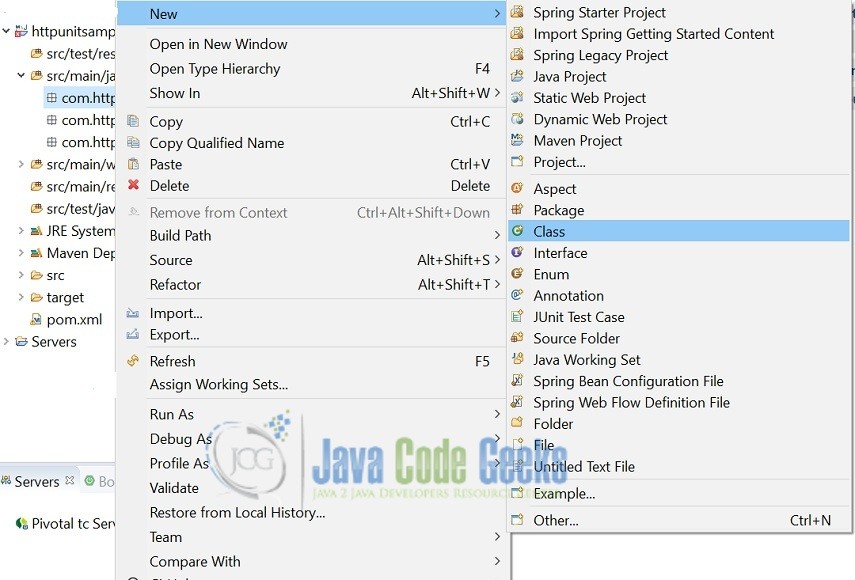
Once the package is created let us create implementation classes as shown below. Right-click on the newly created package, New -> Class.
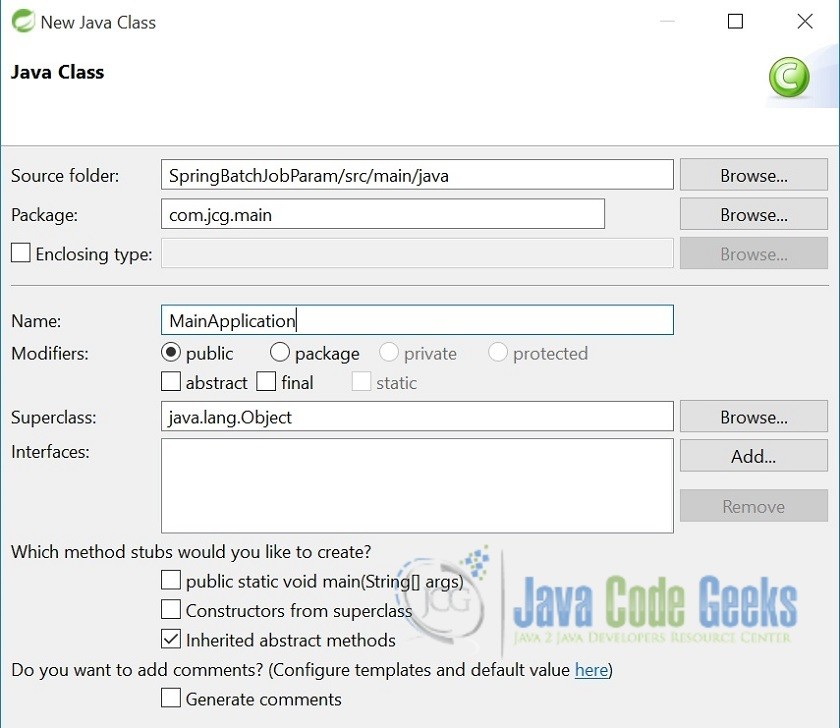
Enter classname as MainApplication. A new class will be created under the package com.jcg.main.
Following the above steps for class creation, create a class for Student.java and PassedStudentReportProcessor.java under the package com.jcg.model and com.jcg.processor respectively.
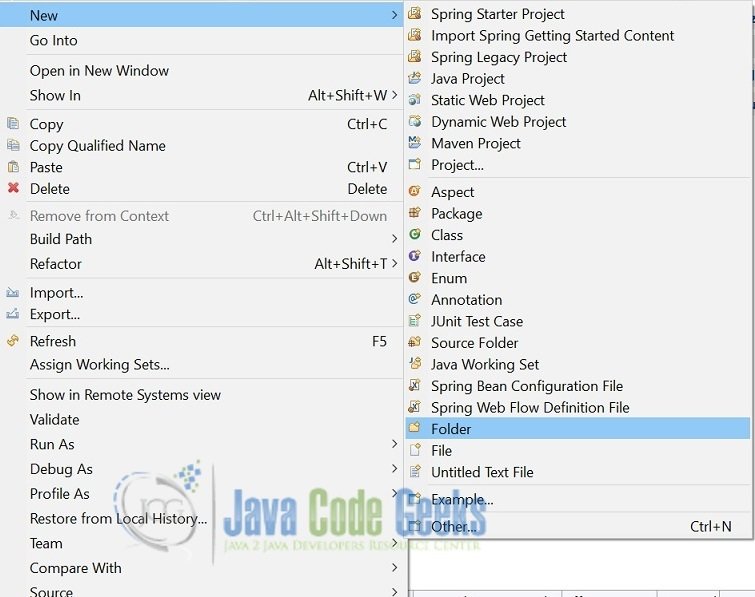
Create a folder to hold the context and job related property files named config and an another folder xml to hold the xml file with a list of students as shown below.
Let us create the configuration files appcontext.xml and reportcard.xml for the project under config folder under src/main/resources.
Create an xml file StudentReport.xml with a list of all the students with their marks under folder xml under src/main/resources.
Below is the code for all the classes defined above.
In the below main class, I have passed the required JobParameters to the class JobLauncher alongwith the job.
MainApplication.java
package com.jcg.main;

import org.springframework.batch.core.Job;
import org.springframework.batch.core.JobExecution;
import org.springframework.batch.core.JobParameters;
import org.springframework.batch.core.JobParametersBuilder;
import org.springframework.batch.core.launch.JobLauncher;
import org.springframework.context.ApplicationContext;
import org.springframework.context.support.ClassPathXmlApplicationContext;

public class MainApplication {

	public static void main(String[] args) {


		ApplicationContext context =
				new ClassPathXmlApplicationContext("config/reportcard.xml","config/appcontext.xml");

		JobLauncher jobLauncher = (JobLauncher) context.getBean("jobLauncher");
		Job job = (Job) context.getBean("studentReportJob");

		try {

			JobParametersBuilder jobBuilder= new JobParametersBuilder();
			jobBuilder.addString("passstudentfilename", "PassedStudents");
			jobBuilder.addString("marksfileName","StudentReport");
			JobParameters jobParameters =jobBuilder.toJobParameters();
			JobExecution execution = jobLauncher.run(job, jobParameters);
			System.out.println("Completion Status : " + execution.getStatus());

		} catch (Exception e) {
			e.printStackTrace();
		}

		System.out.println("Done");

	}

}
The below model class has the required xml tags for marshalling and unmarshalling the xml objects into java objects.
Student.java
package com.jcg.model;

import javax.xml.bind.annotation.XmlAttribute;
import javax.xml.bind.annotation.XmlElement;
import javax.xml.bind.annotation.XmlRootElement;

@XmlRootElement(name = "student")
public class Student {

		private int studentId;
		private String name;
		private int marks;

		@XmlAttribute(name = "studentId")
		public int getStudentId() {
			return studentId;
		}

		public void setStudentId(int studentId) {
			this.studentId = studentId;
		}

		@XmlElement(name = "name")
		public String getName() {
			return name;
		}

		public void setName(String name) {
			this.name = name;
		}

		@XmlElement(name = "marks")
		public int getMarks() {
			return marks;
		}

		public void setMarks(int marks) {
			this.marks = marks;
		}


}
In the below processor class, I am filtering all the students who have scored less than 30 marks.
PassedStudentReportProcessor.java
package com.jcg.processor;

import org.springframework.batch.item.ItemProcessor;

import com.jcg.model.Student;

public class PassedStudentReportProcessor implements ItemProcessor {

	public Student process(Student item) throws Exception {
		//filter object with marks< 30
		if(item.getMarks() <30){
			return null; // null = ignore this object
		}
		return item;
	}


}
The below xml file has definitions for JobRepository and TransactionManager.
appcontext.xml
<beans xmlns="http://www.springframework.org/schema/beans"
	xmlns:xsi="http://www.w3.org/2001/XMLSchema-instance"
	xsi:schemaLocation="
		http://www.springframework.org/schema/beans
		http://www.springframework.org/schema/beans/spring-beans-3.2.xsd">

	<bean id="jobRepository"
		class="org.springframework.batch.core.repository.support.MapJobRepositoryFactoryBean">
		<property name="transactionManager" ref="transactionManager" />
	</bean>

	<bean id="transactionManager"
		class="org.springframework.batch.support.transaction.ResourcelessTransactionManager" />

	<bean id="jobLauncher"
		class="org.springframework.batch.core.launch.support.SimpleJobLauncher">
		<property name="jobRepository" ref="jobRepository" />
	</bean>

</beans>
The below xml file defines a job that reads an xml file, processes it and creates a csv file. Here, the xml filename and the csv filename are provided during runtime.
reportcard.xml
<beans xmlns="http://www.springframework.org/schema/beans"
	xmlns:batch="http://www.springframework.org/schema/batch" xmlns:task="http://www.springframework.org/schema/task"
	xmlns:util="http://www.springframework.org/schema/util" xmlns:xsi="http://www.w3.org/2001/XMLSchema-instance"
	xsi:schemaLocation="http://www.springframework.org/schema/batch
		http://www.springframework.org/schema/batch/spring-batch-2.2.xsd
		http://www.springframework.org/schema/beans
		http://www.springframework.org/schema/beans/spring-beans-3.2.xsd
		http://www.springframework.org/schema/util
		http://www.springframework.org/schema/util/spring-util-3.2.xsd">

	<batch:job id="studentReportJob">
		<batch:step id="step1">
			<batch:tasklet>
				<batch:chunk reader="xmlItemReader" writer="cvsFileItemWriter" processor="passedStudentReportProcessor"
					commit-interval="1">
				</batch:chunk>
			</batch:tasklet>
		</batch:step>
	</batch:job>

	<bean id="passedStudentReportProcessor" class="com.jcg.processor.PassedStudentReportProcessor" scope="step"/>

	<bean id="xmlItemReader" class="org.springframework.batch.item.xml.StaxEventItemReader" scope="step">
		<property name="fragmentRootElementName" value="student" />
		<property name="resource" value="classpath:xml/#{jobParameters['marksfileName']}.xml" />
		<property name="unmarshaller" ref="reportUnmarshaller" />
	</bean>

	<!-- Read and map values to object, via jaxb2 -->
	<bean id="reportUnmarshaller" class="org.springframework.oxm.jaxb.Jaxb2Marshaller">
		<property name="classesToBeBound">
			<list>
				<value>com.jcg.model.Student</value>
			</list>
		</property>
	</bean>

	<bean id="cvsFileItemWriter" class="org.springframework.batch.item.file.FlatFileItemWriter" scope="step">

		<!-- write to this csv file -->
		<property name="shouldDeleteIfExists" value="true" />
 		<property name="resource"
      value="file:csv/#{jobParameters['passstudentfilename']}.csv" />
		<property name="lineAggregator">
			<bean
				class="org.springframework.batch.item.file.transform.DelimitedLineAggregator">
				<property name="delimiter" value="," />
				<property name="fieldExtractor">
					<bean
						class="org.springframework.batch.item.file.transform.BeanWrapperFieldExtractor">
						<property name="names" value="studentId,name,marks" />
					</bean>
				</property>
			</bean>
		</property>

	</bean>

</beans>
The below xml file has a list of students with their respective marks.
StudentReport.xml
<?xml version="1.0" encoding="UTF-8" ?>
<College>
    <student studentId="1001">
        <name>Gaurav</name>
        <marks>40</marks>
    </student>
    <student studentId="1002">
        <name>Garima</name>
        <marks>10</marks>
        <dob>26/7/1983</dob>
        <income>100,999</income>
    </student>
    <student studentId="1003">
        <name>Mahima</name>
        <marks>35</marks>
    </student>
</College>
3.6 Maven Build
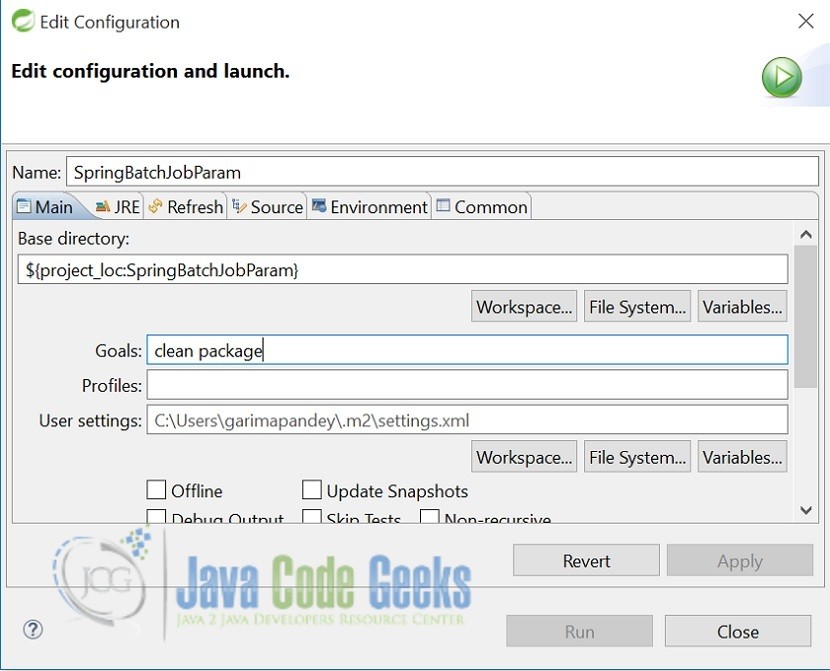
Build the application with command as Run As-->Maven Build--> Provide goals as clean package .
3.7 Run Java Application
Run the application using the command Run As--> Java Application.
3.8 Project Demo
When I run the application as a java application, a PassedStudents.csv is created under the folder csv under the project alongside src folder with contents as shown in the below image.
The above image has all the students that have marks greater than 30.
4. Conclusion
That’s all for getting the developers started with spring batch job parameters. I hope this article served you well. Developers can download the sample application as an Eclipse project in the Downloads section.
5. Download the Source Code
This was an example on how you can pass JobParameters to spring batch job.
You can download the full source code of this example here: Spring Batch Job Parameters Example

