This article is a tutorial about Spring Batch and running the jobs with CommandLineJobRunner. We will use Spring Boot to speed our development process.
1. Introduction
Spring Batch is a lightweight, scale-able and comprehensive batch framework to handle data at massive scale. Spring Batch builds upon the spring framework to provide intuitive and easy configuration for executing batch applications. Spring Batch provides reusable functions essential for processing large volumes of records, including cross-cutting concerns such as logging/tracing, transaction management, job processing statistics, job restart, skip and resource management.
Spring Batch has a layered architecture consisting of three components:
- Application – Contains custom code written by developers.
- Batch Core – Classes to launch and control batch job.
- Batch Infrastructure – Reusable code for common functionalities needed by core and Application.
Let us dive into spring batch with a simple example of a tasklet and see how we can leverage CommandLineJobRunner to run our job. The main use of CommandLineJobRunner is to run our Spring Batch jobs via Shell script. Spring provides a flexible quartz scheduler but often there may be a need to trigger based on events in our host environment which is achieved by using CommandLineJobRunner.
2. Technologies Used
- Java 1.8.101 (1.8.x will do fine)
- Gradle 4.4.1 (4.x will do fine)
- IntelliJ Idea (Any Java IDE would work)
- Rest will be part of the Gradle configuration.
3. Spring Batch Project
Spring Boot Starters provides more than 30 starters to ease the dependency management for your project. The easiest way to generate a Spring Boot project is via Spring starter tool with the steps below:
- Navigate to https://start.spring.io/
- Select Gradle Project with Java and Spring Boot version 2.0.1.
- Add Batch and H2 in the “search for dependencies”
- Enter the group name as
com.jcgand artifact asspcljr - Click the Generate Project button
A Gradle Project will be generated. If you prefer Maven, use Maven instead of Gradle before generating the project. Import the project into your Java IDE.
3.1 Gradle File
We will look at the generated gradle file for our project. It has detailed configuration outlining the compile time and run time dependencies for our project.
build.gradle
buildscript {
    ext {
        springBootVersion = '2.0.1.RELEASE'
    }
    repositories {
        mavenCentral()
    }
    dependencies {
        classpath("org.springframework.boot:spring-boot-gradle-plugin:${springBootVersion}")
    }
}

apply plugin: 'java'
apply plugin: 'eclipse'
apply plugin: 'idea'
apply plugin: 'org.springframework.boot'
apply plugin: 'io.spring.dependency-management'

group = 'com.jcg'
version = '0.0.1-SNAPSHOT'
sourceCompatibility = 1.8

repositories {
    mavenCentral()
}


dependencies {
    compile('org.springframework.boot:spring-boot-starter-batch')
    compileOnly('org.projectlombok:lombok')
    runtime("org.hsqldb:hsqldb")
    testCompile('org.springframework.boot:spring-boot-starter-test')
    testCompile('org.springframework.batch:spring-batch-test')
}

bootJar {
    mainClassName = 'org.springframework.batch.core.launch.support.CommandLineJobRunner'
}- We have provided
Mavenas the repository for all our dependencies. - Idea plugin has been applied to support Idea IDE in line 15.
- Spring Boot Batch Starter dependency is applied to enable batch nature in our project.
- Lombok Annotations are added to avoid typing tedious boiler plate code.
- HSQL DB is provided as runtime dependency to save spring batch job status in embedded mode. Spring batch needs to track the job execution, results in a reliable manner to survive across job restarts and abnormal terminations. To ensure this, generally they are stored in the database but since our application does not use a persistent store, Hsql DB in embedded mode is utilized for the same.
- Lines 32,33 represent the test configuration.
- We need to configure the main class to
CommandLineJobRunneror else it will pick our application class as the main class and directly execute our jobs.
3.2 Tasklet Configuration
Below we will look at the batch configuration for a simple Tasklet step. Tasklet does not follow a strict construct but provides a single execute method where business logic resides.
Tasklet Configuration
package com.jcg.spcljr.config;

import org.slf4j.Logger;
import org.slf4j.LoggerFactory;
import org.springframework.batch.core.Job;
import org.springframework.batch.core.configuration.annotation.EnableBatchProcessing;
import org.springframework.batch.core.configuration.annotation.JobBuilderFactory;
import org.springframework.batch.core.configuration.annotation.StepBuilderFactory;
import org.springframework.batch.core.launch.support.RunIdIncrementer;
import org.springframework.batch.core.step.tasklet.Tasklet;
import org.springframework.batch.core.step.tasklet.TaskletStep;
import org.springframework.batch.repeat.RepeatStatus;
import org.springframework.beans.factory.annotation.Autowired;
import org.springframework.context.annotation.Bean;
import org.springframework.context.annotation.Configuration;

@Configuration
@EnableBatchProcessing
public class SpringBatchConfig {

    Logger logger = LoggerFactory.getLogger(SpringBatchConfig.class);

    @Autowired
    public JobBuilderFactory jobBuilderFactory;

    @Autowired
    public StepBuilderFactory stepBuilderFactory;

    @Bean
    public Job job1() {
        return jobBuilderFactory.get("job1")
                .incrementer(new RunIdIncrementer())
                .start(step1()).build();
    }

    private TaskletStep step1() {
        Tasklet tasklet = (contribution, context) -> {
            logger.info("This is from tasklet step with parameter ->"
                    + context.getStepContext().getJobParameters().get("message"));
            return RepeatStatus.FINISHED;
        };
        return stepBuilderFactory.get("step1").tasklet(tasklet).build();
    }
}- Line 17 indicates that it is a configuration class and should be picked up by spring to configure them as beans available for our application.
- Line 18 configures the application with batch processing nature. This instructs spring to initialize batch related beans and dependencies to be available for our application.
- Spring configured
JobBuilderFactoryandStepBuilderFactoryare explicitly injected into our application. These provide a template to create user defined jobs and steps. - In Line 30, we configure a Job named Job1 which contains a step Step1. We provide a
RunIdIncrementerto ensure that each execution of the job gets an unique instance. This will help Spring to differentiate multiple executions of the same job even if rest of the job parameters are same. - We have configured a simple
TaskletStepin Line 36. Tasklet is used when our job does not fit into the convention of normal flow of batch job – Reader, Processor and Writer.TaskletStepuses a class implementingTaskletfunctional interface. The interface specifies a single method execute which receives two parameters of typeStepContributionandChunkContext. The former is similar toStepExecutionclass which holds information such as write count, commit count etc related to a step while the latter holds data at chunk level. - In our application, we are retrieving the information stored in job parameters via the
ChunkContext.
To prevent the job from auto starting, we need to disable the job in application.properties/application.yml file. This ensures that unless we explicitly start the job, Job would not be running.
application.yml
spring:
  batch:
    job:
      enabled: false
Now, we will see the use of CommandLineJobRunner to trigger our job.
CommandLineJobRunner
gradle build
java -jar build/libs/spcljr-0.0.1-SNAPSHOT.jar
- The first step is building our project with the use of gradle. Our line1 builds the required jar with the main class as
CommandLineJobRunner. - Next step is executing the jar which is specified in line 2.
We would get the below output on running the job.
07:35:02.597 [main] ERROR org.springframework.batch.core.launch.support.CommandLineJobRunner - At least 2 arguments are required: JobPath/JobClass and jobIdentifier.
The logs above are from our CommandLineJobRunner class. We need to provide our Job configuration either the java class or XML if prior to spring 4. In our case, we will provide the SpringBatchConfig class containing our batch configuration. We also need to pass the job identifier which is the job name in our configuration. Running in the below manner will ensure that our job gets executed.
java -jar build/libs/spcljr-0.0.1-SNAPSHOT.jar com.jcg.spcljr.config.SpringBatchConfig job1
We get a lot of information relating to the inputs passed along with detailed information on the execution similar to below screenshot.
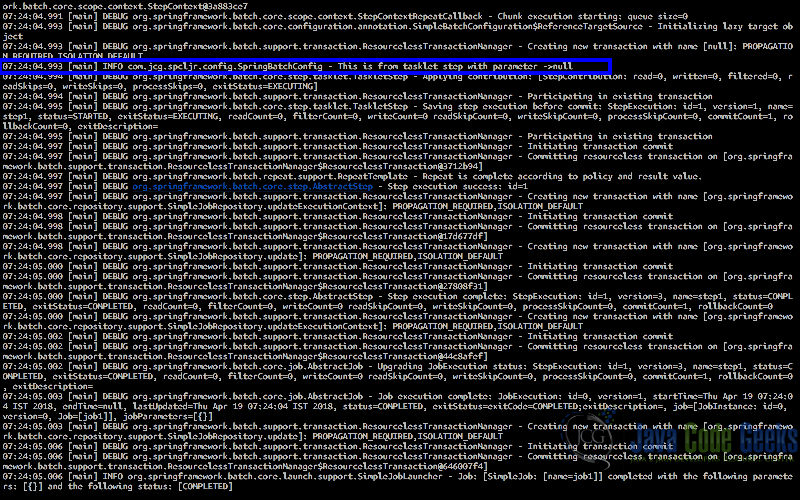
We also see that our tasklet has been executed with the log lines is printed to console. Highlighted line shows the tasklet log being printed.
CommandLineJobRunner with Job Parameters

In the above example, we saw that null was being printed to the console. We did not pass job parameters to our application and hence the value was not available which evaluated to null in the console. We can pass job parameters in the below manner to our job.
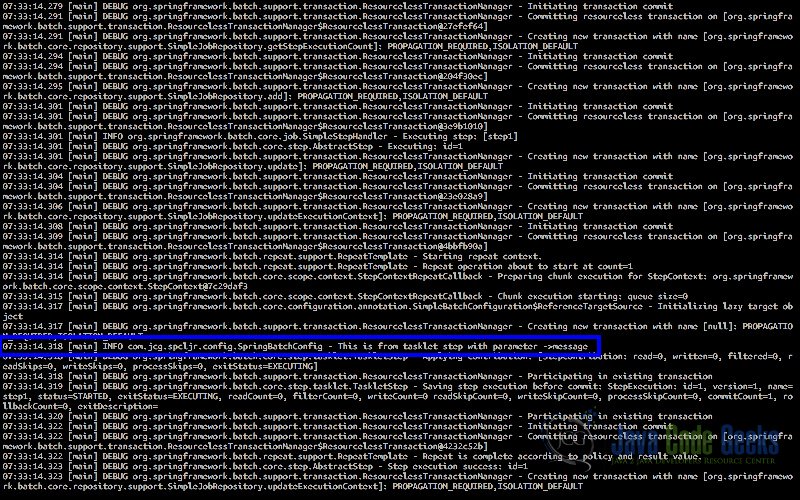
java -jar build/libs/spcljr-0.0.1-SNAPSHOT.jar com.jcg.spcljr.config.SpringBatchConfig job1 message=hi
The below screenshot shows the message is printed to the console.
3.3 Job Configuration
Extending our previous example, we will add a normal Spring batch job to the mix. Below we will cover the configuration for Spring Batch Job.
Job Configuration
@Bean
    public Job job2() {
        return jobBuilderFactory.get("job2")
                .incrementer(new RunIdIncrementer())
                .start(step2()).build();
    }

    @Bean
    public Step step2() {
        return stepBuilderFactory.get("step2")
                .<Map<String,String>,Map<String,String>>chunk(10)
                .reader(reader(null))
                .writer(writer())
                .build();
    }

    @Bean
    @StepScope
    public FlatFileItemReader<Map<String,String>> reader(@Value("#{jobParameters['file']}") String file) {
        FlatFileItemReader<Map<String,String>> reader = new FlatFileItemReader<>();
        reader.setResource(new ClassPathResource(file));
        reader.setStrict(false);

        DefaultLineMapper<Map<String,String>> lineMapper = new DefaultLineMapper<>();
        DelimitedLineTokenizer tokenizer = new DelimitedLineTokenizer(":");
        tokenizer.setNames("key", "value");

        lineMapper.setFieldSetMapper((fieldSet) -> {
            Map<String,String> map = new LinkedHashMap<>();
            map.put(fieldSet.readString("key"),fieldSet.readString("value"));
            return map;
        });
        lineMapper.setLineTokenizer(tokenizer);
        reader.setLineMapper(lineMapper);

        return reader;
    }

    @Bean
    public ItemWriter<Map<String,String>> writer(){
        return (items) -> items.forEach(item -> {
            item.entrySet().forEach(entry -> {
                logger.info("key->[" + entry.getKey() + "] Value ->[" + entry.getValue() + "]");
            });
        });
    }
- We create a new Job Job2 which has a single Step Step2 in line 2.
- In Lines 10-14, we create a step with a file item reader and a custom Writer.
- From Line 19, we configure a
FlatFileItemReader. Reader is provided the filename fromJobParameters. Ifstrictmode is set, Reader throws an Exception if file is not found. In our example, We have disabled strict mode to ensure there is no exception if file is not found. Our file is split by : which has just a key and value. Each line is read and fed to our customlineMapperwritten inline as lambda function.LineMappertransforms the read tokens into aMapwith key and value. - This chunk of lines are fed into our custom writer which is another anonymous class implementation. Our custom writer iterates through the chunk of maps fed into it and logs out the key/value pair. We will see the output below with the steps to run the application.
Below is the sample file content which is being provided to our Reader.
data.txt
Monday:1
Tuesday:2
Wednesday:3
Thursday:4
Friday:5
Below we will cover the steps to run the application for our job2.
Job2 Run without parameters
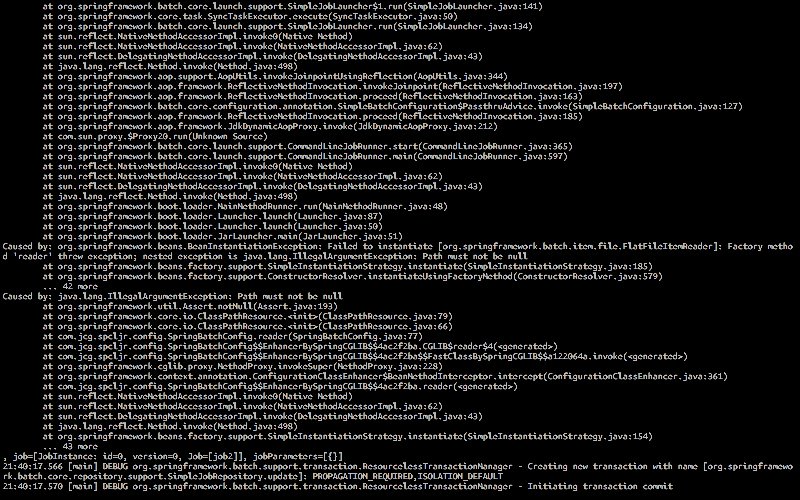
java -jar build/libs/spcljr-0.0.1-SNAPSHOT.jar com.jcg.spcljr.config.SpringBatchConfig job2
On running the program, we get an exception. The reason is we have not specified the parameter and FlatFileItemReader needs a file as input. Below is the exception screenshot:
To rectify that, we can provide the job parameter. But this time, let us pass an invalid file name.
java -jar build/libs/spcljr-0.0.1-SNAPSHOT.jar com.jcg.spcljr.config.SpringBatchConfig job2 file=data1.txt
Below is the screenshot of the output for an invalid file name.
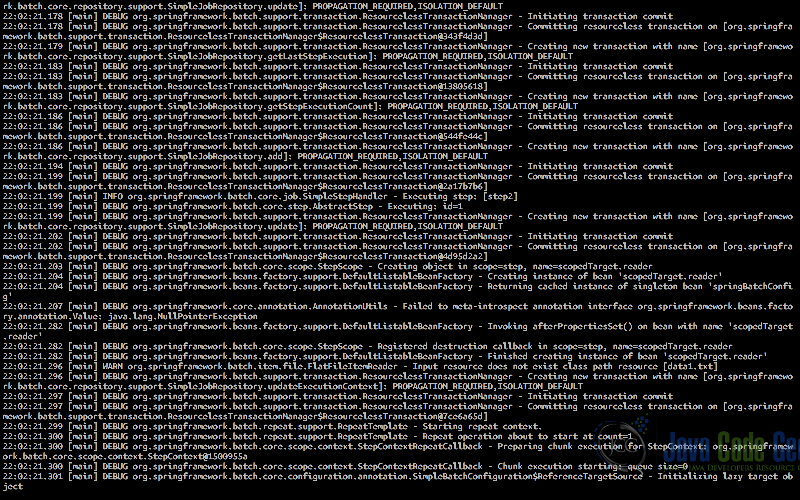
Since we are not in strict mode, there is silent failure as highlighted in the screenshot. We can pass the correct parameters and observe the result as specified in the below screenshot.
java -jar build/libs/spcljr-0.0.1-SNAPSHOT.jar com.jcg.spcljr.config.SpringBatchConfig job2 file=data.txt

4. Summary
In this example, we have demonstrated the usage of CommandLineJobRunner with a simple example of Tasklet. We also saw how to pass parameters to our Spring Batch Job via CommandLineJobRunner. We introduced another Batch Job and we saw how CommandLineJobRunner was able to execute the job with parameters.
5. Download the Source Code
You can download the full source code of this example here: SpringBatchCommandLineJobRunner

Hi Rajagopal,
org.springframework.batch.core.launch.support.CommandLineJobRunner is a part of spring batch API.
I guess there’s NO connection between start of new java application using main class=org.springframework.batch.core.launch.support.CommandLineJobRunner (java -jar) as a process and start of Spring Boot application from CLI. My guess is that in the first case no auto-configuration will be applied.
This should work like explained there – https://docs.spring.io/spring-batch/4.0.x/reference/html/job.html#runningJobsFromCommandLine
But in the later case (Sprinb Boot Application) we’ll trigger start with org.springframework.boot.autoconfigure.batch.JobLauncherCommandLineRunner class under the hood.
Please suggest.
Hi Karatkou. Iam working in the similar use case . Could you help me how to runthe spring boot batch job from commandline. . Any sample code is helpfull Thanks in advance
Hi Raj Gopal, how to run the same job1 and job2 in STS ide after importing.