This article explores using Selenium in node environment to automate testing. This covers running selenium inside local machine to utilize chrome browser
1. Introduction
Selenium is used to automate browsers. Selenium WebDriver has found its place in test automation for web applications. It is used to create robust, browser-based regression automation suites and tests. It can be used for end to end testing of an application.
Node.js is an open-source, cross-platform JavaScript run-time environment that executes JavaScript code outside of a browser. Typically, JavaScript is used primarily for client-side scripting and run client-side by a JavaScript engine in the user’s web browser. Node.js lets developers use JavaScript to write command line tools and for server-side scripting—running scripts server-side to produce dynamic web page content before the page is sent to the user’s web browser. Consequently, Node.js represents a “JavaScript everywhere” paradigm, unifying web application development around a single programming language, rather than different languages for server side and client side scripts.
2. Deep Dive into Selenium
In this section, We will take a look at simple test application for testing google search and image search. The first subsection will explore the resources needed and the steps needed for the node application. The subsequent subsection will discuss the actual code and its execution.
2.1 Project Setup
The first step is creating a package.json under a source folder. To create a node application, We need to have node installed and configured in our environment. Node.js is available for various operating systems and also available with all popular package managers. After installation, verify the success of installation with the following command
node -v
npm -version
This returns the appropriate version in the machine. As per Long term Stable versions, ideal would be v8.11.1 for node and v5.6.0 for npm.
Run the following command to initialize a package.json file. Proceed with the defaults, providing application name as appropriate
npm init
This should leave us with a package.json file similar to the one displayed below. The generated file will not have the dependencies section which can be either manually copied from the file or follow the next set of steps to install them.
package.json
{
  "name": "seleniumnode",
  "version": "1.0.0",
  "description": "A test project for selenium",
  "main": "index.js",
  "scripts": {
    "test": "jest"
  },
  "keywords": [
    "npm",
    "selenium"
  ],
  "author": "Rajagopal",
  "license": "ISC",
  "dependencies": {
    "fs": "0.0.1-security",
    "jest": "23.6.0",
    "selenium-webdriver": "4.0.0-alpha.1"
  }
}
npm install jest --save npm install selenium-webdriver --save npm install fs --save
This installs the required dependencies and saves them under dependency section in package.json file. In any node project, the first step is always to run npm install. This ensures that all dependencies defined are downloaded and available for use. This is pre-build step in comparison to other languages. This creates a folder node_modules which contains the needed dependencies.
- Dependencies section contain the various dependencies for our project
- Under Scripts section, we have included the test to execute
jest.Jestis a test runner with assertion and mocking capabilities. It runs tests in parallel and has been growing in strength since its release. - Jest picks up tests located under
__tests__folder or any file with the name .test included in it. Our test file is going to include .test so that jest picks up the file for execution. - We can run our test by executing the command
npm test. This will ensure that jest kicks in and executes our test file under the context of jest. - We use
fsmodule to write to the underlying filesystem. We will cover the need offsmodule in the subsequent section
2.2 Test Suite and Execution
This section concerns with the actual selenium code to test the google.com site. Our aim is to open google and search for selenium. Once the results load, We click on image search to load the image results. We break this up as three tests
- Load google.com and check if title is google.
- Search for Selenium and check if results page is loaded.
- Click on Image search in the results page.
Let us deep dive into the code below.
google.test.js
const fs = require('fs');
describe('test google.com', () => {
    const {
        Builder,
        By,
        Key,
        until
    } = require('selenium-webdriver');
    var driver;

    beforeEach(() => {
        driver = new Builder()
            .forBrowser('chrome')
            .build();
    });

    afterEach(() => {
        driver.quit();
    });

    it('should open google search', async () => {
        await driver.get('http://www.google.com');
        driver
            .getTitle()
            .then(title => {
                expect(title).toEqual('Google');
            });
    });

    it('should open google search and view search results', async () => {
        await driver.get('http://www.google.com');
        var element = await driver.findElement(By.css('input[title=Search]'));
        await element.sendKeys("selenium", Key.RETURN);
        await driver.wait(until.titleContains("selenium"), 4000);
        driver
            .getTitle()
            .then(title => {
                expect(title).toEqual('selenium - Google Search');
            });
    });

    it('should open google search and do image search', async () => {
        await driver.get('http://www.google.com');
        var element = await driver.findElement(By.css('input[title=Search]'));
        await element.sendKeys("selenium", Key.RETURN);
        await driver.wait(until.titleContains("selenium"), 4000);
        var imageSearch = driver.findElement(By.xpath("//a[contains(text(), 'Images')]"));
        await imageSearch.click();
        let image = await driver.takeScreenshot();
        fs.writeFileSync('out.png', image, 'base64');

    });

});
- The first step in testing is to build the appropriate web driver. Here, We have specified chrome as the browser for which the web driver is initialized. This is configured via
@beforeEachannotation to ensure that driver is initialized is before each test run. @afterEachannotation is used to clean up the resources and we leverage it to close the web browser.- Our code is laced with
asyncandawaitkeywords. await is used to wait for an asynchronous operation to complete. Since await involves a asynchronous operation,asyncneeds to be added to the method to indicate that it is a asynchronous method. - In the first test, We navigate to google.com site using
driver.get. We wait for the site to load and then resolve thepromiseto verify the page title is Google. - Each test builds upon the subsequent test. In the second test, We try to find a element by a css locator
(By.css). We locate the search text box and input search keyword as selenium. We also send the return key to execute user action of pressingENTER. - We specify driver timeout of 4 seconds until the page loads with a title containing Selenium. This ensures also our site performs reasonably under normal conditions.
- After the page loads, verify the title to be search string.
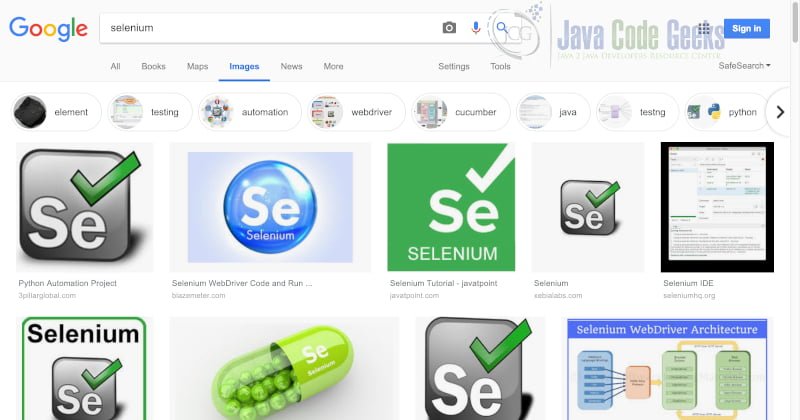
- In the third test, We use a xpath selector to select the image search with the keyword
By.xpath. Once the element is located, we click the image search button to perform the image search. - We use the screenshot capability of the
web driverto take screenshot of the page and save it to the underlying filesystem under the name out.png with the help offsmodule. The screenshot looks similar to the one provided below.
3. Download the Source Code
You can download the full source code of this example here: Selenium NodeJS Example

Thanks for the article; Kindly share when would a NodeJS be an ideal /close-to-ideal choice in a selenium project ?
There is no straight answer here. It is largely dependent on the comfort of devs as Selenium operates via apis. But Selenium has tighter integration for java than node. If the project is not jvm based, then definitely node might be a good choice as the front end most likely would have been in javascript.
I tried to download the code and run it and got the error message as describe is not defined , can you share the solution
Hi,
I am facing the same issue. Did you find any solution to that. Please provide if u do
—
Thankyou,
poornima
You need to run npm install before execute the code.