In this example, we will demonstrate the concept of distributed testing with JMeter. We will look at setting up the client node that will distribute the tests on server instances. Before understanding the semantics of distributed testing, let’s look at the concept.
1. Introduction
Apache JMeter is an open source Java based tool that enables you to perform functional, load, performance and regression tests on an application. The application may be running on a Web server or it could be a standalone in nature. It supports testing on both client-server and web model containing static and dynamic resources. It supports wide variety of protocols for conducting tests that includes, HTTP, HTTPS, JDBC, FTP, JMS, LDAP, SOAP etc.
A quick look at some of the features:
- It provides a comprehensive GUI based workbench to play around with tests. It also allows you to work in a non-GUI mode. JMeter can also be ported on the server allowing to perform tests in a distributed environment.
- It provides a concept of template which are pre-defined test plans for various schemes or protocols that can be directly used to create your required test plan.
- It enables you to build test plan structurally using powerful features like Thread Group, Controllers, Samplers, Listeners etc.
- It provides debugging and error monitoring through effective logging.
- It supports parameterized testing through the concept of variables.
- It supports creation of different flavors of test plan that includes Web, Database, FTP, LDAP, Web service, JMS, Monitors etc.
- It allows for remote testing by having different JMeter instances running as servers across nodes and accessed from a single client application.
- It gives you real time test results that covers metrics like latency, throughput, response times, active threads etc.
- It enables you to perform testing based on regular expressions and many more other features.
1.1 What is Distributed Testing
Distributed testing allows for testing in a distributed environment. In a typical distributed environment, there are different machines each running a test engine instance and controlled by one primary machine or node. Distributed testing comes in handy when you have large number of users to simulate and test and a single machine is not good enough to handle such load. You can distribute the tests on different nodes thereby making it appear as one large load test executed on a single server. Nodes with test engine instance coordinate with each other to produce a common test output. The different test machines or nodes are controlled or managed by one single client node. The below diagram shows the distributed test deployment view:
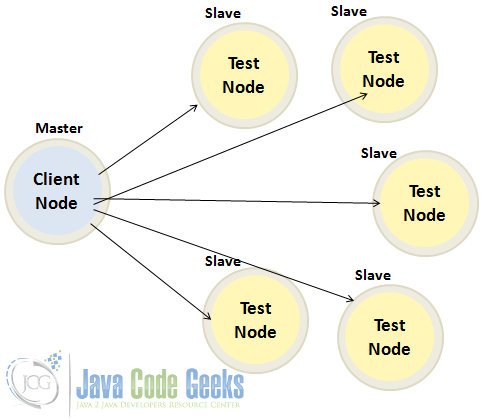
As you can see from the above figure, the primary client node acts as a controller that initiates test execution on the test nodes that distributes the load. Distributed testing effectively means distributing the test load across test machines. It is helpful when you have limited computing resources on a single machine and it is unable to take the heavy test load (no. of concurrent requests). Distributed testing can also be thought of as horizontal scaling of tests. You can increase and simulate the test load by adding test node or machine in your distributed test cluster. With the advent of cloud computing, one can also take advantage of cloud benefits and perform tests on the cloud. The cloud itself offers various benefits in terms of on-demand computing, provisioning, elasticity and low cost. You do not have to worry about creating the distributed test infrastructure. One of the tools that offers load testing capability on the cloud is BlazeMeter which can simulate load of upto millions of users and is fully compliant with JMeter.
1.2 Distributed Testing in JMeter
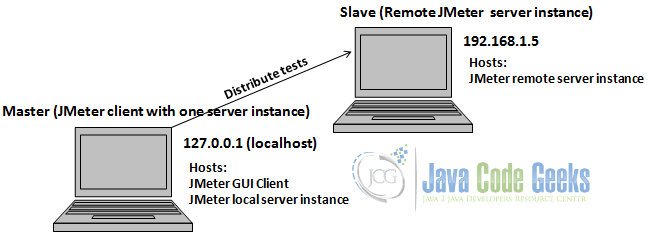
Distributed Testing in JMeter can be achieved through the concept of master and slaves model. The master is a client machine that configures the test plan and connects to different slave machines to distribute the tests. The client (master) node has a JMeter installed as a client. You will make use of GUI to setup the test plan as you do normally. You will also connect to different slave machines (server) which will automatically get the copies of test plan when the client is connected. The slave machines will have a JMeter installed and executed as a server instance. Each slave node has an associated IP address that is configured in the jmeter.properties file on the client node. This will enable you to connect to slave machines from the JMeter GUI client.
Some pre-requisites to be considered as per the JMeter remote testing guidelines:
- All the participating test machines should be on the same subnet.
- All the machines are running the same version of JMeter installation
- All the machines are running the same version of Java
- Firewall should be disabled or have it designated with a proxy supporting RMI protocol
The test distribution in JMeter works a bit differently. It does not distribute the load but rather distributes the tests on each server. You create a test plan on the client node and it gets copied to the server instances. For example, if you create 100 threads (users) as part of test plan on the client machine and if you have configured 3 remote test server instances then the test will be executed with 300 threads (100 each for the 3 remote server instances).
2. JMeter Distributed Testing by Example
We will now perform distributed testing with JMeter. We will have 2 instances of JMeter installed on one machine. One will act as a client and another as a server. We will install one more JMeter instance on a seperate machine that will act as a remote test server. Also for the sake of this example, let’s assume the IP address of the remote machine is 192.168.1.5
Before installing JMeter, make sure you have JDK 1.6 or higher installed on both the machines. Download the latest release of JMeter using the link here. At the time of writing this article, the current release of JMeter is 2.13.
Setting up the first machine (localhost or 127.0.0.1)
Unzip the archive into the folder of your choice, you will see the folder named apache-jmeter-2.13 created. Rename this folder to jmeter-client. Once again unzip the archive and then rename the created apache-jmeter-2.13 folder to jmeter-server1. Now we have installed two instances of JMeter on the same machine. Start the JMeter server instance by navigating to the path jmeter-server1/bin and providing the following command: jmeter-server. Now we have to tell the client that we are dealing with two server instances, one is local and other is remote. Navigate to jmeter-client/bin folder and edit jmeter.properties file. Find and edit the key remote_hosts. By default, the remote_hosts key will hold the value 127.0.0.1 which is our first machine. You also have to add IP for the remote machine and so the modified entry will look like the following:

Setting up the second machine (192.168.1.5)
Unzip the archive into the folder of your choice, you will see the folder named apache-jmeter-2.13 created. Rename this folder to jmeter-server2. This will be our remote JMeter server instance. Start the server by navigating to the path jmeter-server2/bin and providing the following command: jmeter-server. This will start the remote server instance. Server start implies launching RMI registry on port 1099. RMI registry also opens a dynamic port (arbitrary port number) for internal object communication. So if you are behind firewall then you will need to make the registry open the static port so that you can grant access to that port in the firewall. To do that use the following property when starting the JMeter server instance in the jmeter-server.bat file: -Dserver.rmi.localport=. If your server instance is exposed to the public internet (for example say if you use WIFI) then it may assign an IP that may not be reachable by the client. In such cases, use the following property when starting the JMeter server instance in the jmeter-server.bat file: -Djava.rmi.server.hostname=192.168.1.5. In this way you can explicitly set the IP of the server instance.
2.1 Performing the Test
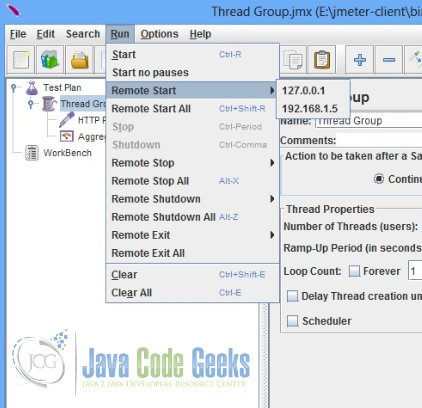
We will create the test plan on the client instance. Navigate to jmeter-client/bin folder on the first machine and type jmeter. This will launch the JMeter client control panel. We will configure the ThreadGroup with 100 threads (users) and a HTTP Sampler that will point to the JCG home page (www.javacodegeeks.com). For more information on setting up ThreadGroup and Sampler, refer to this article. Then we will execute the tests by running the JMeter server instances. Select Run -> Remote Start All
This will start all the server instances and execute the test. We can observe the test result using Aggregate Report listener.
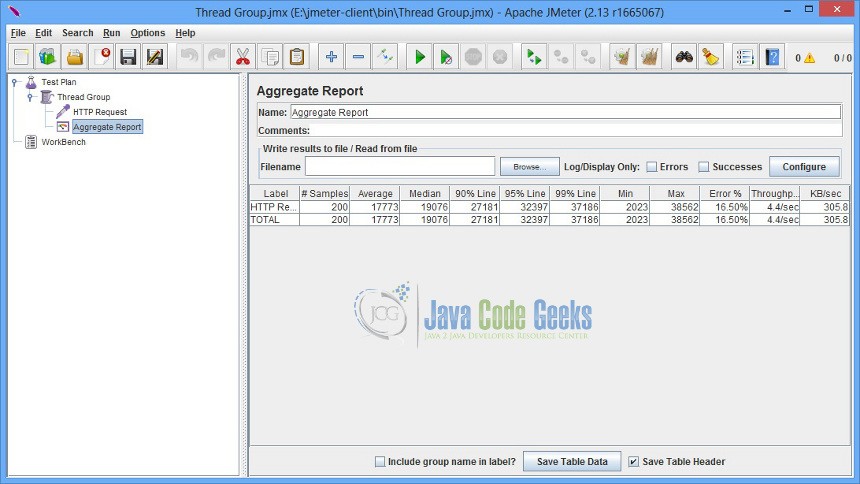
As you can see, the test generated 200 samples (100 each for every JMeter server instance). It effectively means the client delegated or ditributed 100 threads each to the running servers thereby distributing the load.
2.2 Points to ponder
What we have seen so far is the GUI mode of remote testing. This can quickly overload the client machine if there are more server instances. GUI mode takes up more memory resources and dramatically affects the test execution metrics. A recommended approach is to perform the remote test using command-line or non-GUI mode. You can provide the following command to launch the remote test: jmeter -n -t script.jmx -r
The -n flag indicates that this test will be run in a non-GUI mode. The -t flag is used to specify the test file (.jmx). You can save the test file while running in the GUI mode and then use it here. The -r flag starts the remote servers as specified in the remote_hosts file.
Make sure each JMeter instance is running on a seperate machine. Also the JMeter should not be installed on the machine that hosts your application server. This can overload your app server machine and you may end up getting incorrect test results.
If your tests depends upon external data files then make sure these files are copied manually to the server node in the appropriate path. The client node will not automatically perform the data file copy. Any specific server related configuration, make sure to use the properties files located in the bin folder of the JMeter home on the server machines.
If you are running multiple JMeter server instance on single machine then make ure they all use different RMI ports.
3. Conclusion
Distributed testing is more like horizontal scaling of tests. It is useful when you want to simulate very large number of user load and single machine is not enough to handle such large load. One can perform test execution on remote server instances and control it from the client. This can help distribute the tests and eventually the load. The objective of the article was to show how you can setup distributed testing with JMeter.
