In this example, we will demonstrate the significance of Thread Group in Apache JMeter. We will go about implementing one test plan using JMeter by configuring Thread Group and related elements. We will cover a basic Web application test case that will involve HTTP as a request protocol. Before we dive into the practical usage of Thread Group, let’s look at the concept.
1. Introduction
Apache JMeter is an open source Java based tool that enables you to perform functional, load, performance and regression tests on an application. The application may be running on a Web server or it could be a standalone in nature. It supports testing on both client-server and web model containing static and dynamic resources. It supports wide variety of protocols for conducting tests that includes, HTTP, HTTPS, JDBC, FTP, JMS, LDAP, SOAP etc.
A quick look at some of the features
- It provides a comprehensive GUI based workbench to play around with tests. It also allows you to work in a non-GUI mode. JMeter can also be ported on the server allowing to perform tests in a distributed environment.
- It provides a concept of template which are pre-defined test plans for various schemes or protocols that can be directly used to create your required test plan.
- It enables you to build test plan structurally using powerful features like Thread Group, Controllers, Samplers, Listeners etc.
- It provides debugging and error monitoring through effective logging.
- It supports parameterized testing through the concept of variables
- It supports creation of different flavors of test plan that includes Web, Database, FTP, LDAP, Web service, JMS, Monitors etc.
- It allows for remote testing by having different JMeter instances running as servers across nodes and accessed from a single client application.
- It gives you real time test results that covers metrics like latency, throughput, response times, active threads etc.
- It enables you to perform testing based on regular expressions and many more other features
1.1. What is a ThreadGroup?
In JMeter, you formulate or create a test plan. ThreadGroup is the most basic element of a test plan. To execute a test, you have to simulate test users who will perform or run the test. Test users are simulated using threads in JMeter. These threads are created as part of ThreadGroup element. These threads execute your tests. One can define how many threads you want to configure for your test using ThreadGroup element. The ThreadGroup element allows you to configure the following:
- Number of threads that will initiate request and therefore execute test
- Ramp up period for the threads to start
- Number of times the test is executed per thread
- Schedule a test run
1.2. What you can do with ThreadGroup?
Once the base ThreadGroup element is created, you can continue building the test plan by adding elements under ThreadGroup. Some of the important elements that can be added under ThreadGroup are:
- Samplers: Samplers are requests to the server made by each user (thread). You can configure requests based on the type of application that you are testing. For web application, you could use HTTP Request sampler, for FTP application, use FTP request sampler and so on.
- Controllers: Controllers define the way in which the request or the sampler is processed. For example, you might want to execute a particular request 5 times, then you could use Loop Controller, or you may want to execute alternate requests, in which case you use Interleave Controller and so on. There are plenty of built-in logic controllers provided by JMeter to handle execution of requests or samplers.
- Listeners: Listeners listens to the resulting data produced by a test plan during execution. It then produces output that is presented on the screen in a certain way. For example, Graphs Results listeners will show the test results plotted as graphs, View Results listener shows the response and the time taken as a tree and so on. With listeners, you can also configure, where to output your test results, in what format (Text, XML, CSV etc) and what metrics (response message, response time, latency etc) to show.
- Config Element: This element is used to configure any default values for the samplers or add configuration details for specific type of sampler. The configuration details could be adding HTTP cookie manager or providing JDBC connection configuration and so on.
- Timers: Timers allows you to pause a request before it is sent. When you are testing with multiple requests (threads), it is always a good idea to configure short time delay between each request. Timers can be applied to samplers (request) or controllers to allow you to control specific request execution.
2. ThreadGroup by example
We will now demonstrate the use of ThreadGroup by a building a sample test plan. The test plan that we will create will be for a web application.
2.1. JMeter installation and setup
Before installing JMeter, make sure you have JDK 1.6 or higher installed. Download the latest release of JMeter using the link here. At the time of writing this article, the current release of JMeter is 2.13. To install, simply unzip the archive into your home directory where you want JMeter to be installed. Set the JAVA_HOME environment variable to point to JDK root folder. After unzipping the archive, navigate to <JMeter_Home>/bin folder and run the command jmeter. For Windows, you can run using the command window. This will open JMeter GUI window that will allow you to build the test plan.
2.2. Configuring ThreadGroup
We will now build a test plan for a web application. To keep it simple, we will consider Java Code Geeks (JCG) website as a web application. The first step will be to create users (threads) and that will make http request to the web application. We will create three users that will make a request to two web pages on JCG. On the JMeter GUI left hand pane, select Test Plan, right click and select Add -> Threads (Users) -> ThreadGroup. This will create ThreadGroup element under Test Plan. Now we will configure the properties of ThreadGroup. Select the ThreadGroup that you created under Test Plan, you will see the ThreadGroup control panel on the right side.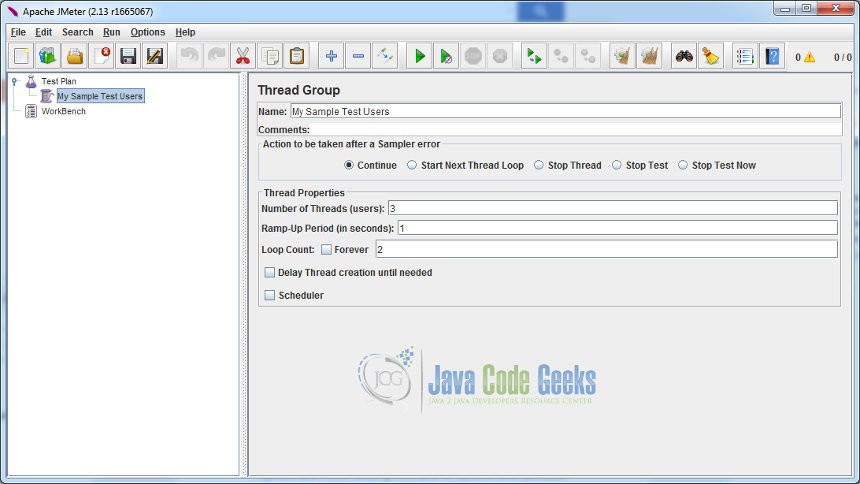
We will provide the name of the ThreadGroup as ‘My Sample Test Users’ against the Name field. We will set the value of Number of Threads as 3. We will retain the default value for Ramp-Up Period as 1. It indicates that all the 3 threads will take 1 second to start. We will set Loop Count value as 2. It indicates that we will run the tests twice per user (thread).
2.3. Configuring Default Request Properties
As we are building the test plan for a web application, we will deal with HTTP request and configure its default properties. Users (threads) will invoke HTTP request to perform test execution. Select My Sample Test Users Thread Group, right click on it and select Add -> Config Element -> HTTP Request Defaults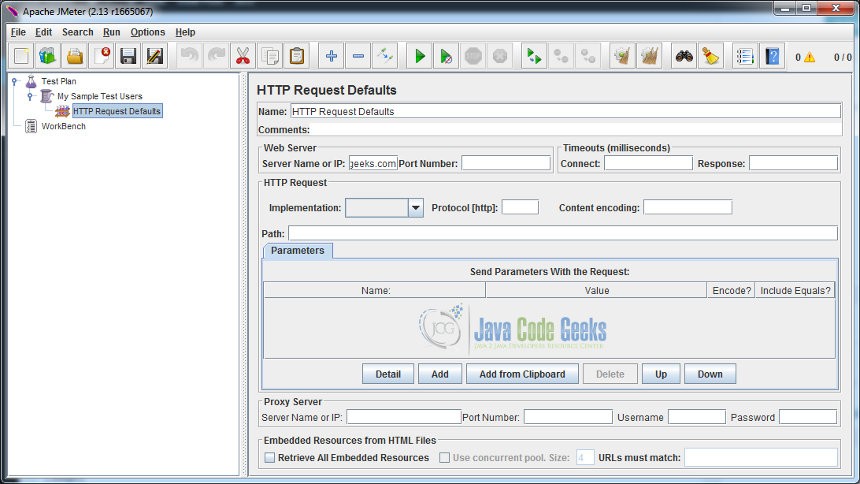
Provide the Server Name as ‘www.javacodegeeks.com’. This indicates the base server or domain name where all the requests will be routed. Leave the rest of the fields with their default values.
2.4. Configuring HTTP Request Sampler
In the previous section, we configured default properties for HTTP request. In this section we will actually define HTTP request that will be invoked by the users (threads). If you recall, we mentioned that the user will make request to two pages. We will create first request for the home page of JCG (www.javacodegeeks.com) and the second request for the About page (www.javacodegeeks.com/about). To define the request, we have to use Sampler. Right click on the My Sample Test Users Thread Group and select Add -> Sampler -> HTTP Request
Change the Name field value to ‘JCG Home’. Leave the Server Name field blank, as if we have already set the server name in the HTTP Request Defaults configuration. Set the Path field value to ‘/’.
Similarly, add the second HTTP request. Right click on the My Sample Test Users Thread Group and select Add -> Sampler -> HTTP Request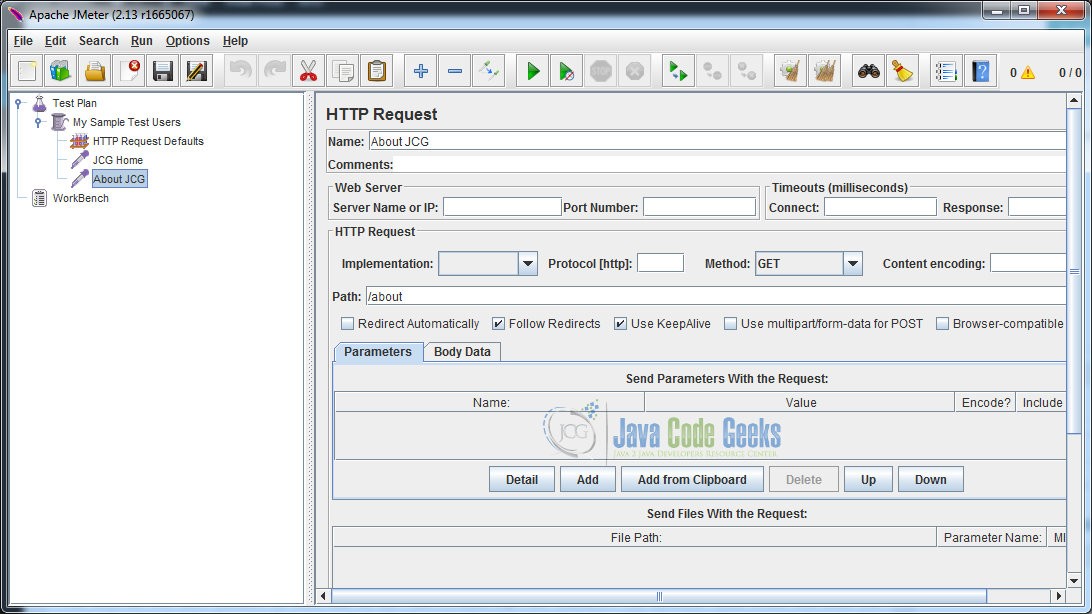
Change the Name field value to ‘About JCG’. Set the Path field value to ‘/about’
Now when you execute the tests, three users (threads) will invoke two http requests one each for the JCG Home page and the About page.
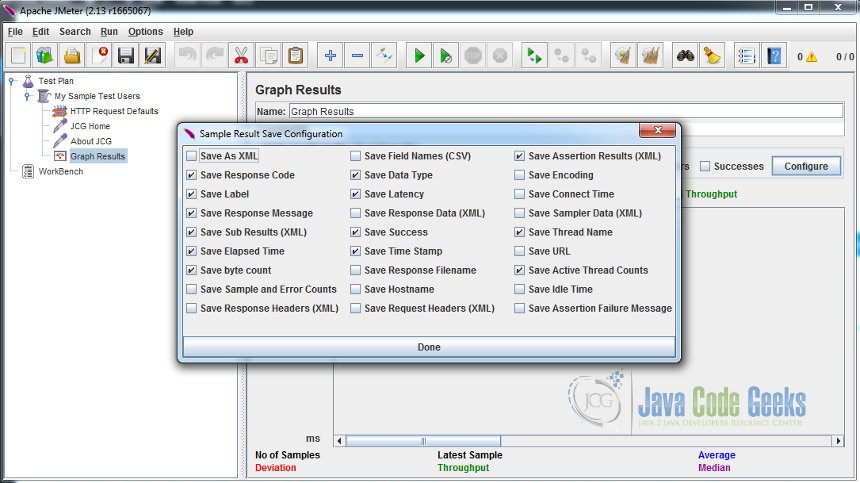
2.5. Configuring Graph Results Listeners
This will be the last element we will add to our ThreadGroup element. The listener will track and show the graph of request data from performance point of view, as it gets executed. It will also log the request data to the specified file. Let’s look at how to configure this listener. Right click on My Sample Test Users Thread Group and select Add -> Listener -> Graph Results.
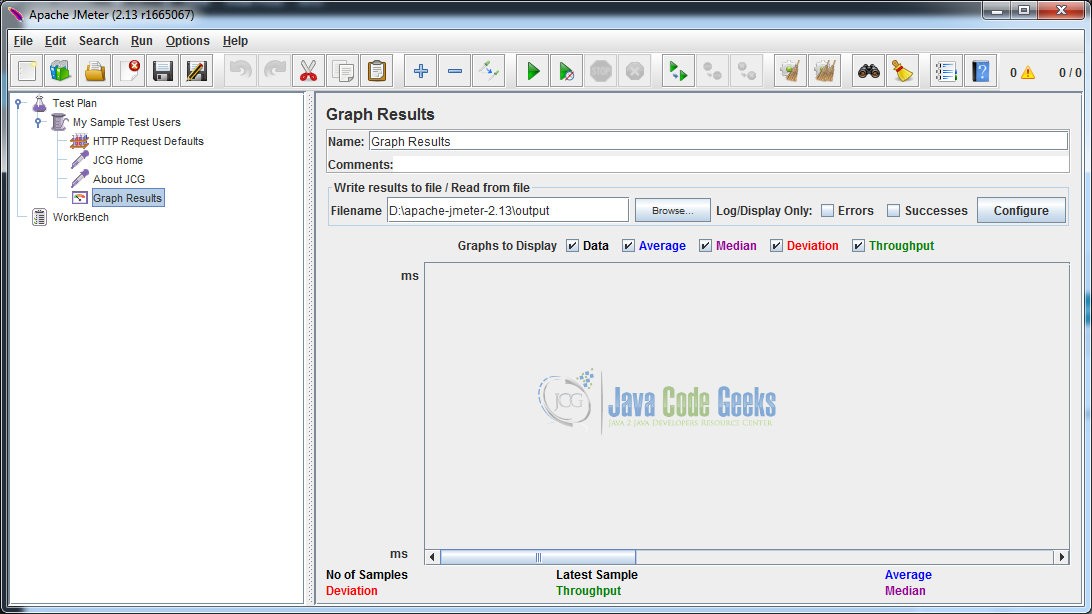
Select the file name to store the metrics by clicking on Browse button. You can also configure what needs to be shown and what should be the format of the log file by clicking on Configure button and select/deselecting different indicators.
Run the test plan by selecting Run -> Start from the menu.
3. Conclusion
The above example demonstrated the use of ThreadGroup and its related elements in JMeter. There are plenty of things one can achieve through the use of JMeter from the performance test perspective. The objective of the article was to highlight the significance of Thread Group in building the test plan.
