JavaFX Table Example
This is a JavaFX TableView example. The TableView is a powerful control to display and edit data in a tabular form from a data model. It consists of rows and columns. A cell is an intersection of a row and a column. Cells contain the data values. Columns have headers that describe the type of data they contain. Columns can be nested. Resizing and sorting of column data have built-in support.
The following table shows an overview of the whole article:
Table Of Contents
The following examples uses Java SE 7 and JavaFX 2.2.
1. The Person Class
The Person-Class contains the most important attributes about a person like name, adress, etc. The class also supports a Constructor, Getters and Setters for each attribute.
1.1 The Code
Person.java
public class Person
{
	// Properties of the person (name, address, job)
	private Integer id;
	private String firstName;
	private String lastName;
	private String street;
	private String zipCode;
	private String city;
	private String country;
	private String Job;

	public Person(Integer id, String firstName, String lastName, String street, String zipCode, String city, String country)
	{
		super();
		this.id = id;
		this.firstName = firstName;
		this.lastName = lastName;
		this.street = street;
		this.zipCode = zipCode;
		this.city = city;
		this.country = country;
	}

	public Integer getId() {
		return id;
	}

	public void setId(Integer id) {
		this.id = id;
	}

	public String getFirstName() {
		return firstName;
	}

	public void setFirstName(String firstName) {
		this.firstName = firstName;
	}

	public String getLastName() {
		return lastName;
	}

	public void setLastName(String lastName) {
		this.lastName = lastName;
	}

	public String getStreet() {
		return street;
	}

	public void setStreet(String street) {
		this.street = street;
	}

	public String getZipCode() {
		return zipCode;
	}

	public void setZipCode(String zipCode) {
		this.zipCode = zipCode;
	}

	public String getCity() {
		return city;
	}

	public void setCity(String city) {
		this.city = city;
	}

	public String getCountry() {
		return country;
	}

	public void setCountry(String country) {
		this.country = country;
	}

	public String getJob() {
		return Job;
	}

	public void setJob(String job) {
		Job = job;
	}
}
2. The TableViewHelper Class
This is a helper class. It supports the following features:
- Creation of the Data Rows
- Creation of the Columns for the Table
2.1 The Code
TableViewHelper.java
import javafx.collections.FXCollections;
import javafx.collections.ObservableList;
import javafx.scene.control.TableColumn;
import javafx.scene.control.cell.PropertyValueFactory;

public class TableViewHelper
{
	// Returns an observable list of persons
	public static ObservableList<Person> getPersonList()
	{
		Person p1 = new Person(1,"Mark","Pearson","First Avenue 2","1200","Los Angeles","USA");
		Person p2 = new Person(2,"Tom","Hoover","Kings Cross 3","2350","Denver","USA");
		Person p3 = new Person(3,"David","Mason","Bond Street 5","1100","Manchester","Great Britain");
		Person p4 = new Person(4,"Mary","Miller","Baker Street 86","1200","London","Great Britain");
		Person p5 = new Person(5,"Martha","Lancester","Main Street 375","9923","Sidney","Australia");
		Person p6 = new Person(6,"Henry","Forsyth","Main Street 3","37472","Toronto","Canada");

		return FXCollections.<Person>observableArrayList(p1, p2, p3, p4, p5, p6);
	}

	// Returns Person Id TableColumn
	public static TableColumn<Person, Integer> getIdColumn()
	{
		TableColumn<Person, Integer> idCol = new TableColumn<>("Id");
		PropertyValueFactory<Person, Integer> idCellValueFactory = new PropertyValueFactory<>("id");
		idCol.setCellValueFactory(idCellValueFactory);
		return idCol;
	}

	// Returns First Name TableColumn
	public static TableColumn<Person, String> getFirstNameColumn()
	{
		TableColumn<Person, String> firstNameCol = new TableColumn<>("First Name");
		PropertyValueFactory<Person, String> firstNameCellValueFactory = new PropertyValueFactory<>("firstName");
		firstNameCol.setCellValueFactory(firstNameCellValueFactory);
		return firstNameCol;
	}

	// Returns Last Name TableColumn
	public static TableColumn<Person, String> getLastNameColumn()
	{
		TableColumn<Person, String> lastNameCol = new TableColumn<>("Last Name");
		PropertyValueFactory<Person, String> lastNameCellValueFactory = new PropertyValueFactory<>("lastName");
		lastNameCol.setCellValueFactory(lastNameCellValueFactory);
		return lastNameCol;
	}

	// Returns Street TableColumn
	public static TableColumn<Person, String> getStreetColumn()
	{
		TableColumn<Person, String> streetCol = new TableColumn<>("Street");
		PropertyValueFactory<Person, String> streetCellValueFactory = new PropertyValueFactory<>("street");
		streetCol.setCellValueFactory(streetCellValueFactory);
		return streetCol;
	}

	// Returns ZipCode TableColumn
	public static TableColumn<Person, String> getZipCodeColumn()
	{
		TableColumn<Person, String> zipCodeCol = new TableColumn<>("Zip Code");
		PropertyValueFactory<Person, String> zipCodeCellValueFactory = new PropertyValueFactory<>("zipCode");
		zipCodeCol.setCellValueFactory(zipCodeCellValueFactory);
		return zipCodeCol;
	}

	/* Returns City TableColumn */
	public static TableColumn<Person, String> getCityColumn()
	{
		TableColumn<Person, String> cityCol = new TableColumn<>("City");
		PropertyValueFactory<Person, String> cityCellValueFactory = new PropertyValueFactory<>("city");
		cityCol.setCellValueFactory(cityCellValueFactory);
		return cityCol;
	}

	// Returns Country TableColumn
	public static TableColumn<Person, String> getCountryColumn()
	{
		TableColumn<Person, String> countryCol = new TableColumn<>("Country");
		PropertyValueFactory<Person, String> countryCellValueFactory = new PropertyValueFactory<>("country");
		countryCol.setCellValueFactory(countryCellValueFactory);
		return countryCol;
	}

}
An instance of the TableColumn class represents a column in a TableView. A TableColumn is responsible for displaying and editing the data in its cells. A TableColumn has a header that can display header text, a graphic, or both.
The TableColumn<S, T> class is a generic class. The S parameter is the items type, which is of the same type as the parameter of the TableView. The T parameter is the type of data in all cells of the column. For example, an instance of the TableColumn<Person, Integer> may be used to represent a column to display the ID of a Person, which is of int type; an instance of the TableColumn<Person, String> may be used to represent a column to display the first name of a person, which is of String type.
The following code snippet creates a TableColumn with First Name as its header text:
TableColumn<Person, String> firstNameCol = new TableColumn<>("First Name");
A TableColumn needs to know how to get the value for it cell from the model. To populate the cell, you need to set the cellValueFactory property of the TableColumn. If the model for a TableView contains objects of a class that is based on JavaFX properties, you can use an object of the PropertyValueFactory class as the cell value factory, which takes the property name. It reads the property value from the model and populates all of the cells in the column, as in the following code:
PropertyValueFactory<Person, String> firstNameCellValueFactory = new PropertyValueFactory<>("firstName");
firstNameCol.setCellValueFactory(firstNameCellValueFactory);
You need to create a TableColumn object for each column in the TableView and set its cell value factory property.
3. Creating a TableView
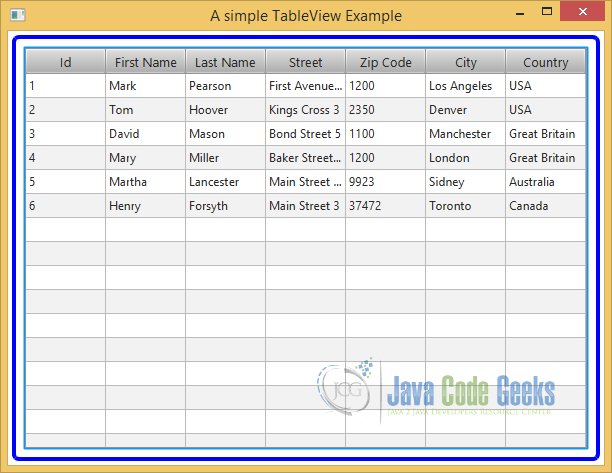
In the following example, we will use the TableView class to create a TableView control. TableView is a parameterized class, which takes the type of items the TableView contains. Optionally, you can pass the model into its constructor that supplies the data. The default constructor creates a TableView without a model.
3.1 The Code
FxTableViewExample1.java
import javafx.application.Application;
import javafx.scene.Scene;
import javafx.scene.control.Label;
import javafx.scene.control.TableView;
import javafx.scene.layout.VBox;
import javafx.stage.Stage;

public class FxTableViewExample1 extends Application
{
	public static void main(String[] args)
	{
		Application.launch(args);
	}

	@SuppressWarnings("unchecked")
	@Override
	public void start(Stage stage)
	{
		// Create a TableView with a list of persons
		TableView<Person> table = new TableView<>();
		// Add rows to the TableView
		table.getItems().addAll(TableViewHelper.getPersonList());
		// Add columns to the TableView
		table.getColumns().addAll(TableViewHelper.getIdColumn(), TableViewHelper.getFirstNameColumn(),
			TableViewHelper.getLastNameColumn(),TableViewHelper.getStreetColumn(),
			TableViewHelper.getZipCodeColumn(), TableViewHelper.getCityColumn(), TableViewHelper.getCountryColumn());

		// Set the column resize policy to constrained resize policy
		table.setColumnResizePolicy(TableView.CONSTRAINED_RESIZE_POLICY);
		// Set the Placeholder for an empty table
		table.setPlaceholder(new Label("No visible columns and/or data exist."));

		// Create the VBox
		VBox root = new VBox();
		// Add the Table to the VBox
		root.getChildren().add(table);
		// Set the Padding and Border for the VBox
		root.setStyle("-fx-padding: 10;" +
				"-fx-border-style: solid inside;" +
				"-fx-border-width: 2;" +
				"-fx-border-insets: 5;" +
				"-fx-border-radius: 5;" +
				"-fx-border-color: blue;");

		// Create the Scene
		Scene scene = new Scene(root);
		// Add the Scene to the Stage
		stage.setScene(scene);
		// Set the Title of the Stage
		stage.setTitle("A simple TableView Example");
		// Display the Stage
		stage.show();
	}
}
In our example we created a TableView that will use objects of the Person class as its items:
// Create a TableView with a list of persons
TableView<Person> table = new TableView<>();
3.2 Adding Columns to a TableView
The next step after creating the table cells is to add the columns to the TableView. A TableView stores references of its columns in an ObservableList<TableColumn> whose reference can be obtained using the getColumns() method of the TableView. The following snippet of code adds columns to a TableView.
// Add columns to the TableView
table.getColumns().addAll(TableViewHelper.getIdColumn(), TableViewHelper.getFirstNameColumn(),
	TableViewHelper.getLastNameColumn(),TableViewHelper.getStreetColumn(),
	TableViewHelper.getZipCodeColumn(), TableViewHelper.getCityColumn(), TableViewHelper.getCountryColumn());
3.3 Customizing TableView Placeholder
TableView displays a placeholder when it does not have any visible leaf columns or content. You can replace the built-in placeholder using the placeholder property of the TableView. The value for the property is an instance of the Node class. The following statement sets a Label with a generic message as a placeholder:
// Set the Placeholder for an empty table
table.setPlaceholder(new Label("No visible columns and/or data exist."));
3.4 Populating a TableColumn with Data
Cells in a row of a TableView contain data related to an item such as a Person, a Book, and so forth. Data for some cells in a row may come directly from the attributes of the item or they may be computed. TableView has an items property of the ObservableList<S> type. The generic type S is the same as the generic type of the TableView. It is the data model for the TableView. Each element in the items list represents a row in the TableView. Adding a new item to the items list adds a new row to the TableView. Deleting an item from the items list deletes the corresponding row from the TableView.
// Add rows to the TableView
table.getItems().addAll(TableViewHelper.getPersonList());
3.5 Resizing a TableColumn
Whether a TableColumn is resizable by the user is specified by its resizable property. By default, a TableColumn is resizable. The TableView class provides two built-in resize policies as constants:
- CONSTRAINED_RESIZE_POLICY
- UNCONSTRAINED_RESIZE_POLICY
CONSTRAINED_RESIZE_POLICY ensures that the sum of the width of all visible leaf columns is equal to the width of the TableView. Resizing a column adjusts the width of all columns to the right of the resized column. When the column width is increased, the width of the rightmost column is decreased up to its minimum width. When the width of a column is increased, UNCONSTRAINED_RESIZE_POLICY shifts all columns to its right by the amount the width is increased. When the width is decreased, columns to the right are shifted to the left by the same amount.
// Set the column resize policy to constrained resize policy
table.setColumnResizePolicy(TableView.CONSTRAINED_RESIZE_POLICY);
3.6 The GUI
4. Editing Data in a TableView
4.1 The Code
FxTableViewExample2.java
import javafx.application.Application;
import javafx.event.EventHandler;
import javafx.scene.Scene;
import javafx.scene.control.Label;
import javafx.scene.control.TableColumn;
import javafx.scene.control.TableColumn.CellEditEvent;
import javafx.scene.control.TableView;
import javafx.scene.control.cell.TextFieldTableCell;
import javafx.scene.layout.HBox;
import javafx.stage.Stage;

public class FxTableViewExample2 extends Application
{
	public static void main(String[] args)
	{
		Application.launch(args);
	}

	@Override
	public void start(Stage stage)
	{
		// Create a TableView with a list of persons
		TableView<Person> table = new TableView<>(TableViewHelper.getPersonList());
		// Set the column resize policy to constrained resize policy
		table.setColumnResizePolicy(TableView.CONSTRAINED_RESIZE_POLICY);
		// Set the Placeholder for an empty table
		table.setPlaceholder(new Label("No visible columns and/or data exist."));
		// Make the TableView editable
		table.setEditable(true);

		// Add columns with appropriate editing features
		addIdColumn(table);
		addFirstNameColumn(table);
		addLastNameColumn(table);
		addStreetColumn(table);
		addZipCodeColumn(table);
		addCityColumn(table);
		addCountryColumn(table);
		addJobColumn(table);

		// Create the HBox
		HBox root = new HBox();
		// Add the Table to the BBox
		root.getChildren().add(table);
		// Set the Padding and Border for the HBox
		root.setStyle("-fx-padding: 10;" +
				"-fx-border-style: solid inside;" +
				"-fx-border-width: 2;" +
				"-fx-border-insets: 5;" +
				"-fx-border-radius: 5;" +
				"-fx-border-color: blue;");

		// Create the Scene
		Scene scene = new Scene(root);
		// Add the Scene to the Stage
		stage.setScene(scene);
		// Set the Title of the Stage
		stage.setTitle("An editable TableView Example");
		// Display the Stage
		stage.show();
	}

	public void addIdColumn(TableView<Person> table)
	{
		// Id column is non-editable
		table.getColumns().add(TableViewHelper.getIdColumn());
	}

	public void addFirstNameColumn(TableView<Person> table)
	{
		// First Name is a String, editable column
		TableColumn<Person, String> firstNameCol = TableViewHelper.getFirstNameColumn();
		// Use a TextFieldTableCell, so it can be edited
		firstNameCol.setCellFactory(TextFieldTableCell.<Person>forTableColumn());

		// Set editing related event handlers (OnEditCommit)
		firstNameCol.setOnEditCommit(new EventHandler<CellEditEvent<Person, String>>()
	    {
            @Override
            public void handle(CellEditEvent<Person, String> t)
            {
                ((Person) t.getTableView().getItems().get(
                        t.getTablePosition().getRow())
                        ).setFirstName(t.getNewValue());
            }
	    });

		table.getColumns().add(firstNameCol);
	}

	public void addLastNameColumn(TableView<Person> table)
	{
		// Last Name is a String, editable column
		TableColumn<Person, String> lastNameCol = TableViewHelper.getLastNameColumn();
		// Use a TextFieldTableCell, so it can be edited
		lastNameCol.setCellFactory(TextFieldTableCell.<Person>forTableColumn());

		// Set editing related event handlers (OnEditCommit)
		lastNameCol.setOnEditCommit(new EventHandler<CellEditEvent<Person, String>>()
	    {
            @Override
            public void handle(CellEditEvent<Person, String> t)
            {
                ((Person) t.getTableView().getItems().get(
                        t.getTablePosition().getRow())
                        ).setLastName(t.getNewValue());
            }
	    });

		table.getColumns().add(lastNameCol);
	}

	public void addStreetColumn(TableView<Person> table)
	{
		// Street is a String, editable column
		TableColumn<Person, String> streetCol = TableViewHelper.getStreetColumn();
		// Use a TextFieldTableCell, so it can be edited
		streetCol.setCellFactory(TextFieldTableCell.<Person>forTableColumn());

		// Set editing related event handlers (OnEditCommit)
		streetCol.setOnEditCommit(new EventHandler<CellEditEvent<Person, String>>()
	    {
            @Override
            public void handle(CellEditEvent<Person, String> t)
            {
                ((Person) t.getTableView().getItems().get(
                        t.getTablePosition().getRow())
                        ).setStreet(t.getNewValue());
            }
	    });

		table.getColumns().add(streetCol);
	}

	public void addZipCodeColumn(TableView<Person> table)
	{
		// Zip Code is a String, editable column
		TableColumn<Person, String> zipCodeCol = TableViewHelper.getZipCodeColumn();
		// Use a TextFieldTableCell, so it can be edited
		zipCodeCol.setCellFactory(TextFieldTableCell.<Person>forTableColumn());

		// Set editing related event handlers (OnEditCommit)
		zipCodeCol.setOnEditCommit(new EventHandler<CellEditEvent<Person, String>>()
	    {
            @Override
            public void handle(CellEditEvent<Person, String> t)
            {
                ((Person) t.getTableView().getItems().get(
                        t.getTablePosition().getRow())
                        ).setZipCode(t.getNewValue());
            }
	    });

		table.getColumns().add(zipCodeCol);
	}

	public void addCityColumn(TableView<Person> table)
	{
		// City is a String, editable column
		TableColumn<Person, String> cityCol = TableViewHelper.getCityColumn();
		// Use a TextFieldTableCell, so it can be edited
		cityCol.setCellFactory(TextFieldTableCell.<Person>forTableColumn());

		// Set editing related event handlers (OnEditCommit)
		cityCol.setOnEditCommit(new EventHandler<CellEditEvent<Person, String>>()
	    {
            @Override
            public void handle(CellEditEvent<Person, String> t)
            {
                ((Person) t.getTableView().getItems().get(
                        t.getTablePosition().getRow())
                        ).setCity(t.getNewValue());
            }
	    });

		table.getColumns().add(cityCol);
	}

	public void addCountryColumn(TableView<Person> table)
	{
		// Country is a String, editable column
		TableColumn<Person, String> countryCol = TableViewHelper.getCountryColumn();
		// Use a TextFieldTableCell, so it can be edited
		countryCol.setCellFactory(TextFieldTableCell.<Person>forTableColumn());

		// Set editing related event handlers (OnEditCommit)
		countryCol.setOnEditCommit(new EventHandler<CellEditEvent<Person, String>>()
	    {
            @Override
            public void handle(CellEditEvent<Person, String> t)
            {
                ((Person) t.getTableView().getItems().get(
                        t.getTablePosition().getRow())
                        ).setCountry(t.getNewValue());
            }
	    });

		table.getColumns().add(countryCol);
	}

	public void addJobColumn(TableView<Person> table)
	{
		// Job is a String, editable column
		TableColumn<Person, String> jobCol = new TableColumn<>("Job");
		// Use a TextFieldTableCell, so it can be edited
		jobCol.setCellFactory(TextFieldTableCell.<Person>forTableColumn());

		// Set editing related event handlers (OnEditCommit)
		jobCol.setOnEditCommit(new EventHandler<CellEditEvent<Person, String>>()
	    {
            @Override
            public void handle(CellEditEvent<Person, String> t)
            {
                ((Person) t.getTableView().getItems().get(
                        t.getTablePosition().getRow())
                        ).setJob(t.getNewValue());
            }
	    });

		table.getColumns().add(jobCol);
	}
}
4.2 Editing Data Using a TextField
A cell in a TableView can be edited. An editable cell switches between editing and nonediting modes. In editing mode, cell data can be modified by the user. For a cell to enter editing mode, the TableView, TableColumn, and TableCell must be editable. All three of them have an editable property, which can be set to true using the setEditable(true) method. By default, TableColumn and TableCell are editable. To make cells editable in a TableView, you need make the TableView editable:
// Make the TableView editable
table.setEditable(true);
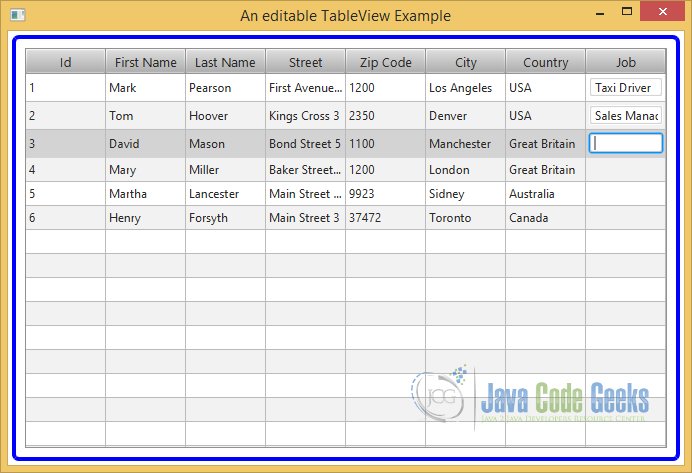
A TextFieldTableCell renders a TextField inside the cell when the cell is being edited where the user can modify the data. It renders the cell data in a Label when the cell is not being edited. Clicking a selected cell or double-clicking an unselected cell puts the cell into editing mode, which displays the cell data in a TextField. Once the cell is in editing mode, you need to click in the TextField to put the caret in the TextField so you can make changes.
// First Name is a String, editable column
TableColumn<Person, String> firstNameCol = TableViewHelper.getFirstNameColumn();
// Use a TextFieldTableCell, so it can be edited
firstNameCol.setCellFactory(TextFieldTableCell.<Person>forTableColumn());
The TableColumn class supports three types of events:
- onEditStart
- onEditCommit
- onEditCancel
The onStartEdit event is fired when a cell in the column enters editing mode. The onEditCommit event is fired when the user successfully commits the editing, for example, by pressing the Enter key in a TextField. The onEditCancel event is fired when the user cancels the editing, for example, by pressing the Esc key in a TextField.
The events are represented by an object of the TableColumn.CellEditEvent class. The event object encapsulates the old and new values in the cell, the row object from the items list of the TableView, TableColumn, TablePosition indicating the cell position where the editing is happening, and the reference of the TableView. Use the methods of the CellEditEvent class to get these values.
The following code snippet shows an example of the CellEditEvent:
// Set editing related event handlers (OnEditCommit)
firstNameCol.setOnEditCommit(new EventHandler<CellEditEvent<Person, String>>()
{
	@Override
	public void handle(CellEditEvent<Person, String> t)
	{
		((Person) t.getTableView().getItems().get(
				t.getTablePosition().getRow())
				).setFirstName(t.getNewValue());
	}
});
4.3 The GUI
5. Adding and Deleting Rows in a TableView
Adding and deleting rows in a TableView is easy. Note that each row in a TableView is backed by an item in the items list.
Adding a row is as simple as adding an item in the items list. When you add an item to the items list, a new row appears in the TableView at the same index as the index of the added item in the items list. If the TableView is sorted, it may need to be resorted after adding a new row. Call the sort() method of the TableView to re-sort the rows after adding a new row.
You can delete a row by removing its item from the items list. An application provides a way for the user to indicate the rows that should be deleted. Typically, the user selects one or more rows to delete. Other options are to add a Delete button to each row or to provide a Delete check box to each row. Clicking the Delete button should delete the row. Selecting the Delete check box for a row indicates that the row is marked for deletion.
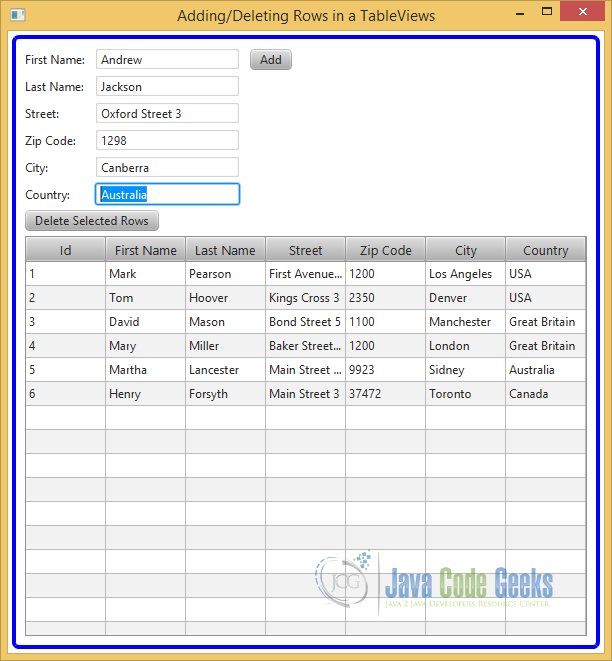
The following example shows how to add and delete rows to a TableView. It displays a window with three sections:
- The Add Person form at the top has all necessary fields to add person details and an Add button. Enter the details for a person and click the Add button to add a record to the TableView.
- In the middle, you have the delete button. This button deletes the selected rows.
- At the bottom, a TableView is displayed with some rows. The multirow selection is enabled. Use the Ctrl or Shift key with the mouse to select multiple rows.
5.1 The Code
FxTableViewExample3.java
import javafx.application.Application;
import javafx.collections.ObservableList;
import javafx.event.ActionEvent;
import javafx.event.EventHandler;
import javafx.scene.Scene;
import javafx.scene.control.Button;
import javafx.scene.control.Label;
import javafx.scene.control.SelectionMode;
import javafx.scene.control.TableView;
import javafx.scene.control.TableView.TableViewSelectionModel;
import javafx.scene.control.TextField;
import javafx.scene.layout.GridPane;
import javafx.scene.layout.VBox;
import javafx.stage.Stage;
import java.util.Arrays;

public class FxTableViewExample3 extends Application
{
	// Define the Text Fields
	private final TextField firstNameField = new TextField();
	private final TextField lastNameField = new TextField();
	private final TextField streetField = new TextField();
	private final TextField zipCodeField = new TextField();
	private final TextField cityField = new TextField();
	private final TextField countryField = new TextField();

	// Create the TableView
	TableView table = new TableView(TableViewHelper.getPersonList());

	public static void main(String[] args)
	{
		Application.launch(args);
	}

	@SuppressWarnings("unchecked")
	@Override
	public void start(Stage stage)
	{
		// Turn on multi-row selection for the TableView
		TableViewSelectionModel tsm = table.getSelectionModel();
		tsm.setSelectionMode(SelectionMode.MULTIPLE);

		// Add columns to the TableView
		table.getColumns().addAll(TableViewHelper.getIdColumn(), TableViewHelper.getFirstNameColumn(),
				TableViewHelper.getLastNameColumn(),TableViewHelper.getStreetColumn(),
				TableViewHelper.getZipCodeColumn(), TableViewHelper.getCityColumn(), TableViewHelper.getCountryColumn());

		// Set the column resize policy to constrained resize policy
		table.setColumnResizePolicy(TableView.CONSTRAINED_RESIZE_POLICY);
		// Set the Placeholder for an empty table
		table.setPlaceholder(new Label("No visible columns and/or data exist."));

		// Create the GridPane
		GridPane newDataPane = this.getNewPersonDataPane();

		// Create the Delete Button and add Event-Handler
		Button deleteButton = new Button("Delete Selected Rows");
		deleteButton.setOnAction(new EventHandler()
		{
            @Override public void handle(ActionEvent e)
            {
                deletePerson();
            }
        });

		// Create the VBox
		VBox root = new VBox();
		// Add the GridPane and the Delete Button to the VBox
		root.getChildren().addAll(newDataPane, deleteButton, table);

		// Set the Padding and Border for the VBox
		root.setSpacing(5);
		// Set the Spacing and Border for the VBox
		root.setStyle("-fx-padding: 10;" +
				"-fx-border-style: solid inside;" +
				"-fx-border-width: 2;" +
				"-fx-border-insets: 5;" +
				"-fx-border-radius: 5;" +
				"-fx-border-color: blue;");

		// Create the Scene
		Scene scene = new Scene(root);
		// Add the Scene to the Stage
		stage.setScene(scene);
		// Set the Title of the Stage
		stage.setTitle("Adding/Deleting Rows in a TableViews");
		// Display the Stage
		stage.show();
	}

	public GridPane getNewPersonDataPane()
	{
		// Create the GridPane
		GridPane pane = new GridPane();

		// Set the hgap and vgap properties
		pane.setHgap(10);
		pane.setVgap(5);

		// Add the TextFields to the Pane
		pane.addRow(0, new Label("First Name:"), firstNameField);
		pane.addRow(1, new Label("Last Name:"), lastNameField);
		pane.addRow(2, new Label("Street:"), streetField);
		pane.addRow(3, new Label("Zip Code:"), zipCodeField);
		pane.addRow(4, new Label("City:"), cityField);
		pane.addRow(5, new Label("Country:"), countryField);

		// Create the Add Button and add Event-Handler
		Button addButton = new Button("Add");
		addButton.setOnAction(new EventHandler()
		{
            @Override public void handle(ActionEvent e)
            {
                addPerson();
            }
        });

		// Add the Add Button to the GridPane
		pane.add(addButton, 2, 0);

		return pane;
	}

	public void addPerson()
	{
		Integer currentId = 0;

		// Get the next ID
		for(Person p : table.getItems())
		{
			if(p.getId()>currentId)
			{
				currentId = p.getId();
			}
		}

		// Create a new Person Object
		Person person = new Person(currentId+1,firstNameField.getText(),lastNameField.getText(),streetField.getText(),
			zipCodeField.getText(),cityField.getText(),countryField.getText());

		// Add the new Person to the table
		table.getItems().add(person);

		// Clear the Input Fields
		firstNameField.setText(null);
		lastNameField.setText(null);
		streetField.setText(null);
		zipCodeField.setText(null);
		cityField.setText(null);
		countryField.setText(null);
	}

	public void deletePerson()
	{
		TableViewSelectionModel tsm = table.getSelectionModel();

		// Check, if any rows are selected
		if (tsm.isEmpty())
		{
			System.out.println("Please select a row to delete.");
			return;
		}

		// Get all selected row indices in an array
		ObservableList list = tsm.getSelectedIndices();

		Integer[] selectedIndices = new Integer[list.size()];
		selectedIndices = list.toArray(selectedIndices);

		// Sort the array
		Arrays.sort(selectedIndices);

		// Delete rows (last to first)
		for(int i = selectedIndices.length - 1; i >= 0; i--)
		{
			tsm.clearSelection(selectedIndices[i].intValue());
			table.getItems().remove(selectedIndices[i].intValue());
		}
	}
}
5.2 Selecting Cells and Rows in a TableView
TableView has a selection model represented by its property selectionModel. A selection model is an instance of the TableViewSelectionModel class, which is an inner static class of the TableView class. The selection model supports cell-level and row-level selection. It also supports two selection modes:
- single
- multiple
In the single-selection mode, only one cell or row can be selected at a time. In the multiple-selection mode, multiple cells or rows can be selected. By default, single-row selection is enabled. You can enable multirow selection, as follows:
// Turn on multi-row selection for the TableView
TableViewSelectionModel<Person> tsm = table.getSelectionModel();
tsm.setSelectionMode(SelectionMode.MULTIPLE);
5.3 Adding a Row in a TableView
The class contains a method for the creation of a GridPane. The GridPane contains all Input Fields, which are necessary for creating and adding a new item of the class Person. It also contains a Button with an EventHandler for Adding a new Person to the table.
public GridPane getNewPersonDataPane()
{
	// Create the GridPane
	GridPane pane = new GridPane();

	// Set the hgap and vgap properties
	pane.setHgap(10);
	pane.setVgap(5);

	// Add the TextFields to the Pane
	pane.addRow(0, new Label("First Name:"), firstNameField);
	pane.addRow(1, new Label("Last Name:"), lastNameField);
	pane.addRow(2, new Label("Street:"), streetField);
	pane.addRow(3, new Label("Zip Code:"), zipCodeField);
	pane.addRow(4, new Label("City:"), cityField);
	pane.addRow(5, new Label("Country:"), countryField);

	// Create the Add Button and add Event-Handler
	Button addButton = new Button("Add");
	addButton.setOnAction(new EventHandler()
	{
		@Override public void handle(ActionEvent e)
		{
			addPerson();
		}
	});

	// Add the Add Button to the GridPane
	pane.add(addButton, 2, 0);

	return pane;
}
The following method will be called, if the user presses the Add-Button:
public void addPerson()
{
	Integer currentId = 0;

	// Get the next ID
	for(Person p : table.getItems())
	{
		if(p.getId()>currentId)
		{
			currentId = p.getId();
		}
	}

	// Create a new Person Object
	Person person = new Person(currentId+1,firstNameField.getText(),lastNameField.getText(),streetField.getText(),
		zipCodeField.getText(),cityField.getText(),countryField.getText());

	// Add the new Person to the table
	table.getItems().add(person);

	// Clear the Input Fields
	firstNameField.setText(null);
	lastNameField.setText(null);
	streetField.setText(null);
	zipCodeField.setText(null);
	cityField.setText(null);
	countryField.setText(null);
}
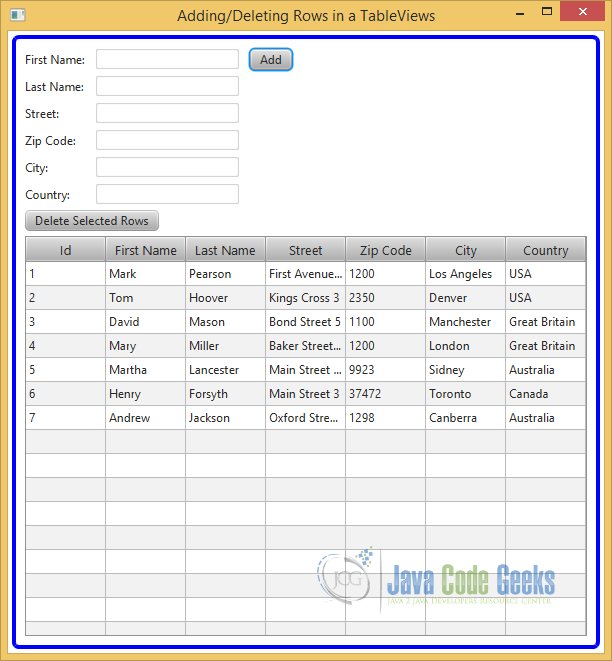
The method reads the input from the Text Fields. It creates a new object of the Person class and appends it at the end of the table. Thereafter all text fields will be cleared.
5.4 Deleting a Row in a TableView
The following method will be called, if the user presses the Delete-Button:
public void deletePerson()
{
	TableViewSelectionModel tsm = table.getSelectionModel();

	// Check, if any rows are selected
	if (tsm.isEmpty())
	{
		System.out.println("Please select a row to delete.");
		return;
	}

	// Get all selected row indices in an array
	ObservableList list = tsm.getSelectedIndices();

	Integer[] selectedIndices = new Integer[list.size()];
	selectedIndices = list.toArray(selectedIndices);

	// Sort the array
	Arrays.sort(selectedIndices);

	// Delete rows (last to first)
	for(int i = selectedIndices.length - 1; i >= 0; i--)
	{
		tsm.clearSelection(selectedIndices[i].intValue());
		table.getItems().remove(selectedIndices[i].intValue());
	}
}
The method reads the indizes of the selected rows and sorts it. Thereafter all corresponding items will be removed from the table.
5.5 The GUI
The first example shows how to add a new entry of the class Person to a TableView.
At first, we have to insert the properties into the Text Fields:
After pressing the Add-Button, the table contains the new entry:
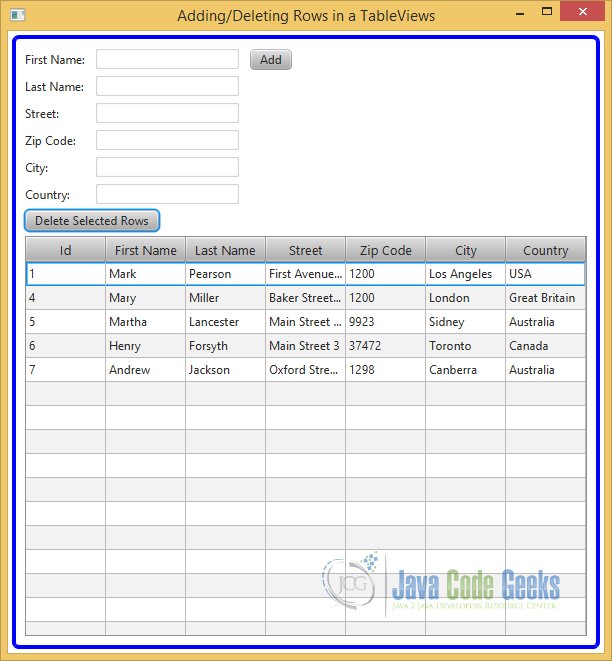
The second example shows how to delete one or more items of the Person class from a TableView.
At first, we have to select the rows, which we want to delete:
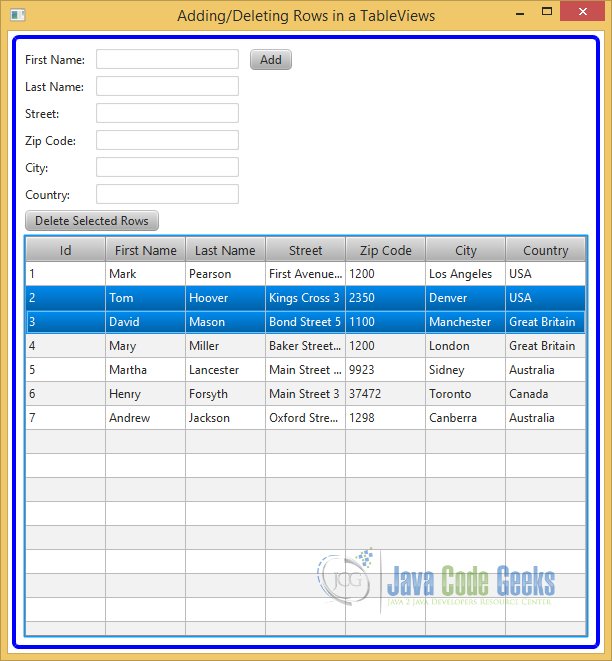
After pressing the Delete-Button, the table contains only the following persons:
6. Download Java Source Code
This was an example of javafx.scene.control.TableView
You can download the full source code of this example here: JavaFxTableViewExample.zip


Sir can you help me how can JavaFX sence DatePicker how can add to JTABLE with cell cenderer
this is just an extended example from the official website https://docs.oracle.com/javafx/2/ui_controls/table-view.htm