IntelliJ IDEA is one of the most used Java IDE. If we want to create tests for our IntelliJ project, it may not be very intuitive, so, in this tutorial we will see how to create them.
For this tutorial, we will use:
- IntelliJ IDEA 2016.2.2 Community Edition (free and open source).
- Linux Mint 18.
You can download the IDE from the official JetBrains website, available for Linux, Windows and MacOS.
You may skip project creation and jump directly to the beginning of the example below.
1. Project creation
If it is the first time you open IntelliJ IDEA, you will see that it suggests you to create a new project. Otherwise, create a new file selecting “File/New/Project“.
In the new window, you have to select “Java” as the project type, and then select the SDK for the project, as shown in the image below.
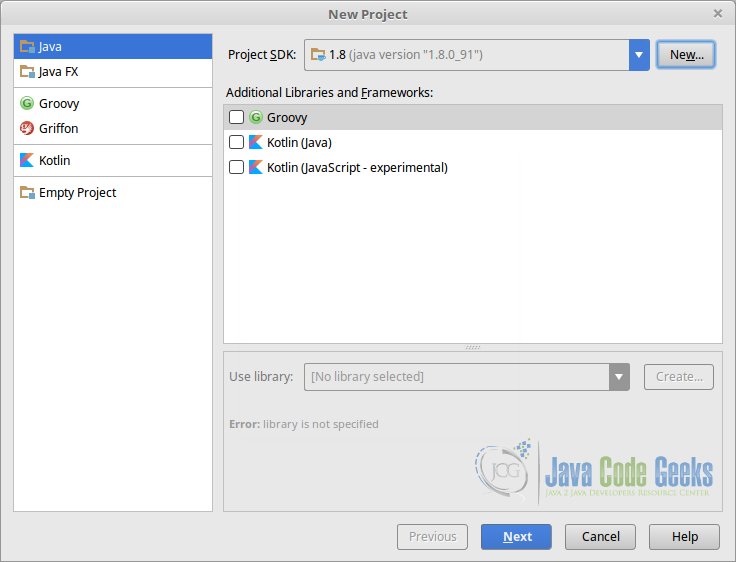
Then, just select the name for the project, and finish the creation.
Once the project is created, in the explorer (left part), right click the root folder, the one with the folder name.
Select “New/Folder“.
Give the folder the name you want; “test” is the standard name for test directory.
Now, right click the tests folder, and select “Mark directory as/Test Sources Root“.
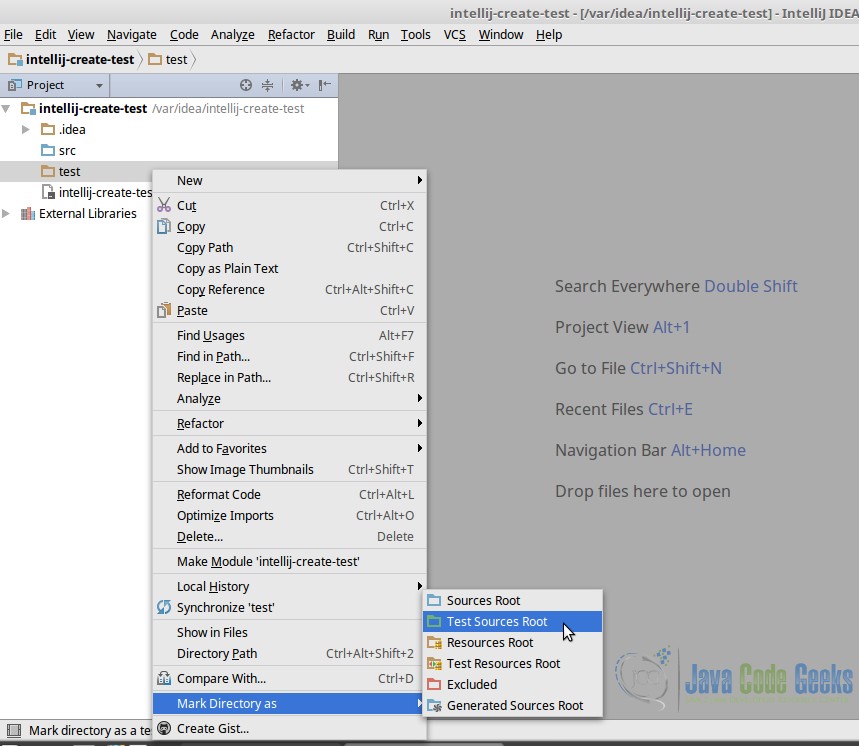
Now, the test directory should appear green.
2. Base code
We will code a simple class in order to test it later:
SimpleCalculator.java
package com.javacodegeeks.intellij.test;

public class SimpleCalculator {

    /**
     * n1 + n2.
     *
     * @param n1 First number.
     * @param n2 Second number.
     * @return n1 + n2.
     */
    public float add(float n1, float n2) {
        return n1 + n2;
    }

    /**
     * n1 - n2.
     *
     * @param n1 First number.
     * @param n2 Second number.
     * @return n1 - n2.
     */
    public float subtract(float n1, float n2) {
        return n1 - n2;
    }

    /**
     * n1 * n2.
     *
     * @param n1 First number.
     * @param n2 Second number.
     * @return n1 * n2.
     */
    public float multiply(float n1, float n2) {
        return n1 * n2;
    }

    /**
     * n1 / n2.
     *
     * @param n1 First number.
     * @param n2 Second number (divisor).
     * @return n1 / n2.
     * @throws ArithmeticException If the divisor is 0.
     */
    public float divide(float n1, float n2) throws ArithmeticException {
        if ((int)n2 == 0) {
            throw new ArithmeticException("Cannot divide by zero.");
        }

        return n1 / n2;
    }

}
3. Creating tests
Finally, after having a class to test, we are going to see how we can create tests for it. There are two ways: manually, and automatically.
3.1. Manually
In this case, we have to manually create the test class, which in this case is SimpleCalculatorTest:
SimpleCalculatorTest.java
package com.javacodegeeks.intellij.test;

public class SimpleCalculatorTest {

    @Test
    public void testAdd() {

    }
}
The @Test annotation will appear in red, because the symbol cannot be resolved, since JUnit is not added to the path. To add it, we have to place the caret in the annotation, and press Alt + Return. A window with several options will appear; we have to choose the first, the one saying “Add JUnit4 to classpath“.
After this, we have to choose to reference JUnit to the distribution included with IntelliJ IDEA; or to add it locally to the project, in a directory.
Regardless the option we choose, now the annotation should not be marked in red, having now every JUnit symbols available. So, we could write the following test:
SimpleCalculatorTest.java
package com.javacodegeeks.intellij.test;

import org.junit.Before;
import org.junit.Test;

import static org.junit.Assert.assertEquals;

public class SimpleCalculatorTest {

    private SimpleCalculator calculator;

    @Before
    public void setUp() {
        this.calculator = new SimpleCalculator();
    }

    @Test
    public void testAdd() {
        float n1 = 1;
        float n2 = 2;
        float expected = 3;
        float actual;

        actual = this.calculator.add(n1, n2);

        assertEquals(expected, actual, 0.000);
    }
}
Which should pass if we run it (Ctrl + F5).

3.2. Automatically
IntelliJ IDEA is able to generate test classes automatically, in a very fast and comfortable way, specially for those classes with many methods.
To do this, we just have to place the caret, in the class file, in any point of the class declaration statement (i.e. public class SimpleCalculatorTest), and press Alt + Return, to show a list of options, where “Create Test” should appear.
If we select it, another window will be shown, in this case, to select the methods we want to test:
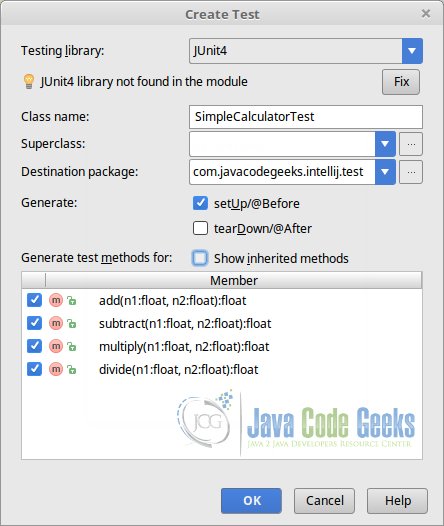
As you can see, IntelliJ IDEA shows every method of the class for which the test methods can be generated. And, also, allows to generate setUp() and tearDown() methods.
If we haven’t JUnit added to the project, IntelliJ IDEA will warn us. If we press the “Fix” button, we will see the same window as when adding JUnit manually, asking about adding the library locally to the project, or using the distribution of IntelliJ IDEA.
Finally, IntelliJ IDEA would politely generate the following test case for us!
SimpleCalculatorTest.java
package com.javacodegeeks.intellij.test;

import org.junit.Before;
import org.junit.Test;

import static org.junit.Assert.*;

public class SimpleCalculatorTest {
    @Before
    public void setUp() throws Exception {

    }

    @Test
    public void add() throws Exception {

    }

    @Test
    public void subtract() throws Exception {

    }

    @Test
    public void multiply() throws Exception {

    }

    @Test
    public void divide() throws Exception {

    }

}
Note that, for every test, IntelliJ IDEA has added a throws Exception clause. This is how IntelliJ is configured by default, and we can change it if we want.
To change this, go to “File/Settings” (Ctrl + Alt + S), go to “Editor/File and Code Templates“, navigate to the “Code” tab, and find the “JUnit4 Test Method“. Once selected, edit the template of the editor displayed in the right part of the window, removing the throws Exception clause, and save the changes.
4. Summary
This tutorial has shown how to create tests for our Java projects with IntelliJ IDEA. We have seen two ways, manually and automatically, being the second one the most comfortable for almost every cases; seeing also that we have the possibility to choose to use a reference to the JUnit version packaged with IntelliJ IDEA, or to copy the binaries to a local folder of the project.
5. Download the IntelliJ IDEA project
This was an example of test creation with IntelliJ IDEA.
You can download the full source code of this example here: IntelliJIDEACreateTestTutorial
